【C5】bmc wtd,post
文章目录
- 1.bmc_wtd_cpld:syscpld.c中wd_en和wd_kick节点对应寄存器,crontab,FUNCNAME
- 2.AST芯片WDT切换主备:BMC用WDT2作为主备切换的控制器
- 2.1 AC后读取:bmc处于主primary flash(设完后:实际主,wtd1主,wtd2主)
- 2.2 切换spi备:wtd2的2c寄存器设为0x93,换另一个flash后reboot后从备起(设完后:实际备,wtd1主,wtd2备)
- 2.3 用WDT1切主:(设完后:实际备,wtd1备,wtd2备)
- 2.4 用WDT2切主:(设完后:实际备,wtd1备,wtd2主)
- 2.5 用WDT1切主:(设完后:实际主,wtd1主,wtd2主)
- 2.6 关于清空寄存器:(设完后:WTD1主,WTD2主,实际主)
- 2.7 结论:从主切到备,需要一个wdt的status是default也就是0的wdt,然后用0x93切换
- 3.BMC喂狗实现:sys/class/gpio/gpio1/value获取gpio1值
- 3.1 watch-dog.h
- watch-dog.c
- main.c
- Makefile
- run-watch-dog.sh
- setup-watch-dog.sh
- watch-dog_0.1.bb
- 4.post code
1.bmc_wtd_cpld:syscpld.c中wd_en和wd_kick节点对应寄存器,crontab,FUNCNAME
PATH=/sbin:/bin:/usr/sbin:/usr/bin:/usr/local/bin
WATCHDOG_LOG="/tmp/watchdog.log"usage(){program=$(basename "$0")echo "Usage:"echo "$program <operation>"echo "  <operation>  : start stop kick query restart"echo "Examples:"echo "  $program start"echo ""
}kick()
{ret=$(head -1  /sys/bus/i2c/devices/0-000d/wd_en)if [ "$ret" = "0x1" ];thenecho "0x7c" > /sys/bus/i2c/devices/0-000d/wd_kickelseusageexitfiret=$(date)echo "$ret ${FUNCNAME[0]}" >> $WATCHDOG_LOG
}enable()
{ret=$(head -1  /sys/bus/i2c/devices/0-000d/wd_en)if [ "$ret" != "0x1" ];thenecho "0x1" > /sys/bus/i2c/devices/0-000d/wd_enelseusageexitfiret=$(date)echo "$ret ${FUNCNAME[0]}" > $WATCHDOG_LOG
}disable()
{ret=$(head -1  /sys/bus/i2c/devices/0-000d/wd_en)if [ "$ret" = "0x1" ];thenecho "0x0" > /sys/bus/i2c/devices/0-000d/wd_enecho "0x7c" > /sys/bus/i2c/devices/0-000d/wd_kickelseusageexitfiret=$(date)echo "$ret ${FUNCNAME[0]}" >> $WATCHDOG_LOG
}check_parameter()
{if [ $# -ne 1 ];thenusageexitficase ${1} in"start" | "stop" | "kick" |"query" |"restart");;*)  #除上面的其他的usageexit;;esac
}check_parameter "$@"case ${1} in"start")ret=$(head -1  /sys/bus/i2c/devices/0-000d/wd_en)if [ "$ret" = "0x1" ];thenusageexitfienablekick;;"stop")disableexit;;"kick")kickexit;;"restart")ret=$(head -1  /sys/bus/i2c/devices/0-000d/wd_en)if [ "$ret" = "0x1" ];thenusageexitfienablekickexit;;"query")ret=$(head -1  /sys/bus/i2c/devices/0-000d/wd_en)if [ "$ret" = "0x1" ];thenecho "ENABLE"elseecho "DISABLE"fiexit;;
esacwhile true
doret=$(head -1  /sys/bus/i2c/devices/0-000d/wd_en)if [ "$ret" = "0x1" ];thenkickfisleep 30
doneroot@bmc-oob:~# ps | grep wd588 root      2904 S    runsv /etc/sv/wd591 root      3036 S    {wd} /bin/bash /usr/local/bin/wd start779 root      3036 S    grep wd
root@bmc-oob:~# wd query
ENABLE
root@bmc-oob:~# wd stop
root@bmc-oob:~# wd query
DISABLE
root@bmc-oob:~# wd restart
root@bmc-oob:~# wd kick
root@bmc-oob:~# wd query
ENABLEinit()
{ret=$(ps |grep crond|grep -v grep)if [ "x$ret" = "x" ];thenecho "No found crond process"exitfiif [ ! -d /crontabs ];thenmkdir /crontabstouch /crontabs/rootficrontab -c /etc/cron/crontabs/ /etc/cron/crontabs/rootcp /var/log/watchdog.sh /usr/local/bin/watchdog.sh
}add_task()
{echo "* * * * * /usr/local/bin/watchdog.sh kick" >> /etc/cron/crontabs/rootecho "* * * * * date >> /var/log/date.log" >> /etc/cron/crontabs/root
}del_task()
{sed -i "/\* \* \* \* \* \/usr\/local\/bin\/watchdog.sh kick/d" /etc/cron/crontabs/root  #最后一个d代表删除
}
2.AST芯片WDT切换主备:BMC用WDT2作为主备切换的控制器
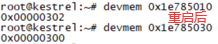
2.1 AC后读取:bmc处于主primary flash(设完后:实际主,wtd1主,wtd2主)

如下0x100(十六进制,不是二进制)代表default flash,offset为30寄存器。


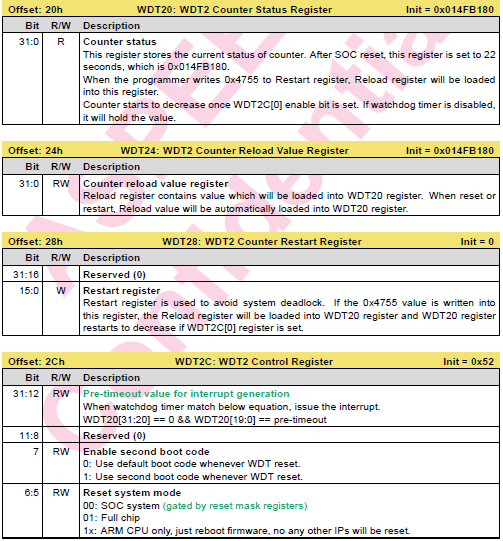
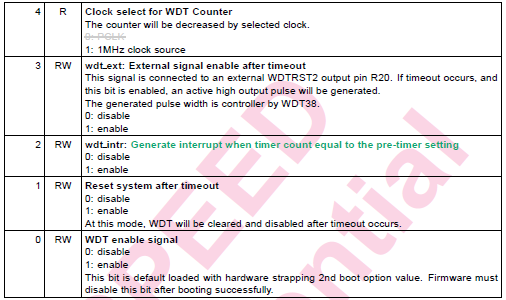
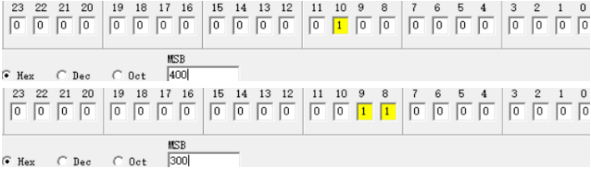
2.2 切换spi备:wtd2的2c寄存器设为0x93,换另一个flash后reboot后从备起(设完后:实际备,wtd1主,wtd2备)
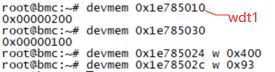

如下202第1位(不是第0位)和第9位置为1,发现这时确实WDT2可控,当前在备flash启动。

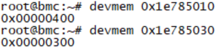
2.3 用WDT1切主:(设完后:实际备,wtd1备,wtd2备)

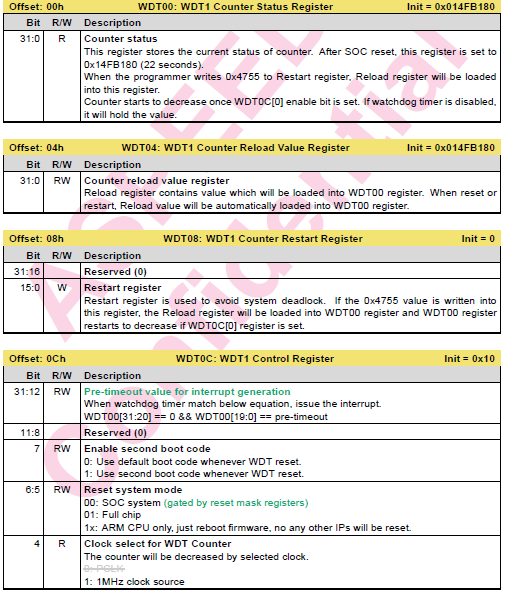
如下10是wdt1状态寄存器,30是wdt2状态寄存器。302和202第1位都为1即second boot code。

2.4 用WDT2切主:(设完后:实际备,wtd1备,wtd2主)

2.5 用WDT1切主:(设完后:实际主,wtd1主,wtd2主)

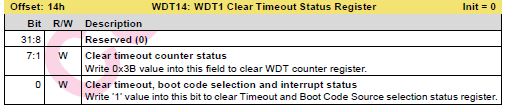
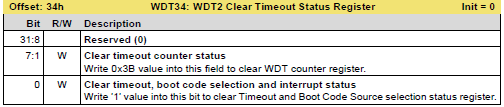
2.6 关于清空寄存器:(设完后:WTD1主,WTD2主,实际主)
wdt1和wdt2都切到备flash。

如下clear寄存器清除wdt1的status,保留了reset次数,但是将code source(主备)清除为0(主)。
再用wdt2切换主。

这次切到了主。
用wdt1切换到备。

清空wdt1的status。这时如果用我们的测试脚本bootsource会判断是在主,其实是在备。
尝试wdt1用0x13切换主,成功切到主。

2.7 结论:从主切到备,需要一个wdt的status是default也就是0的wdt,然后用0x93切换
从备切到主,需要满足两(三)个wdt中都从备切到主。比如wdt1是备,wdt2是备,那要对wdt1,wdt2都设一次0x93。如果wdt1,wdt2中一个是备,那对对应的wdt设0x93。
还有因为清空寄存器造成的虽然在备,但是wdt都是显示在主,这时候用0x13就可以切到主。用wdt2进行切换主备。避免使用清空寄存器0x14/0x34。
a=0x00000100 #256 (1 0000 0000)
b=$(( ((a & 0xff00) >> 8 ) ))
c=$((a & 0xff00))
d=$((a >> 8))
echo $b
echo $c
echo $d
# $ ./a.sh
# 1
# 256
# 1# 检查当前BMC是在主还是备启动的检查函数boot_source实现如下:
check_boot_source()
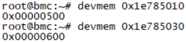
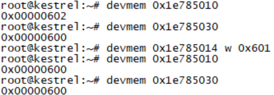
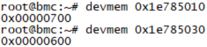
{# WDT1 is on page 646 of ast2500v16.pdf# and WDT2 is on page 649 of ast2500v16.pdf# get watch dog1 timeout status registerwdt1=$(devmem 0x1e785010)# get watch dog2 timeout status registerwdt2=$(devmem 0x1e785030)wdt1_timeout_cnt=$(( ((wdt1 & 0xff00) >> 8) )) #取出高8位,自动转为十进制wdt2_timeout_cnt=$(( ((wdt2 & 0xff00) >> 8) ))wdt1_boot_code_source=$(( ((wdt1 & 0x2) >> 1) )) #取出第1位(不是第0)wdt2_boot_code_source=$(( ((wdt2 & 0x2) >> 1) ))boot_code_source=0# Check both WDT1 and WDT2 to indicate the boot sourceif [ $wdt1_timeout_cnt -ge 1 ] && [ $wdt1_boot_code_source -eq 1 ]; thenboot_code_source=1elif [ $wdt2_timeout_cnt -ge 1 ] && [ $wdt2_boot_code_source -eq 1 ]; thenboot_code_source=1fiecho $boot_code_source
}bmc_boot_info() {wdt1=$(devmem 0x1e785010)wdt2=$(devmem 0x1e785030)wdt1_timeout_cnt=$(( ((wdt1 & 0xff00) >> 8) ))wdt2_timeout_cnt=$(( ((wdt2 & 0xff00) >> 8) ))boot_code_source=$(check_boot_source)boot_source="Master Flash"if [ $((boot_code_source)) -eq 1 ]; thenboot_source="Slave Flash"fiecho "WDT1 Timeout Count: " $wdt1_timeout_cntecho "WDT2 Timeout Count: " $wdt2_timeout_cntecho "Current BMC Boot Code Source: $boot_source"
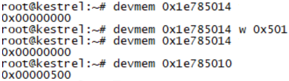
}bmc_boot_from() {# Enable watchdog reset_system_after_timeout bit and WDT_enable_signal bit.# Refer to ast2500v16.pdf page 650th.boot_source=0x00000013boot_code_source=$(check_boot_source)if [ "$1" = "master" ]; thenif [ $((boot_code_source)) -eq 0 ]; thenecho "Current boot source is master, no need to switch."return 0fi# Set bit_7 to 0 : Use default boot code whenever WDT reset.boot_source=0x00000033elif [ "$1" = "slave" ]; thenif [ $((boot_code_source)) -eq 1 ]; thenecho "Current boot source is slave, no need to switch."return 0fi# No matter BMC boot from any one of master and slave.# Set bit_7 to 1 : Use second boot code whenever WDT reset.# And the sencond boot code stands for the other boot source.boot_source=0x000000b3fiecho "BMC will switch to $1 after 10 seconds..."/usr/local/bin/watch-dog stop# Clear WDT1 counter and boot code source statusdevmem 0x1e785014 w 0x77# Clear WDT2 counter and boot code source statusdevmem 0x1e785034 w 0x77# Set WDT time out 10s, 0x00989680 = 10,000,000 usdevmem 0x1e785024 32 0x00989680# WDT magic number to restart WDT counter to decrease.devmem 0x1e785028 32 0x4755devmem 0x1e78502c 32 $boot_source
}
3.BMC喂狗实现:sys/class/gpio/gpio1/value获取gpio1值

bmc喂狗gpio硬件管脚:


bmc监听gpio中断硬件管脚:


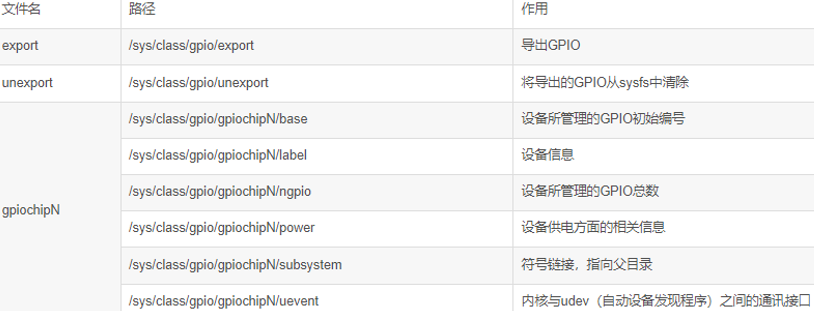
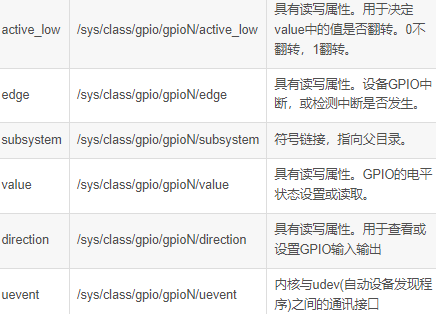
导出GPIO:echo $gpio_num > /sys/class/gpio/exporteg: echo 1 > /sys/class/gpio/export执行完以上命令后,如果该gpio接口存在且未被占用则会出现如下目录:/sys/class/gpio/gpio1设置方向:gpio的方向分为两类:in和outin:表示该gpio用于输入。(如该gpio连接一个按钮)out:表示该gpio用于输出。(如该gpio连接一个led灯)指定为in模式的命令:echo in > /sys/class/gpio/gpio1/direction指定为out模式的命令如下:echo out > /sys/class/gpio/gpio1/direction //默认value为0echo low > /sys/class/gpio/gpio1/direction //指定方向为out且value为0echo high > /sys/class/gpio/gpio1/direction //指定方向为out且value为1设置高低:只用当方向为out模式时才能指定gpio接口的电压的高低。这个很容易理解,因为如果是in模式的话,它的电平高低取决于所连接外设的电平高低,我们只能读取它的值,不能更改它的值echo 1 > /sys/class/gpio/gpio1/value //指定gpio1为高电平echo 0 > /sys/class/gpio/gpio1/value //指定gpio1为低电平
3.1 watch-dog.h
#ifndef SENSOR_MON__h
#define SENSOR_MON__h#include <stdio.h>
#include <string.h>
#include <pthread.h>
#include <unistd.h>
#include <stdlib.h>
#include <signal.h>
#include <sys/time.h>
#include <time.h>
#include <sys/file.h>
#include <sys/stat.h>
#include <sys/types.h>
#include <errno.h>
#include <dirent.h>
#include <stdarg.h>
#include <syslog.h>
#include <openbmc/libgpio.h>
#include <fcntl.h>
#include <stdbool.h>
#include <poll.h>
#include <ctype.h>
#include <assert.h>
#include <libgen.h>
#include <linux/limits.h>//#define GPIO_KICK_NUM    885
//#define GPIO_KICK_NAME   "GPIOL5"
#define WDT_MASK_PATH "/sys/bus/i2c/devices/82-000d/bmc_wdt_mask"
#define GPIO_KICK_SHADOW "BMC_CPLD_GPIO69_WDO"typedef enum {WD_FUNC_START,  //0WD_FUNC_STOP,WD_FUNC_KICK,WD_FUNC_UNKNOWN,
} wd_func;typedef enum {MASK_ENABLE = 1,MASK_DISABLE = 0,
} wd_mask;// 如下LOG替换syslog , syslog像printf定义在<syslog.h>, 打印在/var/log/message
#define LOG(mode,format, ...)   syslog(mode, format, __VA_ARGS__)int bmc_wd_set(wd_mask value);
void feed_dog_func();#endif
watch-dog.c
#include "watch-dog.h"int bmc_wd_set(wd_mask value){   // bmc设置cpld寄存器控制wtd芯片(是外置芯片,不是bmc芯片内置的)开关FILE* pFile = fopen(WDT_MASK_PATH, "w");char regvalue[4]= {0};int ret = 0;if(value == MASK_DISABLE){ // 0sprintf(regvalue,"0x0");}else if(value == MASK_ENABLE){sprintf(regvalue,"0x1");}ret = fwrite(regvalue, sizeof(regvalue) , 1, pFile );  //ret为次数即fwrite中的1if(ret==1){fflush(pFile);ret = 0;}else{ret = -1;}fclose(pFile);return ret;
}void feed_dog_func()   // bmc通过gpio的0.5s高低电平来喂狗
{int ret = 0;struct timespec n_sleep;n_sleep.tv_sec = 0; //secondes, integer part sleep duration    // 整数n_sleep.tv_nsec = 5e8L; //nanoseconds, decimal part sleep duration   // 小数  0.5s(上行整数0,这行小数5)gpio_desc_t* desc = gpio_open_by_shadow(GPIO_KICK_SHADOW);  // libgpio-ctrl.so中的接口if (!desc) {syslog(LOG_INFO ,"gpio_open_by_shadow fail\n");return ;}ret = gpio_set_direction(desc, GPIO_DIRECTION_OUT);if (ret == -1){syslog(LOG_ERR ,"gpio_change_direction err \n");gpio_close(desc);return ;}ret = gpio_set_edge(desc, GPIO_EDGE_NONE);if (ret == -1){syslog(LOG_ERR ,"gpio_change_edge err \n");gpio_close(desc);return ;}
//BMC启动时,喂狗(硬件gpio管脚,每隔500ms翻转一次高低电平),并关闭中断MASK如下:
//cmm cpld 0X71 地址 bit0 是中断MASK (为1时MASK使能即看门狗关闭;为0时MASK失效即看门狗打开)
//i2cset -f -y 82 0xd 0x71 0xfe 做成bmc_wdt_mask节点ret=bmc_wd_set(MASK_DISABLE);  // 0开wtdif(ret == 0){syslog(LOG_INFO ,"bmc_wd_set OK\n");}else{syslog(LOG_ERR ,"bmc_wd_set Fail\n");gpio_close(desc);return;}while(1){gpio_set_value(desc,GPIO_VALUE_HIGH);nanosleep(&n_sleep, NULL);  // 0.5s 高电平gpio_set_value(desc,GPIO_VALUE_LOW);nanosleep(&n_sleep, NULL);   // 0.5s 低电平}gpio_close(desc);return ;
}
main.c
#include "watch-dog.h"int func_start()
{int ret = 0;ret=bmc_wd_set(MASK_DISABLE);  //mask和disable都是否定if(ret == 0){syslog(LOG_INFO ,"func_start OK\n");}else{syslog(LOG_ERR ,"func_start Fail\n");return -1;}return 0;
}int func_stop()
{int ret = 0;ret=bmc_wd_set(MASK_ENABLE);if(ret == 0){syslog(LOG_INFO ,"func_stop OK\n");}else{syslog(LOG_ERR ,"func_stop Fail\n");return -1;}return 0;
}void usage(void)
{fprintf(stderr, "usage: watch-dog <start/stop/kick> \n");exit (1);
}int func_kick()
{int rc,ret,pid_file;int pid_value;char piddata[12];char file_path[60];pthread_t tid_feed;ret = snprintf(file_path, sizeof(file_path), "/var/run/watch_dog.pid");  // /var/run/a 也可以,记录当前进程pid号if ((ret < 0) || (ret >= sizeof(file_path))) {syslog(LOG_ERR ,"watch_dog:too long for lockfile\n");return -1;}pid_file = open(file_path, O_CREAT | O_RDWR, 0666);if (pid_file < 0) {syslog(LOG_ERR ,"watch_dog: failed to acquire lock\n");exit(1);}else{pid_value=getpid();snprintf(piddata, sizeof(piddata), "%d\n", pid_value);ret=write(pid_file, piddata, sizeof(piddata));  //先open再writeif(ret < 0) {syslog(LOG_ERR ,"watch_dog: write pid err\n");}}rc = flock(pid_file, LOCK_EX | LOCK_NB); // Linux文件锁flock: 检测进程是否已经存在if(rc){if(EWOULDBLOCK == errno){syslog(LOG_ERR ,"Another watch_dog instance is running...\n");exit(1);}}syslog(LOG_INFO ,"watch_dog: daemon started\n");pthread_create(&tid_feed,NULL,(void *)feed_dog_func,NULL);  //一个pthread_create只创建一个线程pthread_join(tid_feed,NULL);if (pid_file >= 0) {unlink(file_path);  //#include<unistd.h> , unlink删除文件}syslog(LOG_INFO ,"watch_dog: daemon end\n");return 0;
}wd_func wd_func_judge(char * desc)
{if (!strcmp(desc, "start")){   // strcmp相同返回0,if(1)执行,shell中if(0)执行return WD_FUNC_START;}else if (!strcmp(desc, "stop")){return WD_FUNC_STOP;}else if (!strcmp(desc, "kick")){return WD_FUNC_KICK;}return WD_FUNC_UNKNOWN;
}int main(int argc, char* argv[])
{wd_func wd_func_sel = WD_FUNC_UNKNOWN;if (argc != 2) {usage();}wd_func_sel = wd_func_judge(argv[1]);if ( wd_func_sel == WD_FUNC_UNKNOWN ){usage();}switch (wd_func_sel){case WD_FUNC_START :func_start();break;case WD_FUNC_STOP :func_stop();break;case WD_FUNC_KICK :func_kick();break;default :break;}return 0;
}
Makefile
#
all: watch-dog
SRC = $(wildcard ./*.c)
CFLAGS += -Wall -Werror -D _XOPEN_SOURCE -pthread -lm -std=c99watch-dog: $(SRC)$(CC) $(CFLAGS) -o $@ $^ $(LDFLAGS).PHONY: cleanclean:rm -rf *.o watch-dog
run-watch-dog.sh
exec /usr/local/bin/watch-dog kick
setup-watch-dog.sh
WDTFUNC=/usr/local/bin/watch-dog
# /etc/init.d/setup-watch-dog.sh: start and stop the watch-dog
export PATH="${PATH:+$PATH:}/usr/sbin:/sbin:/usr/local/bin"
case "$1" instart)echo -n "Starting watch dog kick daemon..."runsv /etc/sv/watch-dog > /dev/null 2>&1 &  # runsv找/etc/sv/watch-dog/run文件运行echo "done.";;stop)echo -n "Stopping watch dog daemon..."$WDTFUNC stop > /dev/null 2>&1 &echo "done.";;*)echo "Usage: /etc/init.d/setup-watch-dog.sh {start|stop}"exit 1;;
esac
exit 0
watch-dog_0.1.bb
SUMMARY = "watch dog Daemon"
DESCRIPTION = "Daemon for watch dog"
SECTION = "base"
PR = "r1"
LICENSE = "GPLv2"
LIC_FILES_CHKSUM = "file://COPYING;md5=eb723b61539feef013de476e68b5c50a"
SRC_URI = "file://COPYING \file://main.c \file://watch-dog.c \file://watch-dog.h \file://Makefile \file://setup-watch-dog.sh \file://run-watch-dog.sh \"
S = "${WORKDIR}"
binfiles = "watch-dog \"
pkgdir = "watch-dog"
LDFLAGS = "-lgpio-ctrl"
DEPENDS += "libgpio-ctrl update-rc.d-native"
RDEPENDS_${PN} += "libgpio-ctrl bash"install_sysv() {install -d ${D}${sysconfdir}/init.dinstall -d ${D}${sysconfdir}/rcS.dinstall -d ${D}${sysconfdir}/svinstall -d ${D}${sysconfdir}/sv/watch-doginstall -d ${D}${sysconfdir}/watch-doginstall -m 755 setup-watch-dog.sh ${D}${sysconfdir}/init.d/setup-watch-dog.shinstall -m 755 run-watch-dog.sh ${D}${sysconfdir}/sv/watch-dog/run  #将run-watch-dog.sh复制到/etc/sv/watch-dog/run文件里update-rc.d -r ${D} setup-watch-dog.sh defaults 93 5  #defaults :开机自动执行setup-watch-dog.sh start ,reboot自动执行setup-watch-dog.sh stop
}do_install() {dst="${D}/usr/local/fbpackages/${pkgdir}"bin="${D}/usr/local/bin"install -d $dstinstall -d $binfor f in ${binfiles}; doinstall -m 755 $f ${dst}/$fln -snf ../fbpackages/${pkgdir}/$f ${bin}/$fdoneinstall_sysv
}FBPACKAGEDIR = "${prefix}/local/fbpackages"
FILES_${PN} = "${FBPACKAGEDIR}/watch-dog ${prefix}/local/bin ${sysconfdir}"
4.post code
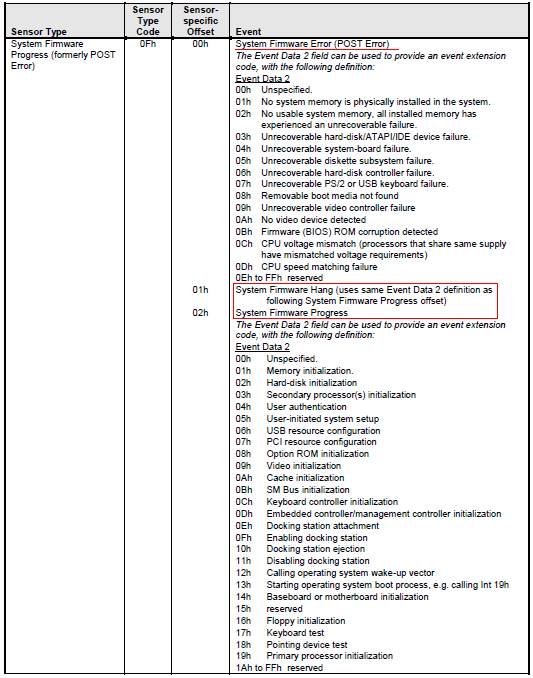
// obmc-pal.c
/* IPMI SEL: System Firmware Error string table */
struct system_fw_progress {uint8_t EventData1;char DecodeString[128];
};struct system_fw_progress system_fw_error[] = {{0x00, "Unspecified"},   // 一个{}就是一个system_fw_progress结构体,129字节{0x01, "No system memory is physically installed in the system"},{0x02, "No usable system memory, all installed memory has experienced an unrecoverable failure"}, // 88字节{0x03, "Unrecoverable hard-disk/ATAPI/IDE device failure"},{0x04, "Unrecoverable system-board failure"},{0x05, "Unrecoverable diskette subsystem failure"},{0x06, "Unrecoverable hard-disk controller failure"},{0x07, "Unrecoverable PS/2 or USB keyboard failure"},{0x08, "Removable boot media not found"},{0x09, "Unrecoverable video controller failure"},{0x0A, "No video device detected"},{0x0B, "Firmware (BIOS) ROM corruption detected"},{0x0C, "CPU voltage mismatch"},{0x0D, "CPU speed matching failure"},
};struct system_fw_progress system_fw_hang_or_progress[] = {{0x00, "Unspecified"},{0x01, "Memory initialization"},{0x02, "Hard-disk initialization"},{0x03, "Secondary processor(s) initialization"},{0x04, "User authentication"},{0x05, "User-initiated system setup"},{0x06, "USB resource configuration"},{0x07, "PCI resource configuration"},{0x08, "Option ROM initialization"},{0x09, "Video initialization"},{0x0A, "Cache initialization"},{0x0B, "SM Bus initialization"},{0x0C, "Keyboard controller initialization"},{0x0D, "Embedded controller/management controller initialization"},{0x0E, "Docking station attachment"},{0x0F, "Enabling docking station"},{0x10, "Docking station ejection"},{0x11, "Disabling docking station"},{0x12, "Calling operating system wake-up vector"},{0x13, "Starting operating system boot process, e.g. calling Int 19h"},{0x14, "Baseboard or motherboard initialization"},{0x15, "reserved"},{0x16, "Floppy initialization"},{0x17, "Keyboard test"},{0x18, "Pointing device test"},{0x19, "Primary processor initialization"},
};uint8_t *ed = &event_data[3];char temp_log[512] = {0};char add_sol_log_com[512] = "logger -p local3.info ";case POST_ERROR:if (((ed[0] >> 6) & 0x03) == 0x3) {  // table29 eventdata1第6和7位为11switch (ed[0] & 0xF) { // table29取eventdata1低四位case 0x00: // sensor offsetstrcat(error_log, "System Firmware Error (POST Error), IPMI Post Code"); // 50字节if (ed[1] <  (sizeof(system_fw_error) / sizeof(system_fw_error[0]))) { // 13*129/129=0x0dsprintf(temp_log, ", %s", system_fw_error[ed[1]].DecodeString); // 88字节,ed[1]即eventdata2} else {sprintf(temp_log, ", reserved");}break;case 0x01:strcat(error_log, "System Firmware Hang, IPMI Post Code");case 0x02:if (strcmp(error_log, "") == 0) {strcat(error_log, "System Firmware Progress, IPMI Post Code");}if (ed[1] <  (sizeof(system_fw_hang_or_progress) / sizeof(system_fw_hang_or_progress[0]))) {sprintf(temp_log, ", %s", system_fw_hang_or_progress[ed[1]].DecodeString);} else {sprintf(temp_log, ", reserved");}break;default:sprintf(temp_log, "Unknown");break;}strcat(error_log, temp_log); //138// send post code sel to sol logsprintf(temp_log, " '%s' ", error_log);strcat(add_sol_log_com, temp_log);system(add_sol_log_com);break;