SpringMVC
SpringMVC配置
- 引入Maven依赖 (springmvc)
- web.xml配置DispatcherServlet
- 配置 applicationContext 的 MVC 标记
- 开发Controller控制器
几点注意事项:
- 在web.xml中 配置<load-on-startup> 0 </load-on-startup> 会自动创建SpringIOC容器并初始化DispatcherServlet
- 增加ContextConfigLocation地址
- @RequestMapping也可以加在方法上,意思上不区分Get/Post请求类型,当然也可加上Method=RequestMethod.Get等设置
- @RequestParam可以映射参数,另外值得注意的是如果使用Map传递参数,当使用复合参数时,会丢失参数(数据绑定)
转换器 使用
转换器很简单,其实就是一个java方法,这里关注的重点是如何配置转换器
package com.dfbz.converter;import com.dfbz.entity.Student;
import org.springframework.core.convert.converter.Converter;
import org.springframework.stereotype.Component;import java.text.ParseException;
import java.text.SimpleDateFormat;/*** @author lscl* @version 1.0* @intro:*/
@Component              // 放入IOC容器
public class StringToStudentConverterimplements Converter<String, Student> {           // String: 什么参数需要转换   Student: 转换为什么类型SimpleDateFormat sdf = new SimpleDateFormat("yyyy-MM-dd");/*** 前端只要传递了String类型的表单** @param str* @return*/@Overridepublic Student convert(String str) {// id:name:age:birthday--->1:zhangsan:20:birthdaytry {String[] studentInfo = str.split(":");Student student = new Student();student.setId(Integer.parseInt(studentInfo[0]));student.setName(studentInfo[1]);student.setAge(Integer.parseInt(studentInfo[2]));student.setBirthday(sdf.parse(stu`在这里插入代码片`dentInfo[3]));return student;} catch (ParseException e) {e.printStackTrace();}return null;}
}
配置如下:
<?xml version="1.0" encoding="UTF-8"?>
<beans xmlns="http://www.springframework.org/schema/beans"xmlns:xsi="http://www.w3.org/2001/XMLSchema-instance"xmlns:context="http://www.springframework.org/schema/context"xmlns:mvc="http://www.springframework.org/schema/mvc"xsi:schemaLocation="http://www.springframework.org/schema/beans http://www.springframework.org/schema/beans/spring-beans.xsd http://www.springframework.org/schema/context https://www.springframework.org/schema/context/spring-context.xsd http://www.springframework.org/schema/mvc https://www.springframework.org/schema/mvc/spring-mvc.xsd"><context:component-scan base-package="com.dfbz"/><!--静态资源放行--><mvc:default-servlet-handler/><!--在SpringMVC提供的converts中加上我们的--><bean id="conversionService"class="org.springframework.context.support.ConversionServiceFactoryBean"><property name="converters"><set><ref bean="stringToStudentConverter"/></set></property></bean><!-- 指定使用定制的converts--><mvc:annotation-driven conversion-service="conversionService"/>
</beans>
中文乱码处理
中文乱码主要有三种情况,这里分别介绍处理方式
- Get乱码:在server.xml增加URIEncoding属性
- Post乱码:web.xml配置characterEncodingFilter过滤器
- Response乱码:Spring配置StringHttpMessageConverter转换器
响应产生结果
- 方法上加@ResponseBody注解,同时参数使用String ,则数据自动展示在页面不进行跳转
- 采用ModelAndView返回,则会利用模板引擎进行数据渲染,使用ModelAndView可以将数据绑定到模板引擎上,而默认模板引擎是JSP;
值得注意的是:
ModelAndView参数放在当前请求中,所以页面跳转使用的是请求转发,或者使用重定向则会丢失数据
使用示例为:
ModelAndView mav = new ModelAndView ("/show.jsp");mav.setObject("key",value);
或者是
ModelAndView mav = new ModelAndView ();mav.setViewName("/show.jsp");mav.setObject("key",value);
另外我们可以通过String +ModelMap 实现ModelAndView
SpringMVC整合FreeMarker
步骤:
- 引入FreeMarker依赖(POM.xml)
- application.xml中引入FreeMarker(ViewResolver)
- 配置FreeMarker参数(模板路径,设置选项等)
Rest :表现层状态转换(WEB下以URL传递)
对应的开发风格是Restful , 使用URL作为用户交互入口
url命名要求: 语义明确,名词,不超过两级,区分单复数
几个重要点:
- 当使用@RestController后不再需要@ResponseBody注解
- 路径变量:@PostMapping(“/test/{name}”),则使用@PathVariable接
简单请求与非简单请求
简单请求:标准结构HTTP请求:Get/Post
非简单请求:非标准:PUT/DELETE 或者其他拓展
两者最大区别在于 非简单请求在请求前需要发送预检请求
如果使用非简单请求,则需要配置formContextFilter
Json序列化
返回类型为Object时,使用FastJson将数据转换为String
但是针对于时间处理时不太理想,此时需要使用@JsonFormat处理时间类型
跨域问题
什么是跨域
受浏览器同源策略保护机制,当协议、子域名、主域名、端口号中任意一个不相同时,都算作不同域。不同域之间相互请求资源,就算作“跨域”。称之为 CORS,(URL头包含Access-control-* 时表明请求支持跨域)
如何解决跨域问题:
- @CrosOrigin注解 ——Controller跨域注解(局部的)
@CrossOrigin(origins="http://localhost:8080")@GetMapping("/persons")public List<Person> findPersons() {}
- 配置 < mvc:cors > ——SpringMVC全局跨域配置
<mvc:cors><mvc:mapping path="/restful/**" allowed-origins="http://localhost:8080" max-age="3600"/></mvc:cors>
拦截器
开发流程:
- maven 依赖加入Servlet-api
- 实现HandleInterceptor接口
- ApplicationContext配置拦截地址
注意:
HandleInterceptor接口 含有三个方法:分别是处理前,处理完成未响应,产生响应文本之后
示例配置:
<mvc:interceptors><mvc:interceptor><mvc:mapping path="/**"/><mvc:exclude-mapping path="/**.ico"/><mvc:exclude-mapping path="/**.jpg"/><mvc:exclude-mapping path="/**.gif"/><mvc:exclude-mapping path="/**.css"/><mvc:exclude-mapping path="/**.js"/><bean class="com.imooc.restful.interceptor.MyInterceptor1"/><!-- 排除资源--></mvc:interceptor></mvc:interceptors><mvc:interceptors><mvc:interceptor><mvc:mapping path="/**"/><mvc:exclude-mapping path="/**.ico"/><mvc:exclude-mapping path="/**.jpg"/><mvc:exclude-mapping path="/**.gif"/><mvc:exclude-mapping path="/**.css"/><mvc:exclude-mapping path="/**.js"/><bean class="com.imooc.restful.interceptor.AccessHistoryInterceptor"/></mvc:interceptor></mvc:interceptors>
此处配置了两个拦截器,多个执行器如何执行
例如先配置了 A,再配置了B拦截器
请求-> A-Pre -> Bpre ->Bph -> Aph ->AfterB ->AfterA
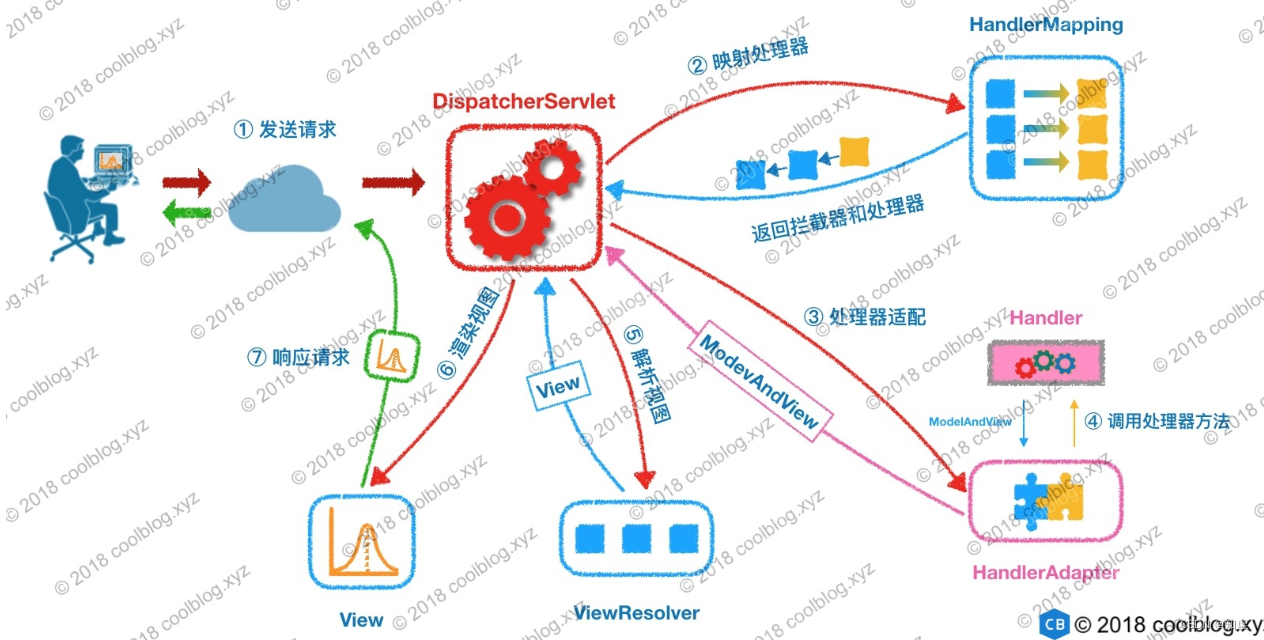
Spring MVC 一个请求的完整过程
Spring Task定时任务——>底层使用Cron表达式
使用也很简单:① 加注解 @Scheduled ② 加配置 < task:annotation-driven >