08 SpringBoot 自定定义配置
SpringBoot自定义配置有三种方式:
使用@PropertySource进行自定义配置
使用@ImportResource进行自定义配置
使用@Configuration进行自定义配置
@PropertySource
如果将所有的配置都集中到 application.properties 或 application.yml 中,那么这个配置文件会十分的臃肿且难以维护,因此我们通常会将与 Spring Boot 无关的配置(例如自定义配置)提取出来,写在一个单独的配置文件中,并在对应的 JavaBean 上使用 @PropertySource 注解指向该配置文件。
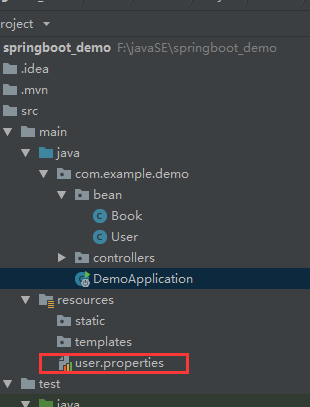
步骤一:
以 DemoApplication为例,将与 user’ 相关的自定义配置移动到 src/main/resources 下的 user.properties 中
注意,必须把 application.properties 或 application.yml 中的相关配置删除
如下图
person.properties 的配置如下
user.id=30
user.name="Administrator"
user.sex="man"
user.age=32
user.salary=33000.45
user.address="cehngdushi"
user.jobName="教师"
user.hibernate=2022/09/26#对数组books赋值
user.books[0].name=bigdata
user.books[0].price=32.62d
user.books[1].name=python
user.books[1].price=102.62d#对数组names赋值
user.names[0]="jianghuan"
user.names[1]="xiangjie"
user.names[2]="taoshi"#students中的key-value表示学生姓名和学号
user.students.key1=2020120014
user.students.key2=2020120015
user.students.key3=2020120016
user.students.key4=2020120017
步骤二:
在 User 使用 @PropertySource 注解指向 user.properties,代码如下。
创建Book实体
public class Book {private String name;private Double price;.... 此处省略有参无参构造函数 及 setter、getter方法和toString方法
}创建User实体类
/**
* 将配置文件中配置的每一个属性的值,映射到这个组件中
*
* @ConfigurationProperties:告诉 SpringBoot 将本类中的所有属性和配置文件中相关的配置进行绑定;
* prefix = "person":配置文件中哪个下面的所有属性进行一一映射
*
* 只有这个组件是容器中的组件,才能使用容器提供的@ConfigurationProperties功能;
*/@Component
@PropertySource("classpath:user.properties") //指向对应的配置文件
@ConfigurationProperties(prefix = "user") // 使用user.properties中的进行注入
public class User {private String id;private String name;private String sex;private Integer age;private Double salary;private String address;private Date hibernate;private Book[] books;private List<String> names;private Map<String,Integer> students; //students中的key-value表示学生姓名和学号.... 此处省略有参无参构造函数 及 setter、getter方法和toString方法}
注意:
- @PropertySource()可以同时支持多个配置文件用逗号隔开,例如@PropertySource(locations={“classpath:user.properties”,“classpath:emp.properties”})
步骤三:
重启主启动类,在 DemoApplication 项目的 主启动类 中获取IOC容器,从IOC容器中获取Userbean,通过打印userbean展示配置文件中各个属性值。
@SpringBootApplication
public class DemoApplication {public static void main(String[] args) {//1、返回IOC容器ConfigurableApplicationContext run = SpringApplication.run(DemoApplication.class, args);//2、查看容器中的组件User user = run.getBean(User.class);System.out.println(user);}
}
步骤四:
查看运行结果

默认情况下,Spring Boot 中是不包含任何的 Spring 配置文件的,即使我们手动添加 Spring 配置文件到项目中,也不会被识别。那么 Spring Boot 项目中真的就无法导入 Spring 配置吗?答案是否定的。
Spring Boot 为了我们提供了以下 2 种方式来导入 Spring 配置:
- 使用 @ImportResource 注解加载 Spring 配置文件
- 使用全注解方式加载 Spring 配置
@ImportResource
如有是使用springboot项目来重构以前用SSM开发的项目,并且不想重写原有的实体类或者其他类及其spring的配置文件,此时可以使用注解**@ImportResource**导入spring的配置文件,让配置文件生效。
步骤一:
在 DemoApplication 项目的 com.example.demo.bean 中创建一个名为 User 的实体类,代码如下:
创建Book实体
public class Book {private String name;private Double price;.... 此处省略有参无参构造函数 及 setter、getter方法和toString方法
}创建User实体类
public class User {private String id;private String name;private String sex;private Integer age;private Double salary;private String address;private Date hibernate;private Book[] books;private List<String> names;private String jobName;private Map<String,Integer> students; //students中的key-value表示学生姓名和学号.... 此处省略有参无参构造函数 及 setter、getter方法和toString方法}
步骤二:
在该项目的 resources 下添加一个名为 beans.xml 的 Spring 配置文件,使用标签创建Book和User实体类对象和值的注入,配置代码如下。
<?xml version="1.0" encoding="UTF-8"?>
<beans xmlns="http://www.springframework.org/schema/beans"xmlns:xsi="http://www.w3.org/2001/XMLSchema-instance"xmlns:context="http://www.springframework.org/schema/context"xsi:schemaLocation="http://www.springframework.org/schema/beans http://www.springframework.org/schema/beans/spring-beans.xsd http://www.springframework.org/schema/context http://www.springframework.org/schema/context/spring-context.xsd"><!--     使用bean标签创建日期对象--><bean id="date" class="java.util.Date"></bean><!--     使用bean标签创建三个book对象,并注入值--><bean id="book1" class="com.example.demo.bean.Book"><property name="name" value="bigdata"></property><property name="price" value="32.62"></property></bean><bean id="book2" class="com.example.demo.bean.Book"><property name="name" value="java"></property><property name="price" value="72.62"></property></bean><bean id="book3" class="com.example.demo.bean.Book"><property name="name" value="python"></property><property name="price" value="102.62"></property></bean><!--     使用bean标签创建user对象,并注入值--><bean id="user" class="com.example.demo.bean.User" ><property name="id" value="30"></property><property name="name" value="Administrator"></property><property name="sex" value="chuntian"></property><property name="age" value="32"></property><property name="salary" value="33000.45"></property><property name="address" value="cehngdushi"></property><property name="jobName" value="教师"></property><property name="hibernate" ref="date"></property><property name="books" ><array><ref bean="book1"/><ref bean="book2"/><ref bean="book3"/></array></property><property name="names"><list><value>"jianghuan"</value><value>"xiangjie"</value><value>"taoshi"</value></list></property><property name="students"><map><entry key="key1" value="2020120014"/><entry key="key2" value="2020120015"/><entry key="key3" value="2020120016"/><entry key="key4" value="2020120017"/></map></property></bean></beans>
步骤三:
在主启动程序类上使用 @ImportResource 注解,将 Spring 配置文件 beans.xml 加载到项目中,代码如下
@SpringBootApplication
@ImportResource(locations = {"classpath:beans.xml"})
public class DemoApplication {public static void main(String[] args) {//1、返回IOC容器ConfigurableApplicationContext run = SpringApplication.run(DemoApplication.class, args);boolean bl = run.containsBean("user"); //在bean.xml中配置的bean的id值为user的if (bl) {System.out.println("user 已经添加到 IOC 容器中");} else {System.out.println("user 没添加到 IOC 容器中");}//2、查看容器中的组件User user = run.getBean(User.class);System.out.println(user);}
}
步骤四:
启动主启动类,运行结果如下:
@Configuration
全注解方式加载 Spring 配置
如有是使用springboot项目来重构以前用SSM开发的项目,并且不想重写原有的实体类或者其他类及其spring的配置文件,此时可以使用注解@ImportResource导入spring的配置文件,让配置文件生效。
@Configuration底层代码
@Target({ElementType.TYPE})
@Retention(RetentionPolicy.RUNTIME)
@Documented
@Component
public @interface Configuration {@AliasFor(annotation = Component.class)String value() default "";boolean proxyBeanMethods() default true;
}
@Configuration是配置类注解,是spring的底层注解;从@Component可以看出配置类也是一个组件;这个注解@Configuration用在类上,表示告诉spring这个类是配置类===spring配置文件。
Spring Boot 推荐我们使用@Configuration全注解的方式加载 Spring 配置,其实现方式如下:
- 使用 @Configuration 注解定义配置类,替换 Spring 的配置文件;
- 配置类内部可以包含有一个或多个被 @Bean 注解的方法,这些方法会被 AnnotationConfigApplicationContext 或 AnnotationConfigWebApplicationContext 类扫描,构建 bean 定义(相当于 Spring 配置文件中的标签),方法的返回值会以组件的形式添加到容器中,组件的 id 就是方法名。
步骤一:
在 DemoApplication 项目的 com.example.demo.service中创建一个名为 MyService的服务类,代码如下:
//创建MyService
public class MyService {
}
步骤二:
在 com.example.demo.config 包下添加一个名为 DemoConfig 的配置类,并在类上使用注解@Configuration,代码如下。
@Configuration // 告诉spring这是一个配置类 ==  spring配置文件
public class DemoConfig {@Bean // 给容器中添加组件,以方法名为组件id,返回的值就是组件public MyService  myService(){return new MyService();}
}
上述代码等价与在xml中配置bean标签
<bean id="user" class="com.example.demo.servvice.MyService"></bean>
关于@configuration注解的解释:
1.@Configuration 注解用于定义一个配置类,相当于 Spring 的配置文件
2.配置类中包含一个或多个被 @Bean 注解的方法,该方法相当于 Spring 配置文件中的 标签定义的组件
3.@Bean等价spring配置文件中 标签
4.myService()方法的返回值以组件的形式添加到容器中
5.方法名myService()是组件 id(相当于 标签的属性 id)
步骤三:
在主启动程序类上代码如下。
@SpringBootApplication
public class DemoApplication {public static void main(String[] args) {//1、返回IOC容器ConfigurableApplicationContext run = SpringApplication.run(DemoApplication.class, args);boolean bl = run.containsBean("myService"); //配置类中@Bean标注的方法名if (bl) {System.out.println("myService 已经添加到 IOC 容器中");} else {System.out.println("myService 没添加到 IOC 容器中");}//2、查看容器中的组件MyService myService= run.getBean(MyService .class);System.out.println(myService);}
}
步骤四:
启动主启动类,运行结果如下:
