源码编译安装Rsync数据同步
源码编译安装
RPM软件包:rpm -ivh 或者 yum -y install
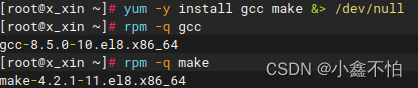
需要开发编译工具gcc、gcc-c++、make等...
源码包----开发工具gcc与make----》可以执行的程序-----》运行安装
•主要优点
–获得软件的最新版,及时修复bug
–软件功能可按需选择/定制,有更多软件可供选择
–源码包适用各种平台
–……
-
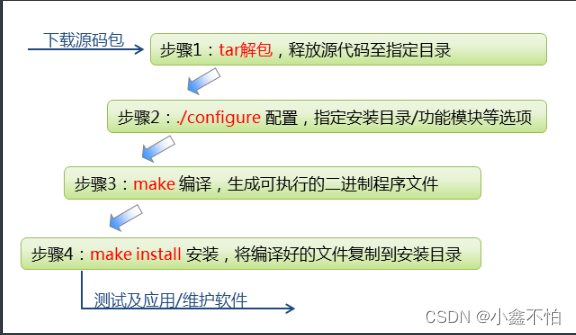
步骤1:安装开发工具gcc与make,释放源代码至指定目录
-
步骤2:tar解包,释放源代码至指定目录
-
步骤3:./configure 配置,指定安装目录/功能模块等选项
-
步骤4:make 编译,生成可执行的二进制程序文件
-
步骤5:make install 安装,将编译好的文件复制到安装目录
真机tools.tar.gz 传递数据到虚拟机
真机为Linux:
]# ls /linux-soft/s1]# scp /linux-soft/s1/tools.tar.gz root@192.168.88.240:/root
真机为windows:windterm进行上传tools.tar.gz

虚拟机:192.168.88.4
![]()
案例
虚拟机A
1.安装开发工具
[root@server ~]# yum -y install gcc make[root@server ~]# rpm -q gcc[root@server ~]# rpm -q make[root@server ~]#
2.进行解压缩
源码包默认放在/usr/local
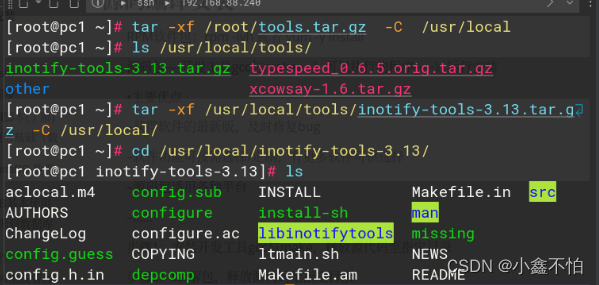
[root@server ~]# tar -xf /root/tools.tar.gz -C /usr/local[root@server ~]# ls /usr/local/toolsinotify-tools-3.13.tar.gz #监听文件
![]()
3.进行tar解包
[root@server ~]# tar -xf /usr/local/tools/inotify-tools-3.13.tar.gz -C /usr/local/ [root@server ~]# ls /usr/local/[root@server ~]# cd /usr/local/inotify-tools-3.13/[root@server ~]# ls
4.运行configure脚本
-
作用1:检测当前系统是否安装gcc
-
作用2:指定安装位置与功能
-
作用3:生成Makefile文件(制作程序的大纲,做菜的菜谱) ./configure
只能在当前目录下,生成makefile文件
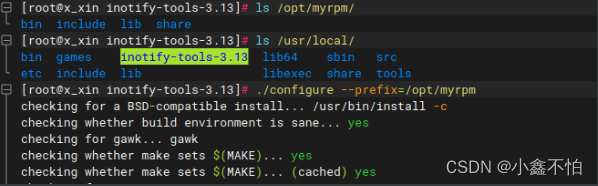
[root@server ~]# cd /usr/local/inotify-tools-3.13/[root@server ~]# ./configure --help #查看帮助信息,大概浏览一下[root@server ~]# ./configure --prefix=/opt/myrpm #指定安装位置,此步骤不产生相应的目录
常见的报错信息:
gcc开发工具没有安装checking for gcc... nochecking for cc... nochecking for cl.exe... noconfigure: error: no acceptable C compiler found in $PATHSee `config.log' for more details.
5.进行make编译,变成可以执行的程序(放在内存中)只能在当前目录下
【此时的目的是生成二进制文件】
[root@server ~]# cd /usr/local/inotify-tools-3.13/[root@server inotify-tools-3.13]# make
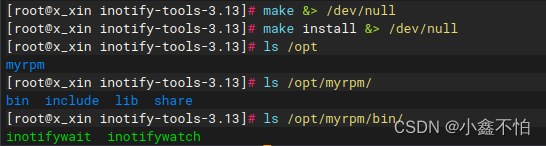
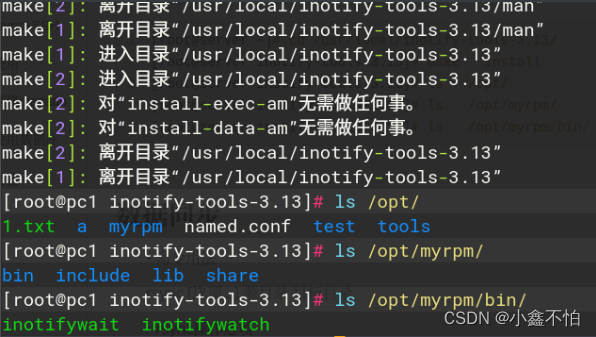
6.进行make install安装。 只能在当前目录下
[root@server ~]# cd /usr/local/inotify-tools-3.13/[root@server inotify-tools-3.13]# make install [root@server inotify-tools-3.13]# ls /opt/[root@server inotify-tools-3.13]# ls /opt/myrpm/[root@server inotify-tools-3.13]# ls /opt/myrpm/bin/
rsync同步+监视+ssh
数据同步
同步的实时性
-
按照固定周期定期同步
-
时间间隔不好固定,同步不及时或资源浪费
实时性较差
Linux内核的inotify机制
-
提高时间响应式的文件系统通知机制
-
安装inotify-tools 控制工具可调用此机制实现监控
• 命令用法
rsync [选项...] 源目录 目标目录
• rsync操作选项
-
-n:测试同步过程,不做实际修改
-
--delete:删除目标文件夹内多余的文档
-
-a:归档模式,相当于-rlptgoD
-
-v:显示详细操作信息
-
-X:保持acl策略不变
本地同步(文件级)
#一般默认10G以上采用rsyns,低于10G也可以,看个人爱好。
#每使用rsyns一次,就同步一次。
#不加--delete ,就是只改不删除
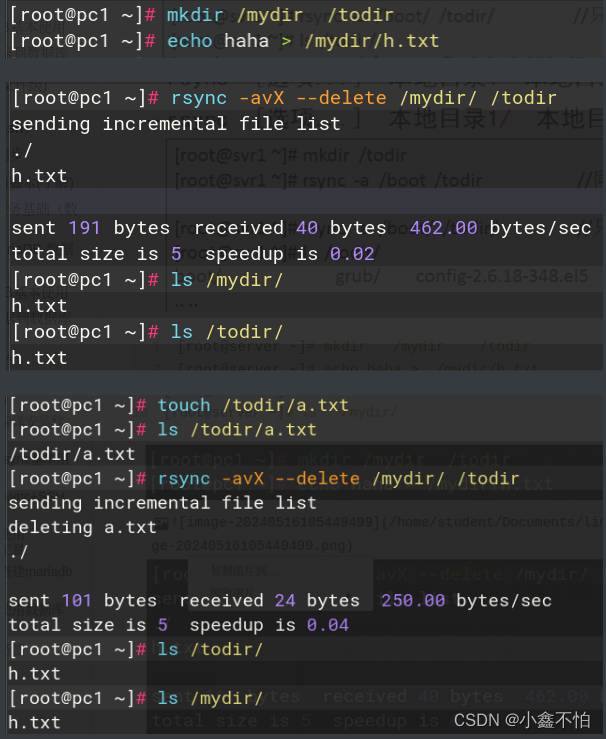
[root@server ~]# mkdir /mydir /todir [root@server ~]# echo haha > /mydir/h.txt [root@server ~]# rsync -avX --delete /mydir/ /todir #同步目录的内容[root@server ~]# ls /mydir/[root@server ~]# ls /todir/[root@server ~]# touch /todir/a.txt [root@server ~]# ls /todir/[root@server ~]# rsync -avX --delete /mydir/ /todir[root@server ~]# ls /todir/[root@server ~]# ls /mydir/
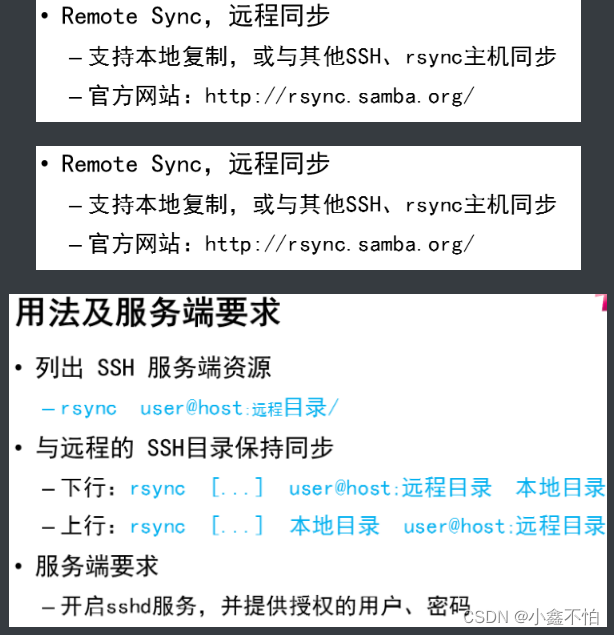
远程同步(rsync+ssh)
与远程的 SSH目录保持同步
下行:rsync [...] user@host:远程目录 本地目录
上行:rsync [...] 本地目录 user@host:远程目录
虚拟机A的/mydir目录的内容与虚拟机B的/mnt进行同步
虚拟机A:
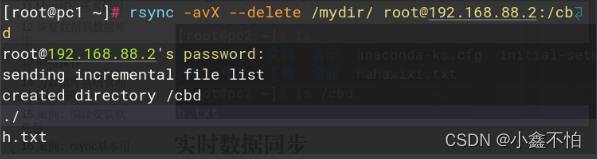
[root@server ~]# rsync -avX --delete /mydir/ root@192.168.88.2:/mnt……..connecting (yes/no)? yesroot@192.168.88.2's password: #输入密码
虚拟机B:
[root@server ~]# ls /mnt

实时数据同步
虚拟机A的/mydir/目录的内容与虚拟机B的/mnt进行同步
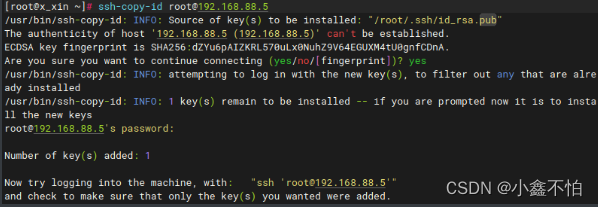
实现ssh无密码验证(公钥与私钥)
虚拟机A
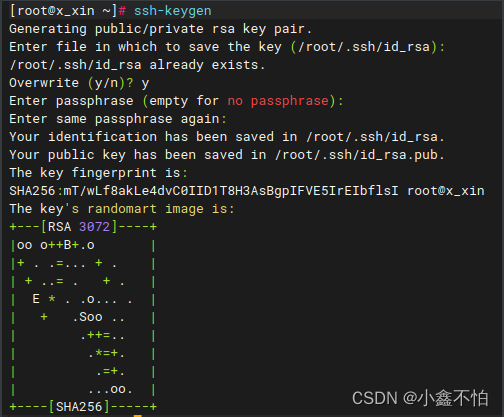
1.虚拟机A生成公钥与私钥
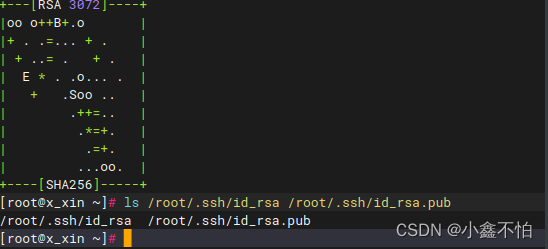
[root@server ~]# ssh-keygen #一路回车[root@server ~]# ls /root/.ssh/id_rsa(私钥) id_rsa.pub(公钥) known_hosts(记录曾经远程管理过的机器)
2.虚拟机A将公钥传递给虚拟机B
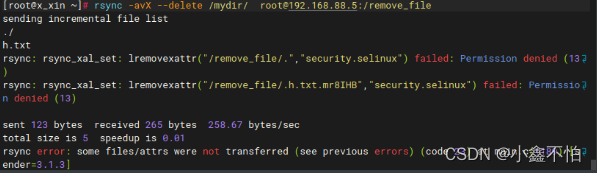
[root@server ~]# ssh-copy-id root@192.168.88.5[root@server ~]# rsync -avX --delete /mydir/ root@192.168.88.5:/remove_file
同步源文件(192.168.88.4)

192.168.88.5---同步前
192.168.88.5---同步后
![]()
监控目录内容变化工具
• 基本用法
inotifywait [选项] 目标文件夹
• 常用命令选项
-m,持续监控(捕获一个事件后不退出)
-r,递归监控、包括子目录及文件
-q,减少屏幕输出信息
-e,指定监视的 modify、move、create、delete、attrib 等事件类别
inotifywait 监控目录内容变化rsync -avX --delete /mydir/ root@192.168.88.2:/mnt
书写shell脚本(了解)
脚本:可以运行一个文件,实现某种功能
中文:新建用户zhangsan shell: useradd zhangsan
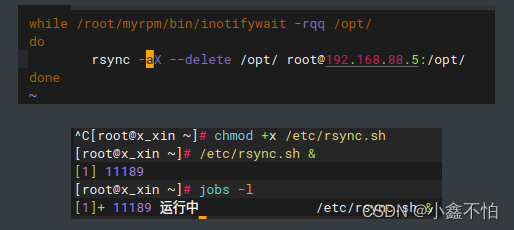
[root@server /]# vim    /root/hello.sh
echo  hello  world
hostname
id  root
ifconfig   |   head  -2
[root@server /]# chmod   +x   /root/hello.sh  #所有人赋予执行权限
[root@server /]# /root/hello.sh   #绝对路径执行脚本
重复性:循环解决
格式:  while   条件do重复执行的事情done
[root@server /]# vim   /etc/rsync.sh
while   /opt/myrpm/bin/inotifywait  -rqq   /opt/
do
rsync -aX  --delete   /mydir/   root@192.168.88.5:/opt/
done
[root@server /]# chmod  +x  /etc/rsync.sh  #赋予执行权限
[root@server /]# /etc/rsync.sh  &          #放入后台运行脚本程序
[root@server /]# jobs  -l                  #-l选项  显示进程的pid
[1]    + 17707 运行中               /etc/rsync.sh &
[root@server /]# kill  17707                #停止脚本,可以杀死进
案例:编译安装软件包
问题
本例要求掌握常规源代码应用的安装过程,通过编译的方式安装inotify-tools 软件工具,完成下列任务:
-
释放 inotify-tools-3.13.tar.gz 源码包
-
配置 ./configure 【生成makefile文件,指定安装位置 】
-
编译 make、安装 make install
-
测试inotifywait监控工具的用法及用途
方案
对于标准源码发布的C/C++软件包,编译安装一般包括以下过程:
-
解包:使用tar命令,将下载的源代码释放至指定目录
-
配置:执行源码目录内的 ./configure 脚本,指定安装目录/功能模块等选项
-
编译:在源码目录下执行 make 操作,根据配置清单Makefile生成可执行的二进制程序文件
-
安装:在源码目录下执行make install 操作,将编译好的程序及相关文件复制到安装目录
步骤
实现此案例需要按照如下步骤进行。
步骤一:确认已配置好编译环境
[root@svr7 ~]# yum -y install gcc gcc-c++ make.. ..[root@svr7 ~]# gcc --versiongcc (GCC) 4.8.5 20150623 (Red Hat 4.8.5-4)Copyright (C) 2015 Free Software Foundation, Inc.This is free software; see the source for copying conditions. There is NOwarranty; not even for MERCHANTABILITY or FITNESS FOR A PARTICULAR PURPOSE.
步骤二:编译安装inotify-tools软件包
1)解包inotify-tools-3.13.tar.gz文件
[root@svr7 ~]# ls inotify-tools-3.13.tar.gzinotify-tools-3.13.tar.gz[root@svr7 ~]# tar xf inotify-tools-3.13.tar.gz -C /usr/src/
2)配置 ./configure,安装目录默认(/usr/local/*/)
[root@svr7 ~]# cd /usr/src/inotify-tools-3.13/ //进入源码目录[root@svr7 inotify-tools-3.13]# ./configure //配置操作checking for a BSD-compatible install... /usr/bin/install -cchecking whether build environment is sane... yeschecking for gawk... gawk.. ..configure: creating ./config.statusconfig.status: creating Makefile.. ..[root@svr7 inotify-tools-3.13]# ls Makefile //检查配置结果Makefile
3)编译 make
[root@svr7 inotify-tools-3.13]# make.. ..Making all in srcmake[2]: Entering directory `/usr/src/inotify-tools-3.13/src'make[3]: Entering directory `/usr/src/inotify-tools-3.13'make[3]: Leaving directory `/usr/src/inotify-tools-3.13'.. ..
4)安装 make install
[root@svr7 inotify-tools-3.13]# make install.. ../usr/bin/install -c .libs/inotifywait /usr/local/bin/inotifywait/bin/sh ../libtool --mode=install /usr/bin/install -c 'inotifywatch' '/usr/local/bin/inotifywatch'.. ..[root@svr7 inotify-tools-3.13]# find /usr/local/ -name "inotify*"/usr/local/bin/inotifywait //确认安装结果/usr/local/bin/inotifywatch/usr/local/include/inotifytools/usr/local/include/inotifytools/inotifytools.h
步骤三:测试inotify-tools软件程序
软件包inotify-tools提供了一个主要程序inotifywait,可以用来监控指定目录或文档的变化,并及时给出通知。
1)开启对/opt目录的事件监控
-
-m,持续监控(捕获一个事件后不退出)
-
-r,递归监控、包括子目录及文件
-
-q,减少屏幕输出信息
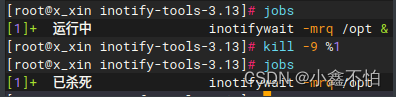
[root@svr7 ~]# inotifywait -mrq /opt & //开启监控[1] 15568

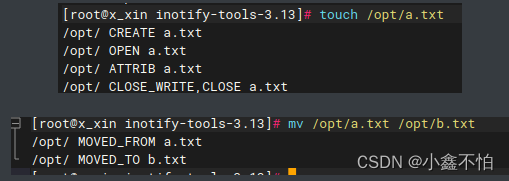
2)修改/opt/目录内容,观察屏幕输出信息
[root@svr7 ~]# touch /opt/a.txt //新建文件a.txt/opt/ CREATE a.txt/opt/ OPEN a.txt/opt/ ATTRIB a.txt/opt/ CLOSE_WRITE,CLOSE a.txt[root@svr7 ~]# mv /opt/a.txt /opt/b.txt //将文件改名/opt/ MOVED_FROM a.txt/opt/ MOVED_TO b.txt
3)结束inotifywait监控
杀死当前用户的第一个后台任务:
[root@svr7 ~]# kill -9 %1[1]+ Killed inotifywait -mrq /opt
案例:rsync基本用法
问题
本例要求掌握远程同步的基本操作,使用rsync命令完成下列任务:
-
将目录 /boot 同步到目录 /todir 下
-
将目录 /boot 下的文档同步到目录 /todir 下
-
在目录 /boot 下新增文件 a.txt,删除 /todir 下的子目录 grub2,再次同步使 /todir 与 /boot 一致
-
验证 -a、-n、-v、--delete 选项的含义
方案
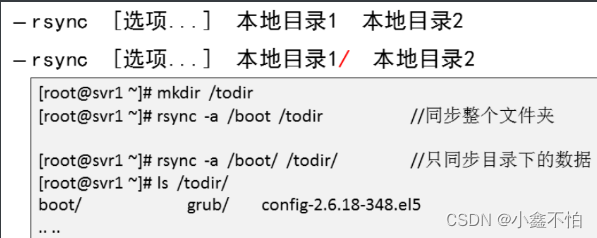
本地同步操作:
-
rsync [选项...] 本地目录1 本地目录2
-
rsync [选项...] 本地目录1/ 本地目录2
rsync同步工具的常用选项:
-
-n:测试同步过程,不做实际修改
-
--delete:删除目标文件夹内多余的文档
-
-a:归档模式,相当于-rlptgoD
-
-v:显示详细操作信息
-
-z:传输过程中启用压缩/解压
-
-X :不改变ACL策略
步实现此案例需要按照如下步骤进行。
步骤一:rsync同步基本操作
1)将目录 /boot 同步到目录 /todir 下
[root@svr7 ~]# ls -l /todir //同步前ls: 无法访问/todir: 没有那个文件或目录[root@svr7 ~]# rsync -a /boot /todir //将目录1作为目录2的子目录[root@svr7 ~]# ls -l /todir //检查同步结果总用量 4dr-xr-xr-x. 4 root root 4096 11月 30 18:50 boot
2)将目录 /boot 下的文档同步到目录 /todir 下
[root@svr7 ~]# rm -rf /todir //清理掉目录2[root@svr7 ~]# rsync -a /boot/ /todir //将目录1下的文档同步到目录2下[root@svr7 ~]# ls -l /todir //检查同步结果总用量 126708-rw-r--r--. 1 root root 126426 10月 30 2015 config-3.10.0-327.el7.x86_64drwxr-xr-x. 2 root root 4096 11月 30 18:50 extlinuxdrwx------. 6 root root 104 12月 9 09:58 grub2.. ..
3)同步效果测试
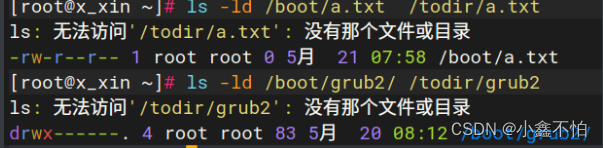
在目录/boot下新增文件a.txt,删除/todir下的子目录 grub2:
[root@svr7 ~]# touch /boot/a.txt[root@svr7 ~]# rm -rf /todir/grub2/

现在目录/boot和/todir目录下的内容已经不一致了:
[root@svr7 ~]# ls -ld /boot/a.txt /todir/a.txtls: 无法访问/todir/a.txt: 没有那个文件或目录-rw-r--r--. 1 root root 0 1月 11 21:09 /boot/a.txt[root@svr7 ~]# ls -ld /boot/grub2 /todir/grub2ls: 无法访问/todir/grub2: 没有那个文件或目录drwx------. 6 root root 104 12月 9 09:58 /boot/grub2
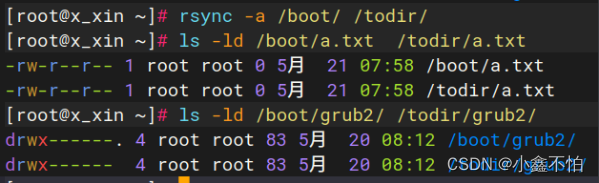
再次同步使/todir与/boot一致:
[root@svr7 ~]# rsync -a /boot/ /todir/
确认同步结果:
[root@svr7 ~]# ls -ld /boot/a.txt /todir/a.txt-rw-r--r--. 1 root root 0 1月 11 21:09 /boot/a.txt-rw-r--r--. 1 root root 0 1月 11 21:09 /todir/a.txt[root@svr7 ~]# ls -ld /boot/grub2 /todir/grub2drwx------. 6 root root 104 12月 9 09:58 /boot/grub2drwx------. 6 root root 104 12月 9 09:58 /todir/grub2
步骤二:验证 -a、-v、-n、--delete 选项的含义
1)验证-a选项
当目录1包含文件夹时,若缺少-a或-r选项则文件夹会被忽略:
[root@svr7 ~]# rsync /home /testaskipping directory home[root@svr7 ~]# ls -ld /testals: 无法访问/testa: 没有那个文件或目录
添加-a后才会执行同步:
[root@svr7 ~]# rsync -a /home/ /testa[root@svr7 ~]# ls -ld /testadrwxr-xr-x. 4 root root 31 1月 6 17:33 /testa
类似的情况,当目录1中的数据出现权限、归属、修改时间等变化时,若文件内容不变默认不会同步,若希望目录2也同步这些变化,也需要-a选项。
2)验证-v选项
创建测试目录及文档:
[root@svr7 ~]# mkdir /fdir[root@svr7 ~]# touch /fdir/1.txt
添加-v选项时,可以看到操作细节信息,比如第一次同步时:
[root@svr7 ~]# rsync -av /fdir/ /tdirsending incremental file listcreated directory /tdir./1.txt //传输文档列表sent 82 bytes received 34 bytes 232.00 bytes/sectotal size is 0 speedup is 0.00
在目录/fdir/添加文件2.txt,再次跟踪同步信息:
[root@svr7 ~]# touch /fdir/2.txtsending incremental file list./2.txt //传输文档列表sent 100 bytes received 34 bytes 268.00 bytes/sectotal size is 0 speedup is 0.00
确认目录1和目录2的内容已经一致:
[root@svr7 ~]# ls /fdir/ /tdir//fdir/:1.txt 2.txt/tdir/:1.txt 2.txt
再次跟踪同步信息,已经无需传输文件:
[root@svr7 ~]# rsync -av /fdir/ /tdirsending incremental file listsent 58 bytes received 12 bytes 140.00 bytes/sectotal size is 0 speedup is 0.00
3)验证-n选项
将-n、-v选项合用,可以模拟同步过程,显示需要做哪些操作(但并不真的同步)。
在目录/fdir下新建文件3.txt,测试同步操作:
[root@svr7 ~]# touch /fdir/3.txt[root@svr7 ~]# rsync -avn /fdir/ /tdir/sending incremental file list./3.txt //提示同步时会传输哪些文件sent 78 bytes received 18 bytes 192.00 bytes/sectotal size is 0 speedup is 0.00 (DRY RUN)[root@svr7 ~]# ls -l /tdir/3.txt //但实际并未真的同步ls: 无法访问/tdir/3.txt: 没有那个文件或目录
去掉-n选项才会真正同步:
[root@svr7 ~]# rsync -av /fdir/ /tdir/sending incremental file list./3.txtsent 114 bytes received 34 bytes 296.00 bytes/sectotal size is 0 speedup is 0.00[root@svr7 ~]# ls -l /tdir/3.txt-rw-r--r--. 1 root root 0 1月 11 21:46 /tdir/3.txt
4)验证--delete选项
rsync同步操作默认只是将目录1的数据同步到目录2,但如果目录2存在多余的文件却并不会去除,除非添加—delete选项。
在目录/fdir、/tdir已经完成同步后,删除/tdir/2.txt文件,再次同步:
[root@svr7 ~]# rm -rf /fdir/2.txt [root@svr7 ~]# rsync -a /fdir/ /tdir/
检查发现目标文件夹/tdir下的2.txt文件还在:
[root@svr7 ~]# ls /fdir/ /tdir//fdir/:1.txt 3.txt/tdir/:1.txt 2.txt 3.txt
这种情况下添加--delete选项再次执行同步,两个目录的内容就一致了:
[root@svr7 ~]# rsync -a --delete /fdir/ /tdir/[root@svr7 ~]# ls /fdir/ /tdir//fdir/:1.txt 3.txt/tdir/:1.txt 3.txtv
案例:rsync+SSH同步
问题
本例要求掌握rsync与远程SSH资源的同步操作,使用rsync命令访问远程主机svr7,完成下列任务:
-
查看远程主机的 / 目录下有哪些子目录
-
从远程主机下载 /etc/passwd 文件到当前目录
-
将远程主机的 /boot/ 目录同步为本地的 /fromssh
-
将本机的 /etc 目录同步到远程主机的 /opt/下
方案
列出 SSH 服务端资源
-
rsync user@host:远程目录/
rsync+SSH远程同步操作:
-
rsync [...] user@host:远程目录 本地目录
-
rsync [...] 本地目录 user@host:远程目录
步骤
实现此案例需要按照如下步骤进行。
步骤一:列出远程主机的SSH资源
查看远程主机svr7的/目录下有哪些子目录:
[root@pc207 ~]# rsync root@192.168.4.7:/root@192.168.4.7's password: //验证对方的密码dr-xr-xr-x 4096 2016/12/15 10:39:34 .lrwxrwxrwx 7 2016/12/07 09:21:50 binlrwxrwxrwx 7 2016/12/07 09:21:50 liblrwxrwxrwx 9 2016/12/07 09:21:50 lib64lrwxrwxrwx 8 2016/12/07 09:21:50 sbindr-xr-xr-x 4096 2016/12/07 11:25:29 bootdrwxr-xr-x 6 2016/12/07 09:21:14 datadrwxr-xr-x 3200 2016/12/15 10:46:15 devdrwxr-xr-x 8192 2016/12/20 17:01:02 etc
步骤二:rsync+SSH同步操作
1)从远程主机svr7下载/etc/passwd文件到当前目录
[root@pc207 ~]# rsync root@192.168.4.7:/etc/passwd ./root@192.168.4.7's password: //验证对方的密码[root@pc207 ~]# cat passwd //检查同步结果root:x:0:0:root:/root:/bin/bashbin:x:1:1:bin:/bin:/sbin/nologindaemon:x:2:2:daemon:/sbin:/sbin/nologinadm:x:3:4:adm:/var/adm:/sbin/nologinlp:x:4:7:lp:/var/spool/lpd:/sbin/nologin.. ..
2)将远程主机svr7的/boot/目录同步为本地的/fromssh
[root@pc207 ~]# rsync -a root@192.168.4.7:/boot/ /fromsshroot@192.168.4.7's password: //验证对方的密码[root@pc207 ~]# ls /fromssh/ //检查同步结果config-3.10.0-327.el7.x86_64extlinuxgrub2initramfs-0-rescue-a19921505cc7e19d20dfcd5cea7d8aa2.imginitramfs-3.10.0-327.el7.x86_64.imginitramfs-3.10.0-327.el7.x86_64kdump.img.. ..
3)将本机的/etc目录同步到远程主机svr7的/opt/下
确认目录大小:
[root@pc207 ~]# du -sh /etc35M /etc
上行同步到远程主机svr7上:
[root@pc207 ~]# rsync -a /etc root@192.168.4.7:/opt/root@192.168.4.7's password:
在远程主机上检查同步结果:
[root@svr7 ~]# du -sh /opt/etc35M /opt/etc
案例:使用inotifywait工具
问题
本例要求安装inotify-tools工具,并针对文件夹 /opt 启用 inotifywait 监控,完成下列任务:
-
当此目录下出现新建、修改、更改权限、删除文件等事件时能给出提示
-
验证上述监控事件的效果
方案
inotifywait监控操作:
-
inotifywait [选项] 目标文件夹
inotifywait常用命令选项:
-
-m,持续监控(捕获一个事件后不退出)
-
-r,递归监控、包括子目录及文件
-
-q,减少屏幕输出信息
-
-e,指定监视的 modify、move、create、delete、attrib 等事件类别
步骤
实现此案例需要按照如下步骤进行。
步骤一:安装inotify-tools软件包
1)解包
[root@svr7 ~]# tar xf inotify-tools-3.13.tar.gz -C /usr/src/
2)配置
[root@svr7 ~]# cd /usr/src/inotify-tools-3.13/[root@svr7 inotify-tools-3.13]# ./configure
3)编译
[root@svr7 inotify-tools-3.13]# make
4)安装
[root@svr7 inotify-tools-3.13]# make install
5)检查安装结果(inotifywait程序可用)
[root@svr7 ~]# inotifywait --helpinotifywait 3.13Wait for a particular event on a file or set of files.Usage: inotifywait [ options ] file1 [ file2 ] [ file3 ] [ ... ]Options:-h|--help Show this help text... ..
步骤二:测试inotifywait监控
1)开启监控任务,置入后台
[root@svr7 ~]# inotifywait -mrq -e create,modify,move,attrib,delete /opt &[1] 55564
2)测试/opt/目录下的新建、修改、改名、更改权限、删除文件等事件的响应消息
观察新建文件时的监控信息:
[root@svr7 ~]# touch /opt/a.txt/opt/ CREATE a.txt/opt/ ATTRIB a.txt
观察修改文件内容时的监控信息:
[root@svr7 ~]# echo Hello > /opt/a.txt[root@svr7 ~]# /opt/ MODIFY a.txt/opt/ MODIFY a.txt
观察将文件改名时的监控信息:
[root@svr7 ~]# mv /opt/a.txt /opt/b.txt/opt/ MOVED_FROM a.txt/opt/ MOVED_TO b.txt
观察修改文件权限时的监控信息:
[root@svr7 ~]# chmod 600 /opt/b.txt/opt/ ATTRIB b.txt
观察删除文件时的监控信息:
[root@svr7 ~]# rm -rf /opt/b.txt /opt/ DELETE b.txt
3)停止监控任务
[root@svr7 ~]# kill -9 %1[1]+ 已杀死 inotifywait -mr -e create,modify,move,attrib,delete /opt