前端开发工程师——ajax
express框架
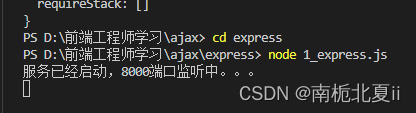
终端输入
npm init --yes
npm i express
请求报文/响应报文


// 1.引入express
const express = require('express');// 2.创建应用对象
const app = express();// 3.创建路由规则
// request:是对请求报文的封装
// response:是对响应报文的封装
app.get('/',(request,response) => {
// 设置响应response.send('hello express');
});// 4.监听端口启动服务
app.listen(8000,() => {console.log("服务已经启动,8000端口监听中。。。");
})
Ajax-get请求
设置server.js服务端
// 1.引入express
const express = require('express');// 2.创建应用对象
const app = express();// 3.创建路由规则
// request:是对请求报文的封装
// response:是对响应报文的封装
app.get('/server',(request,response) => {
// 设置响应头,设置允许跨域response.setHeader('Access-Control-Allow-Origin','*');// 设置响应体response.send("Hello ajax");});// 4.监听端口启动服务
app.listen(8000,() => {console.log("服务已经启动,8000端口监听中。。。");
})
1_get.html客户端页面
<!DOCTYPE html>
<html lang="en">
<head><meta charset="UTF-8"><meta http-equiv="X-UA-Compatible" content="IE=edge"><meta name="viewport" content="width=device-width, initial-scale=1.0"><title>get请求</title><style>#result {width: 200px;height: 100px;border: solid 1px #90b;}</style>
</head>
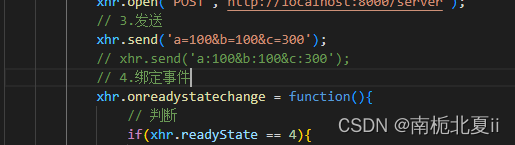
<body><button>点击发送请求</button><div id="result"></div><script>const btn = document.getElementsByTagName('button')[0];const result = document.getElementById("result")// 绑定事件btn.onclick = function(){// ajax步骤// 1.创建对象const xhr = new XMLHttpRequest();// 2.初始化,设置请求方法和urlxhr.open("GET","http://localhost:8000/server");// 3.发送xhr.send();// 4.事件绑定,处理服务端返回的结果//on 当。。。的时候// readystate是xhr对象中的属性,表示状态0,1,2,3,4// change改变xhr.onreadystatechange = function(){// 判断(服务端返回了所有的结果)if(xhr.readyState == 4){// 判断响应状态码 200 404 403 401 500// 其中2xx,表示2开头的都是表示成功if(xhr.status >= 200 && xhr.status < 300){// 处理结果,行 头 空行 体// 1.响应行console.log(xhr.status);//状态码console.log(xhr.statusText);//状态字符串console.log(xhr.getAllResponseHeaders());//所有响应头console.log(xhr.response);//响应体// 设置result文本result.innerHTML = xhr.response;}else{}}}}</script>
</body>
</html>
ajax设置请求参数-get

Ajax—post请求
设置server.js服务端,添加post请求
// 1.引入express
const express = require('express');// 2.创建应用对象
const app = express();// 3.创建路由规则
// request:是对请求报文的封装
// response:是对响应报文的封装
app.get('/server',(request,response) => {
// 设置响应头,设置允许跨域response.setHeader('Access-Control-Allow-Origin','*');// 设置响应体response.send("Hello ajax");});app.post('/server',(request,response) => {// 设置响应头,设置允许跨域response.setHeader('Access-Control-Allow-Origin','*');// 设置响应体response.send("Hello ajax post");});// 4.监听端口启动服务
app.listen(8000,() => {console.log("服务已经启动,8000端口监听中。。。");
})
1_post.html页面
<!DOCTYPE html>
<html lang="en">
<head><meta charset="UTF-8"><meta http-equiv="X-UA-Compatible" content="IE=edge"><meta name="viewport" content="width=device-width, initial-scale=1.0"><title>post请求</title><style>#result {width: 200px;height: 100px;border: solid 1px #903;}</style>
</head>
<body><div id="result"></div><script>// 获取元素对象const result = document.getElementById('result')// 绑定事件:表示只要鼠标经过就会出现ajax响应result.addEventListener('mouseover',function(){// 1.创建对象const xhr = new XMLHttpRequest();// 2.初始化,设置类型与urlxhr.open("POST",'http://localhost:8000/server');// 3.发送xhr.send();// 4.绑定事件xhr.onreadystatechange = function(){// 判断if(xhr.readyState == 4){if(xhr.status >= 200 && xhr.status < 300){// 处理服务端返回的结果result.innerHTML = xhr.response;}}}})</script>
</body>
</html>
ajax设置请求参数-post
post请求头
xhr.setRequestHeader('Content-Type','application/x-www-form-urlencoded')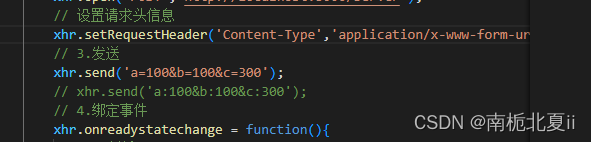
服务端响应JSON数据
服务端server.js
// 1.引入express
const express = require('express');// 2.创建应用对象
const app = express();// 3.创建路由规则
// request:是对请求报文的封装
// response:是对响应报文的封装
app.get('/server',(request,response) => {
// 设置响应头,设置允许跨域response.setHeader('Access-Control-Allow-Origin','*');// 设置响应体response.send("Hello ajax");});
app.get('/json-server',(request,response) => {// 设置响应头,设置允许跨域response.setHeader('Access-Control-Allow-Origin','*');// 响应一个数据const data = {'name':'ivy'};// 对对象进行字符串转换let str = JSON.stringify(data);// 设置响应体response.send(str)});app.post('/server',(request,response) => {// 设置响应头,设置允许跨域response.setHeader('Access-Control-Allow-Origin','*');// 设置响应体response.send("Hello ajax post");});// 4.监听端口启动服务
app.listen(8000,() => {console.log("服务已经启动,8000端口监听中。。。");
})
1_json.html客户端
<!DOCTYPE html>
<html lang="en">
<head><meta charset="UTF-8"><meta http-equiv="X-UA-Compatible" content="IE=edge"><meta name="viewport" content="width=device-width, initial-scale=1.0"><title>json</title><style>#result {width: 300px;height: 100px;border: solid 1px #90e}</style>
</head>
<body><div id="result"></div><script>// 获取元素const result = document.getElementById('result')// 绑定键盘按下事件window.onkeydown = function(){// 发送请求const xhr = new XMLHttpRequest();// 初始化xhr.open("GET","http://127.0.0.1:8000/json-server")// 发送xhr.send()// 绑定事件xhr.onreadystatechange = function(){if(xhr.readyState == 4){if(xhr.status >= 200 && xhr.status < 300){// console.log(xhr.response);// result.innerHTML = xhr.response;// 手动对数据转化let data = JSON.parse(xhr.response)console.log(data)result.innerHTML = data.name;}}}}</script>
</body>
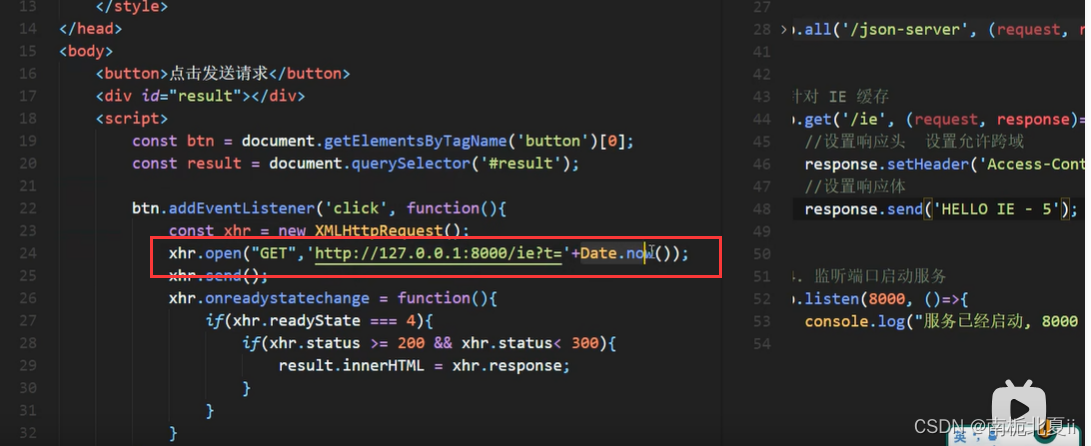
</html>解决ie浏览器缓存问题
网络超时与异常问题
server.js
// 1.引入express
const express = require('express');// 2.创建应用对象
const app = express();// 3.创建路由规则
// request:是对请求报文的封装
// response:是对响应报文的封装
app.get('/server',(request,response) => {
// 设置响应头,设置允许跨域response.setHeader('Access-Control-Allow-Origin','*');// 设置响应体response.send("Hello ajax");});
app.get('/json-server', (request, response) => {// 设置响应头,设置允许跨域response.setHeader('Access-Control-Allow-Origin', '*');// 响应一个数据const data = {'name': 'ivy'};// 对对象进行字符串转换let str = JSON.stringify(data);// 设置响应体response.send(str)});
app.get('/delay', (request, response) => {// 设置响应头,设置允许跨域response.setHeader('Access-Control-Allow-Origin', '*');// 延时响应setTimeout(() => {// 设置响应体response.send("延时响应");},3000)});app.post('/server', (request, response) => {// 设置响应头,设置允许跨域response.setHeader('Access-Control-Allow-Origin', '*');// 设置响应体response.send("Hello ajax post");});// 4.监听端口启动服务
app.listen(8000, () => {console.log("服务已经启动,8000端口监听中。。。");
})
network.html
<!DOCTYPE html>
<html lang="en">
<head><meta charset="UTF-8"><meta http-equiv="X-UA-Compatible" content="IE=edge"><meta name="viewport" content="width=device-width, initial-scale=1.0"><title>网络超时与异常</title><style>#result {width: 300px;height: 100px;border: solid 1px #90e}</style>
</head>
<body><div id="result"></div><script>// 获取元素const result = document.getElementById('result')// 绑定键盘按下事件window.onkeydown = function(){// 发送请求const xhr = new XMLHttpRequest();// 超时设置2s设置xhr.timeout = 2000;// 超时回调xhr.ontimeout = function(){alert("网络异常,请稍后重试");}// 网络异常回调xhr.onerror = function(){alert("你的网络似乎出现一些问题")}// 初始化xhr.open("GET","http://127.0.0.1:8000/delay")// 发送xhr.send()// 绑定事件xhr.onreadystatechange = function(){if(xhr.readyState == 4){if(xhr.status >= 200 && xhr.status < 300){// console.log(xhr.response);// result.innerHTML = xhr.response;// 手动对数据转化let data = JSON.parse(xhr.response)console.log(data)result.innerHTML = data.name;}}}}</script>
</body>
</html>
取消请求问题
<!DOCTYPE html>
<html lang="en">
<head><meta charset="UTF-8"><meta http-equiv="X-UA-Compatible" content="IE=edge"><meta name="viewport" content="width=device-width, initial-scale=1.0"><title>Document</title>
</head>
<body><button>点击发送</button><button>点击取消</button><script>// 获取元素const btns = document.querySelectorAll("button")let x = nullbtns[0].onclick = function(){x = new XMLHttpRequest();x.open("GET","http://127.0.0.1:8000/delay");x.send();}// 取消事件btns[1].onclick = function(){x.abort()}</script>
</body>
</html>