【React】React-redux多组件间的状态传递
效果(部分完整代码在最底部):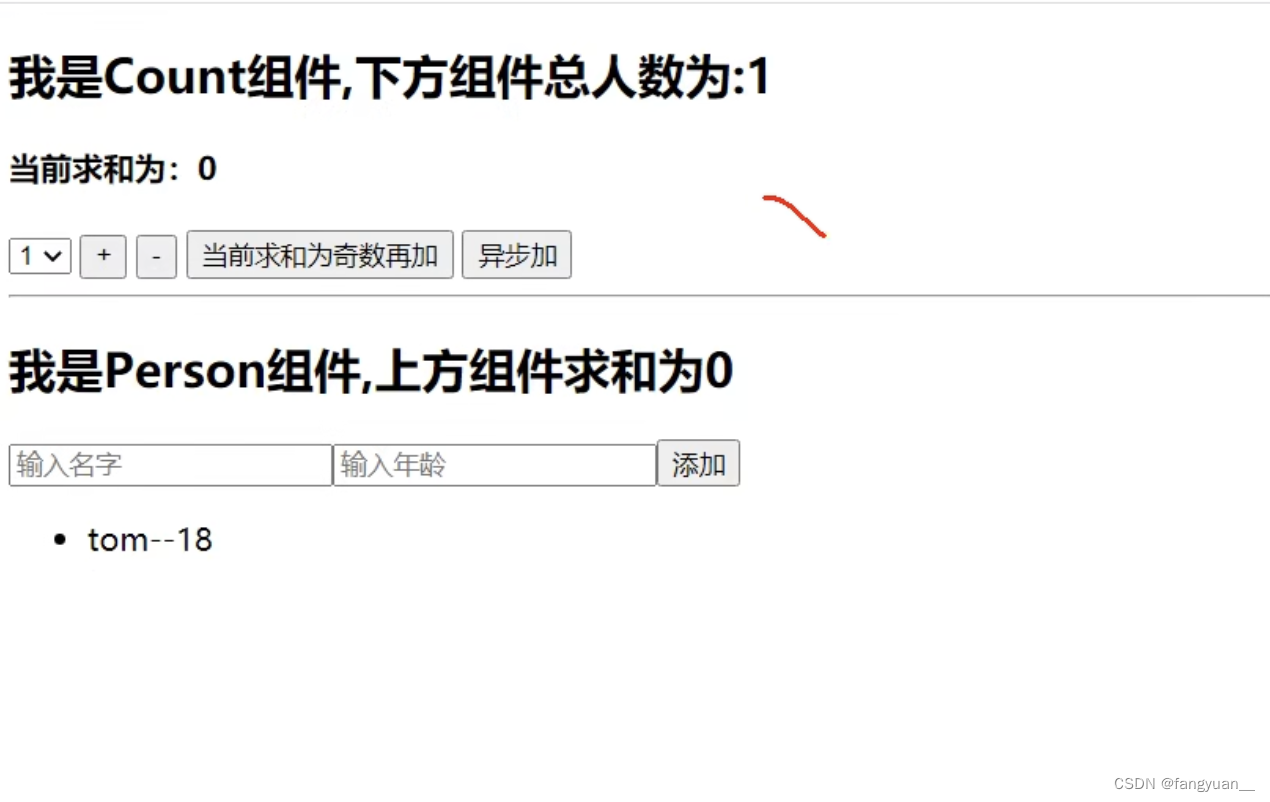
- 编写 Person 组件
上面的 Count 组件,已经在前面几篇写过了,也可以直接翻到最底部看
首先我们需要在 containers 文件夹下编写 Person 组件的容器组件
首先我们需要编写 index.jsx 文件,在这个文件里面编写 Person 组件的 UI 组件,并使用 connect 函数将它包装,映射它的状态和方法
编写 UI 组件架构
<div><h2>我是 Person 组件,上方组件求和为:{this.props.countAll}</h2><input ref={c => this.nameNode = c} type="text" placeholder="输入名字" /><input ref={c => this.ageNode = c} type="text" placeholder="输入年龄" /><button onClick={this.addPerson}>添加</button><ul>{this.props.persons.map((p) => {return <li key={p.id}> {p.name}--{p.age}</li>})}</ul>
</div>
我们可以看到这里采用了 ref 来获取到当前事件触发的节点,并通过 this.addPerson 的方式给按钮绑定了一个点击事件
编写点击事件回调
addPerson = () => {const name = this.nameNode.valueconst age = this.ageNode.valueconst personObj = { id: nanoid(), name, age }this.props.add(personObj)this.nameNode.value = ''this.ageNode.value = ''
}
在这里我们需要处理输入框中的数据,并且将这些数据用于创建一个 action 对象,传递给 store 进行状态的更新
在这里我们需要回顾的是,这里我们使用了一个 nanoid 库,这个库我们之前也有使用过
下载,引入,暴露
import { nanoid } from 'nanoid'
暴露的 nanoid 是一个函数,我们每一次调用时,都会返回一个不重复的数,用于确保 id 的唯一性,同时在后面的 map 遍历的过程中,我们将 id 作为了 key 值,这样也确保了 key 的唯一性,关于 key 的作用,可以看看 diffing 算法的文章
状态管理
在这里我们需要非常熟练的采用 this.props.add 的方式来更新状态
那么它是如何实现状态更新的呢?我们来看看
在我们调用 connect 函数时,我们第一次调用时传入的第二个参数,就是用于传递方法的,我们传递了一个 add 方法
export default connect(state => ({ persons: state.person, countAll: state.count }),//映射状态{ add: createAddPersonAction }
)(Person);
它的原词是:mapDispatchToProps
我的理解是,传入的东西会被映射映射成 props 对象下的方法,这也是我们能够在 props 下访问到 add 方法的原因
对于这一块 connect ,我们必须要能够形成自己的理解,这里非常的重要,它实现了数据的交互,不至于一个组件,而是全部组件
我是如何理解的呢?
想象一个 store 仓库,在我们这个案例当中,Count 组件需要存放 count 值在 store 中,Person 组件需要存放新增用户对象在 store 中,我们要把这两个数据存放在一个对象当中。当某个组件需要使用 store 中的值时,可以通过 connect 中的两个参数来获取,例如这里我们需要使用到 Count 组件的值,可以通过 .count 来从 store 中取值。
也就是说,所有的值都存放在 store 当中,通过点运算符来获取,所有的操作 store 的方法都需要通过 action 来实现。当前组件需要使用的数据都需要在 connect 中暴露
- 编写 reducer
首先,我们需要明确 reducer 的作用,它是用来干什么的?
根据操作类型来指定状态的更新
也就是说当我们点击了添加按钮后,会将输入框中的数据整合成一个对象,作为当前 action 对象的 data 传递给 reducer
我们可以看看我们编写的 action 文件,和我们想的一样
import { ADD_PERSON } from "../constant";
// 创建一个人的action 对象
export const createAddPersonAction = (personObj) => ({type: ADD_PERSON,data: personObj,
});
当 reducer 接收到 action 对象时,会对 type 进行判断
export default function personReducer(preState = initState, action) {const { type, data } = action;switch (type) {case ADD_PERSON:return [data,...preState]default:return preState}
}
一般都采用 switch 来编写
这里有个值得注意的地方是,这个 personReducer 函数是一个纯函数,什么是纯函数呢?这个是高阶函数部分的知识了,纯函数是一个不改变参数的函数,也就是说,传入的参数是不能被改变的。
为什么要提这个呢?在我们 return 时,有时候会想通过数组的 API 来在数组前面塞一个值,不也可以吗?
但是我们要采用 unshirt 方法,这个方法是会改变原数组的,也就是我们传入的参数会被改变,因此这样的方法是不可行的!
- 打通数据共享
写到这里,或许已经写完了,但是有些细节还是需要注意一下
采用 Redux 来进行组件的数据交互真的挺方便。
我们可以在 Count 组件中引入 Person 组件存在 store 中的状态。
export default connect(state => ({ count: state.count, personNum: state.person.length }),{...}
)(Count)
在这里我们将 store 中的 person 数组的长度暴露出来这样 Count 组件就可以直接通过 props 来使用了
同样的我们也可以在 Person 组件中使用 Count 组件的值
从而实现了我们的这个 Demo
- 最终优化
利用对象的简写方法,将键名和键值同名,从而只写一个名即可
合并 reducer ,我们可以将多个 reducer文件 写在一个 index 文件当中,需要采用 combineReducers 来合并
完整代码:
//reducers/count.js
/* 1.该文件是用于创建一个为Count组件服务的reducer,reducer的本质就是一个函数2.reducer函数会接到两个参数,分别为:之前的状态(preState),动作对象(action)
*/
import {INCREMENT,DECREMENT} from '../constant'const initState = 0 //初始化状态
export default function countReducer(preState=initState,action){// console.log('countReducer@#@#@#');//从action对象中获取:type、dataconst {type,data} = action//根据type决定如何加工数据switch (type) {case INCREMENT: //如果是加return preState + datacase DECREMENT: //若果是减return preState - datadefault:return preState}
}
//reducers/person.js
import {ADD_PERSON} from '../constant'//初始化人的列表
const initState = [{id:'001',name:'tom',age:18}]export default function personReducer(preState=initState,action){// console.log('personReducer@#@#@#');const {type,data} = actionswitch (type) {case ADD_PERSON: //若是添加一个人return [data,...preState]default:return preState}
}
//store.js
/* 该文件专门用于暴露一个store对象,整个应用只有一个store对象
*///引入createStore,专门用于创建redux中最为核心的store对象
import {createStore,applyMiddleware,combineReducers} from 'redux'
//引入为Count组件服务的reducer
import countReducer from './reducers/count'
//引入为Count组件服务的reducer
import personReducer from './reducers/person'
//引入redux-thunk,用于支持异步action
import thunk from 'redux-thunk'//汇总所有的reducer变为一个总的reducer
const allReducer = combineReducers({he:countReducer,rens:personReducer
})//暴露store
export default createStore(allReducer,applyMiddleware(thunk))
//containers/count/index.js
import React, { Component } from 'react'
//引入action
import {createIncrementAction,createDecrementAction,createIncrementAsyncAction
} from '../../redux/actions/count'
//引入connect用于连接UI组件与redux
import {connect} from 'react-redux'//定义UI组件
class Count extends Component {state = {carName:'奔驰c63'}//加法increment = ()=>{const {value} = this.selectNumberthis.props.jia(value*1)}//减法decrement = ()=>{const {value} = this.selectNumberthis.props.jian(value*1)}//奇数再加incrementIfOdd = ()=>{const {value} = this.selectNumberif(this.props.count % 2 !== 0){this.props.jia(value*1)}}//异步加incrementAsync = ()=>{const {value} = this.selectNumberthis.props.jiaAsync(value*1,500)}render() {//console.log('UI组件接收到的props是',this.props);return (<div><h2>我是Count组件,下方组件总人数为:{this.props.renshu}</h2><h4>当前求和为:{this.props.count}</h4><select ref={c => this.selectNumber = c}><option value="1">1</option><option value="2">2</option><option value="3">3</option></select> <button onClick={this.increment}>+</button> <button onClick={this.decrement}>-</button> <button onClick={this.incrementIfOdd}>当前求和为奇数再加</button> <button onClick={this.incrementAsync}>异步加</button> </div>)}
}//使用connect()()创建并暴露一个Count的容器组件
export default connect(state => ({count:state.he,renshu:state.rens.length}),{jia:createIncrementAction,jian:createDecrementAction,jiaAsync:createIncrementAsyncAction,}
)(Count)//containers/person/index.js
import React, { Component } from 'react'
import {nanoid} from 'nanoid'
import {connect} from 'react-redux'
import {createAddPersonAction} from '../../redux/actions/person'class Person extends Component {addPerson = ()=>{const name = this.nameNode.valueconst age = this.ageNode.valueconst personObj = {id:nanoid(),name,age}this.props.jiaYiRen(personObj)this.nameNode.value = ''this.ageNode.value = ''}render() {return (<div><h2>我是Person组件,上方组件求和为{this.props.he}</h2><input ref={c=>this.nameNode = c} type="text" placeholder="输入名字"/><input ref={c=>this.ageNode = c} type="text" placeholder="输入年龄"/><button onClick={this.addPerson}>添加</button><ul>{this.props.yiduiren.map((p)=>{return <li key={p.id}>{p.name}--{p.age}</li>})}</ul></div>)}
}export default connect(state => ({yiduiren:state.rens,he:state.he}),//映射状态{jiaYiRen:createAddPersonAction}//映射操作状态的方法
)(Person)本文部分节选自数据共享