<!DOCTYPE html>
<html lang="en">
<head><meta charset="UTF-8"><title>雨特效</title><link rel="stylesheet" href="./style.css">
</head>
<body>
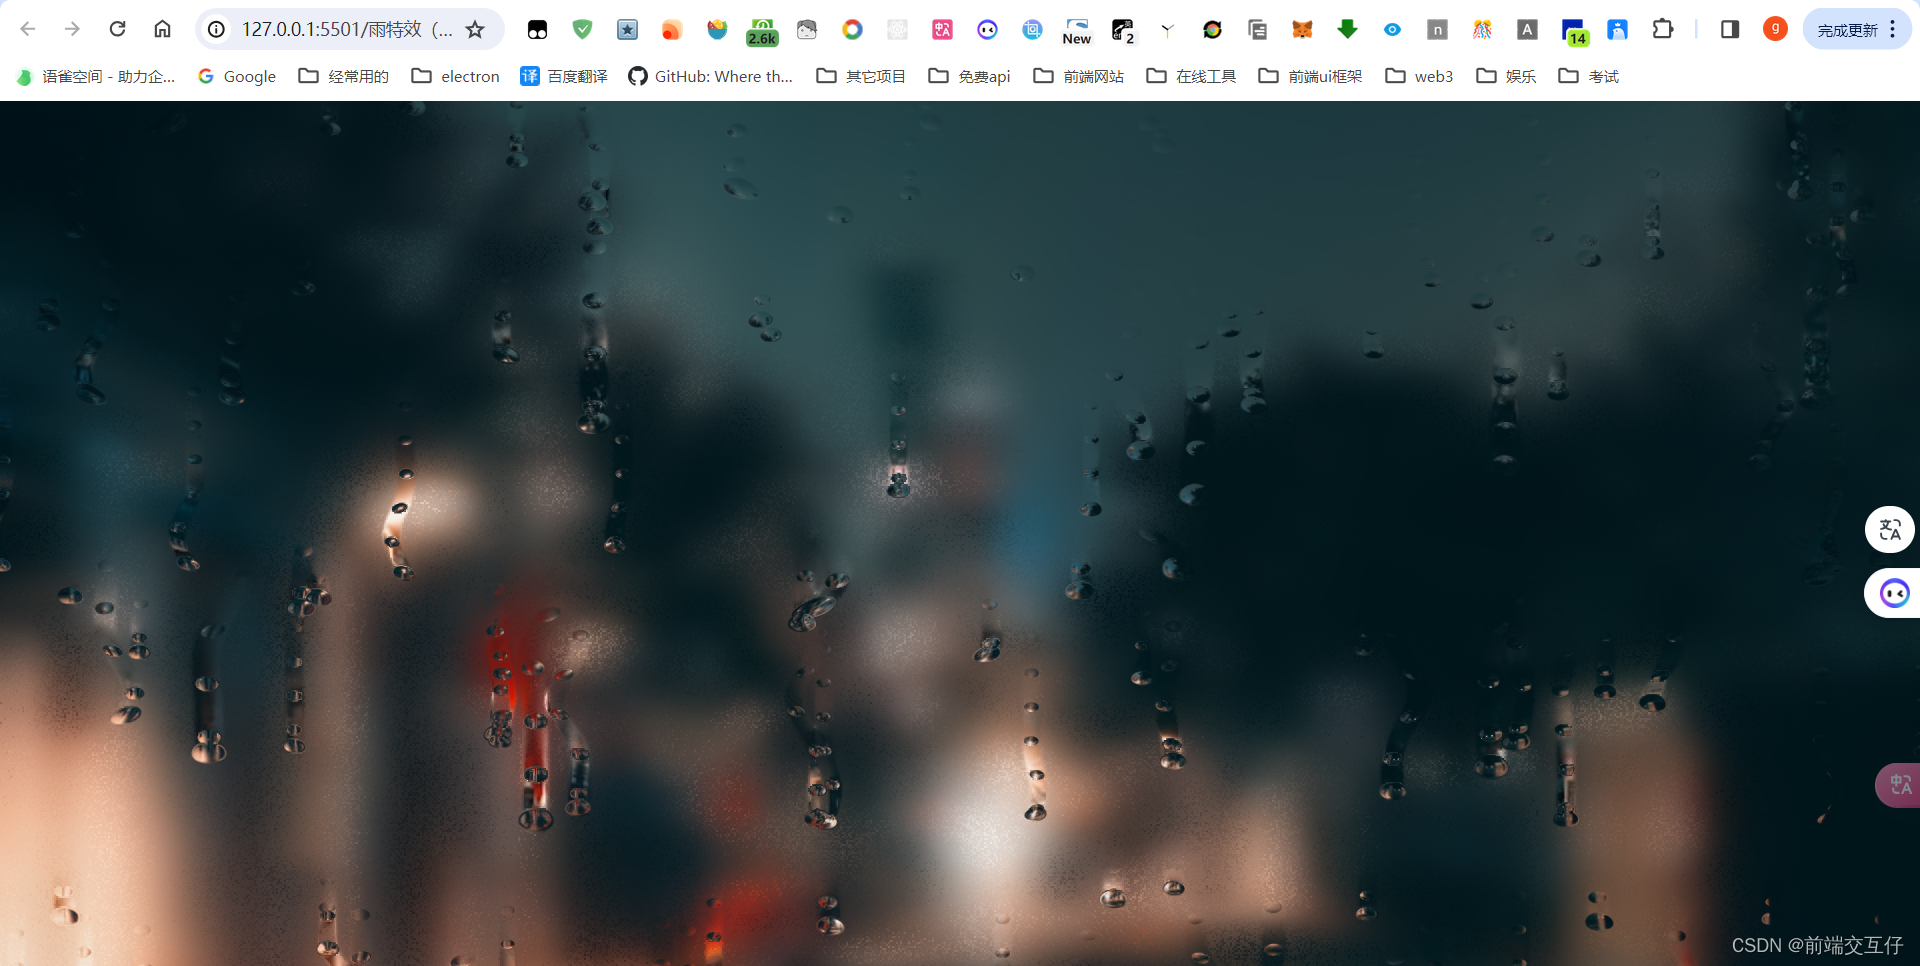
<div id="wrap-texture"><div id="canvas"></div><div class="plane"><img data-sampler="dispImage" id="texture" src="https://source.unsplash.com/MFW8BGYKNIE" crossorigin="anonymous"/></div>
</div>
<script src="https://www.curtainsjs.com/build/curtains.min.js"></script>
<script src="./script.js"></script>
</body>
</html>
window.onload = () => {const shader = {vertex: ` #ifdef GL_ESprecision mediump float;#endif// lib设置的强制属性attribute vec3 aVertexPosition;attribute vec2 aTextureCoord;// lib设置的强制统一,包含模型视图和投影矩阵uniform mat4 uMVMatrix;uniform mat4 uPMatrix;uniform mat4 dispImageMatrix;// 将顶点和纹理坐标传递给着色器varying vec3 vVertexPosition;varying vec2 vTextureCoord;void main() {vec3 vertexPosition = aVertexPosition;gl_Position = uPMatrix * uMVMatrix * vec4(vertexPosition, 1.0);// 设置varyingsvTextureCoord = (dispImageMatrix * vec4(aTextureCoord, 0., 1.)).xy;vVertexPosition = vertexPosition;}`,fragment: `#ifdef GL_ESprecision mediump float;#endif#define PI2 6.28318530718#define PI 3.14159265359#define S(a,b,n) smoothstep(a,b,n)// 获得varyingsvarying vec3 vVertexPosition;varying vec2 vTextureCoord;// 用uniform声明uniform float uTime;uniform vec2 uReso;uniform vec2 uMouse;// 纹理采样器uniform sampler2D dispImage;uniform sampler2D blurImage;// 噪声float N12(vec2 p){p = fract(p * vec2(123.34, 345.45));p += dot(p, p + 34.345);return fract(p.x * p.y);}vec3 Layer(vec2 uv0, float t){vec2 asp = vec2(2., 1.);vec2 uv1 = uv0 * 3. * asp;uv1.y += t * .25;vec2 gv = fract(uv1) - .5;vec2 id = floor(uv1);float n = N12(id);t+= n * PI2;float w = uv0.y * 10.;float x = (n - .5) * .8;x += (.4 - abs(x)) * sin(3. * w) * pow(sin(w), 6.) * .45;float y = -sin(t + sin(t + sin(t) * .5)) * (.5 - .06);y -= (gv.x - x) * (gv.x - x); // sesgar;vec2 dropPos = (gv - vec2(x, y)) / asp; float drop = S(.03, .02, length(dropPos));vec2 trailPos = (gv - vec2(x, t * .25)) / asp; trailPos.y = (fract(trailPos.y * 8.) - .5) / 8.;float trail = S(.02, .015, length(trailPos));float fogTrail = S(-.05, .05, dropPos.y);fogTrail *= S(.5, y, gv.y);trail *= fogTrail;fogTrail *= S(.03, .015, abs(dropPos.x));vec2 off = drop * dropPos + trail * trailPos;return vec3(off, fogTrail);}void main() { float dist = 5.;float blurSize = 5.;float t = mod(uTime * .03, 7200.);vec4 c = vec4(0);vec2 uv = vTextureCoord; vec3 drops = Layer(uv, t);drops += Layer(uv * 1.25 + 7.54, t);drops += Layer(uv * 1.35 + 1.54, t);drops += Layer(uv * 1.57 - 7.54, t);float blur = blurSize * 7. * (1. - drops.z);vec4 col = vec4(0.);int numSamples = 32;float a = N12(uv) * PI2;blur *= .0005;uv += drops.xy * dist;for(int n = 0; n < 32; n++){vec2 off = vec2(sin(a), cos(a)) * blur;float d = fract(sin((float(n) + 1.) * 546.) * 5424.);d = sqrt(d); off *= d;col += texture2D(dispImage, uv + off);a++;}col /= float(numSamples);gl_FragColor = col;}`};const canvasContainer = document.getElementById("canvas");const mouse = {x: 0,y: 0};const webGLCurtain = new Curtains({container: "canvas"});const planeElement = document.getElementsByClassName("plane")[0];const params = {vertexShader: shader.vertex, fragmentShader: shader.fragment, widthSegments: 40,heightSegments: 40, uniforms: {time: {name: "uTime", type: "1f", value: 0},mousepos: {name: "uMouse",type: "2f",value: [mouse.x, mouse.y]},resolution: {name: "uReso",type: "2f",value: [innerWidth, innerHeight]}}};const plane = webGLCurtain.addPlane(planeElement, params);plane.onRender(() => {plane.uniforms.time.value++; plane.uniforms.resolution.value = [innerWidth, innerHeight];});canvasContainer.addEventListener("mousemove", ({ clientX, clientY }) => {mouse.x = clientX;mouse.y = clientY;plane.uniforms.mousepos.value = [mouse.x, mouse.y];});};
body {position: relative;width: 100%;height: 100vh;margin: 0;overflow: hidden;
}#wrap-texture {position: relative;
}#canvas {position: absolute;top: 0;right: 0;bottom: 0;left: 0;
}.plane {width: 100%;height: 100vh;
}.plane img {display: none;
}