自然语言处理-基于预训练模型的方法-chapter3基础工具集与常用数据集
文章目录
- 3.1NLTK工具集
- 3.1.1常用语料库和词典资源
- 3.1.2常见自然语言处理工具集
- 3.2LTP工具集
- 3.3pytorch基础
- 3.3.1张量基本概念
- 3.3.2张量基本运算
- 3.3.3自动微分
- 3.3.4调整张量形状
- 3.3.5广播机制
- 3.3.6索引与切片
- 3.3.7降维与升维
- 3.4大规模预训练模型
3.1NLTK工具集
3.1.1常用语料库和词典资源
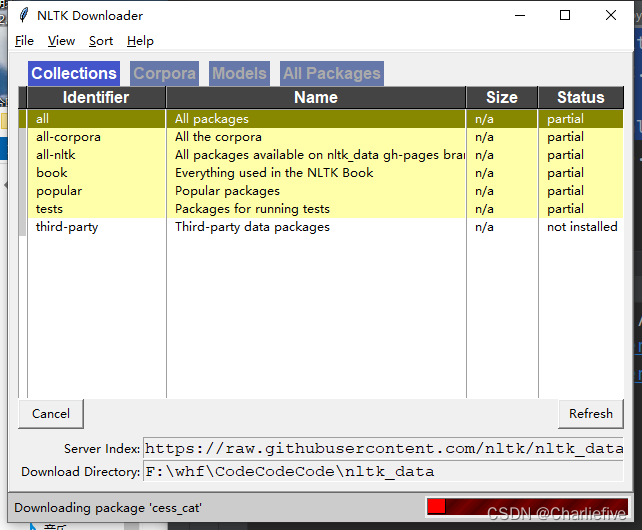
- 下载语料库
import nltk
nltk.download()
- 停用词
from nltk.corpus import stopwordsprint(stopwords.words('english'))['i', 'me', 'my', 'myself', 'we', 'our', 'ours', 'ourselves',
- 常用词典
(1)wordNet
from nltk.corpus import wordnet
syns = wordnet.synsets("bank")
print(syns[0].name())
print(syns[0].definition())
print(syns[0].examples())
print(syns[0].hypernyms())bank.n.01
sloping land (especially the slope beside a body of water)
['they pulled the canoe up on the bank', 'he sat on the bank of the river and watched the currents']
[Synset('slope.n.01')]
3.1.2常见自然语言处理工具集
- 分句
将一个长文档分成若干句子。
from nltk.corpus import gutenberg
from nltk.tokenize import sent_tokenize
text = gutenberg.raw("austen-emma.txt")
sentences = sent_tokenize(text)
print(sentences[0])
3.2LTP工具集
from ltp import LTP
ltp = LTP()segment, hidden = ltp.seg(["南京市长江大桥。"])
print(segment)AttributeError: 'LTP' object has no attribute 'seg'
出现一些问题...
3.3pytorch基础
PyTorch是一个基于张量(Tensor)的数学运算工具包,提供了两个高级功能
- 具有强大的GPU(图形处理单元,也叫显卡)加速的张量计算功能
- 能够自动进行微分计算,从而可以使用基于梯度的方法对模型参数进行优化。
3.3.1张量基本概念
import torchprint(torch.empty(2, 3))
print(torch.rand(2, 3)) # 0-1均匀
print(torch.randn(2, 3))    # 标准正态生成
print(torch.zeros(2, 3, dtype=torch.long))  # 设置数据类型
print(torch.zeros(2, 3, dtype=torch.double))
print(torch.tensor([[1.0, 2.0, 3.0],[4.0, 5.0, 6.0]
])) # 自定义
print(torch.arange(10)) # 排序tensor([[-8.5596e-30,  8.4358e-43, -8.5596e-30],[ 8.4358e-43, -1.1837e-29,  8.4358e-43]])
tensor([[0.7292, 0.9681, 0.8636],[0.3833, 0.8089, 0.5729]])
tensor([[-1.7307,  1.2082,  1.9423],[ 0.2461,  2.3273,  0.1628]])
tensor([[0, 0, 0],[0, 0, 0]])
tensor([[0., 0., 0.],[0., 0., 0.]], dtype=torch.float64)
tensor([[1., 2., 3.],[4., 5., 6.]])
tensor([0, 1, 2, 3, 4, 5, 6, 7, 8, 9])Process finished with exit code 0使用gpu
print(torch.rand(2, 3).cuda())
print(torch.rand(2, 3).to("cuda"))
print(torch.rand(2, 3), device="cuda")
3.3.2张量基本运算
pytorch的运算说白了就是将数据保存在向量中进行运算。
±*/
x = torch.tensor([1, 2, 3], dtype=torch.double)
y = torch.tensor([4, 5, 6], dtype=torch.double)
print(x + y)
print(x - y)
print(x * y)
print(x / y)
print(x.dot(y))
print(x.sin())
print(x.exp())tensor([5., 7., 9.], dtype=torch.float64)
tensor([-3., -3., -3.], dtype=torch.float64)
tensor([ 4., 10., 18.], dtype=torch.float64)
tensor([0.2500, 0.4000, 0.5000], dtype=torch.float64)
tensor(32., dtype=torch.float64)
tensor([0.8415, 0.9093, 0.1411], dtype=torch.float64)
tensor([ 2.7183,  7.3891, 20.0855], dtype=torch.float64)
x = torch.tensor([[1.0, 2.0, 3.0],[4.0, 5.0, 6.0]
]) # 自定义
print(x.mean(dim=0))    # 每列取均值
print(x.mean(dim=0, keepdim=True))    # 每列取均值
print(x.mean(dim=1))    # 每行取均值
print(x.mean(dim=1, keepdim=True))    # 每行取均值
y = torch.tensor([[7.0, 8.0, 9.0],[10.0, 11.0, 12.0]
])
print(torch.cat((x, y), dim=0))
print(torch.cat((x, y), dim=1))tensor([2.5000, 3.5000, 4.5000])
tensor([[2.5000, 3.5000, 4.5000]])
tensor([2., 5.])
tensor([[2.],[5.]])
tensor([[ 1.,  2.,  3.],[ 4.,  5.,  6.],[ 7.,  8.,  9.],[10., 11., 12.]])
tensor([[ 1.,  2.,  3.,  7.,  8.,  9.],[ 4.,  5.,  6., 10., 11., 12.]])Process finished with exit code 0
3.3.3自动微分
可自动计算一个函数关于一个变量在某一取值下的导数。
x = torch.tensor([2.], requires_grad=True)
y = torch.tensor([3.], requires_grad=True)
z = (x+y) * (y-2)
print(z)
z.backward()    # 自动调用反向传播算法计算梯度
print(x.grad, y.grad)tensor([5.], grad_fn=<MulBackward0>)
tensor([1.]) tensor([6.])Process finished with exit code 0
3.3.4调整张量形状
x = torch.tensor([2.], requires_grad=True)
y = torch.tensor([3.], requires_grad=True)
z = (x+y) * (y-2)
print(z)
z.backward()    # 自动调用反向传播算法计算梯度
print(x.grad, y.grad)x = torch.tensor([[1.0, 2.0, 3.0],[4.0, 5.0, 6.0]
]) # 自定义
print(x, x.shape)
print(x.view(2, 3))
print(x.view(3, 2))
print(x.view(-1, 3))    # -1就是针对非-1的自动调整
y = torch.tensor([[7.0, 8.0, 9.0],[10.0, 11.0, 12.0]
])
print(y.transpose(0, 1))tensor([5.], grad_fn=<MulBackward0>)
tensor([1.]) tensor([6.])
tensor([[1., 2., 3.],[4., 5., 6.]]) torch.Size([2, 3])
tensor([[1., 2., 3.],[4., 5., 6.]])
tensor([[1., 2.],[3., 4.],[5., 6.]])
tensor([[1., 2., 3.],[4., 5., 6.]])Process finished with exit code 0
3.3.5广播机制
3.3.6索引与切片
3.3.7降维与升维
x = torch.tensor([1.0, 2.0, 3.0, 4.0]
)
print(x.shape)
y = torch.unsqueeze(x, dim=0)
print(y, y.shape)
y = x.unsqueeze(dim=0)
print(y, y.shape)
z = y.squeeze()
print(z, z.shape)torch.Size([4])
tensor([[1., 2., 3., 4.]]) torch.Size([1, 4])
tensor([[1., 2., 3., 4.]]) torch.Size([1, 4])
tensor([1., 2., 3., 4.]) torch.Size([4])