一文带你入门angular(中)
一、angular中的dom操作原生和ViewChild两种方式以及css3动画
1.原生操作
import { Component } from '@angular/core';@Component({selector: 'app-footer',templateUrl: './footer.component.html',styleUrls: ['./footer.component.scss']
})
export class FooterComponent {flag: boolean = truengOnInit() {//在这个生命周期函数里面,组件和指令只是初始化完成,不是dom加载完毕var ownBox: any = document.getElementById("box")ownBox.style.color = "red"//所以dom元素上添加ngIf指令,控制台会报错var ownBox2: any = document.getElementById("box1")ownBox2.style.color = "blue"}ngAfterViewInit(): void {//在这个生命周期函数就可以,因为dom加载完毕,建议dom操作防止此处var ownBox2: any = document.getElementById("box1")ownBox2.style.color = "blue"}
}
<p>footer works!</p>
<div id="box">这是一个盒子
</div><div id="box1" *ngIf="flag">这是第2个盒子
</div>
2.ViewChild操作
//核心模块引入ViewChild
import { Component, ViewChild } from '@angular/core';@Component({selector: 'app-footer',templateUrl: './footer.component.html',styleUrls: ['./footer.component.scss']
})export class FooterComponent {//装饰器获取dom节点,此处相当于把box dom节点赋值给了Box@ViewChild("box") Box: any;constructor() { }ngAfterViewInit(): void {// nativeElement在this.Box打印出后显示的方法console.log(this.Box.nativeElement);// 这样也可以操作this.Box.nativeElement.style.color = "blue"this.Box.nativeElement.style.width = "100px"this.Box.nativeElement.style.height = "100px"this.Box.nativeElement.style.background = "orange"console.log(this.Box.nativeElement.innerHTML);//viewchild方法}
}
<p #box>viewchild方法</p>3.父子组件中通过ViewChild调用子组件的方法
父组件header.component.ts:
import { Component, ViewChild } from '@angular/core';@Component({selector: 'app-header',templateUrl: './header.component.html',styleUrls: ['./header.component.scss']
})
export class HeaderComponent {//装饰器@ViewChild("child") Child: anyngAfterViewInit(): void {this.Child.children()}handle() {//调用子组件里面的方法this.Child.children()}
}
父组件header.component.html:
<p>我是header组件</p>
<app-footer #child></app-footer>
<button (click)="handle()">获取子组件里面的方法</button>
子组件footer.component.ts:
//核心模块引入ViewChild
import { Component, ViewChild } from '@angular/core';@Component({selector: 'app-footer',templateUrl: './footer.component.html',styleUrls: ['./footer.component.scss']
})export class FooterComponent {//装饰器获取dom节点,此处相当于把box dom节点赋值给了Box@ViewChild("box") Box: any;constructor() {}ngAfterViewInit(): void {// nativeElement在this.Box打印出后显示的方法console.log(this.Box.nativeElement);// 这样也可以操作this.Box.nativeElement.style.color = "blue"this.Box.nativeElement.style.width = "100px"this.Box.nativeElement.style.height = "100px"this.Box.nativeElement.style.background = "orange"console.log(this.Box.nativeElement.innerHTML);//viewchild方法}children() {console.log("我是子组件里的方法");}
}
4.css3动画
transition.component.html:
<div class="contain">内容区域<button (click)="show()">弹出侧边栏</button>
</div>
<aside id="aside">侧边栏区域
</aside>
transition.component.scss定义样式:
#aside {width: 200px;height: 100%;right: 0;top: 0;background-color: aqua;position: absolute;transform: translate(100%, 0);transition: all 2s;
}
然后在style.scss设置全局样式,解决导航条显现问题:
body {width: 100%;overflow-x: hidden;
}
transition.component.ts获取dom并操作:
import { Component } from '@angular/core';@Component({selector: 'app-transition',templateUrl: './transition.component.html',styleUrls: ['./transition.component.scss']
})
export class TransitionComponent {ngAfterViewInit(): void {}show() {var aside1: any = document.getElementById("aside")aside1.style.transform = "translate(0,0)"}}
二、父子之间通讯以及组件之间通讯
1.父组件给子组件@input
①子组件可以获取父组件的数据
②子组件可以执行父组件的方法
father.component.ts:
import { Component } from '@angular/core';@Component({selector: 'app-father',templateUrl: './father.component.html',styleUrls: ['./father.component.scss']
})
export class FatherComponent {// 1.定义数据msg = "我是通讯信息"child() {alert("我是父组件的方法")}
}
father.component.html:
<p>我是父组件</p>
<hr>
<!-- 2.msg传值 child传方法  this传整个组件 -->
<app-child [msg]="msg" [child]="child" [every]="this"></app-child>
child.component.ts:
// 3.引入Input
import { Component, Input } from '@angular/core';@Component({selector: 'app-child',templateUrl: './child.component.html',styleUrls: ['./child.component.scss']
})
export class ChildComponent {@Input() msg: any@Input() child: any@Input() every: anyconstructor() {}getFather() {this.child()console.log(this.every.msg);}
}
child.component.html:
<!-- 获取父组件信息 -->
<p>我是子组件--{{msg}}</p>
<button (click)="getFather()">执行父组件传过来的方法</button>
2.子组件给父组件传值@ViewChild
①父组件可以获取子组件的数据
②父组件可以获取子组件的方法
father.compoent.ts:
import { Component, ViewChild } from '@angular/core';@Component({selector: 'app-father',templateUrl: './father.component.html',styleUrls: ['./father.component.scss']
})
export class FatherComponent {@ViewChild("child") child: anygetChild() {this.child.child()}
}
father.compoent.html:
<p>我是父组件--{{child.msg}}</p>
<button (click)="getChild()">获取子组件里面的方法</button>
<hr><app-child #child></app-child>
child.compoent.ts:
import { Component } from '@angular/core';@Component({selector: 'app-child',templateUrl: './child.component.html',styleUrls: ['./child.component.scss']
})
export class ChildComponent {// 定义数据msg = "我是子组件的msg"constructor() {}child() {alert("我是子组件的方法")}
}
child.compoent.html:
<p>我是子组件</p>效果图:

3.子组件通过@Output触发父组件的方法
child.component.ts:
// 1.引入Output,EventEmitter
import { Component, Output, EventEmitter } from '@angular/core';@Component({selector: 'app-child',templateUrl: './child.component.html',styleUrls: ['./child.component.scss']
})
export class ChildComponent {//2.new一个实例@Output() public outer = new EventEmitter()constructor() {}sendFather() {alert(1111)this.outer.emit("我是子组件的数据")}
}
child.component.html:
<p>我是子组件</p>
<button (click)="sendFather()">通过@Output触发父组件方法</button>
father.component.ts:
import { Component, ViewChild } from '@angular/core';@Component({selector: 'app-father',templateUrl: './father.component.html',styleUrls: ['./father.component.scss']
})
export class FatherComponent {@ViewChild("child") child: anygetChild() {this.child.child()}run(e: any) {alert("我是父组件的方法")console.log(e);//获取到的时emit过来的数据}
}
father.component.html:
<p>我是父组件</p>
<button (click)="getChild()">获取子组件里面的方法</button>
<hr>
<!-- 注意outer要和@Output() public outer = new EventEmitter()里面的outer一致 -->
<app-child #child (outer)="run($event)"></app-child>
4.非父子组件传值:
1.组件之间传值可以使用localstorage
2.共享方法可以使用service(可参考上篇使用)
三、生命周期函数
这里只讲一下使用,详细钩子请参考官网:Angular - 生命周期钩子
import { Component, ViewChild } from '@angular/core';@Component({selector: 'app-header',templateUrl: './header.component.html',styleUrls: ['./header.component.scss']
})
export class HeaderComponent {constructor() {console.log("0-constructor---除了使用简单的值对局部变量进行初始化之外,什么都不用做");}ngOnChanges() {console.log("1-ngOnChanges---当被绑定的输入属性的值发生变化时调用,父子传值时会被触发");}ngOnInit() {console.log("2-ngOnInit---请求数据一般放在这里");}ngDoCheck() {console.log("3-ngDoCheck---检测,并在angular发生无法或者不愿自己检测的变化时作出反应");}ngAfterContentInit() {console.log("4-ngAfterContentInit---当把内容投影到组件之后调用");}ngAfterContentChecked() {console.log("5-ngAfterContentChecked---每次完成被投影组件内容的变更检测之后调用");}ngAfterViewInit() {console.log("6-ngAfterViewInit---初始化完组件视图及其子视图之后调用,dom操作放在这个里面");}ngAfterViewChecked() {console.log("7-ngAfterViewChecked---每次完成组件视图和子视图的变更检测之后调用");}ngOnDestroy() {console.log("8-ngOnDestroy---销毁");}
}
四、RxJS(类似于vue中的promise)
RxJS是 ReactiveX编程理念的JavaScript版本。ReactiveX来自微软,它是一种针对异步数据流的编程。简单来说,它将一切数据,包括HTTP请求,DOM事件或者普通数据等包装成流的形式,然后用强大丰富的操作符对流进行处理,使你能以同步编程的方式处理异步数据,并组合不同的操作符来轻松优雅的实现你所需要的功能。
RxJS是一种针对异步数据流编程工具,或者叫响应式扩展编程;可不管如何解释RxlS其目标就是异步编程,Angular引入 RxJS为了就是让异步可控、更简单。RxlS里面提供了很多模块。这里我们主要使用RxJS里面最常用的Observable和fromEvent。
目前常见的异步编程的几种方法:
1.回调函数
comoon.service.ts:
import { Injectable } from '@angular/core';@Injectable({providedIn: 'root'
})
export class ComoonService {constructor() {}out() {return "service"}//解决方式,传入回调函数data(cb: any) {setTimeout(() => {var data = "张三"// return datacb(data)}, 1000)}
}
header.component.ts:
import { Component } from '@angular/core';
import { ComoonService } from "../../services/comoon.service"
@Component({selector: 'app-header',templateUrl: './header.component.html',styleUrls: ['./header.component.scss']
})
export class HeaderComponent {constructor(public res: ComoonService) {}ngOnInit() {// let str = this.res.data()//undefined,获取不到service里的异步// console.log(str);this.res.data((data: any) => {console.log(data);//张三})}
}
2.事件监听/发布订阅
3.promise
comoon.service.ts:
import { Injectable } from '@angular/core';@Injectable({providedIn: 'root'
})
export class ComoonService {constructor() {}PromiseData() {return new Promise((resolve, reject) => {setTimeout(() => {var username = "张三"resolve(username)}, 1000)})}
}
header.component.ts:
import { Component } from '@angular/core';
import { ComoonService } from "../../services/comoon.service"
@Component({selector: 'app-header',templateUrl: './header.component.html',styleUrls: ['./header.component.scss']
})
export class HeaderComponent {constructor(public res: ComoonService) {}ngOnInit() {let getData = this.res.PromiseData()getData.then((data) => {console.log(data);//张三})}
}
4.Rxjs
comoon.service.ts:
import { Injectable } from '@angular/core';
//1.引入Observable
import { Observable } from "rxjs"
@Injectable({providedIn: 'root'
})
export class ComoonService {constructor() {}// 2.使用,其中observe为参数可以自定义RxjsData() {return new Observable((observe) => {setTimeout(() => {var username = "张三"observe.next(username)}, 1000)})}
}
header.component.ts:
import { Component } from '@angular/core';
import { ComoonService } from "../../services/comoon.service"
@Component({selector: 'app-header',templateUrl: './header.component.html',styleUrls: ['./header.component.scss']
})
export class HeaderComponent {constructor(public res: ComoonService) {}ngOnInit() {var RxjsData = this.res.RxjsData()// 通过subscribe返回数据RxjsData.subscribe((data) => {console.log(data);})}
}
从上面例子我们感觉promise和 RxJS 的用法基本相似。其实Rxjs相比promise要强大很多。比如Rxjs中可以中途撤回、Rxjs可以发射多个值、RxJS提供了多种工具函数等等。
5. Rxjs unsubscribe取消订阅
promise的创建之后,动作是无法撤回的。Observable不一样,动作可以通过unsbscribe()方法中途撤回,而且Observable在内部做了智能的处理。
header.component.ts:
import { Component } from '@angular/core';
import { ComoonService } from "../../services/comoon.service"
@Component({selector: 'app-header',templateUrl: './header.component.html',styleUrls: ['./header.component.scss']
})
export class HeaderComponent {constructor(public res: ComoonService) {}ngOnInit() {var RxjsData = this.res.RxjsData()// 通过subscribe返回数据var result = RxjsData.subscribe((data) => {console.log(data);})// 取消订阅,注意定时器时间要小于service定时器的时间setTimeout(() => {result.unsubscribe()}, 1000)}
}
6. Rxjs订阅后多次执行
如果我们想让异步里面的方法多次执行,这一点 Promise是做不到的,对于Promise来说,最终结果要么resole(兑现)、要么reject(拒绝),而且都只能触发一次。如果在同一个Promise 对象上多次调用resolve方法,则会抛异常。而 Observable不一样,它可以不断地触发下一个值,就像 next()这个方法的名字所暗示的那样。
comoon.service.ts:
import { Injectable } from '@angular/core';
//1.引入Observable
import { Observable } from "rxjs"
@Injectable({providedIn: 'root'
})
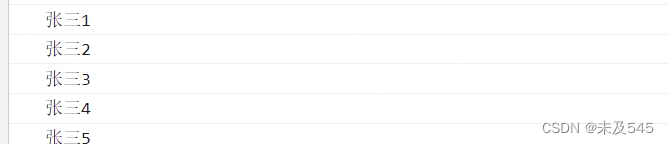
export class ComoonService {constructor() {}RxjsData() {let num = 0return new Observable((observe) => {setInterval(() => {num++var username = "张三" + numobserve.next(username)}, 1000)})}
}header.component.ts:
import { Component } from '@angular/core';
import { ComoonService } from "../../services/comoon.service"
@Component({selector: 'app-header',templateUrl: './header.component.html',styleUrls: ['./header.component.scss']
})
export class HeaderComponent {constructor(public res: ComoonService) {}ngOnInit() {var RxjsData = this.res.RxjsData()// 通过subscribe返回数据var result = RxjsData.subscribe((data) => {console.log(data);})}
}
以上效果promise只执行一次。