C#图像处理OpenCV开发指南(CVStar,07)——通用滤波(Filter2D)的实例代码
1 函数定义
void Filter2D (Mat src,
Mat dst,
int ddepth,
InputArray kernel,
Point anchor = Point(-1,-1),
double delta = 0,
int borderType = BORDER_DEFAULT
)
1.1 原型
#include <opencv2/imgproc.hpp>
Convolves an image with the kernel.
使用内核对图像进行卷积。
The function applies an arbitrary linear filter to an image. In-place operation is supported. When the aperture is partially outside the image, the function interpolates outlier pixel values according to the specified border mode.
该函数将任意线性滤波器应用于图像。支持就地操作。当光圈部分位于图像之外时,该函数会根据指定的边界模式对异常像素值进行插值。
The function does actually compute correlation, not the convolution:

That is, the kernel is not mirrored around the anchor point. If you need a real convolution, flip the kernel using flip and set the new anchor to (kernel.cols - anchor.x - 1, kernel.rows - anchor.y - 1).
The function uses the DFT-based algorithm in case of sufficiently large kernels (~11 x 11 or larger) and the direct algorithm for small kernels.
1.2 参数说明 Parameters
- src input image. 输入图像。
- dst output image of the same size and the same number of channels as src. 输出与src具有相同大小和相同通道数的图像。
- ddepth desired depth of the destination image, see combinations 目标图像的所需深度,请参阅组合
- kernel convolution kernel (or rather a correlation kernel), a single-channel floating point matrix; if you want to apply different kernels to different channels, split the image into separate color planes using split and process them individually. 核卷积核(或者更确切地说是相关核)、单通道浮点矩阵;如果要将不同的内核应用于不同的通道,请使用split将图像拆分为单独的颜色平面,然后分别进行处理。
- anchor anchor of the kernel that indicates the relative position of a filtered point within the kernel; the anchor should lie within the kernel; default value (-1,-1) means that the anchor is at the kernel center. 所述内核的锚定锚,所述锚定锚指示所述内核内的滤波点的相对位置;锚应该位于内核内;默认值(-1,-1)表示锚点位于内核中心。
- delta optional value added to the filtered pixels before storing them in dst. 可选值,在将滤波像素存储在dst中之前添加到滤波像素。
- borderType pixel extrapolation method, see BorderTypes. BORDER_WRAP is not supported. 像素外推法,请参见BorderTypes。不支持BORDER_WRAP。
2 代码解释
2.1 核心代码
private void Filter2D(object? sender, EventArgs? e)
{Mat src = Cv2.ImRead(sourceImage);Mat dst = new Mat();// 自定义卷积核(通用过滤)InputArray arr = InputArray.Create<float>(new float[3, 3] {{ 0, -1, 0 },{ -1, 5, -1 },{ 0, -1, 0 }});Cv2.Filter2D(src: src,dst: dst,ddepth: -1,kernel: arr,anchor: new OpenCvSharp.Point(-1, -1),delta: 0,borderType: BorderTypes.Default);picResult.Image = CVUtility.Mat2Bitmap(dst);PicAutosize(picResult);
}
通过修改 arr 卷积核矩阵,可获得不同的效果。
2.2 Form1.cs 完整源程序
using OpenCvSharp;#pragma warning disable CS8602namespace Legal.Truffer.CVStar
{public partial class Form1 : Form{string[] ImgExtentions = {"*.*|*.*","JPEG|*.jpg;*.jpeg","GIF|*.gif","PNG|*.png","TIF|*.tif;*.tiff","BMP|*.bmp"};private int original_width { get; set; } = 0;private int original_height { get; set; } = 0;private string sourceImage { get; set; } = "";Panel? panelTop { get; set; } = null;Panel? panelBotton { get; set; } = null;PictureBox? picSource { get; set; } = null;PictureBox? picResult { get; set; } = null;Button? btnLoad { get; set; } = null;Button? btnSave { get; set; } = null;Button? btnFunction { get; set; } = null;public Form1(){InitializeComponent();this.Text = "OPENCV C#编程入手教程 POWERED BY 深度混淆(CSDN.NET)";this.StartPosition = FormStartPosition.CenterScreen;GUI();this.Resize += FormResize;}private void FormResize(object? sender, EventArgs? e){if (this.Width < 200) { this.Width = 320; return; }if (this.Height < 200) { this.Height = 320; return; }GUI();}private void GUI(){if (panelTop == null) panelTop = new Panel();panelTop.Parent = this;panelTop.Top = 5;panelTop.Left = 5;panelTop.Width = this.Width - 26;panelTop.Height = 85;panelTop.BorderStyle = BorderStyle.FixedSingle;panelTop.BackColor = Color.FromArgb(200, 200, 255);if (panelBotton == null) panelBotton = new Panel();panelBotton.Parent = this;panelBotton.Top = panelTop.Top + panelTop.Height + 3;panelBotton.Left = 5;panelBotton.Width = panelTop.Width;panelBotton.Height = this.Height - panelBotton.Top - 55;panelBotton.BorderStyle = BorderStyle.FixedSingle;if (picSource == null) picSource = new PictureBox();picSource.Parent = panelBotton;picSource.Left = 5;picSource.Top = 5;picSource.Width = (panelBotton.Width - 10) / 2;picSource.Height = (panelBotton.Height - 10);picSource.BorderStyle = BorderStyle.FixedSingle;if (picResult == null) picResult = new PictureBox();picResult.Parent = panelBotton;picResult.Left = picSource.Left + picSource.Width + 5;picResult.Top = picSource.Top;picResult.Width = picSource.Width;picResult.Height = picSource.Height;picResult.BorderStyle = BorderStyle.FixedSingle;original_width = picSource.Width;original_height = picSource.Height;if (btnLoad == null) btnLoad = new Button();btnLoad.Parent = panelTop;btnLoad.Left = 5;btnLoad.Top = 5;btnLoad.Width = 90;btnLoad.Height = 38;btnLoad.Cursor = Cursors.Hand;btnLoad.Text = "Load";btnLoad.Click += Load_Image;btnLoad.BackColor = Color.LightCoral;if (btnSave == null) btnSave = new Button();btnSave.Parent = panelTop;btnSave.Left = panelTop.Width - btnSave.Width - 25;btnSave.Top = btnLoad.Top;btnSave.Width = 90;btnSave.Height = 38;btnSave.Cursor = Cursors.Hand;btnSave.Text = "Save";btnSave.Click += Save;btnSave.BackColor = Color.LightCoral;if (btnFunction == null) btnFunction = new Button();btnFunction.Parent = panelTop;btnFunction.Left = btnLoad.Left + btnLoad.Width + 5;btnFunction.Top = btnLoad.Top;btnFunction.Width = 90;btnFunction.Height = 38;btnFunction.Cursor = Cursors.Hand;btnFunction.Text = "Filter2D";btnFunction.Click += Filter2D;btnFunction.BackColor = Color.LightCoral;PicAutosize(picSource);PicAutosize(picResult);}private void Load_Image(object? sender, EventArgs? e){OpenFileDialog openFileDialog = new OpenFileDialog();openFileDialog.Filter = String.Join("|", ImgExtentions);if (openFileDialog.ShowDialog() == DialogResult.OK){sourceImage = openFileDialog.FileName;picSource.Image = Image.FromFile(sourceImage);picResult.Image = picSource.Image;PicAutosize(picSource);PicAutosize(picResult);}}private void PicAutosize(PictureBox pb){if (pb == null) return;if (pb.Image == null) return;Image img = pb.Image;int w = original_width;int h = w * img.Height / img.Width;if (h > original_height){h = original_height;w = h * img.Width / img.Height;}pb.SizeMode = PictureBoxSizeMode.Zoom;pb.Width = w;pb.Height = h;pb.Image = img;pb.Refresh();}private void Save(object? sender, EventArgs? e){SaveFileDialog saveFileDialog = new SaveFileDialog();saveFileDialog.Filter = String.Join("|", ImgExtentions);if (saveFileDialog.ShowDialog() == DialogResult.OK){picResult.Image.Save(saveFileDialog.FileName);MessageBox.Show("Image Save to " + saveFileDialog.FileName);}}private void Filter2D(object? sender, EventArgs? e){Mat src = Cv2.ImRead(sourceImage);Mat dst = new Mat();// 自定义卷积核(通用过滤)InputArray arr = InputArray.Create<float>(new float[3, 3] {{ 0, -1, 0 },{ -1, 5, -1 },{ 0, -1, 0 }});Cv2.Filter2D(src: src,dst: dst,ddepth: -1,kernel: arr,anchor: new OpenCvSharp.Point(-1, -1),delta: 0,borderType: BorderTypes.Default);picResult.Image = CVUtility.Mat2Bitmap(dst);PicAutosize(picResult);}}
}
3 运行效果
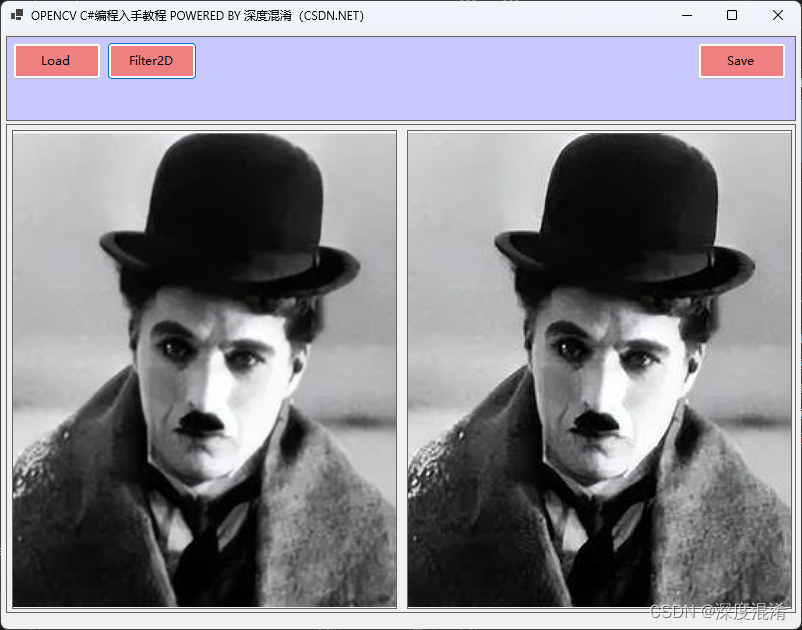
3x3的卷积核显然太小了,效果不明显。