ElasticSearch集群环境搭建
1、准备三台服务器
这里准备三台服务器如下:
| IP地址 | 主机名 | 节点名 |
|---|---|---|
| 192.168.225.65 | linux1 | node-1 |
| 192.168.225.66 | linux2 | node-2 |
| 192.168.225.67 | linux3 | node-3 |
2、准备elasticsearch安装环境
(1)编辑/etc/hosts(三台服务器都执行)
vim /etc/hosts
添加如下内容:
192.168.225.65    linux1
192.168.225.66    linux2
192.168.225.67    linux3

(2)编辑/etc/hostname (三台服务器都执行)
在192.168.225.65上修改
echo 'linux1' > /etc/hostname
在192.168.225.66上修改
echo 'linux2' > /etc/hostname
在192.168.225.67上修改
echo 'linux3' > /etc/hostname
(3)修改系统参数 (三台服务器都执行)
vim /etc/security/limits.conf
修改内容如下:
*  soft nofile  65536
*  hard nofile 131072
*  soft nproc  4096
*  hard nproc  4096 vim /etc/sysctl.conf
修改内容如下:
vm.max_map_count = 262145
保存退出,刷新配置文件
sysctl -p
(4)上传elasticsearch安装包和创建安装用户(三台服务器都执行)
elasticsearch-7.8.1下载地址
这里是将elasticsearch安装包elasticsearch-7.8.1-linux-x86_64.tar.gz上传到/opt目录下
cd /opt
tar -zxvf elasticsearch-7.8.1-linux-x86_64.tar.gz
mv elasticsearch-7.8.1 elasticsearch7.8
useradd jamysong
chown -R jamysong:jamysong  /opt/elasticsearch7.8
注意:做完以上四步重启下三台服务器
3、安装elasticsearch
(1) 编辑elasticsearch配置文件
vim /opt/elasticsearch7.8/cong/elasticsearch.yaml
node1的配置文件
cluster.name: cluster-jamysong
node.name: node-1
network.host: linux1
node.master: true
node.data: true
http.port: 9200
http.cors.allow-origin: "*"
http.cors.enabled: true
http.max_content_length: 200mb
cluster.initial_master_nodes: ["node-1"]
discovery.seed_hosts: ["linux1:9300", "linux2:9300","linux3:9300"]
gateway.recover_after_nodes: 2
network.tcp.keep_alive: true
network.tcp.no_delay: true
transport.tcp.compress: true
cluster.routing.allocation.cluster_concurrent_rebalance: 16
cluster.routing.allocation.node_concurrent_recoveries: 16
cluster.routing.allocation.node_initial_primaries_recoveries: 16
node2的配置文件
cluster.name: cluster-jamysong
node.name: node-2
network.host: linux2
node.master: true
node.data: true
http.port: 9200
http.cors.allow-origin: "*"
http.cors.enabled: true
http.max_content_length: 200mb
cluster.initial_master_nodes: ["node-1"]
discovery.seed_hosts: ["linux1:9300", "linux2:9300","linux3:9300"]
gateway.recover_after_nodes: 2
network.tcp.keep_alive: true
network.tcp.no_delay: true
transport.tcp.compress: true
cluster.routing.allocation.cluster_concurrent_rebalance: 16
cluster.routing.allocation.node_concurrent_recoveries: 16
cluster.routing.allocation.node_initial_primaries_recoveries: 16
node3的配置文件
cluster.name: cluster-jamysong
node.name: node-3
network.host: linux3
node.master: true
node.data: true
http.port: 9200
http.cors.allow-origin: "*"
http.cors.enabled: true
http.max_content_length: 200mb
cluster.initial_master_nodes: ["node-1"]
discovery.seed_hosts: ["linux1:9300", "linux2:9300","linux3:9300"]
gateway.recover_after_nodes: 2
network.tcp.keep_alive: true
network.tcp.no_delay: true
transport.tcp.compress: true
cluster.routing.allocation.cluster_concurrent_rebalance: 16
cluster.routing.allocation.node_concurrent_recoveries: 16
cluster.routing.allocation.node_initial_primaries_recoveries: 16
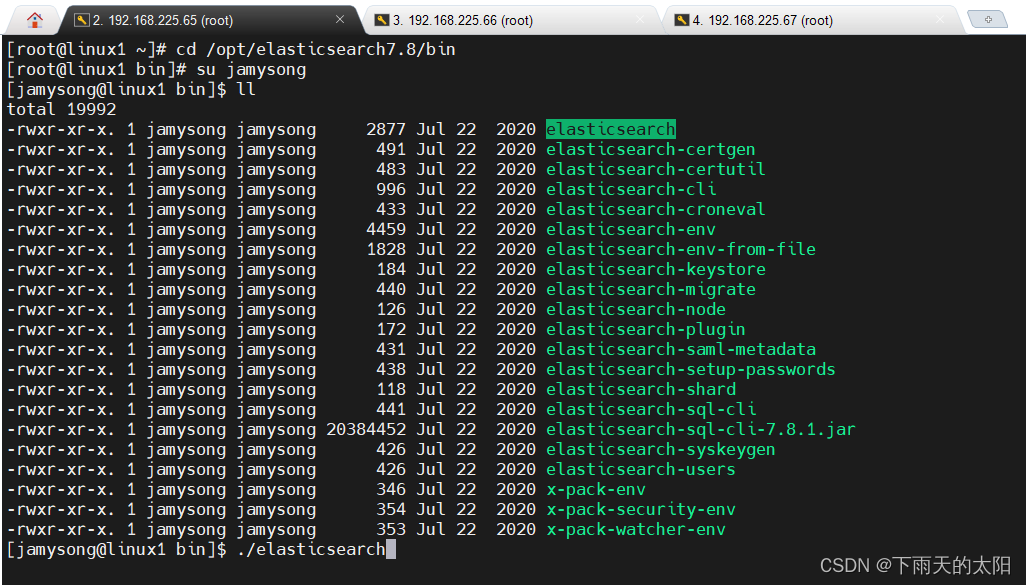
(2)启动elasticsearch
现在直接去启动每台服务器上面的elasticsearch
su jamysong
cd /opt/elasticsearch7.8/bin
./elasticsearch
注意:elasticsearch是不允许root用户启动的,这里使用上面创建的安装用户(jamysong)启动
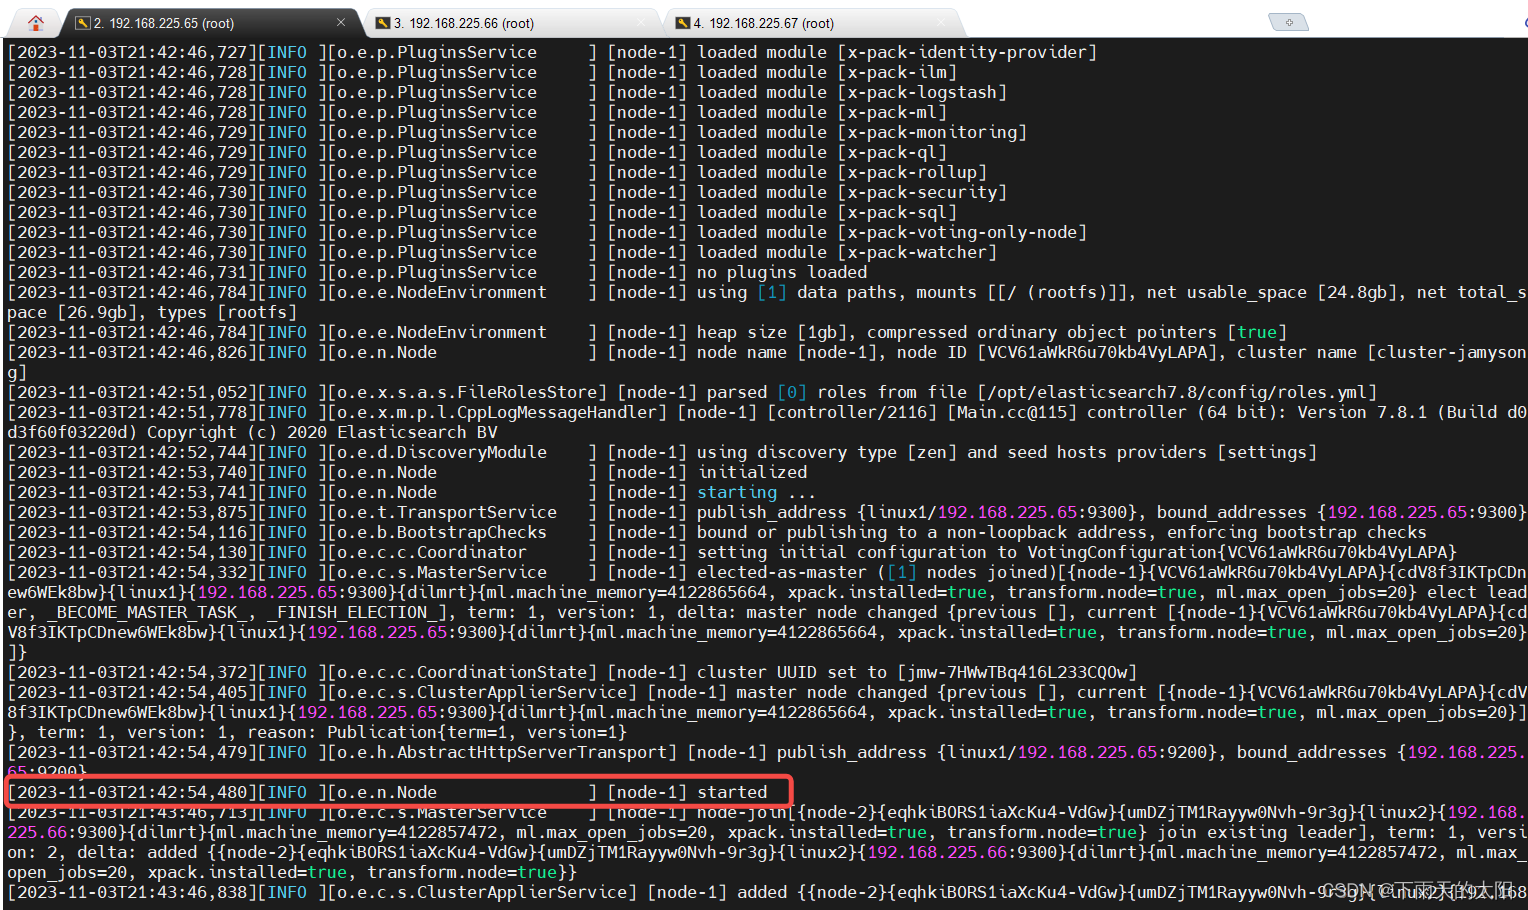
!
查看启动日志如下,表示启动成功!
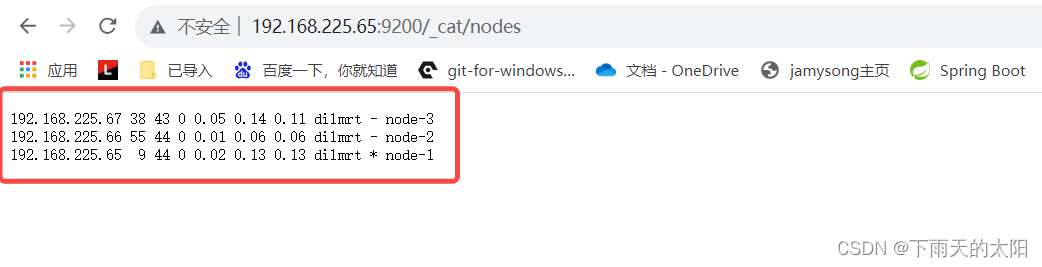
(3)检测elasticsearch集群
这里可以直接访问浏览器来检测一下集群是否搭建成功,这里可以看到node-1是主节点,node-2和node-3是从节点