【日常笔记】使用Server过程中可能遇到的一些问题
使用Server过程中可能遇到的一些问题
- 1. 如何查找GPU型号与驱动版本之间的关系?
- 2. 如何查看当前Server的内核版本?
- 3. 使用Nvidia过程中可能用到的命令
- 4. 对Jupyter Notebook的一些配置
- 5. TensorFlow的一般操作
- 6. 使用PyTorch的一些操作
- 7. 修改安装源为国内地址
1. 如何查找GPU型号与驱动版本之间的关系?
安装新的CUDA驱动的时候,需要查找当前GPU对应的驱动版本,可登录https://www.nvidia.com/Download/Find.aspx?lang=en-us得到,登录界面如下:
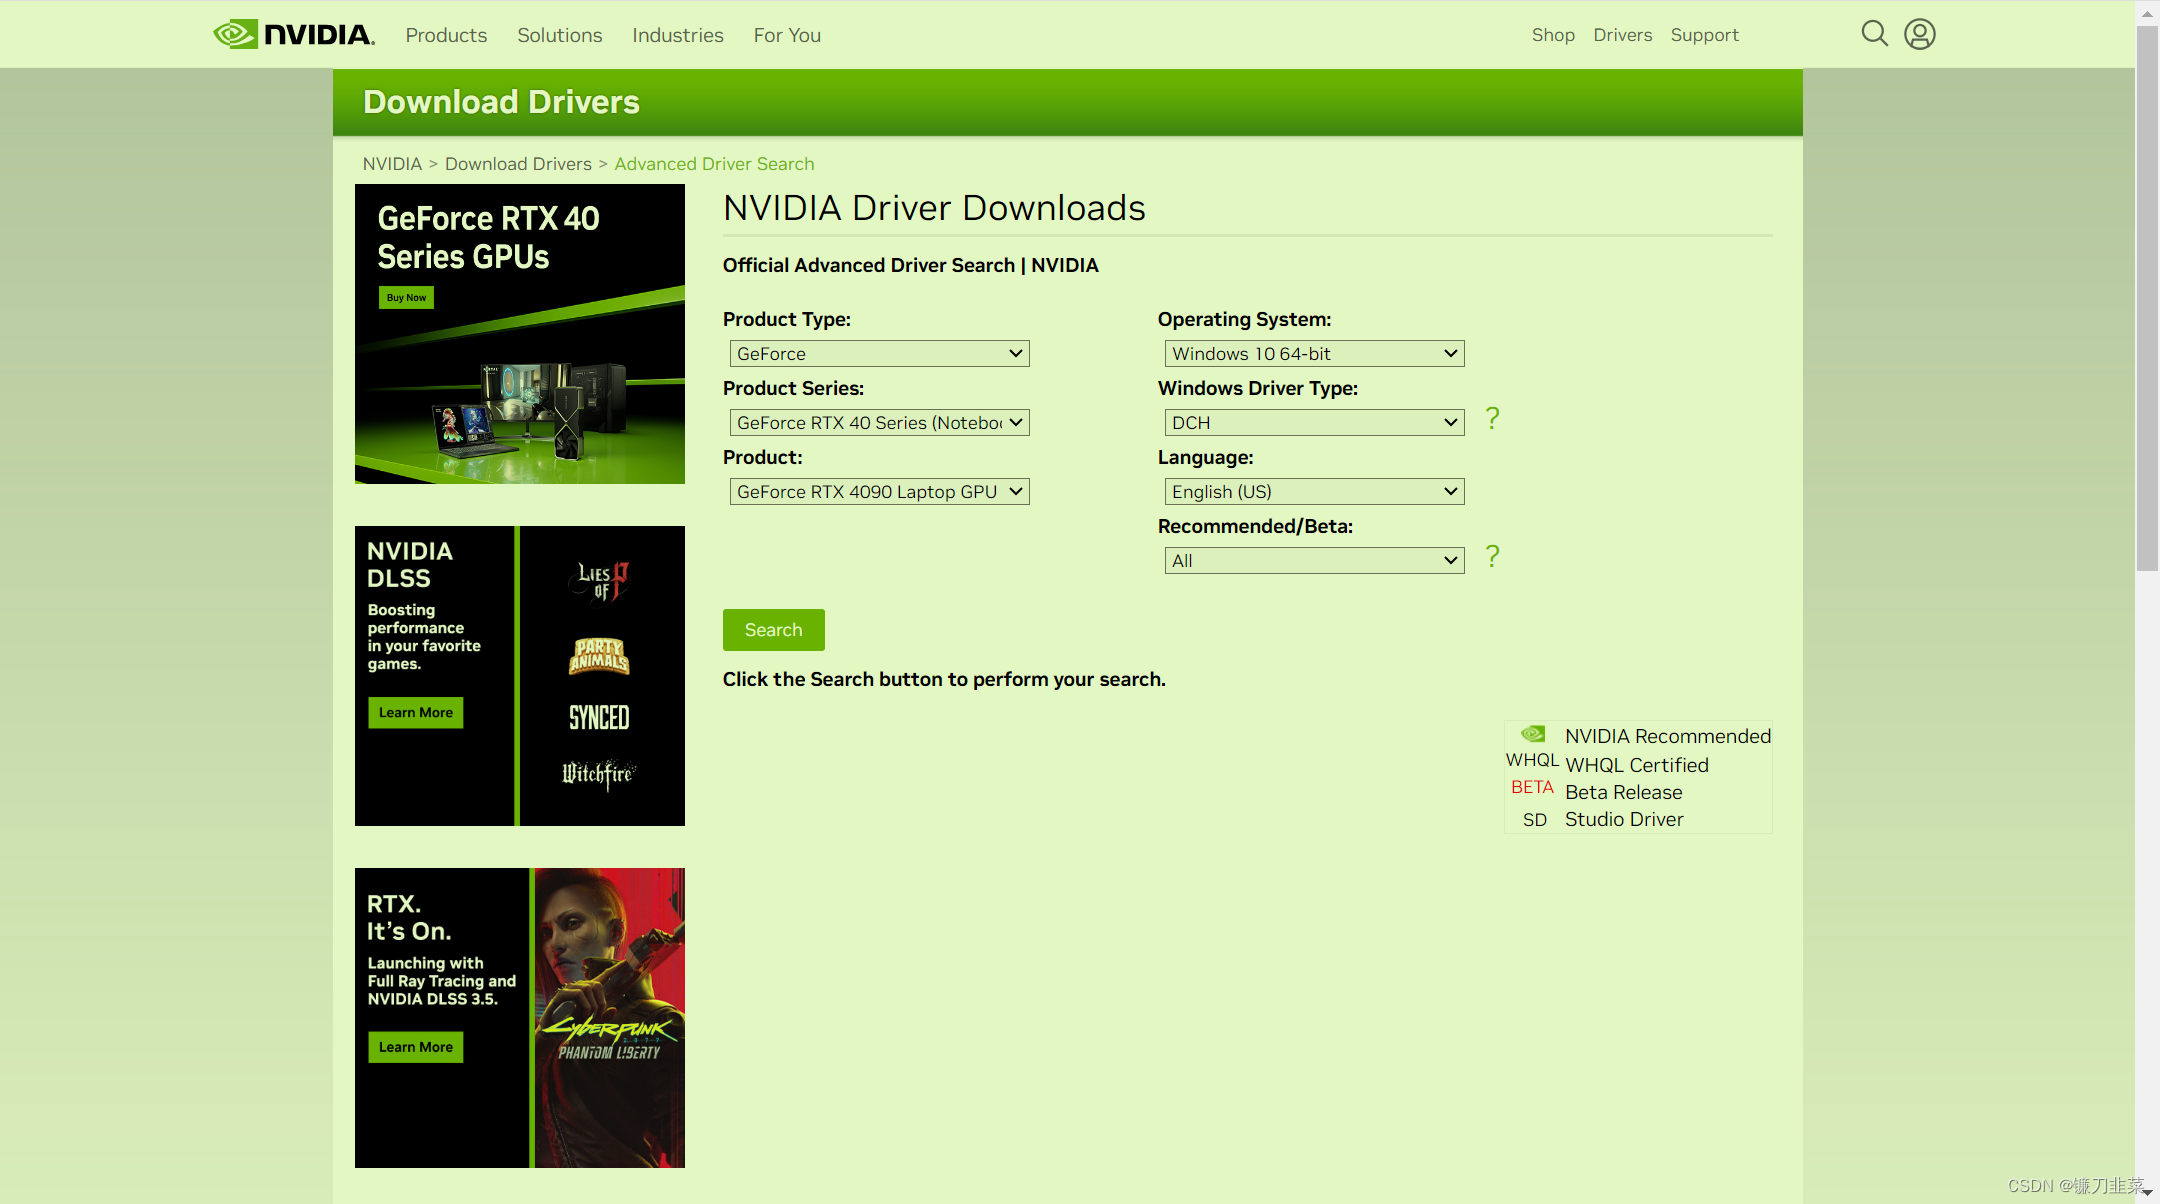
输入相应的GPU型号即可获得对应驱动程序。
2. 如何查看当前Server的内核版本?
1)查看内核列表:
$ sudo dpkg --get-selections | grep linux-image
linux-image-5.0.0-23-generic                    deinstall
linux-image-5.0.0-25-generic                    deinstall
linux-image-5.0.0-27-generic                    deinstall
linux-image-5.0.0-29-generic                    deinstall
linux-image-5.0.0-31-generic                    deinstall
linux-image-5.0.0-32-generic                    deinstall
2)查看当前使用的内核版本:
$ uname -r
5.4.0-146-generic
3)删除非当前使用的内核:
$ sudo apt-get remove linux-image-***-generic
3. 使用Nvidia过程中可能用到的命令
1)查看显卡基本信息
$ nvidia-smi
Tue Sep  5 23:43:55 2023
+-----------------------------------------------------------------------------+
| NVIDIA-SMI 470.182.03   Driver Version: 470.182.03   CUDA Version: 11.4     |
|-------------------------------+----------------------+----------------------+
| GPU  Name        Persistence-M| Bus-Id        Disp.A | Volatile Uncorr. ECC |
| Fan  Temp  Perf  Pwr:Usage/Cap|         Memory-Usage | GPU-Util  Compute M. |
|                               |                      |               MIG M. |
|===============================+======================+======================|
|   0  NVIDIA TITAN X ...  Off  | 00000000:02:00.0 Off |                  N/A |
| 26%   46C    P8    11W / 250W |      0MiB / 12196MiB |      0%      Default |
|                               |                      |                  N/A |
+-------------------------------+----------------------+----------------------+
|   1  NVIDIA TITAN X ...  Off  | 00000000:03:00.0 Off |                  N/A |
| 30%   52C    P8    12W / 250W |      0MiB / 12196MiB |      0%      Default |
|                               |                      |                  N/A |
+-------------------------------+----------------------+----------------------+
|   2  NVIDIA TITAN X ...  Off  | 00000000:82:00.0 Off |                  N/A |
| 34%   58C    P8    15W / 250W |      0MiB / 12196MiB |      0%      Default |
|                               |                      |                  N/A |
+-------------------------------+----------------------+----------------------+
|   3  NVIDIA TITAN X ...  Off  | 00000000:83:00.0 Off |                  N/A |
| 32%   55C    P8    13W / 250W |      0MiB / 12196MiB |      0%      Default |
|                               |                      |                  N/A |
+-------------------------------+----------------------+----------------------++-----------------------------------------------------------------------------+
| Processes:                                                                  |
|  GPU   GI   CI        PID   Type   Process name                  GPU Memory |
|        ID   ID                                                   Usage      |
|=============================================================================|
|  No running processes found                                                 |
+-----------------------------------------------------------------------------+
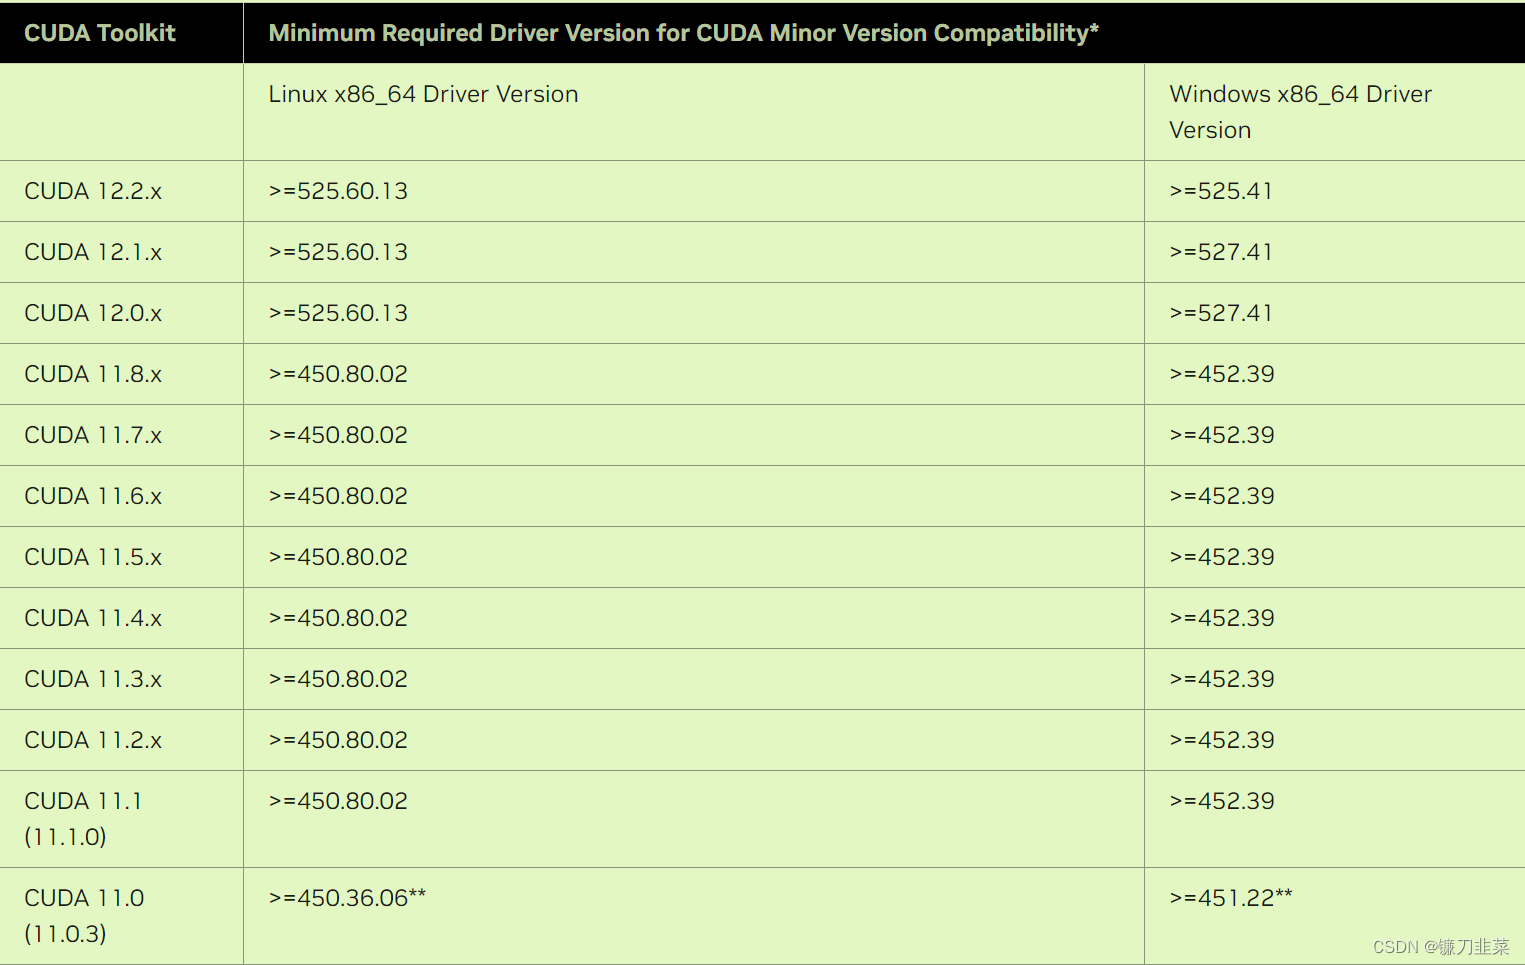
2)Nvidia驱动和CUDA runtime版本对应关系
通过Nvidia官网查询,地址为:https://docs.nvidia.com/cuda/cuda-toolkit-release-notes/index.html。其最新驱动与CUDA runtime版本的对应关系如下:
3)使用conda安装TensorFlow
使用Conda安装Tensorflow-GPU时,它会自动下载依赖项,比如最重要的CUDA和cuDNN等
查找TensorFlow包:
$ conda search tensorflow
安装TensorFlow-GPU 2.4.1
$ conda install tensorflow-gpu=2.4.1
4)使用pip安装TensorFlow
安装cudatookit:
$ pip install cudatoolkit==11.8.0
安装cudnn:
$ pip install cudnn
安装TensorFlow-GPU 2.4.1:
$ pip install tensorflow-gpu==2.4.1
具体版本根据实际情况进行适配!!!
4. 对Jupyter Notebook的一些配置
对Jupyter Notebook进行一些配置可以方便我们的代码开发工作。
1)生成配置文件
$ jupyter notebook --generate-config
将在当前用户目录下生成文件:.jupyter/jupyter_notebook_config.py
2)生成当前用户登录密码。
打开ipython,创建一个密文密码:
$ ipython
Python 3.8.16 (default, Mar  2 2023, 03:21:46)
Type 'copyright', 'credits' or 'license' for more information
IPython 8.12.2 -- An enhanced Interactive Python. Type '?' for help.In [1]:from notebook.auth import passwd
In [2]:passwd()
Enter password:
Verify password:
3)修改配置文件
对配置文件执行如下修改:
$ vim ~/.jupyter/jupyter_notebook_config.py
c.NotebookApp.ip = '*'  # 设置所有ip皆可访问
c.NotebookApp.password = u'argon2:$argon....'   # 粘贴上一步生成的密文
c.NotebookApp.open_browser = False  # 禁止自动打开浏览器
c.NotebookApp.port = 8899  # 指定端口
4)启动jupyter notebook
这里最好令其后台启动,并不记录日志:
$ nohup jupyter notebook >/dev/null 2>&1 &
然后就可以在浏览器中输入http://YOUIP:port,进入jupyter notebook界面:

5. TensorFlow的一般操作
1)验证TensorFlow安装是否成功:
$ python
Python 3.8.16 (default, Mar  2 2023, 03:21:46)
[GCC 11.2.0] :: Anaconda, Inc. on linux
Type "help", "copyright", "credits" or "license" for more information.
>>> import tensorflow as tf
2023-09-06 00:18:25.800736: I tensorflow/core/platform/cpu_feature_guard.cc:182] This TensorFlow binary is optimized to use available CPU instructions in performance-critical operations.
To enable the following instructions: AVX2 FMA, in other operations, rebuild TensorFlow with the appropriate compiler flags.
2023-09-06 00:18:28.733394: W tensorflow/compiler/tf2tensorrt/utils/py_utils.cc:38] TF-TRT Warning: Could not find TensorRT
>>> print(tf.__version__)
2.12.0
>>> print(tf.test.is_gpu_available())
WARNING:tensorflow:From <stdin>:1: is_gpu_available (from tensorflow.python.framework.test_util) is deprecated and will be removed in a future version.
Instructions for updating:
Use `tf.config.list_physical_devices('GPU')` instead.
2023-09-06 00:19:04.284931: W tensorflow/core/common_runtime/gpu/gpu_device.cc:1956] Cannot dlopen some GPU libraries. Please make sure the missing libraries mentioned above are installed properly if you would like to use GPU. Follow the guide at https://www.tensorflow.org/install/gpu for how to download and setup the required libraries for your platform.
Skipping registering GPU devices...
False
>>> print(tf.config.list_physical_devices('GPU'))
2023-09-06 00:19:26.509357: W tensorflow/core/common_runtime/gpu/gpu_device.cc:1956] Cannot dlopen some GPU libraries. Please make sure the missing libraries mentioned above are installed properly if you would like to use GPU. Follow the guide at https://www.tensorflow.org/install/gpu for how to download and setup the required libraries for your platform.
Skipping registering GPU devices...
[]
如果正常执行成功,则返回当前可用的GPU编号。显然这里存在问题,缺少一些libraries。
注意:建议使用conda安装TensorFlow。
6. 使用PyTorch的一些操作
1)登录PyTorch官网,选择安装配置
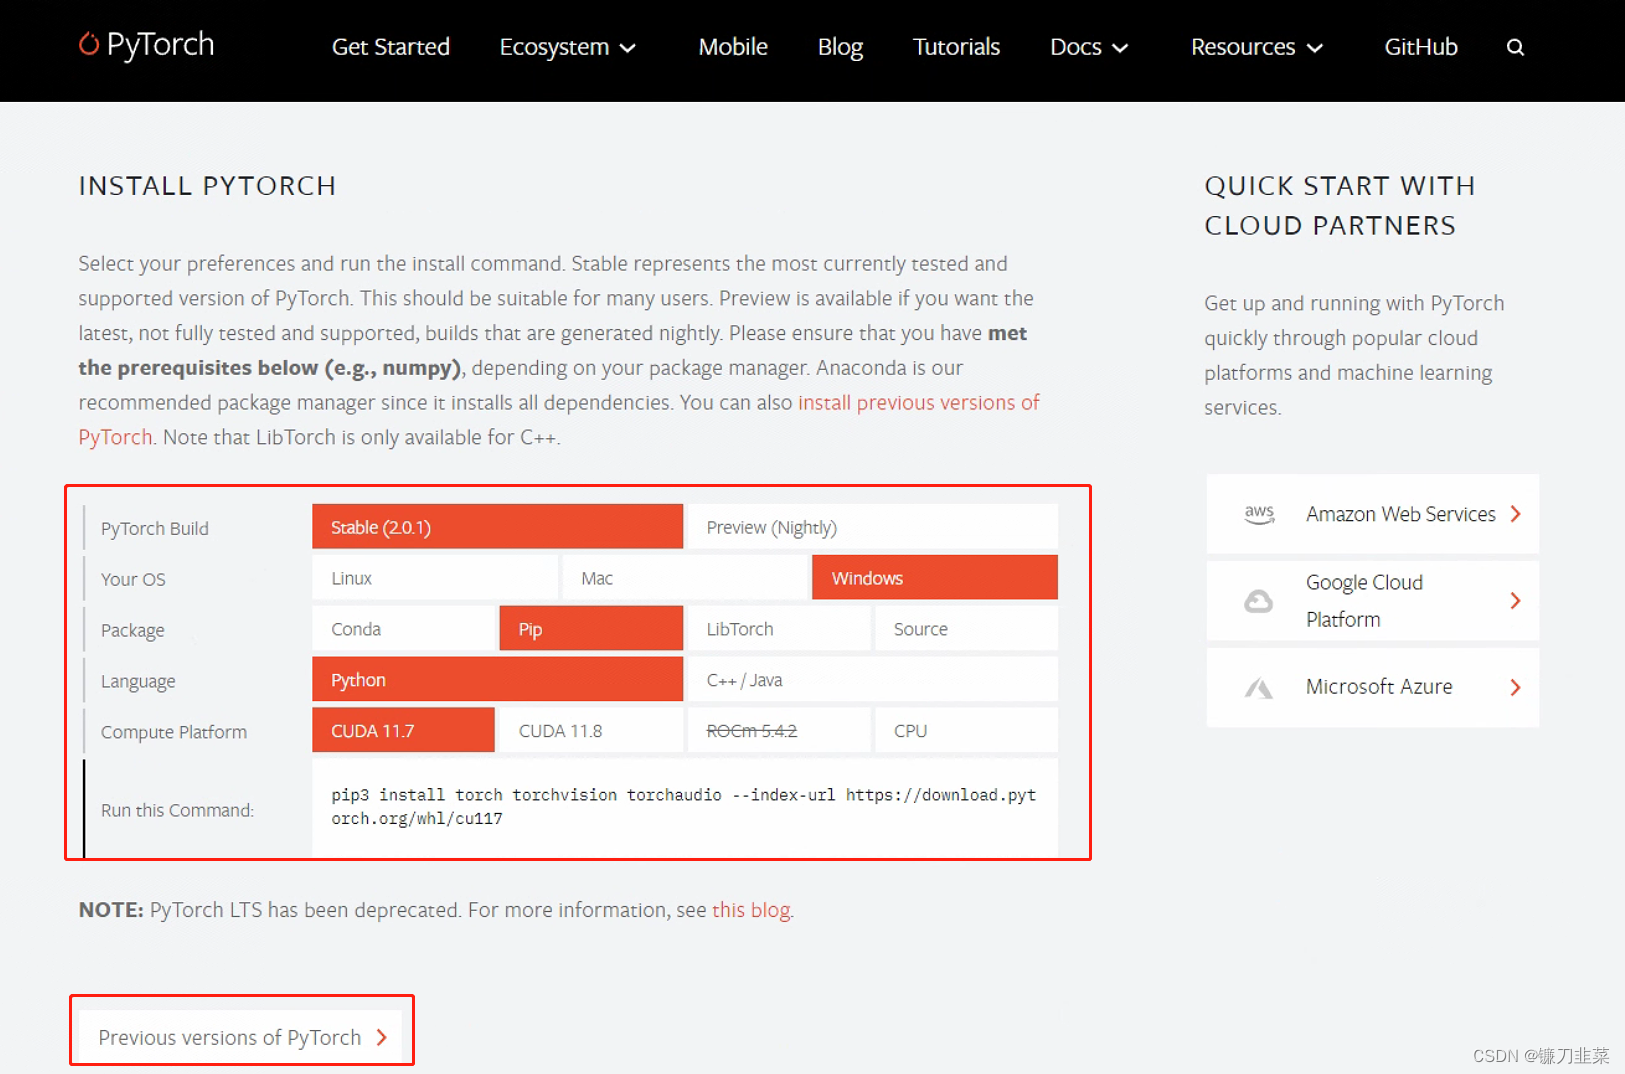
可以选择最新版,或者是根据下方的链接选择旧版本。
2)使用CUDA安装
这里我们根据CUDA的版本,选择安装v1.13.0版PyTorch GPU版本
# CUDA 11.6
conda install pytorch==1.13.0 torchvision==0.14.0 torchaudio==0.13.0 pytorch-cuda=11.6 -c pytorch -c nvidia
如果无法执行,或者下载很慢,则可以把-c pytorch去掉,因为-c参数指明了下载PyTorch的通道,优先级比国内镜像更高。
3)使用pip安装
# CUDA 11.6
pip install torch==1.13.0+cu116 torchvision==0.14.0+cu116 torchaudio==0.13.0 --extra-index-url https://download.pytorch.org/whl/cu116
5)验证安装是否成功
>>> import torch
>>> print(torch.__version__)
2.0.1+cu117
>>> print(torch.cuda.is_available())
True
7. 修改安装源为国内地址
1)修改conda安装源为清华源
在用户当前目录下,创建.condarc文件,然后把以下内容放入到该文件即可:
channels:- defaults
show_channel_urls: true
default_channels:- https://mirrors.tuna.tsinghua.edu.cn/anaconda/pkgs/main- https://mirrors.tuna.tsinghua.edu.cn/anaconda/pkgs/r- https://mirrors.tuna.tsinghua.edu.cn/anaconda/pkgs/msys2
custom_channels:conda-forge: https://mirrors.tuna.tsinghua.edu.cn/anaconda/cloudmsys2: https://mirrors.tuna.tsinghua.edu.cn/anaconda/cloudbioconda: https://mirrors.tuna.tsinghua.edu.cn/anaconda/cloudmenpo: https://mirrors.tuna.tsinghua.edu.cn/anaconda/cloudpytorch: https://mirrors.tuna.tsinghua.edu.cn/anaconda/cloudpytorch-lts: https://mirrors.tuna.tsinghua.edu.cn/anaconda/cloudsimpleitk: https://mirrors.tuna.tsinghua.edu.cn/anaconda/clouddeepmodeling: https://mirrors.tuna.tsinghua.edu.cn/anaconda/cloud/
2)修改pip安装源
这里同样选择清华源。
临时使用: pip install -i https://pypi.tuna.tsinghua.edu.cn/simple some-package
设为默认:
python -m pip install --upgrade pip
pip config set global.index-url https://pypi.tuna.tsinghua.edu.cn/simple