【Stable Diffusion安装】支持python3.11 window版
前言
主要的安装步骤是参考B站播放量第一的视频,但是那位阿婆主应该是没有编程经验,只强调使用3.10,而python最新版本是3.11。
理论上来说,只是一个小版本的不同,应该是可以安装成功了。自己摸索了下,挺费劲了,故记录下,支持最新版python3.11的安装经验。
这里建议先看下B站视频:【B站第一套系统的AI绘画课!零基础学会Stable Diffusion,这绝对是你看过的最容易上手的AI绘画教程 | SD WebUI 保姆级攻略】
这里我假设你们已经自己安装好了python、git。
这里我假设你们已经自己安装好了python、git。
这里我假设你们已经自己安装好了python、git。
毕竟CSDN是编程人员的论坛,这点小事,应该没问题。
安装步骤
更新window显卡驱动
这里为了后续安装的顺利,我们需要更新下电脑的显卡驱动,如果最近已经更新过的,就不用更新了。
按win+R,输入devmgmt.msc,弹出下框。
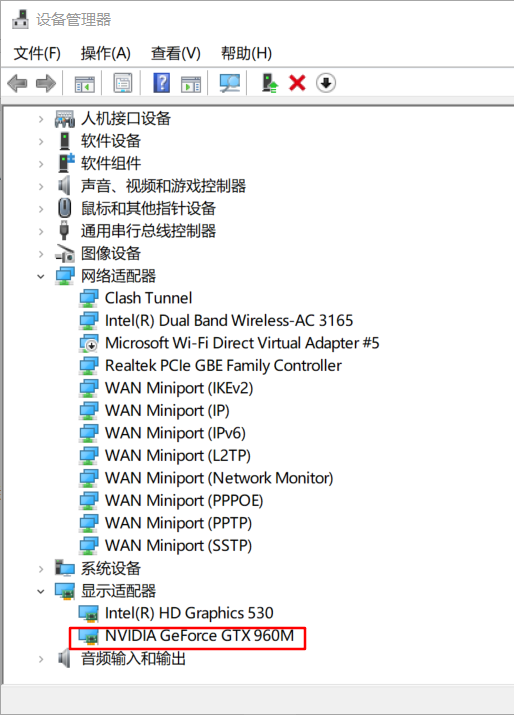
上图是我的显卡驱动。
这时我们再去官网下载最新驱动:https://www.nvidia.cn/Download/index.aspx

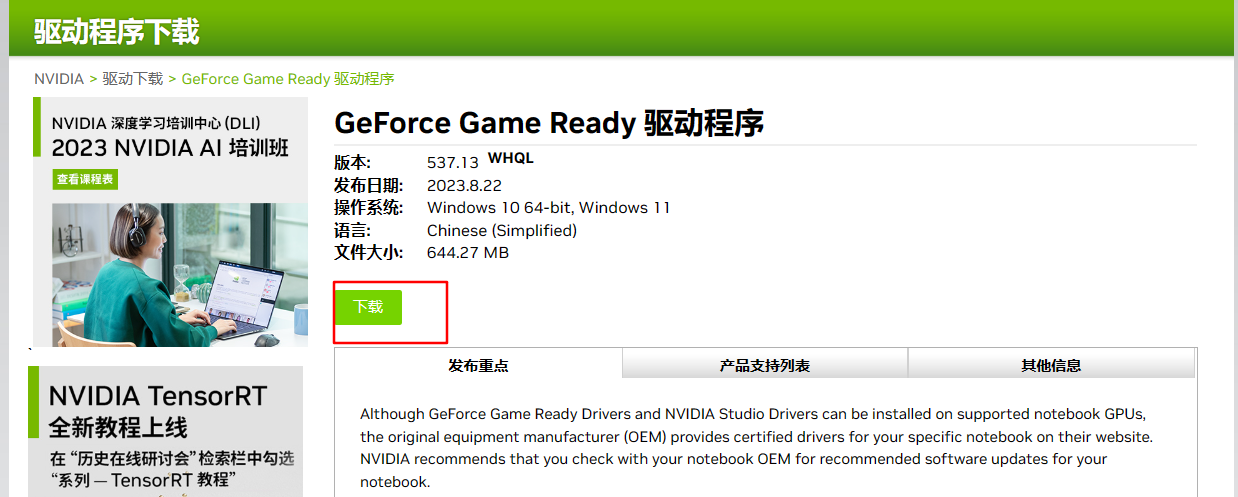
之后,点击exe文件,进行安装即可。
下载 Stable Diffusion 代码
执行:
git clone https://github.com/AUTOMATIC1111/stable-diffusion-webui.git
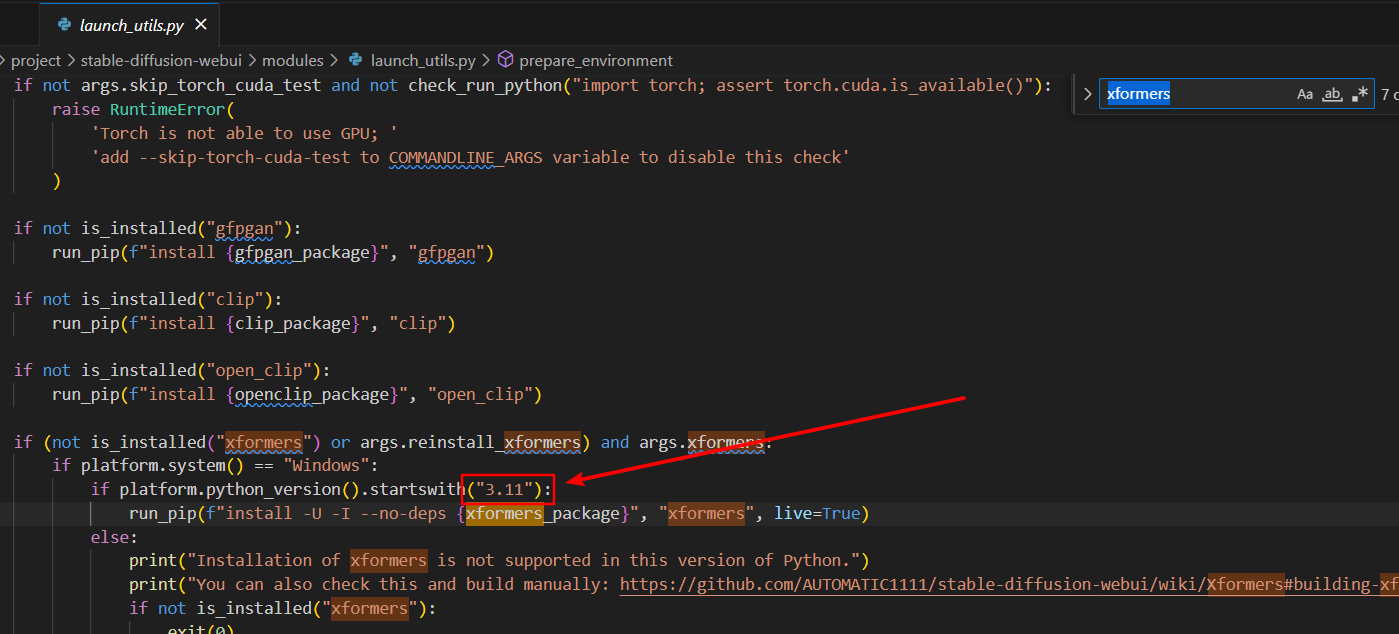
修改launch_utils.py文件
路径:
stable-diffusion-webui-master\modules\launch_utils.py
搜索关键字:xformers,找到platform.python_version().startswith,改为3.11
修改webui-user.bat文件
路径:
stable-diffusion-webui-master\modules\webui-user.bat
主要是修改:COMMANDLINE_ARGS
@echo offset PYTHON=
set GIT=
set VENV_DIR=
set COMMANDLINE_ARGS=--no-half-vae --disable-nan-check --skip-python-version-check --force-enable-xformers --xformerscall webui.bat
配置git代理
我的代理:

所以你也需要根据自己的代理来修改下面的端口号。
git config --global https.proxy http://127.0.0.1:7890
git config --global https.proxy https://127.0.0.1:7890
假设想去掉代理:
# 恢复
git config --global --unset http.proxy
git config --global --unset https.proxy
include-system-site-packages 这个参数可以设置是否开启“引用系统中的模块”的功能。如果开启了,那么当你就可以直接使用系统中已经装过的第三方模块。(但是你在虚拟环境下装的模块就不能被其他地方的程序使用)
设置pip下载源、代理、升级
# 设置源
pip config set global.index-url https://mirrors.aliyun.com/pypi/simple
pip config set install.trusted-host mirrors.aliyun.com
设置代理,路径:C:\Users\yutao\AppData\Roaming\pip\pip.ini
[global]
index-url = https://mirrors.aliyun.com/pypi/simple
proxy = http://127.0.0.1:7890[install]
trusted-host = mirrors.aliyun.com
升级pip,在cmd中:
C:\Users\yutao>python.exe -m pip install --upgrade pip
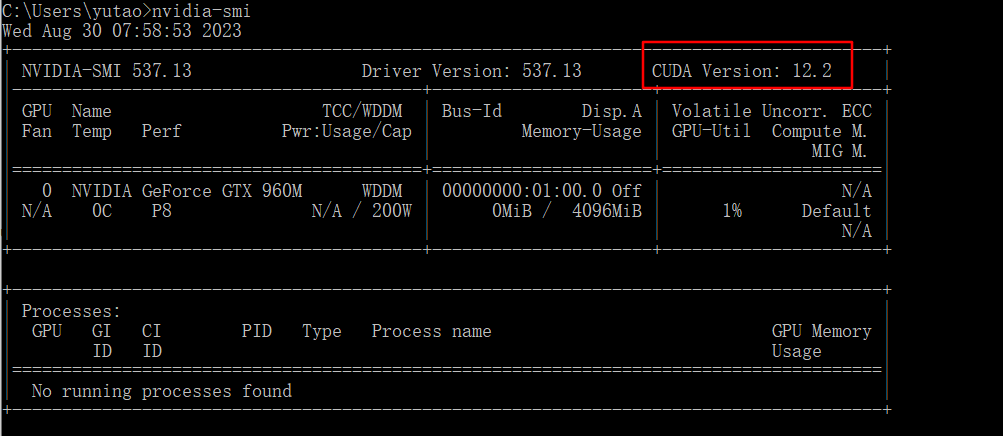
安装cuda
在cmd命令中,执行:nvidia-smi,查看本机适合的cuda version版本
cuda各版本下载地址
下载下来是一个exe文件,如:cuda_12.2.2_537.13_windows.exe文件。
点击安装即可。一切默认。
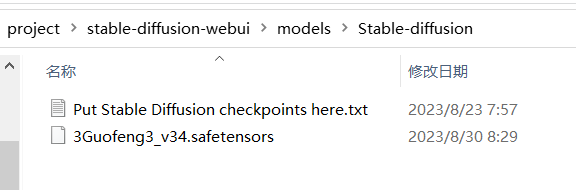
下载大模型
可以先看视频了解下,都有哪些模型:
【AI绘画模型新手包!“画风”自由切换,有哪些你不知道的模型使用技巧? | 零基础入门Stable Diffusion的保姆级新手教程 | SD模型下载方式与推荐】
我下载的是guofeng3
下载后,存放路径:
如果出现pip已经下载的模块,但是识别不了的情况下,修改pyvenv.cfg文件
路径E:\openai\project\stable-diffusion-webui\venv,这个需要启动webui-user.bat才会产生。
E:\openai\project\stable-diffusion-webui\venv
这个venv是需要运行webui-user.bat文件后才会产生的。
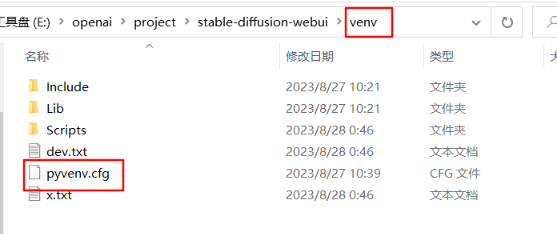
下面是我的pyvenv.cfg文件内容
home = D:\Program Files\Python
include-system-site-packages = true
version = 3.11.2
executable = D:\Program Files\Python\python.exe
command = D:\Program Files\Python\python.exe -m venv E:\openai\project\stable-diffusion-webui\venv
include-system-site-packages 这个参数可以设置是否开启“引用系统中的模块”的功能。如果开启了,那么我们就可以直接使用系统中已经装过的第三方模块。(但是你在虚拟环境下装的模块就不能被其他地方的程序使用)
双击运行webui-user.bat文件
该文件是以后每次运行启动文件。
启动时,遇到的各种问题,下面会单独讲解。
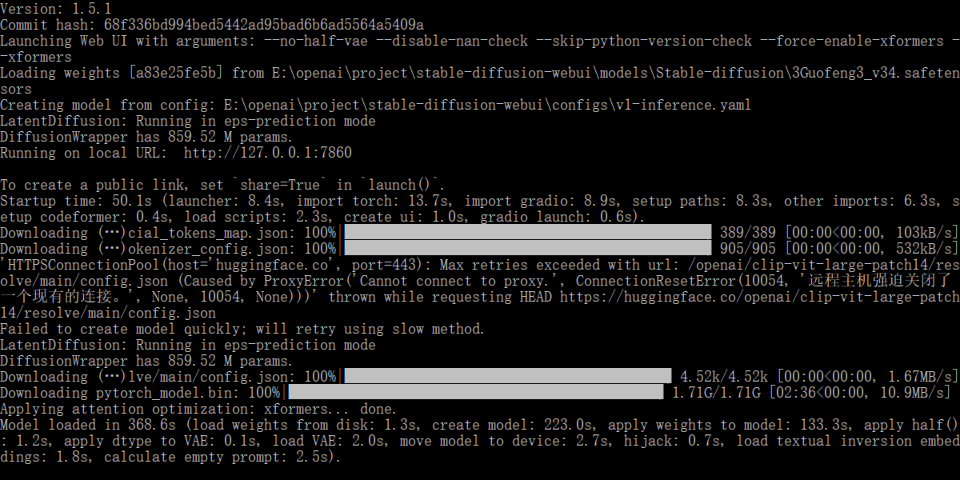
启动页命令框里,看到:Running on local URL: http://127.0.0.1:7860,表示启动成功。
将http://127.0.0.1:7860,放入浏览器里执行,就OK了。
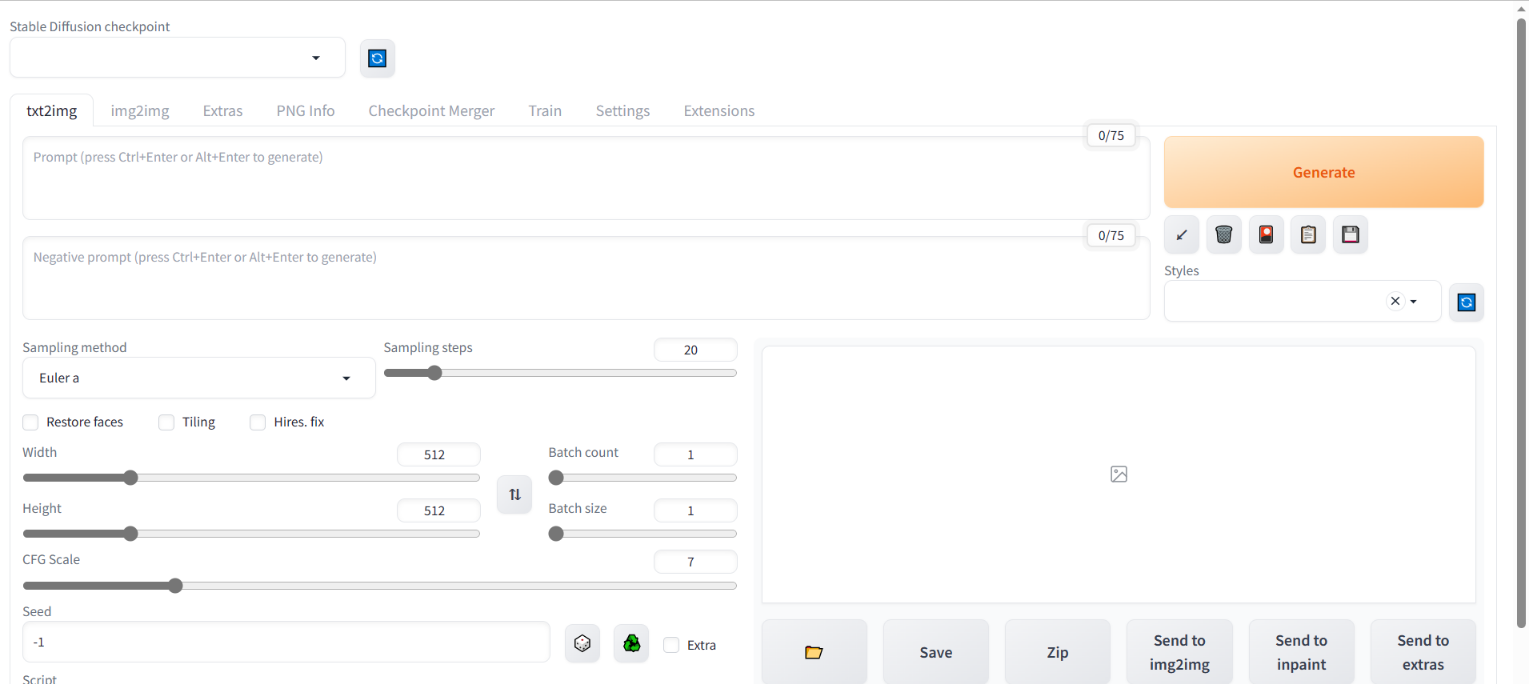
页面长这个样子:
以后每次运行程序:双击运行webui-user.bat文件即可。
遇到的问题
pip 安装失败,万能解决办法 – 手动安装
正常情况下,当我们遇到pip安装失败的情况下,单独执行,下面的语句是没有问题的:
# 这种总是安装失败时
pip install https://github.com/TencentARC/GFPGAN/archive/8d2447a2d918f8eba5a4a01463fd48e45126a379.zip --prefer-binary
但是如果遇到总是安装失败的情况下,这时,我们就需要手动安装了:
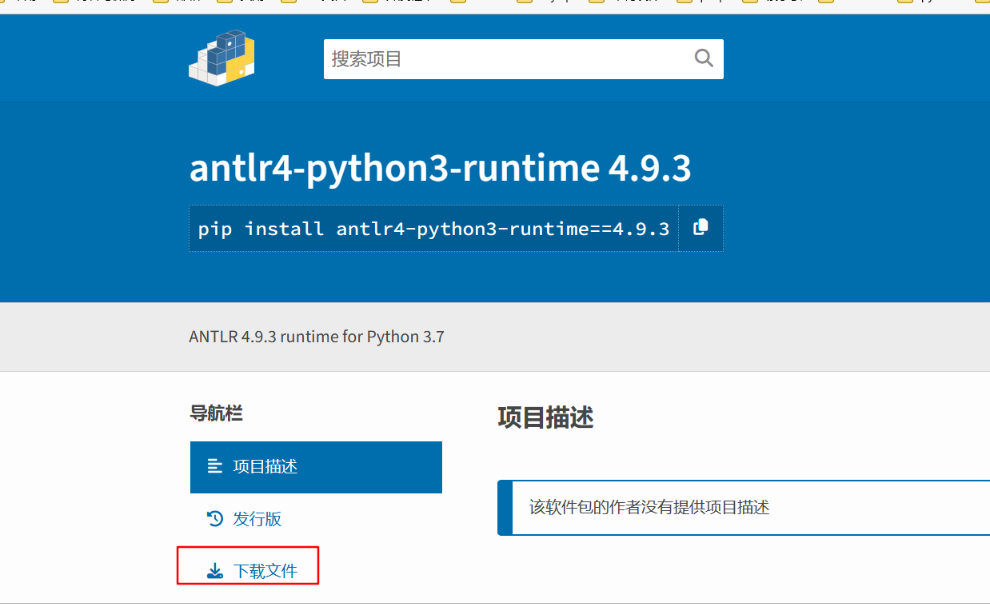
比如,我们现在遇到安装:antlr4-python3-runtime==4.9.3无法自动安装的情况。
这时,我们就去官网下载:https://pypi.org/project/antlr4-python3-runtime/4.9.3/
把文件下载下来:
然后将下载下来的包,解压到:E:\openai\project\stable-diffusion-webui\venv\Scripts\路径下。
接着在cmd中执行python3 setup.py build install:
具体我执行的命令:
E:\openai\project\stable-diffusion-webui\venv\Scripts\antlr4-python3-runtime-4.9.3>e:\openai\project\stable-diffusion-webui\venv\Scripts\python.exe setup.py build install
RuntimeError: Couldn’t install torch.
错误信息:
E:\openai\project\stable-diffusion-webui\venv\Scripts\python.exe: No module named pip
Traceback (most recent call last):File "E:\openai\project\stable-diffusion-webui\launch.py", line 39, in <module>main()File "E:\openai\project\stable-diffusion-webui\launch.py", line 30, in mainprepare_environment()File "E:\openai\project\stable-diffusion-webui\modules\launch_utils.py", line 311, in prepare_environmentrun(f'"{python}" -m {torch_command}', "Installing torch and torchvision", "Couldn't install torch", live=True)File "E:\openai\project\stable-diffusion-webui\modules\launch_utils.py", line 113, in runraise RuntimeError("\n".join(error_bits))
RuntimeError: Couldn't install torch.
Command: "E:\openai\project\stable-diffusion-webui\venv\Scripts\python.exe" -m pip install torch==2.0.1 torchvision==0.15.2 --extra-index-url https://download.pytorch.org/whl/cu118
Error code: 1
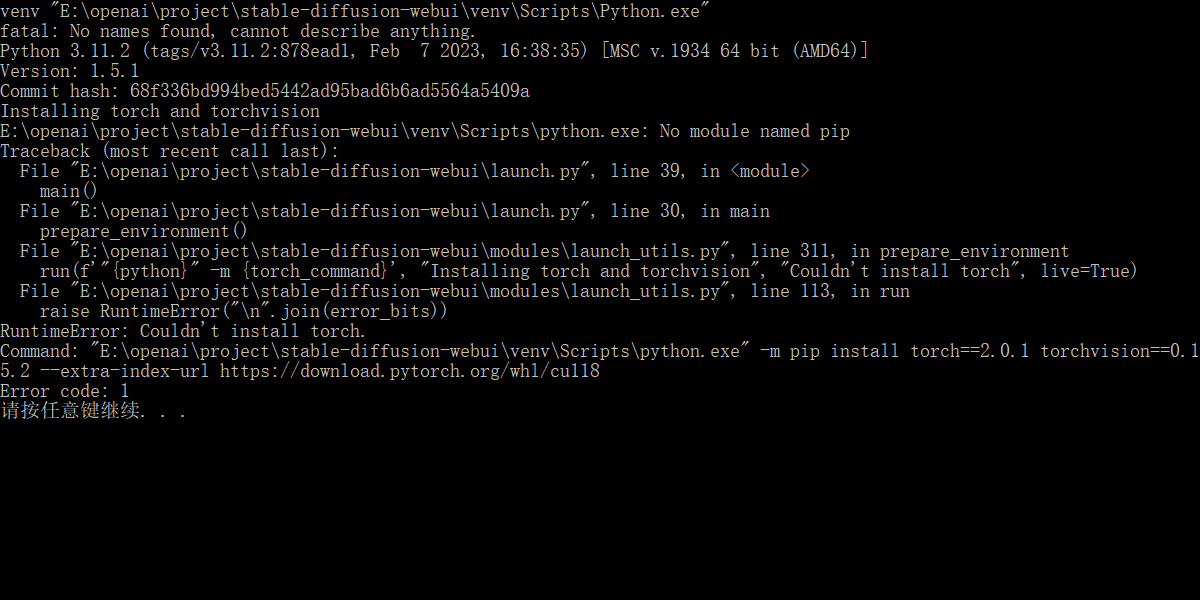
解决办法
# 在cmd窗口中执行如下命令即可:
pip install torch==2.0.1 torchvision==0.15.2 --extra-index-url https://download.pytorch.org/whl/cu118
RuntimeError: Torch is not able to use GPU;
错误信息:
venv "E:\openai\project\stable-diffusion-webui\venv\Scripts\Python.exe"
fatal: No names found, cannot describe anything.
Python 3.11.2 (tags/v3.11.2:878ead1, Feb  7 2023, 16:38:35) [MSC v.1934 64 bit (AMD64)]
Version: 1.5.1
Commit hash: 68f336bd994bed5442ad95bad6b6ad5564a5409a
Traceback (most recent call last):File "E:\openai\project\stable-diffusion-webui\launch.py", line 39, in <module>main()File "E:\openai\project\stable-diffusion-webui\launch.py", line 30, in mainprepare_environment()File "E:\openai\project\stable-diffusion-webui\modules\launch_utils.py", line 314, in prepare_environmentraise RuntimeError(
RuntimeError: Torch is not able to use GPU; add --skip-torch-cuda-test to COMMANDLINE_ARGS variable to disable this check

解决办法
这说明需要安装cuda。上面有安装教程。
RuntimeError: Couldn’t install gfpgan.
错误信息:
Version: 1.5.1
Commit hash: 68f336bd994bed5442ad95bad6b6ad5564a5409a
Installing gfpgan
Traceback (most recent call last):File "E:\openai\project\stable-diffusion-webui\launch.py", line 39, in <module>main()File "E:\openai\project\stable-diffusion-webui\launch.py", line 30, in mainprepare_environment()File "E:\openai\project\stable-diffusion-webui\modules\launch_utils.py", line 320, in prepare_environmentrun_pip(f"install {gfpgan_package}", "gfpgan")File "E:\openai\project\stable-diffusion-webui\modules\launch_utils.py", line 136, in run_pipreturn run(f'"{python}" -m pip {command} --prefer-binary{index_url_line}', desc=f"Installing {desc}", errdesc=f"Couldn't install {desc}", live=live)^^^^^^^^^^^^^^^^^^^^^^^^^^^^^^^^^^^^^^^^^^^^^^^^^^^^^^^^^^^^^^^^^^^^^^^^^^^^^^^^^^^^^^^^^^^^^^^^^^^^^^^^^^^^^^^^^^^^^^^^^^^^^^^^^^^^^^^^^^^^^File "E:\openai\project\stable-diffusion-webui\modules\launch_utils.py", line 113, in runraise RuntimeError("\n".join(error_bits))
RuntimeError: Couldn't install gfpgan.
Command: "E:\openai\project\stable-diffusion-webui\venv\Scripts\python.exe" -m pip install https://github.com/TencentARC/GFPGAN/archive/8d2447a2d918f8eba5a4a01463fd48e45126a379.zip --prefer-binary
Error code: 1
stdout: Collecting https://github.com/TencentARC/GFPGAN/archive/8d2447a2d918f8eba5a4a01463fd48e45126a379.zipDownloading https://github.com/TencentARC/GFPGAN/archive/8d2447a2d918f8eba5a4a01463fd48e45126a379.zip (6.0 MB)---------------------------------------- 6.0/6.0 MB 43.6 kB/s eta 0:00:00Preparing metadata (setup.py): startedPreparing metadata (setup.py): finished with status 'done'stderr: ERROR: No .egg-info directory found in C:\Users\yutao\AppData\Local\Temp\pip-pip-egg-info-6ubqppke
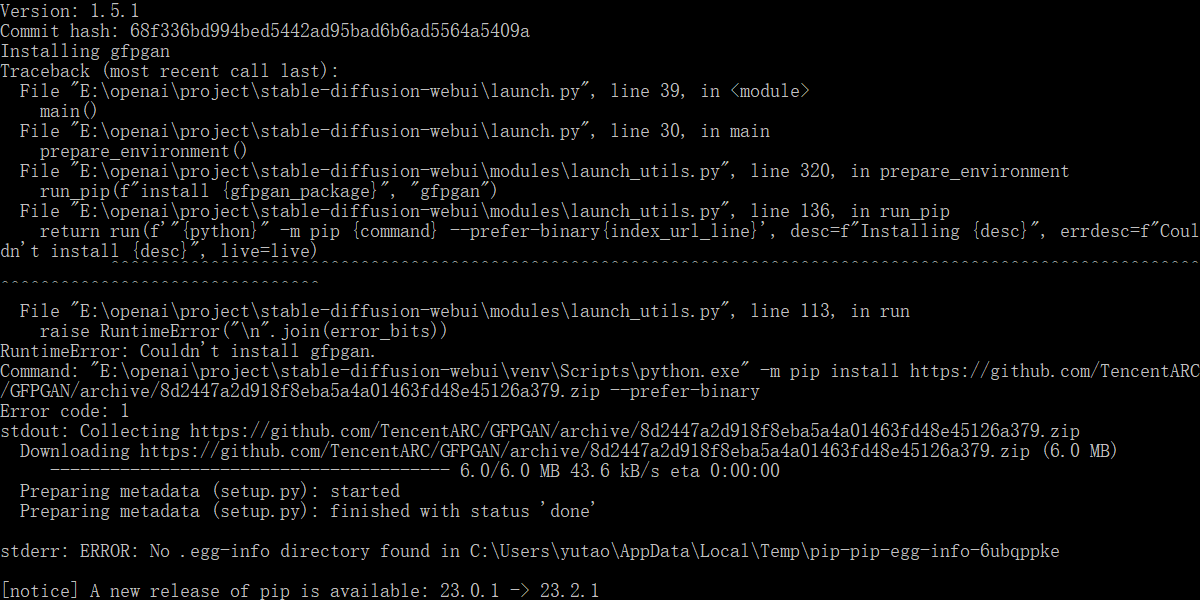
解决办法
本质上就是连不上网,所以需要开代理,并配置代理,只要按照上面来,就没问题。
RuntimeError: Couldn’t install clip.
Version: 1.5.1
Commit hash: 68f336bd994bed5442ad95bad6b6ad5564a5409a
Installing clip
Traceback (most recent call last):File "E:\openai\project\stable-diffusion-webui\launch.py", line 39, in <module>main()File "E:\openai\project\stable-diffusion-webui\launch.py", line 30, in mainprepare_environment()File "E:\openai\project\stable-diffusion-webui\modules\launch_utils.py", line 323, in prepare_environmentrun_pip(f"install {clip_package}", "clip")File "E:\openai\project\stable-diffusion-webui\modules\launch_utils.py", line 136, in run_pipreturn run(f'"{python}" -m pip {command} --prefer-binary{index_url_line}', desc=f"Installing {desc}", errdesc=f"Couldn't install {desc}", live=live)^^^^^^^^^^^^^^^^^^^^^^^^^^^^^^^^^^^^^^^^^^^^^^^^^^^^^^^^^^^^^^^^^^^^^^^^^^^^^^^^^^^^^^^^^^^^^^^^^^^^^^^^^^^^^^^^^^^^^^^^^^^^^^^^^^^^^^^^^^^^^File "E:\openai\project\stable-diffusion-webui\modules\launch_utils.py", line 113, in runraise RuntimeError("\n".join(error_bits))
RuntimeError: Couldn't install clip.
Command: "E:\openai\project\stable-diffusion-webui\venv\Scripts\python.exe" -m pip install https://ghproxy.com/https://github.com/openai/CLIP/archive/d50d76daa670286dd6cacf3bcd80b5e4823fc8e1.zip --prefer-binary
Error code: 1
stdout: Collecting https://ghproxy.com/https://github.com/openai/CLIP/archive/d50d76daa670286dd6cacf3bcd80b5e4823fc8e1.zipDownloading https://ghproxy.com/https://github.com/openai/CLIP/archive/d50d76daa670286dd6cacf3bcd80b5e4823fc8e1.zip (4.3 MB)---------------------------------------- 4.3/4.3 MB 2.3 MB/s eta 0:00:00Preparing metadata (setup.py): startedPreparing metadata (setup.py): finished with status 'done'stderr: ERROR: No .egg-info directory found in C:\Users\yutao\AppData\Local\Temp\pip-pip-egg-info-w8i73o1w
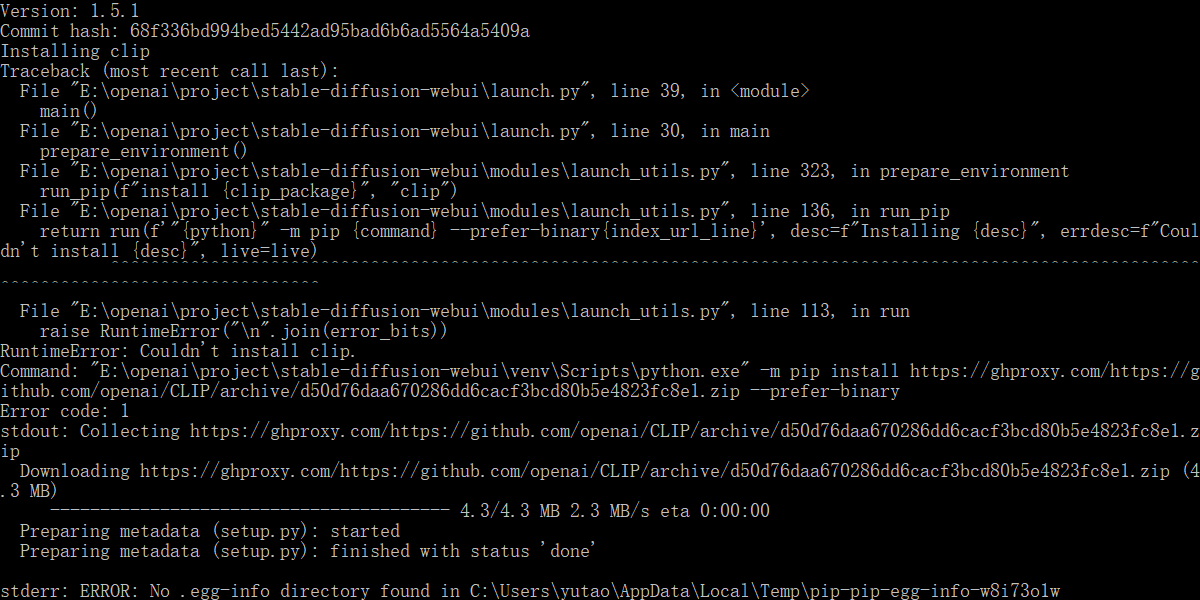
解决办法
先试试:
pip install https://ghproxy.com/https://github.com/openai/CLIP/archive/d50d76daa670286dd6cacf3bcd80b5e4823fc8e1.zip --prefer-binary
如果不行,就手动安装:
- https://github.com/openai/CLIP 下载
- 把压缩文件解压到
xxx\stable-diffusion-webui\venv\Scripts - 打开clip-main文件夹,在上方红框的路径地址栏里输入CMD,进入clip-main路径下的cmd命令提示符界面

- cmd中执行:python.exe setup.py build install
特别注意,python.exe要是你自己的路径。
stable diffusion本地安装部署提示clip安装失败的解决方法
下载:https://github.com/openai/CLIP
输入xxx\stable-diffusion-webui\venv\Scripts\python.exe -m pip install ftfy regex tqdm 安装clip依赖输入xxx\stable-diffusion-webui\venv\Scripts\python.exe setup.py build install
安装jsonmerge==1.8.0 报错
这种情况下,就执行pip install jsonmerge安装最新版即可。
安装好后,注意cmd中打印的版本信息,比如我安装完后的版本号jsonmerge==1.9.2;
这时需要修改下文件:
将jsonmerge==1.8.0 修改为:jsonmerge==1.9.2
jsonmerge==1.9.2
参考地址:
Python pip 源设置成国内源,阿里云源,清华大学源
https://civitai.com/models/10415/3-guofeng3
Antlr4-python3-runtime在ubuntu上的安装
stable diffusion本地安装部署提示clip安装失败的解决方法
打开stable diffusion webui时,提示缺少clip或clip安装不上的解决方案(windows下的操作)
Windows下使用Git部署Stable-Diffusion-Webui