【实战】十一、看板页面及任务组页面开发(六) —— React17+React Hook+TS4 最佳实践,仿 Jira 企业级项目(二十八)
文章目录
- 一、项目起航:项目初始化与配置
- 二、React 与 Hook 应用:实现项目列表
- 三、TS 应用:JS神助攻 - 强类型
- 四、JWT、用户认证与异步请求
- 五、CSS 其实很简单 - 用 CSS-in-JS 添加样式
- 六、用户体验优化 - 加载中和错误状态处理
- 七、Hook,路由,与 URL 状态管理
- 八、用户选择器与项目编辑功能
- 九、深入React 状态管理与Redux机制
- 十、用 react-query 获取数据,管理缓存
- 十一、看板页面及任务组页面开发
- 1~3
- 4~6
- 7&8
- 9&10
- 11&12
- 13.任务组页面 (下)
- 14.完成 popover
- 15.开发完成,部署页面
学习内容来源:React + React Hook + TS 最佳实践-慕课网
相对原教程,我在学习开始时(2023.03)采用的是当前最新版本:
| 项 | 版本 |
|---|---|
| react & react-dom | ^18.2.0 |
| react-router & react-router-dom | ^6.11.2 |
| antd | ^4.24.8 |
| @commitlint/cli & @commitlint/config-conventional | ^17.4.4 |
| eslint-config-prettier | ^8.6.0 |
| husky | ^8.0.3 |
| lint-staged | ^13.1.2 |
| prettier | 2.8.4 |
| json-server | 0.17.2 |
| craco-less | ^2.0.0 |
| @craco/craco | ^7.1.0 |
| qs | ^6.11.0 |
| dayjs | ^1.11.7 |
| react-helmet | ^6.1.0 |
| @types/react-helmet | ^6.1.6 |
| react-query | ^6.1.0 |
| @welldone-software/why-did-you-render | ^7.0.1 |
| @emotion/react & @emotion/styled | ^11.10.6 |
具体配置、操作和内容会有差异,“坑”也会有所不同。。。
一、项目起航:项目初始化与配置
- 一、项目起航:项目初始化与配置
二、React 与 Hook 应用:实现项目列表
- 二、React 与 Hook 应用:实现项目列表
三、TS 应用:JS神助攻 - 强类型
- 三、 TS 应用:JS神助攻 - 强类型
四、JWT、用户认证与异步请求
- 四、 JWT、用户认证与异步请求(上)
- 四、 JWT、用户认证与异步请求(下)
五、CSS 其实很简单 - 用 CSS-in-JS 添加样式
- 五、CSS 其实很简单 - 用 CSS-in-JS 添加样式(上)
- 五、CSS 其实很简单 - 用 CSS-in-JS 添加样式(下)
六、用户体验优化 - 加载中和错误状态处理
- 六、用户体验优化 - 加载中和错误状态处理(上)
- 六、用户体验优化 - 加载中和错误状态处理(中)
- 六、用户体验优化 - 加载中和错误状态处理(下)
七、Hook,路由,与 URL 状态管理
- 七、Hook,路由,与 URL 状态管理(上)
- 七、Hook,路由,与 URL 状态管理(中)
- 七、Hook,路由,与 URL 状态管理(下)
八、用户选择器与项目编辑功能
- 八、用户选择器与项目编辑功能(上)
- 八、用户选择器与项目编辑功能(下)
九、深入React 状态管理与Redux机制
- 九、深入React 状态管理与Redux机制(一)
- 九、深入React 状态管理与Redux机制(二)
- 九、深入React 状态管理与Redux机制(三)
- 九、深入React 状态管理与Redux机制(四)
- 九、深入React 状态管理与Redux机制(五)
十、用 react-query 获取数据,管理缓存
- 十、用 react-query 获取数据,管理缓存(上)
- 十、用 react-query 获取数据,管理缓存(下)
十一、看板页面及任务组页面开发
1~3
- 十一、看板页面及任务组页面开发(一)
4~6
- 十一、看板页面及任务组页面开发(二)
7&8
- 十一、看板页面及任务组页面开发(三)
9&10
- 十一、看板页面及任务组页面开发(四)
11&12
- 十一、看板页面及任务组页面开发(五)
13.任务组页面 (下)
新建 src\screens\TaskGroup\components\createTaskGroup.js:
import React, { useEffect } from "react";
import { Button, Drawer, Form, Input, Spin } from "antd";
import { DrawerProps } from "antd/es/drawer";
import styled from "@emotion/styled";
import { ErrorBox } from "components/lib";
import { useAddTaskGroup } from "utils/taskGroup";
import { useTaskGroupsQueryKey } from "screens/TaskGroup/utils";
import { useForm } from "antd/es/form/Form";
import { useProjectIdInUrl } from "screens/ViewBoard/utils";export const CreateTaskGroup = (props: Pick<DrawerProps, "visible"> & { onClose: () => void }
) => {const { mutate: addEpic, isLoading, error } = useAddTaskGroup(useTaskGroupsQueryKey());const [form] = useForm();const projectId = useProjectIdInUrl();const onFinish = async (values: any) => {await addEpic({ ...values, projectId });props.onClose();};useEffect(() => {form.resetFields();}, [form, props.visible]);return (<Drawervisible={props.visible}onClose={props.onClose}forceRender={true}destroyOnClose={true}width={"100%"}><Container>{isLoading ? (<Spin size={"large"} />) : (<><h1>创建任务组</h1><ErrorBox error={error} /><Formform={form}layout={"vertical"}style={{ width: "40rem" }}onFinish={onFinish}><Form.Itemlabel={"名称"}name={"name"}rules={[{ required: true, message: "请输入任务组名" }]}><Input placeholder={"请输入任务组名称"} /></Form.Item><Form.Item style={{ textAlign: "right" }}><Buttonloading={isLoading}type={"primary"}htmlType={"submit"}>提交</Button></Form.Item></Form></>)}</Container></Drawer>);
};const Container = styled.div`height: 80vh;display: flex;flex-direction: column;justify-content: center;align-items: center;
`;
编辑 src\screens\TaskGroup\index.tsx(新增创建任务组功能):
...
import { CreateTaskGroup } from "./components/createTaskGroup";export const TaskGroupIndex = () => {...const [epicCreateOpen, setEpicCreateOpen] = useState(false);...return (<ViewContainer><Row between={true}><h1>{currentProject?.name}任务组</h1><Button onClick={() => setEpicCreateOpen(true)} type={"link"}>创建任务组</Button></Row><Liststyle={{ overflow: "scroll" }}dataSource={taskGroups}itemLayout={"vertical"}renderItem={...}/><CreateTaskGrouponClose={() => setEpicCreateOpen(false)}visible={epicCreateOpen}/></ViewContainer>);
};
查看页面, 尝试新增任务组,功能正常!
注意,若是发现新增或删除后页面数据没有变化,那说明新增或删除时使用的
queryKey和useQuery中入参不一致,导致无法正常更新缓存数据
14.完成 popover
功能实现的差不多了,接下来查漏补缺
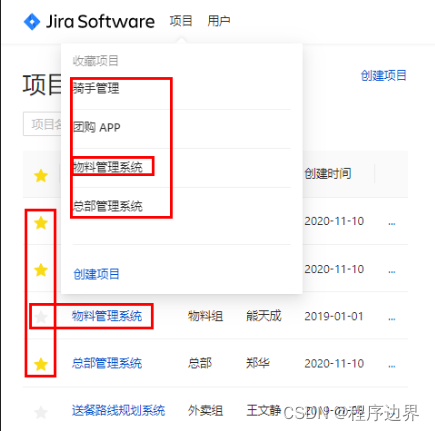
从图中可以看到,在项目列表页中,取消或新增收藏项目,页面左上角收藏夹不会自动更新,查看代码并结合控制台发现 ProjectPopover 中没有给 useProjects 传入参数作为 queryKey,因此在缓存中 这两个地方(收藏夹和项目列表并不一致)
编辑 src\screens\ProjectList\components\ProjectPopover.tsx(使用 refetch,在 onOpenChange 中调用):
...export const ProjectPopover = () => {...const { data: projects, refetch } = useProjects();...return (<Popover onOpenChange={() => refetch()} placement="bottom" content={content}>项目</Popover>);
};
...
查看页面,这样功能正常啦!
编辑 src\utils\use-users.ts(改为 react-query 的方式):
import { useHttp } from "utils/http";
import { User } from "types/User";
import { useQuery } from "react-query";export const useUsers = (param?: Partial<User>) => {const client = useHttp();return useQuery<User[]>(["users", param], () =>client("users", { data: param }));
};
新建 src\screens\ProjectList\components\UserPopover.tsx(页面布局有一部分与 ProjectPopover 相同,可以拿过来 src\screens\ProjectList\components\ProjectPopover.tsx):
import React from "react";
import { Divider, List, Popover, Typography } from "antd";
import styled from "@emotion/styled";
import { useUsers } from "utils/use-users";export const UserPopover = () => {const { data: users, refetch } = useUsers();const content = (<ContentContainer><Typography.Text type={"secondary"}>组员列表</Typography.Text><List>{users?.map((user) => (<List.Item key={user.id}><List.Item.Meta title={user.name} /></List.Item>))}</List><Divider /></ContentContainer>);return (<PopoveronVisibleChange={() => refetch()}placement={"bottom"}content={content}><span>组员</span></Popover>);
};const ContentContainer = styled.div`min-width: 30rem;
`;
编辑 src\authenticated-app.tsx(使用 UserPopover 组件)
...
import { UserPopover } from "screens/ProjectList/components/UserPopover";export const AuthenticatedApp = () => {...
};const PageHeader = () => {...return (<Header between={true}><HeaderLeft gap={true}>...<ProjectPopover /><UserPopover /></HeaderLeft><HeaderRight>...</HeaderRight></Header>);
};
查看页面,显示正常!
15.开发完成,部署页面
按视频教程是部署到 github pages
在 github 上新建一个仓库,仓库名必须为 username.github.io,其中 username 是 github 用户名。
安装依赖
npm i gh-pages -D
npm i deploy
修改 package.json(配置部署脚本)
{"scripts": {..."predeploy": "npm run build","deploy": "gh-pages -d build -r git@github.com:sindu12jun/sindu12jun.github.io.git -b main"},
}
注意要将
git链接替换成自己的,并指定分支(main替代之前master作为github默认主分支)
安装好后执行:npm run deploy(predeploy 也会自动执行),打包后的文件会自动上传到 github 并生成提交记录
打开部署后的页面,成功!
但是还有个问题,github 如何判断路由是前端路由还是后端路由?
目前点到其他子页面,刷新后 显示404
接下来解决这个问题,参考 spa-github-pages: 使用GitHub Pages 托管单页应用程序
大概步骤如下:
- 自定义 404 页面,将当前的路由信息记录下来
- 携带路由信息跳转到 index
- 进入 index 后检查路由信息,进行还原
新建 public\404.html(配置404页面,解决强制刷新页面时,github pages当做后端路由,从而报错的问题)
<!DOCTYPE html>
<html>
<head><meta charset="utf-8"><title>Single Page Apps for GitHub Pages</title><script type="text/javascript">// Single Page Apps for GitHub Pages// MIT License// https://github.com/rafgraph/spa-github-pages// This script takes the current url and converts the path and query// string into just a query string, and then redirects the browser// to the new url with only a query string and hash fragment,// e.g. https://www.foo.tld/one/two?a=b&c=d#qwe, becomes// https://www.foo.tld/?/one/two&a=b~and~c=d#qwe// Note: this 404.html file must be at least 512 bytes for it to work// with Internet Explorer (it is currently > 512 bytes)// If you're creating a Project Pages site and NOT using a custom domain,// then set pathSegmentsToKeep to 1 (enterprise users may need to set it to > 1).// This way the code will only replace the route part of the path, and not// the real directory in which the app resides, for example:// https://username.github.io/repo-name/one/two?a=b&c=d#qwe becomes// https://username.github.io/repo-name/?/one/two&a=b~and~c=d#qwe// Otherwise, leave pathSegmentsToKeep as 0.var pathSegmentsToKeep = 0;var l = window.location;l.replace(l.protocol + '//' + l.hostname + (l.port ? ':' + l.port : '') +l.pathname.split('/').slice(0, 1 + pathSegmentsToKeep).join('/') + '/?/' +l.pathname.slice(1).split('/').slice(pathSegmentsToKeep).join('/').replace(/&/g, '~and~') +(l.search ? '&' + l.search.slice(1).replace(/&/g, '~and~') : '') +l.hash);</script>
</head>
<body>
</body>
</html>
编辑 public\index.html(将路由信息完整的带到 index 中还原,从而实现 SPA 的效果,当然,会看到浏览器地址栏中路由的跳转,体验上稍微差了点,不过功能上已经基本无异。)
<!DOCTYPE html>
<html lang="en"><head>...<title>Jira任务管理系统</title><!-- Start Single Page Apps for GitHub Pages --><script type="text/javascript">// Single Page Apps for GitHub Pages// MIT License// https://github.com/rafgraph/spa-github-pages// This script checks to see if a redirect is present in the query string,// converts it back into the correct url and adds it to the// browser's history using window.history.replaceState(...),// which won't cause the browser to attempt to load the new url.// When the single page app is loaded further down in this file,// the correct url will be waiting in the browser's history for// the single page app to route accordingly.(function(l) {if (l.search[1] === '/' ) {var decoded = l.search.slice(1).split('&').map(function(s) {return s.replace(/~and~/g, '&')}).join('?');window.history.replaceState(null, null,l.pathname.slice(0, -1) + decoded + l.hash);}}(window.location))</script><!-- End Single Page Apps for GitHub Pages --></head><body>...</body>
</html>
英文注释译文:该脚本检查查询字符串中是否存在重定向,将其转换回正确的
url,并使用window.history.replaceState(…)将其添加到浏览器的历史记录中,这不会导致浏览器尝试加载新url。当单页应用程序在这个文件中被进一步加载时,正确的url将在浏览器的历史记录中等待单页应用程序相应地路由。
解决方案原地址:https://github.com/rafgraph/spa-github-pages
- 为方便访问,博主在gitee上 fork 了一份 https://gitee.com/OliverDaDa_admin/spa-github-pages
这样部署就完成啦!
部分引用笔记还在草稿阶段,敬请期待。。。