Springboot 整合MQ实现延时队列入门
延时队列
- 添加依赖
- 配置文件
- 队列TTL
- 代码架构图
- 交换机、队列、绑定配置文件代码
- 生产者代码
- 消费者代码
- 延时队列优化
- 添加普通队列配置代码
- 生产者发送消息是进行设置消息的ttl
- 通过MQ 插件实现延时队列
- 代码架构图
- 配置交换机
- 生产者代码
- 消费者代码
- 测试发送
添加依赖
<!-- rabbitMQ 集成 spring boot --><dependency><groupId>org.springframework.boot</groupId><artifactId>spring-boot-starter-amqp</artifactId></dependency><dependency><groupId>org.springframework.boot</groupId><artifactId>spring-boot-starter-web</artifactId></dependency><dependency><groupId>org.springframework.boot</groupId><artifactId>spring-boot-starter-test</artifactId><scope>test</scope></dependency><dependency><groupId>com.alibaba</groupId><artifactId>fastjson</artifactId><version>1.2.47</version></dependency><dependency><groupId>org.projectlombok</groupId><artifactId>lombok</artifactId></dependency><!--swagger--><dependency><groupId>io.springfox</groupId><artifactId>springfox-swagger2</artifactId><version>2.9.2</version></dependency><dependency><groupId>io.springfox</groupId><artifactId>springfox-swagger-ui</artifactId><version>2.9.2</version></dependency><!--RabbitMQ 测试依赖--><dependency><groupId>org.springframework.amqp</groupId><artifactId>spring-rabbit-test</artifactId><scope>test</scope></dependency>
配置文件
spring.rabbitmq.host=localhost
spring.rabbitmq.port=5672
spring.rabbitmq.username=guest
spring.rabbitmq.password=guest
队列TTL
代码架构图
创建两个队列 QA 和 QB,两者队列 TTL 分别设置为 10S 和 40S,然后在创建一个交换机 X 和死信交换机 Y,它们的类型都是 direct,创建一个死信队列 QD,它们的绑定关系如下:

交换机、队列、绑定配置文件代码
package com.wlj.rabbitmq.sbmq.confing;import org.springframework.amqp.core.*;
import org.springframework.beans.factory.annotation.Qualifier;
import org.springframework.context.annotation.Bean;
import org.springframework.context.annotation.Configuration;import java.util.HashMap;/***@创建人 wlj*@创建时间 2023/8/16*@描述 MQ配置*/
@Configuration
public class TtlQueueConfig {//X交换机public static final String X_EXCHANGE = "X";//QA队列public static final String QUEUE_A = "QA";//QB队列public static final String QUEUE_B = "QB";//Y死信交换机public static final String Y_DEAD_LETTER_EXCHANGE = "Y";//QD死信队列public static final String DEAD_LETTER_QUEUE = "QD";//声明x交换机@Bean("xExchange")public DirectExchange xExchange(){return new DirectExchange(X_EXCHANGE);}//声明y交换机@Bean("yExchange")public DirectExchange yExchange(){return new DirectExchange(Y_DEAD_LETTER_EXCHANGE);}//声明QA队列 ttl为10秒 并绑定对应的死信交换机@Bean("queueA")public Queue queueA(){HashMap<String, Object> args = new HashMap<>();//声明当前队列绑定的死信交换机args.put("x-dead-letter-exchange", Y_DEAD_LETTER_EXCHANGE);//声明当前队列的死信路由 keyargs.put("x-dead-letter-routing-key", "YD");//声明队列的 TTLargs.put("x-message-ttl", 10000);return QueueBuilder.durable(QUEUE_A).withArguments(args).build();}//声明QB队列 ttl为40秒 并绑定对应的死信交换机@Bean("queueB")public Queue queueB(){HashMap<String, Object> args = new HashMap<>();//声明当前队列绑定的死信交换机args.put("x-dead-letter-exchange", Y_DEAD_LETTER_EXCHANGE);//声明当前队列的死信路由 keyargs.put("x-dead-letter-routing-key", "YD");//声明队列的 TTLargs.put("x-message-ttl", 40000);return QueueBuilder.durable(QUEUE_B).withArguments(args).build();}//设置队列QA 绑定交换机X@Beanpublic Binding  queueaBindingX(@Qualifier("queueA")Queue queueA,@Qualifier("xExchange")DirectExchange xExchange){return BindingBuilder.bind(queueA).to(xExchange).with("XA");}//设置队列QB 绑定交换机X@Beanpublic Binding  queuebBindingX(@Qualifier("queueB")Queue queueB,@Qualifier("xExchange")DirectExchange xExchange){return BindingBuilder.bind(queueB).to(xExchange).with("XB");}//声明死信队列QD@Bean("queueD")public  Queue queueD(){return QueueBuilder.durable(DEAD_LETTER_QUEUE).build();}//死信队列和死信交换机绑定@Beanpublic Binding queuedBind(@Qualifier("queueD") Queue queueD,@Qualifier("yExchange") DirectExchange yExchange){return  BindingBuilder.bind(queueD).to(yExchange).with("YD");}
}
生产者代码
package com.wlj.rabbitmq.sbmq.confing.controller;import lombok.extern.slf4j.Slf4j;
import org.springframework.amqp.rabbit.core.RabbitTemplate;
import org.springframework.web.bind.annotation.GetMapping;
import org.springframework.web.bind.annotation.PathVariable;
import org.springframework.web.bind.annotation.RequestMapping;
import org.springframework.web.bind.annotation.RestController;import javax.annotation.Resource;
import java.util.Date;/***@创建人 wlj*@创建时间 2023/8/16*@描述 生产者controller*/
@Slf4j
@RestController
@RequestMapping("ttl")
public class MsgController {@ResourceRabbitTemplate rabbitTemplate;@GetMapping("/send/{msg}")public void sendMsg(@PathVariable String msg){log.info("当前时间:{},发送一条信息给两个 TTL 队列:{}", new Date(), msg);rabbitTemplate.convertAndSend("X","XA","发送的消息,延时10秒: "+msg);rabbitTemplate.convertAndSend("X","XB","发送的消息,延时40秒: "+msg);}
}
消费者代码
package com.wlj.rabbitmq.sbmq.confing.dead;import com.rabbitmq.client.Channel;
import com.rabbitmq.client.Channel;
import lombok.extern.slf4j.Slf4j;
import org.springframework.amqp.core.Message;
import org.springframework.amqp.rabbit.annotation.RabbitListener;
import org.springframework.stereotype.Component;import java.util.Date;/***@创建人 wlj*@创建时间 2023/8/16*@描述 消费者*/
@Component
@Slf4j
public class DeadLetterQueueConsumer {@RabbitListener(queues = "QD")public void getMsg(Message msg, Channel channel){System.out.println(new String(msg.getBody()));log.info("当前时间:{},收到死信队列信息{}", new Date().toString(), msg);}
}
发送测试
http://localhost:8080/ttl/send/嘻嘻嘻
以上代码声明队列的时候,设置队列的延时时间是10秒和40秒,意味着所有进入队列的消息都是根据队列的延时时间的。这就会有一个问题,如果说业务需要延时20秒、15秒、一分钟、等等等等,难道都需要创建每一种延时队列吗?那岂不是要增加无数个队列才能满足需求。下面就进行优化延时队列
延时队列优化
代码架构图
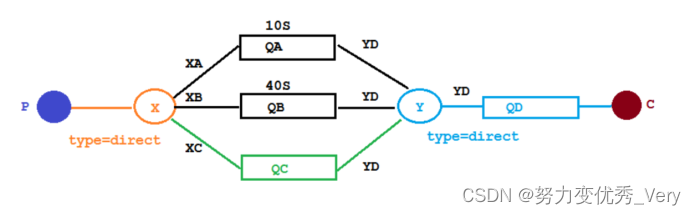
声明一个普通的队列,只需要在生产消息的时候设置消息的延时时间即可。
添加普通队列配置代码
//声明普通队列QC代码@Bean("queueC")public Queue queueC(){HashMap<String, Object> args = new HashMap<>();//声明当前队列绑定的死信交换机args.put("x-dead-letter-exchange", Y_DEAD_LETTER_EXCHANGE);//声明当前队列的死信路由 keyargs.put("x-dead-letter-routing-key", "YD");return QueueBuilder.durable(QUEUE_C).withArguments(args).build();}//设置QC队列和X交换机绑定@Beanpublic Binding queuecBindX(@Qualifier("queueC")Queue queueC,@Qualifier("xExchange")DirectExchange xExchange){return BindingBuilder.bind(queueC).to(xExchange).with("XC");}
生产者发送消息是进行设置消息的ttl
@GetMapping("/send/{msg}/{ttl}")public void sendMsgTtl(@PathVariable String msg,@PathVariable String ttl){rabbitTemplate.convertAndSend("X","XC",msg,correlationData->{correlationData.getMessageProperties().setExpiration(ttl);return correlationData;});log.info("当前时间:{},发送一条时长{}毫秒 TTL 信息给队列 C:{}", new Date(),ttl, msg);}
发送测试
http://localhost:8080/ttl/send/嘻嘻嘻/20000
http://localhost:8080/ttl/send/哈哈哈/2000
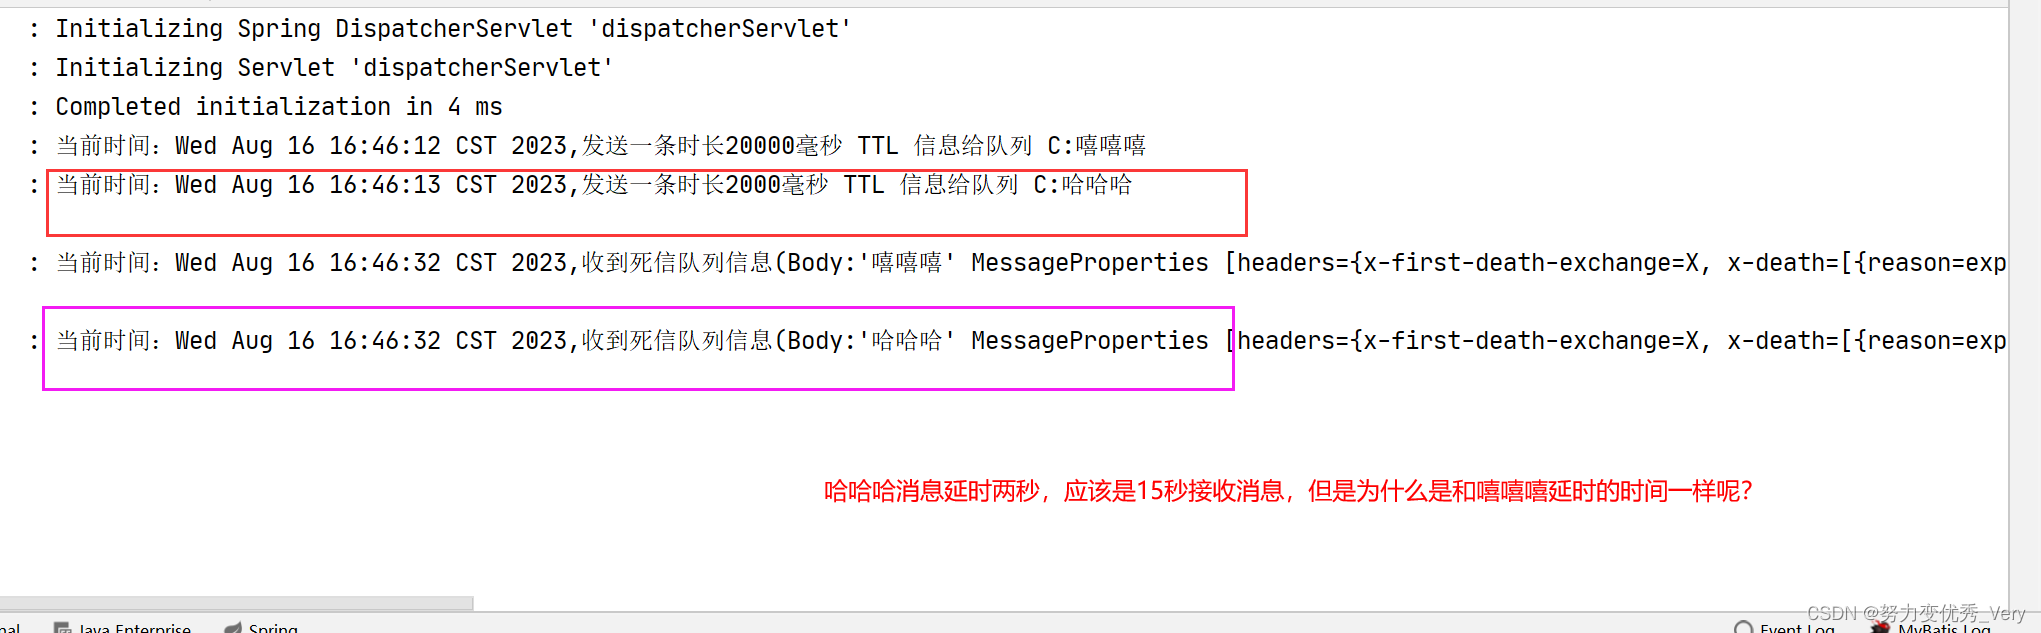
消息可能并不会按时“死亡“,因为 RabbitMQ 只会检查第一个消息是否过期,如果过期则丢到死信队列,
如果第一个消息的延时时长很长,而第二个消息的延时时长很短,第二个消息并不会优先得到执行。
通过MQ 插件实现延时队列
Windows 安装MQ延时插件,请查看
Linux 安装MQ延时插件,请查看
代码架构图
延时队列是交换机进行把控消息的ttl。ttl到期才会发送到对应到队列
在这里新增了一个队列 delayed.queue,一个自定义交换机 delayed.exchange,绑定关系如下

配置交换机
package com.wlj.rabbitmq.sbmq.confing.plugins;import org.springframework.amqp.core.*;
import org.springframework.beans.factory.annotation.Qualifier;
import org.springframework.context.annotation.Bean;
import org.springframework.stereotype.Component;import java.util.HashMap;/***@创建人 wlj*@创建时间 2023/8/16*@描述 基于插件实现延时消息发送*/
@Component
public class DelayedQueueConfig {//队列public static final String DELAYED_QUEUE_NAME = "delayed.queue";//交换机public static final String DELAYED_EXCHANGE_NAME = "delayed.exchange";//routingkeypublic static final String DELAYED_ROUTING_KEY = "delayed.routingkey";//声明队列@Beanpublic Queue delayedQueue(){return QueueBuilder.durable(DELAYED_QUEUE_NAME).build();}/***   声明交换机*   因为交换机的类型没有延时类型 所以使用自定义交换机*/@Beanpublic CustomExchange delayedExchange(){HashMap<String, Object> args = new HashMap<>();//自定义交换机的类型args.put("x-delayed-type", "direct");// 对应参数: 交换机的名称 x-delayed-message说明是延时消息交换机 是否序列化 是否自动删除,参数return  new CustomExchange(DELAYED_EXCHANGE_NAME,"x-delayed-message",true,false,args);}//进行绑定@Beanpublic Binding bindingDelayedQueue(@Qualifier("delayedQueue") Queue queue,@Qualifier("delayedExchange") CustomExchangedelayedExchange) {return BindingBuilder.bind(queue).to(delayedExchange).with(DELAYED_ROUTING_KEY).noargs();}
}
生产者代码
public static final String DELAYED_EXCHANGE_NAME = "delayed.exchange";public static final String DELAYED_ROUTING_KEY = "delayed.routingkey";@GetMapping("sendDelayMsg/{message}/{delayTime}")public void sendMsg(@PathVariable String message,@PathVariable Integer delayTime) {rabbitTemplate.convertAndSend(DELAYED_EXCHANGE_NAME, DELAYED_ROUTING_KEY, message,correlationData ->{correlationData.getMessageProperties().setDelay(delayTime);return correlationData;});log.info(" 当 前 时 间 : {}, 发送一条延迟 {} 毫秒的信息给队列 delayed.queue:{}", new Date(),delayTime, message);}
消费者代码
public static final String DELAYED_QUEUE_NAME = "delayed.queue";@RabbitListener(queues = DELAYED_QUEUE_NAME)public void receiveDelayedQueue(Message message){String msg = new String(message.getBody());log.info("当前时间:{},收到延时队列的消息:{}", new Date().toString(), msg);}
测试发送
http://localhost:8080/ttl/sendDelayMsg/qwer/20000
http://localhost:8080/ttl/sendDelayMsg/121212/2000