opencv实战项目 手势识别-手势音量控制(opencv)
本项目是使用了谷歌开源的框架mediapipe,里面有非常多的模型提供给我们使用,例如面部检测,身体检测,手部检测等。
手势识别系列文章
1.opencv实现手部追踪(定位手部关键点)
2.opencv实战项目 实现手势跟踪并返回位置信息(封装调用)
3.手势识别-手势音量控制(opencv)
4.opencv实战项目 手势识别-手势控制鼠标
未完待续...
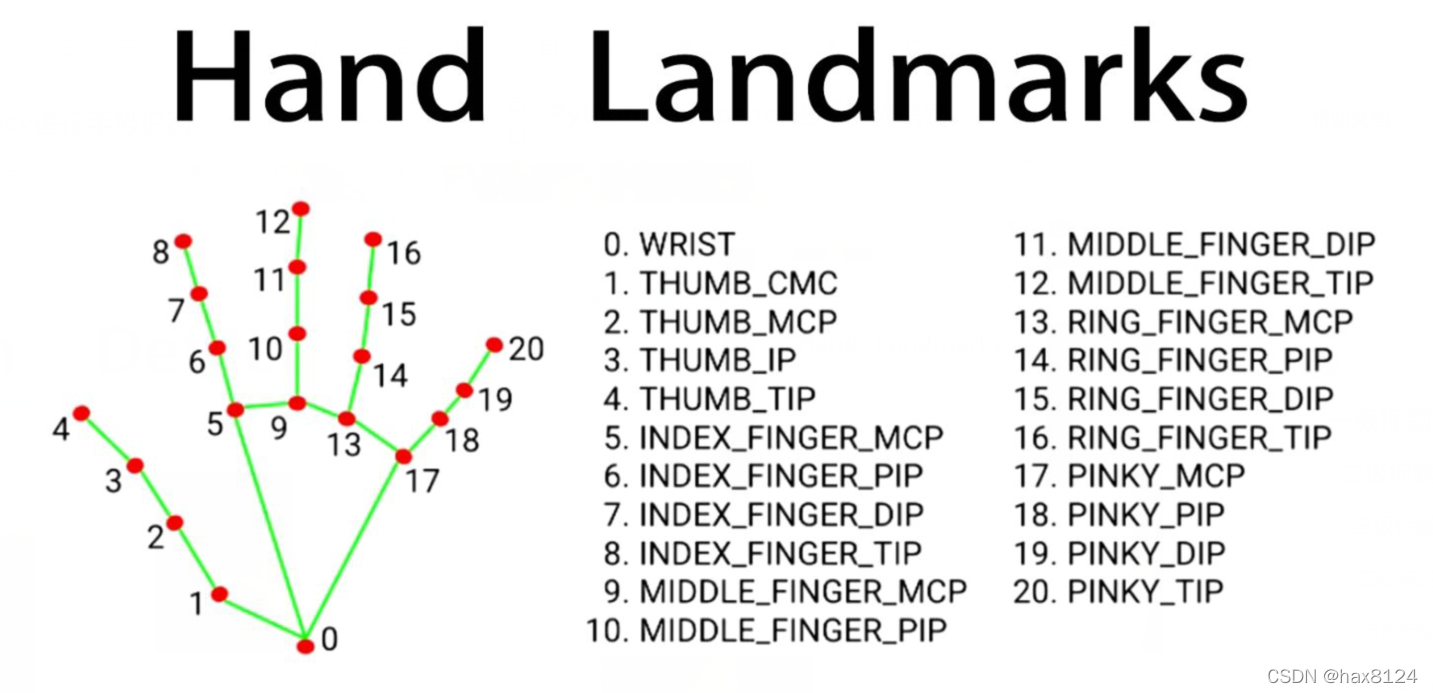
代码需要用到opencv HandTraqckModule模块 mediapipe模块和一个音量控制模块
AndreMiras/pycaw: Python Core Audio Windows Library (github.com) 音量控制模块的作者,有兴趣可以了解
手部追踪模块来自前期的我们实战内容opencv 实现手势跟踪并返回位置信息(封装调用)_陈子迩的博客-CSDN博客
下面给大家详细说一下代码
import cv2
import time
import numpy as np
from HandTraqckModule import *
import math
from comtypes import CLSCTX_ALL
from pycaw.pycaw import AudioUtilities, IAudioEndpointVolume
这些行导入了所需的库和模块:
cv2: OpenCV 库,用于图像处理和显示。time: Python 标准库,用于处理时间操作。numpy: 数值计算库,用于插值计算。HandTraqckModule: 自定义的手部追踪模块(你的代码中似乎有个拼写错误,正确的应该是HandTrackModule)。math: Python 标准库,用于数学计算。comtypes: 用于处理 COM 接口的库。pycaw: 用于访问 Windows 音频控制接口的库。-
devices = AudioUtilities.GetSpeakers() interface = devices.Activate(IAudioEndpointVolume._iid_, CLSCTX_ALL, None) volume = interface.QueryInterface(IAudioEndpointVolume) volRange = volume.GetVolumeRange() minVol = volRange[0] maxVol = volRange[1] -
这部分代码获取了默认音频输出设备的信息,并通过
pycaw库设置了音量范围、最小音量和最大音量。 -
wCam, hCam = 1280, 720
cap = cv2.VideoCapture(0)
cap.set(3, wCam)
cap.set(4, hCam)
这里设置了摄像头的分辨率,并通过 OpenCV 打开摄像头。
pTime = 0
detector = handDetector(detectionCon=0.7)
初始化了上一帧的时间 pTime,并创建了 handDetector 类的实例 detector,设置了手势检测的置信度阈值为 0.7。
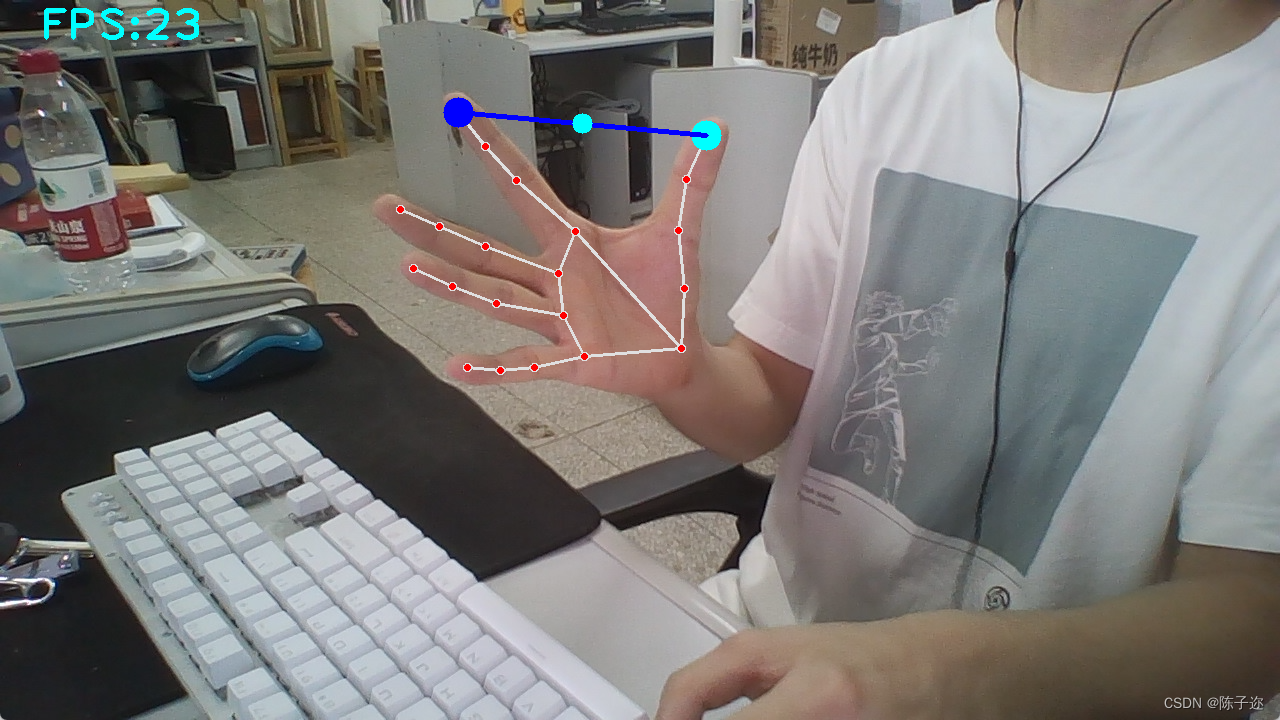
while True:success, img = cap.read()img = detector.findHands(img)lmList = detector.findPosition(img, draw=False)if len(lmList) != 0:# 从手部标记点列表中获取两个指尖的坐标x1, y1 = lmList[4][1], lmList[4][2]x2, y2 = lmList[8][1], lmList[8][2]cx, cy = (x1 + x2) // 2, (y1 + y2) // 2# 绘制手势标记和连接线cv2.circle(img, (x1, y1), 15, (255, 255, 0), cv2.FILLED)cv2.circle(img, (x2, y2), 15, (255, 0, 0), cv2.FILLED)cv2.line(img, (x1, y1), (x2, y2), (255, 0, 0), 3)cv2.circle(img, (cx, cy), 10, (255, 255, 0), cv2.FILLED)# 计算手势长度length = math.hypot(x2 - x1, y2 - y1)# 映射手势长度到音量范围vol = np.interp(length, [10, 230], [minVol, maxVol])print(int(length), int(vol))# 设置系统音量volume.SetMasterVolumeLevel(vol, None)# 如果手势长度小于一定阈值,绘制一个圆圈表示手势过小if length < 50:cv2.circle(img, (cx, cy), 15, (255, 100, 100), cv2.FILLED)cTime = time.time()fps = 1 / (cTime - pTime)pTime = cTime# 绘制帧率信息cv2.putText(img, f'FPS:{int(fps)}', (40, 40), cv2.FONT_HERSHEY_PLAIN, 3, (255, 255, 0), 3)# 显示图像cv2.imshow('img', img)cv2.waitKey(1)
这部分代码是主要的处理循环,它会不断地从摄像头捕获图像,然后使用 detector 对象进行手部检测和标记绘制。随后,通过手指标记点的坐标计算手势的长度,并将这个长度映射到音量范围,然后设置系统音量。如果手势长度小于阈值,会在图像上绘制一个圆圈来表示手势过小。最后,还会绘制帧率信息并显示图像。
下面附上全部代码
总体代码
import cv2
import time
import numpy as np
from HandTraqckModule import *
import math
from comtypes import CLSCTX_ALL
from pycaw.pycaw import AudioUtilities, IAudioEndpointVolume# 获取默认音频输出设备
devices = AudioUtilities.GetSpeakers()
interface = devices.Activate(IAudioEndpointVolume._iid_, CLSCTX_ALL, None)
volume = interface.QueryInterface(IAudioEndpointVolume)
# 获取音量范围
volRange = volume.GetVolumeRange()
minVol = volRange[0]
maxVol = volRange[1]# 设置摄像头分辨率
wCam, hCam = 1280, 720# 打开摄像头
cap = cv2.VideoCapture(0)
cap.set(3, wCam)
cap.set(4, hCam)pTime = 0
detector = handDetector(detectionCon=0.7)while True:success, img = cap.read()img = detector.findHands(img)lmList = detector.findPosition(img, draw=False)if len(lmList) != 0:x1, y1 = lmList[4][1], lmList[4][2]x2, y2 = lmList[8][1], lmList[8][2]cx, cy = (x1 + x2) // 2, (y1 + y2) // 2# 绘制手势标记和连接线cv2.circle(img, (x1, y1), 15, (255, 255, 0), cv2.FILLED)cv2.circle(img, (x2, y2), 15, (255, 0, 0), cv2.FILLED)cv2.line(img, (x1, y1), (x2, y2), (255, 0, 0), 3)cv2.circle(img, (cx, cy), 10, (255, 255, 0), cv2.FILLED)# 计算手势长度length = math.hypot(x2 - x1, y2 - y1)# 映射手势长度到音量范围vol = np.interp(length, [10, 230], [minVol, maxVol])print(int(length), int(vol))# 设置系统音量volume.SetMasterVolumeLevel(vol, None)# 如果手势长度小于一定阈值,绘制一个圆圈表示手势过小if length < 50:cv2.circle(img, (cx, cy), 15, (255, 100, 100), cv2.FILLED)cTime = time.time()fps = 1 / (cTime - pTime)pTime = cTime# 绘制帧率信息cv2.putText(img, f'FPS:{int(fps)}', (40, 40), cv2.FONT_HERSHEY_PLAIN, 3, (255, 255, 0), 3)# 显示图像cv2.imshow('img', img)cv2.waitKey(1)