Android AOSP源码编译——AOSP整编(二)
切换到源码目录下执行下面命令
1、初始化环境
. build/envsetup.sh
//清除缓存
make clobber
2、选择编译目标
lunch
AOSP 预制了很多 Product。这里为了简单我们先不用真机,而是选择模拟器的方式,对于 x86_64 模拟器,我们选择的是 aosp_x86_64-eng。
lunch命令回车后会让你选择编译目标,我们选31(aosp_x86_64-eng)
maoweiyi@maoweiyi-OMEN-by-HP-Laptop-15-dc0xxx:~/aosp$ lunchYou're building on LinuxLunch menu... pick a combo:1. aosp_arm-eng2. aosp_arm64-eng3. aosp_barbet-userdebug4. aosp_blueline-userdebug5. aosp_blueline_car-userdebug6. aosp_bonito-userdebug7. aosp_bonito_car-userdebug8. aosp_bramble-userdebug9. aosp_car_arm-userdebug10. aosp_car_arm64-userdebug11. aosp_car_x86-userdebug12. aosp_car_x86_64-userdebug13. aosp_cf_arm64_auto-userdebug14. aosp_cf_arm64_phone-userdebug15. aosp_cf_x86_64_phone-userdebug16. aosp_cf_x86_auto-userdebug17. aosp_cf_x86_phone-userdebug18. aosp_cf_x86_tv-userdebug19. aosp_coral-userdebug20. aosp_coral_car-userdebug21. aosp_crosshatch-userdebug22. aosp_crosshatch_car-userdebug23. aosp_flame-userdebug24. aosp_flame_car-userdebug25. aosp_redfin-userdebug26. aosp_sargo-userdebug27. aosp_sunfish-userdebug28. aosp_trout_arm64-userdebug29. aosp_trout_x86-userdebug30. aosp_x86-eng31. aosp_x86_64-eng32. arm_krait-eng33. arm_v7_v8-eng34. armv8-eng35. armv8_kryo385-eng36. beagle_x15-userdebug37. beagle_x15_auto-userdebug38. car_x86_64-userdebug39. db845c-userdebug40. fuchsia_arm64-eng41. fuchsia_x86_64-eng42. hikey-userdebug43. hikey64_only-userdebug44. hikey960-userdebug45. hikey960_tv-userdebug46. hikey_tv-userdebug47. pixel3_mainline-userdebug48. poplar-eng49. poplar-user50. poplar-userdebug51. qemu_trusty_arm64-userdebug52. silvermont-eng53. uml-userdebug54. yukawa-userdebug55. yukawa_sei510-userdebugWhich would you like? [aosp_arm-eng] 31
3、编译
选择好编译目标,通过下面命令进行编译
//通过-jN 参数来设置编译的并行任务数,提高编译速度
make -j4
2000 years later~
 看到build completed successfully就代表我们构建成功了。
接下来运行模拟器
运行模拟器
emulator
因为我们是刚编译, 执行过envsetup脚本和lunch,否则需要先执行这两条命令
. build/envsetup.sh
lunch 31
emulator
备注:在启动模拟器的时候遇到了磁盘空间不足,我看了下整个AOSP文件夹占用了我200多G,其中隐藏文件.repo占用了50G,考虑了下因为是学习后期不使用repo
sync同步更新代码,所以就给删除了。
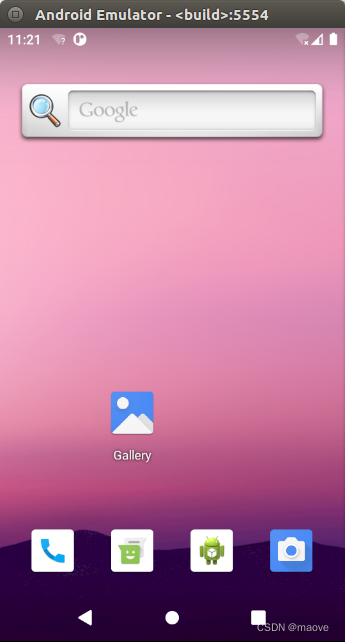
到这里我们的模拟器就成功运行起来了
4、修改代码运行
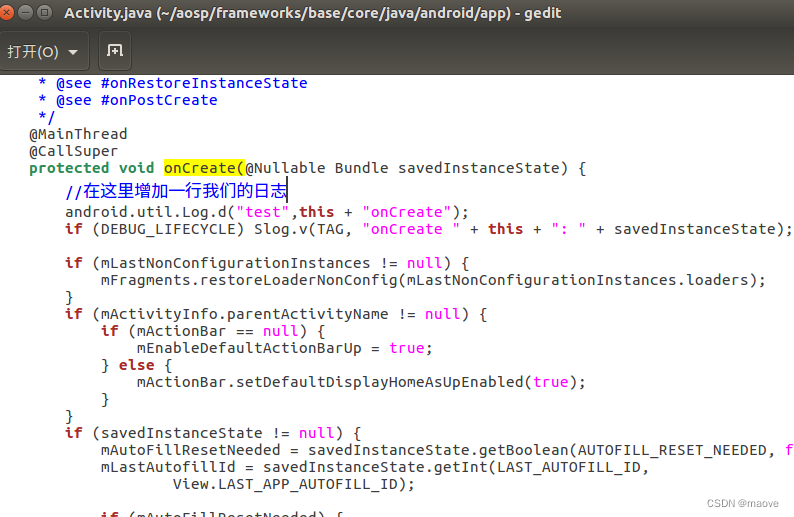
最后我们尝试下修改我们的Activity.java,重新编译看看有没有生效。可以通过find -name "Activity.java"命令找到我们的Activity.java

找到后给Activity.java的onCreate加一行日志打印。
 修改后保存,重新编译
. build/envsetup.sh
lunch 31
make -j4
编译成功再次运行模拟器
. build/envsetup.sh
lunch 31
emulator
打开终端 通过adb shell 和 logcat 命令查看日志
 adb shell 的配置可自行百度。
点击模拟器中几个app后日志结果日下
 可以看到我们修改的代码确实生效了。