智能家居项目(三)之框架设计及框架代码文件工程建立
目录
一、智能家居项目框架设计草图
二、框架代码文件工程建立
三、添加声音识别模块的串口读取功能
一、智能家居项目框架设计草图
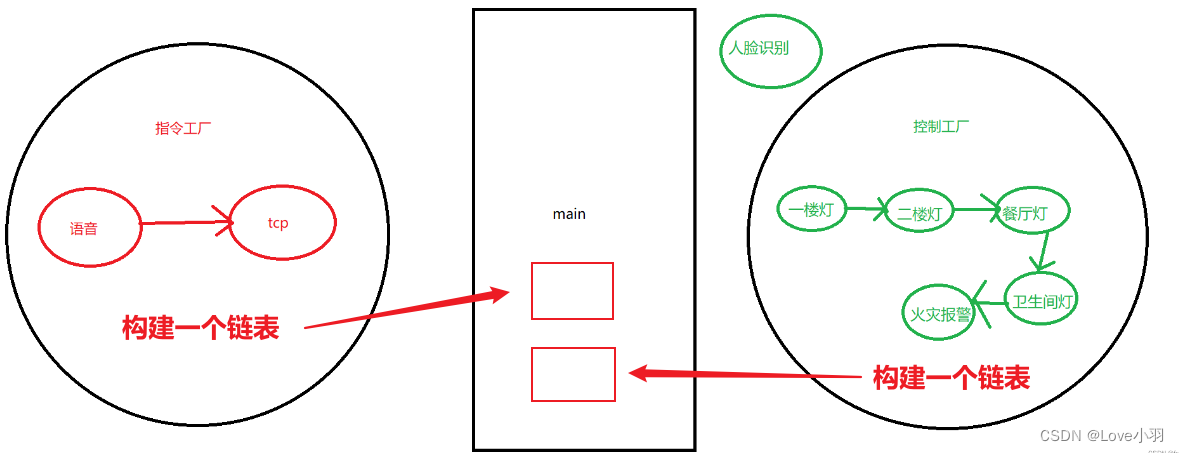
代码思路讲解:
1、一个指令工厂,一个控制工厂,实际上就是通过链表链起来的数据。具体怎么链接起来,就是基于简单工厂模式的类与对象的概念,上一篇文章有学习记录。
2、主函数语音指令程序和tcp指令程序各起一个线程,然后通过指令名字找到对应的控制程序,实现对应的模块的功能。
二、框架代码文件工程建立
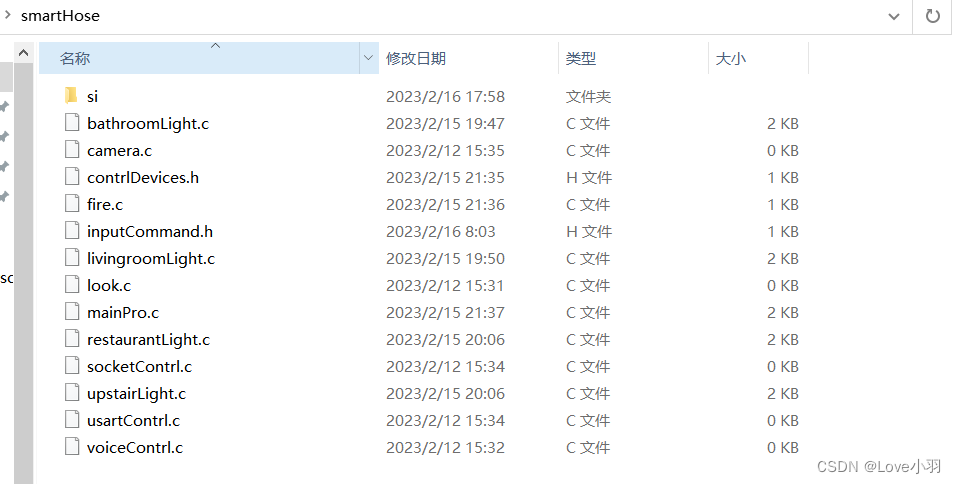
1、在桌面新建一个项目文件夹smartHose,然后在文件夹中创建如下文件:
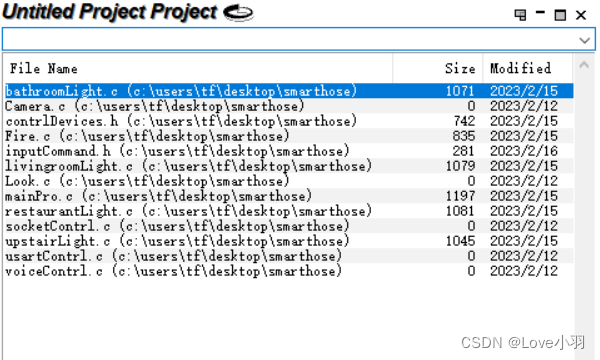
2、把上述的所有文件,都加载到Source lnsight工具中,如下图代表加载完毕
3、创建inputCommand.h头文件
//面向指令工厂的头文件
#include <wiringPi.h>
#include <stdlib.h>struct InputCommander{char commandName[128];             //名字char command[32];                  //指令int (*Init)(char *name,char *ipAdress,char *port);  //操作函数 int (*getCommand)(char *cmd);      //获取数据函数char log[1024];                    //log日志获取struct InputCommander *next;
};
4、创建contrlDevices.h头文件
//设备头文件
#include <wiringPi.h>struct Devices{char deviceName[128]; //名字int status;           //状态int pinNum;           //引脚int (*open)(int pinNum);        //打开int (*close)(int pinNum);       //关闭int (*deviceInit)(int pinNum);  //设备初始化int (*readStatus)();  //火灾int (*changeStatus)(int status);struct Devices *next;
};struct Devices* addBathroomLightToDeviceLink(struct Devices *phead);
struct Devices* addUpstairLightToDeviceLink(struct Devices *phead);
struct Devices* addLivingRoomLightToDeviceLink(struct Devices *phead);
struct Devices* addRestaurantLightToDeviceLink(struct Devices *phead);
struct Devices* addFireToDeviceLink(struct Devices *phead);
5、创建bathroomLight.c文件
//浴室的灯
#include "contrlDevices.h"
#include<stdlib.h>int bathroomLightOpen(int pinNum){digitalWrite(pinNum,LOW);
}
int bathroomLightClose(int pinNum){digitalWrite(pinNum,HIGH);
}
int bathroomLightCloseInit(int pinNum){pinMode(pinNum,OUTPUT);digitalWrite(pinNum,HIGH);
}
int bathroomLightCloseStatus(int status){}
struct Devices bathroomLight={.deviceName = "bathroomLight",.pinNum = 26,.open = bathroomLightOpen,.close = bathroomLightClose,.deviceInit = bathroomLightCloseInit,.changeStatus = bathroomLightCloseStatus};
struct Devices* addBathroomLightToDeviceLink(struct Devices *phead){if(phead == NULL){	return &bathroomLight;}else{bathroomLight.next = phead;phead = &bathroomLight;}
};
6、创建livingroomLight.c文件
#include "contrlDevices.h"
#include<stdlib.h>int livingroomLightOpen(int pinNum){digitalWrite(pinNum,LOW);
}
int livingroomLightClose(int pinNum){digitalWrite(pinNum,HIGH);
}
int livingroomLightCloseInit(int pinNum){pinMode(pinNum,OUTPUT);digitalWrite(pinNum,HIGH);
}
int livingroomLightCloseStatus(int status){}
struct Devices livingroomLight={.deviceName = "livingroomLight",.pinNum = 27,.open = livingroomLightOpen,.close = livingroomLightClose,.deviceInit = livingroomLightCloseInit,.changeStatus = livingroomLightCloseStatus};
struct Devices* addLivingRoomLightToDeviceLink(struct Devices *phead){if(phead == NULL){	return &livingroomLight;}else{livingroomLight.next = phead;phead = &livingroomLight;}
};
7、创建restaurantLight.c文件
#include "contrlDevices.h"
#include<stdlib.h>int restaurantLightOpen(int pinNum){digitalWrite(pinNum,LOW);
}
int restaurantLightClose(int pinNum){digitalWrite(pinNum,HIGH);
}
int restaurantLightCloseInit(int pinNum){pinMode(pinNum,OUTPUT);digitalWrite(pinNum,HIGH);
}
int restaurantLightCloseStatus(int status){}
struct Devices restaurantLight={.deviceName = "restaurantLight",.pinNum = 28,.open = restaurantLightOpen,.close = restaurantLightClose,.deviceInit = restaurantLightCloseInit,.changeStatus = restaurantLightCloseStatus
};
struct Devices* addRestaurantLightToDeviceLink(struct Devices *phead){if(phead == NULL){	return &restaurantLight;}else{restaurantLight.next = phead;phead = &restaurantLight;}
};
8、创建upstairLight.c文件
//二楼灯
#include "contrlDevices.h"
#include<stdlib.h>int upstairLightOpen(int pinNum){digitalWrite(pinNum,LOW);
}
int upstairLightClose(int pinNum){digitalWrite(pinNum,HIGH);
}
int upstairLightCloseInit(int pinNum){pinMode(pinNum,OUTPUT);digitalWrite(pinNum,HIGH);
}
int upstairLightCloseStatus(int status){}
struct Devices upstairLight={.deviceName = "upstairLight",.pinNum = 29,.open = upstairLightOpen,.close = upstairLightClose,.deviceInit = upstairLightCloseInit,.changeStatus = upstairLightCloseStatus
};
struct Devices* addUpstairLightToDeviceLink(struct Devices *phead){if(phead == NULL){	return &upstairLight;}else{upstairLight.next = phead;phead = &upstairLight;}
};
9、创建fire.c文件
//火灾报警
#include "contrlDevices.h"
#include<stdlib.h>int fireIfOrNotInit(int pinNum){pinMode(pinNum,INPUT);digitalWrite(pinNum,HIGH);
}
int fireStatusRead(int pinNum){return digitalRead(pinNum);
}
struct Devices fireIfOrNot={.deviceName = "fireIfOrNot",.pinNum = 25,.deviceInit = fireIfOrNotInit,.readStatus = fireStatusRead};
struct Devices* addFireToDeviceLink(struct Devices *phead){if(phead == NULL){	return &fireIfOrNot;}else{fireIfOrNot.next = phead;phead = &fireIfOrNot;}
};
10、创建mainPro.c主函数文件
#include <stdio.h>
#include "contrlDevices.h"
#include <string.h>
#include "inputCommand.h"struct Devices* findDeviceByName(char* name,struct Devices* phead){struct Devices *tmp = phead;if(phead == NULL){return NULL;}else{while(tmp != NULL){if(strcmp(tmp->deviceName,name) == 0){return tmp;}tmp = tmp->next;}return NULL;}
};int main(){char name [128];struct Devices *tmp = NULL;if(-1 == wiringPiSetup()){return -1;}struct Devices *pdeviceHead = NULL;pdeviceHead = addBathroomLightToDeviceLink(pdeviceHead);pdeviceHead = addUpstairLightToDeviceLink(pdeviceHead);pdeviceHead = addLivingRoomLightToDeviceLink(pdeviceHead);pdeviceHead = addRestaurantLightToDeviceLink(pdeviceHead);pdeviceHead = addFireToDeviceLink(pdeviceHead);while(1){printf("Input:\n");scanf("%s",name);tmp = findDeviceByName(name,pdeviceHead);if(tmp != NULL){tmp->deviceInit(tmp->pinNum);tmp->open(tmp->pinNum);}}//1、指令工厂初始化//2、设备控制工厂初始化//3、线程池建立//3.1、语音线程//3.2、socket线程//3.3、摄像头线程//3.4、火灾线程
}
把上述的代码传到树莓派的终端,用FileZilla传即可,然后执行结果:
gcc mainPro.c upstairLight.c bathroomLight.c livingroomLight.c restaurantLight.c -lwiringPi -o test1

效果演示:(虽然没有装到实际的智能家居里,但是小灯亮了,说明程序是可以正常用的🤭)

三、添加声音识别模块的串口读取功能
这里主要通过主控芯片树莓派的串口跟语音模块连接。
树莓派的T接语音模块的R
树莓派的R接语音模块的T
然后就是供电
我们先把语音模块的代码整合到指令链表当中去:
1.语音控制设备voiceContrl.c
#include "inputCommand.h"
#include <stdlib.h>
#include <wiringPi.h>
#include <stdio.h>
#include <wiringSerial.h>
#include <unistd.h>//串口int voiceInit(struct InputCommander *voicer,char *ipAdress,char *port){ //声音初始化int fd;if((fd = serialOpen(voicer->deviceName,9600)) == -1){  //初始化串口,波特率9600exit(-1);}voicer->fd = fd;return fd;
}
int voiceGetCommand(struct InputCommander *voicer){int nread = 0;nread = (voicer->fd,voicer->command,sizeof(voicer->command));if(nread == 0){printf("usart for voice read over time\n");}else{return nread;}
}
struct InputCommander voiceContrl = {.commandName = "voice", .deviceName = "dev/ttyAMA0",.command = {'\0'},.Init = voiceInit,.getCommand = voiceGetCommand,.log = {'\0'},.next = NULL,};
struct InputCommander* addvoiceContrlToInputCommandLink(struct InputCommander *phead){if(phead == NULL){return &voiceContrl;}else{voiceContrl.next = phead;phead = &voiceContrl;}
};
2.控制设备的头文件inputCommand.h
//面向指令工厂的头文件
#include <wiringPi.h>
#include <stdlib.h>struct InputCommander{char commandName[128];  //声音的名字char command[32];       char deviceName[128];   //串口的名字int (*Init)(struct InputCommander *voicer,char *ipAdress,char *port); int (*getCommand)(struct InputCommander *voicer);char log[1024];int fd;struct InputCommander *next;};
struct InputCommander* addvoiceContrlToInputCommandLink(struct InputCommander *phead);
3.在mainPro.c主函数中添加语音模块的函数
#include <stdio.h>
#include "contrlDevices.h"
#include <string.h>
#include "inputCommand.h"struct Devices* findDeviceByName(char* name,struct Devices* phead){struct Devices *tmp = phead;if(phead == NULL){return NULL;}else{while(tmp != NULL){if(strcmp(tmp->deviceName,name) == 0){return tmp;}tmp = tmp->next;}return NULL;}
};
int main(){char name [128];struct Devices *tmp = NULL;if(-1 == wiringPiSetup()){return -1;}struct Devices        *pdeviceHead = NULL;   //设备工厂struct InputCommander *pCommandHead = NULL;  //指令工厂pdeviceHead = addBathroomLightToDeviceLink(pdeviceHead);pdeviceHead = addUpstairLightToDeviceLink(pdeviceHead);pdeviceHead = addLivingRoomLightToDeviceLink(pdeviceHead);pdeviceHead = addRestaurantLightToDeviceLink(pdeviceHead);pdeviceHead = addFireToDeviceLink(pdeviceHead);  //火灾pCommandHead = addvoiceContrlToInputCommandLink(pCommandHead); //串口while(1){printf("Input:\n");scanf("%s",name);tmp = findDeviceByName(name,pdeviceHead);if(tmp != NULL){tmp->deviceInit(tmp->pinNum);tmp->open(tmp->pinNum);}}
}
4.把上述的代码传到树莓派的终端,用FileZilla传即可,然后执行结果:
gcc mainPro.c upstairLight.c bathroomLight.c fire.c livingroomLight.c restaurantLight.c voiceContrl.c -lwiringPi -o test1
