CNNs: ZFNet之CNN的可视化网络介绍
CNNs: ZFNet之CNN的可视化网络介绍
- 导言
- Deconvnet
- 1. Unpooling
- 2. ReLU
- 3. Transpose conv
- AlexNet网络修改
- AlexNet Deconv网络介绍
- 特征可视化
导言
上一个内容,我们主要学习了AlexNet网络的实现、超参数对网络结果的影响以及网络中涉及到一些其他的知识点,如激活函数、dropout等。
经过前面三节关于AlexNet的学习,我们大概了解一个简单的卷积神经网络模型的工作过程和如何针对一个数据集去调参以实现我们期望的模型结果。当然,这里我们忽略了一个重要的点就是数据集,我们训练出来的模型的好坏第一步是要确认我们手头的数据集是比较好的,如我在第二篇中提供的flower数据集,如dandelion下的数据(还有其他)很差,导致我们在训练过程中很难达到我们需要的效果。所以,我们在工程中或者研究中一定要保证第一个前提:采集较好的数据集。当然,当数据集不够时,我们需要对数据集进行增强(这里先挖一个坑,关于数据集增强系列)。
从本篇开始,我们将参考文章Visualizing and Understanding Convolutional Networks基于AlexNet模型对模型训练过程中convnet模块进行探索,窥视网络不同层学习到了什么特征。
Deconvnet
首先,让我们对deconvnet进行介绍:
AlexNet中一个基础的convnet模块基本上要进行卷积、ReLU和池化操作。所以,对应的deconvnet模块需要进行反池化、ReLU和卷积的转置操作。
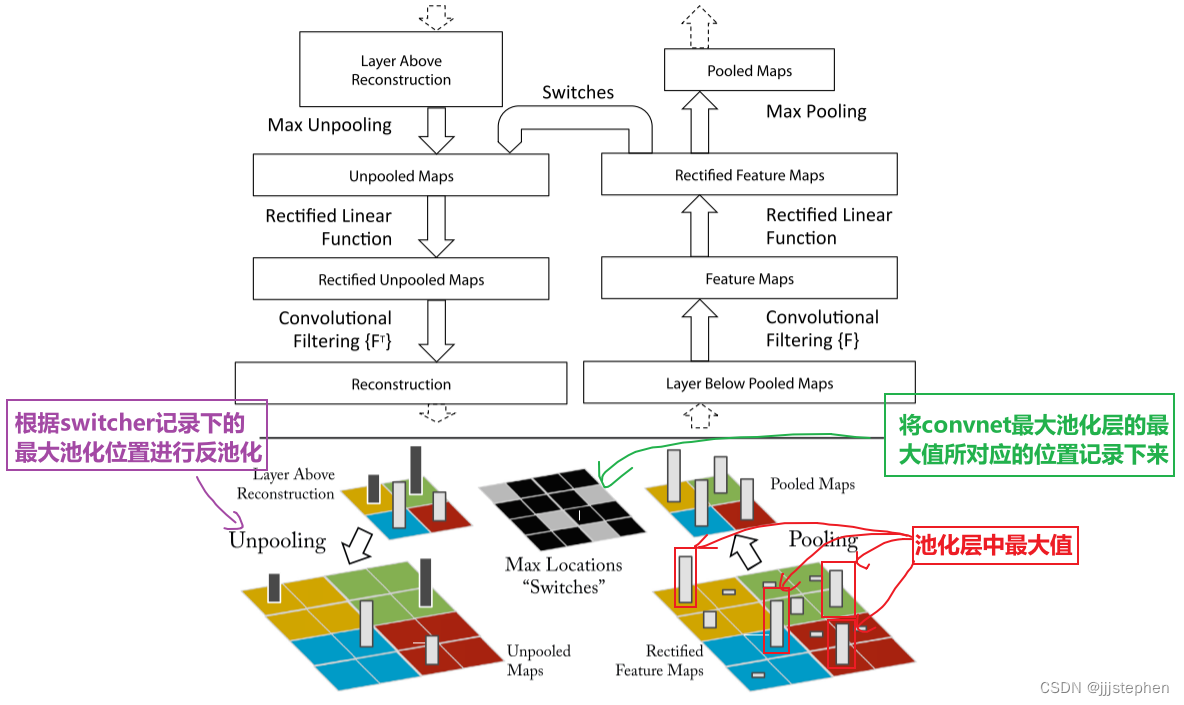
1. Unpooling
在convnet模块中,最大池化的基本原理是:
- 将输入数据分割成若干个不重叠的矩形。
- 对于每个矩形块,取其中最大的数作为输出。
- 将所有输出组合成一个新的矩阵作为最终的输出。
最大池化的作用是减少特征图的大小,从而减少计算量和参数数量,同时可以提取出输入数据中的最显著的特征。
在convnet中,最大池化操作是不可逆的,但是我们可以通过记录一组switch变量(每个池化区域内的最大值的位置)来获得近似逆。在deconvnet中,unpooling操作使用这些switch变量将来自上层的重建放置到适当的位置。具体操作如上图所示。
2. ReLU
convnet使用ReLU非线性,为了在每一层获得有效的特征重建我们将重建的信号通过ReLU。
3. Transpose conv
convnet模块使用学习后的卷积核来卷积来自前一层的特征图。为了近似地反转这一点,deconvnet使用相同滤波器的转置,应用在使用ReLU后的特征图上,而不是下面的层的输出。
AlexNet网络修改
为了能够将AlexNet可视化,我们需要对在AlexNet网络介绍中的网络进行修改:
import torch
import torch.nn as nn
from collections import OrderedDictclass AlexNet(nn.Module):def __init__(self, class_num = 5):super(AlexNet, self).__init__()self.features = nn.Sequential(# input[3, 227, 227]  output[96, 55, 55]nn.Conv2d(3, 96, kernel_size=11, stride=4, padding=0),nn.ReLU(inplace=True),# output[96, 27, 27]nn.MaxPool2d(kernel_size=3, stride=2, return_indices=True),# output[256, 27, 27]nn.Conv2d(96, 256, kernel_size=5, padding=2),nn.ReLU(inplace=True),# output[256, 13, 13]nn.MaxPool2d(kernel_size=3, stride=2, return_indices=True),# output[384, 13, 13]nn.Conv2d(256, 384, kernel_size=3, padding=1),nn.ReLU(inplace=True),# output[384, 13, 13]nn.Conv2d(384, 384, kernel_size=3, padding=1),nn.ReLU(inplace=True),# output[256, 13, 13]nn.Conv2d(384, 256, kernel_size=3, padding=1),nn.ReLU(inplace=True),# output[256, 6, 6]nn.MaxPool2d(kernel_size=3, stride=2, return_indices=True),)self.classifier = nn.Sequential(nn.Linear(256 * 6 * 6, 4096),nn.ReLU(inplace=True),nn.Dropout(p=0.5),nn.Linear(4096, 4096),nn.ReLU(inplace=True),nn.Linear(4096, class_num),)# index of convself.conv_layer_indices = [0, 3, 6, 8, 10]# feature mapsself.feature_maps = OrderedDict()# switchself.pool_locs = OrderedDict()def forward(self, x):for idx, layer in enumerate(self.features):if isinstance(layer, nn.MaxPool2d):x, location = layer(x)self.pool_locs[idx] = locationself.feature_maps[idx] = xelse:x = layer(x)self.feature_maps[idx] = xx = torch.flatten(x, start_dim=1)x = self.classifier(x)return x
首先,我们在执行最大池化时,将最大池化的位置需要返回,以便我们可以记录下来,所以nn.MaxPool2d中参数return_indices置为true。
nn.MaxPool2d(kernel_size=3, stride=2, return_indices=True),
然后,我们在执行forward方法时,需要将最大池化层的位置和每一层的feature map都记录下来。
AlexNet Deconv网络介绍
import sys
sys.path.append('.')import torch
import torch.nn as nn
from utils_module import param_settingsclass AlexNetDeconv(nn.Module):def __init__(self):super(AlexNetDeconv, self).__init__()self.features = nn.Sequential(# deconv1nn.MaxUnpool2d(kernel_size=3, stride=2),nn.ReLU(inplace=True),nn.ConvTranspose2d(256, 384, kernel_size=3, padding=1),nn.ReLU(inplace=True),nn.ConvTranspose2d(384, 384, kernel_size=3, padding=1),nn.ReLU(inplace=True),nn.ConvTranspose2d(384, 256, kernel_size=3, padding=1),# deconv2nn.MaxUnpool2d(kernel_size=3, stride=2),nn.ReLU(inplace=True),nn.ConvTranspose2d(256, 96, kernel_size=5, padding=2),# deconv3nn.MaxUnpool2d(kernel_size=3, stride=2),nn.ReLU(inplace=True),nn.ConvTranspose2d(96, 3, kernel_size=11, stride=4, padding=0))self.conv2deconv_indices = { 0:12, 3:9, 6:6, 8:4, 10:2 }self.unpool2pool_indices = { 10:2, 7:5, 0:12 }self.init_weight()def init_weight(self):model_path = param_settings.SAVE_PATHalexnet_model = torch.load(model_path)for idx, layer in enumerate(alexnet_model.features):if isinstance(layer, nn.Conv2d):self.features[self.conv2deconv_indices[idx]].weight.data = layer.weight.datadef forward(self, x, layer, activation_idx, pool_locs):if layer in self.conv2deconv_indices:start_idx = self.conv2deconv_indices[layer]else:raise ValueError('layer is not a conv feature map')for idx in range(start_idx, len(self.features)):if isinstance(self.features[idx], nn.MaxUnpool2d):x = self.features[idx]\(x, pool_locs[self.unpool2pool_indices[idx]].cpu())else:x = self.features[idx](x)return x
首先,我们做Deconv模块时,需要从convnet模块的最底层反向进行操作。
其次,我们需要记录conv和deconv的相对关系以及unpooling和pooling之间的相对关系。
接着,我们需要将conv模型的feature参数记录下来,并对其进行初始化。
forward方法定义了模型的前向传播过程。给定输入x、层索引layer、激活索引activation_idx和池化位置pool_locs,它根据指定的层开始进行反卷积操作,直到模型的最后一层。
特征可视化
首先,获取指定层的特征图,并选择其中最大激活的特征。
然后,将其他层的特征图置为0,并将激活值设置为0,以便反卷积模型能够还原出原始图像。
接着,使用反卷积模型对处理后的特征图进行反卷积操作,得到原始图像。
def layer_viewer(layer, model, model_deconv):feat_num = model.feature_maps[layer].shape[1]new_feat_map = model.feature_maps[layer].clone().cpu()# 选择最大激活特征act_lst = []for i in range(0, feat_num):choose_map = new_feat_map[0, i, :, :]activation = torch.max(choose_map)act_lst.append(activation.item())act_lst = np.array(act_lst)mark = np.argmax(act_lst)choose_map = new_feat_map[0, mark, :, :]max_activation = torch.max(choose_map)# 将其他层的特征图置为0if mark == 0:new_feat_map[:, 1:, :, :] = 0else:new_feat_map[:, :mark, :, :] = 0choose_map = torch.where(choose_map == max_activation,choose_map, torch.zeros(choose_map.shape))# 将激活值设置为0new_feat_map[0, mark, :, :] = choose_mapprint(max_activation)deconv_output = model_deconv(new_feat_map, layer, mark, model.pool_locs)# (H, W, C)new_img = deconv_output.data.numpy()[0].transpose(1, 2, 0) # normalizenew_img = (new_img - new_img.min()) / (new_img.max() - new_img.min()) * 255new_img = new_img.astype(np.uint8)# cv2.imshow('reconstruction img ' + str(layer), new_img)# cv2.waitKey()return new_img, int(max_activation)
项目地址:
https://gitee.com/jiangli01/dl-practice/tree/master/AlexNet-Visualizing