Padding, Spacer, Initializer 的使用
1. Padding 的使用
1.1 样式一
1) 实现
func testText1()-> some View{Text("Hello, World!").background(Color.yellow) // 背景颜色//.padding()              // 默认间距.padding(.all, 10)        // 所有的间距.padding(.leading, 20)    // 开始的间距.background(Color.blue)   // 背景
}
2) 效果图:

1.2 文本样式 2
1) 实现
/// 文本样式 2
func testText2()-> some View{Text("Hell, World!").font(.largeTitle)     // 字体大小.fontWeight(.semibold) // 权重.frame(maxWidth: .infinity, alignment: .leading) // 宽,对齐方式.background(Color.red) // 颜色.padding(.leading, 30) // 间距
}
2) 效果图:

1.3 文本样式 3
1) 实现
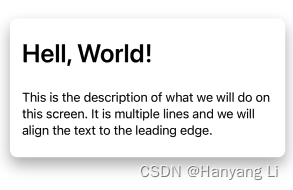
/// 文本样式 3
func testTest3()->some View{VStack(alignment: .leading) {Text("Hell, World!").font(.largeTitle)     // 字体大小.fontWeight(.semibold) // 权重样式.padding(.bottom, 20)  // 向下间距Text("This is the description of what we will do on this screen. It is multiple lines and we will align the text to the leading edge.") // 文本}.padding() // 默认间距.padding(.vertical, 10) // 垂直间距.background(Color.white.cornerRadius(10).shadow(color: Color.black.opacity(0.3), radius: 10, x: 0.0, y: 10)) // 背景: 圆角,阴影.padding(.horizontal, 10) // 水平间距
}
2) 效果图:
2. Spacer 的使用
2.1 垫片水平堆栈
1) 实现
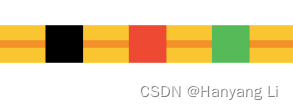
// 垫片水平堆栈
func spacerHStack() -> some View{HStack(spacing: 0){//垫片,将控件向两边推 nil == 8/10Spacer(minLength: 0).frame(height: 10).background(Color.orange)Rectangle().frame(width: 50, height: 50) // 矩形Spacer().frame(height: 10).background(Color.orange)Rectangle().fill(Color.red).frame(width: 50, height: 50)Spacer().frame(height: 10).background(Color.orange)Rectangle().fill(Color.green).frame(width: 50, height: 50)//垫片,将控件向两边推Spacer().frame(height: 10).background(Color.orange)}.background(Color.yellow)//.padding(.horizontal, 200).background(Color.blue)
}
2) 效果图:
2.2 垫片 VH 堆栈
1) 实现
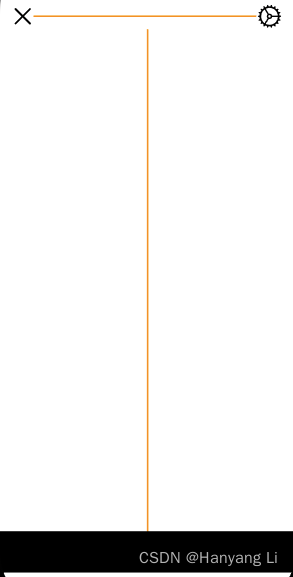
// 垫片 VH 堆栈
func spacerVHStack() -> some View{VStack {HStack(spacing: 0){Image(systemName: "xmark") // 图片Spacer()// 垫片.frame(height: 2).background(Color.orange)Image(systemName: "gear")  // 图片}.font(.title)//.background(Color.yellow).padding(.horizontal)//.background(Color.blue)Spacer()// 垫片.frame(width: 2).background(Color.orange)Rectangle().frame(height: 55)}//.background(Color.yellow)
}
2) 效果图:
3. Initializer 的使用
3.1 实现
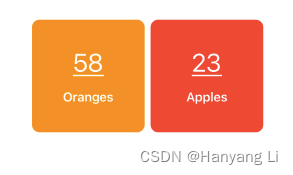
/// 初始化与枚举
struct InitializerBootcamp: View {let backgroundColor: Colorlet count: Intlet title: Stringinit(count: Int, fruit: Fruit) {self.count = count;if fruit == .apple{self.title = "Apples"self.backgroundColor = .red}else{self.title = "Oranges"self.backgroundColor = .orange}}/// 枚举enum Fruit{case applecase orange}var body: some View {// 垂直堆栈VStack(spacing: 15){Text("\(count)").font(.largeTitle).foregroundColor(.white).underline()Text(title).font(.headline).foregroundColor(.white)}.frame(width: 150, height: 150).background(backgroundColor).cornerRadius(10)}
}struct InitializerBootcamp_Previews: PreviewProvider {static var previews: some View {HStack {InitializerBootcamp(count: 58, fruit: .orange)InitializerBootcamp(count: 23, fruit: .apple)}}
}
3.2 效果图: