Linux安装MySQL后无法通过IP地址访问处理方法
本文主要总结Linux安装Mysql后,其他主机访问不了MySQL数据库的原因和解决方法
环境说明:
- MySQL 5.7.30
- CentOS Linux release 7.6.1810 (Core)
创建完Mysql数据库后可以查看mysql 日志获取root 用户登录密码
[root@localhost mysql-5.7.30]# cat /var/log/mysqld.log
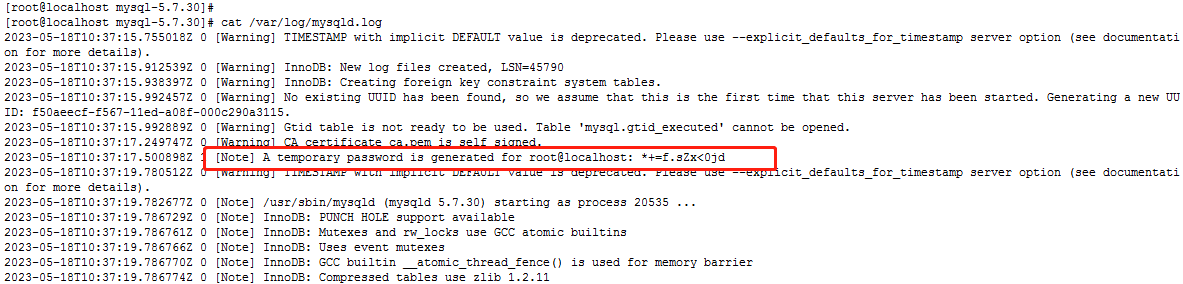
使用获取到的密码就可以登录数据库了,登录后显示mysql> 表示成功
[root@localhost etc]# mysql -u root -p
Enter password:
Welcome to the MySQL monitor.  Commands end with ; or \g.
Your MySQL connection id is 2
Server version: 5.7.30Copyright (c) 2000, 2020, Oracle and/or its affiliates. All rights reserved.Oracle is a registered trademark of Oracle Corporation and/or its
affiliates. Other names may be trademarks of their respective
owners.Type 'help;' or '\h' for help. Type '\c' to clear the current input statement.mysql>
mysql>
登录后root用户不能直接使用,会提示需要先重置密码,重置密码的时候可能会出现not stifsy current plicy错误。 默认情况下密码长度是8位, 如果希望密码简单好记,需要修改规则
mysql> set password for root@localhost=password("root");
ERROR 1819 (HY000): Your password does not satisfy the current policy requirements
mysql>
mysql> set global validate_password_length=4;
Query OK, 0 rows affected (0.00 sec)mysql> set global validate_password_policy=0;
Query OK, 0 rows affected (0.00 sec)mysql> set password for root@localhost=password("root");
Query OK, 0 rows affected, 1 warning (0.00 sec)mysql> show databases;
+--------------------+
| Database           |
+--------------------+
| information_schema |
| mysql              |
| performance_schema |
| sys                |
+--------------------+
4 rows in set (0.00 sec)mysql> use mysql;
Database changed
mysql>
此时如果使用Navicat链接Mysql数据库是链接不上的,

Mysql数据库系统中,每一用户都有自己的用户名和密码, 同时还有自己的主机名称,root用户默认的主机名称是 localhost, 所以只能localhost方法, 不能使用其他主机访问。 如果此时需要设置root用户其他主机也可以访问,修改后使用flush privileges 刷新权限,这样不用重启。
mysql> grant all privileges on *.* to 'root'@'%' identified by 'root';
Query OK, 0 rows affected, 1 warning (0.00 sec)mysql> flush privileges;
Query OK, 0 rows affected (0.00 sec)mysql>
mysql> select user ,host from user;
+---------------+-------------+
| user          | host        |
+---------------+-------------+
| root          | %           |
| mysql.session | localhost   |
| mysql.sys     | localhost   |
| root          | localhost   |
+---------------+-------------+
4 rows in set (0.00 sec)mysql>
此时使用IP访问也可能不成功,部分人可能访问数据库成功, 部分人可能访问数据库库失败。 如果访问链接失败, 再查看my.cnf或者my.ini的配置, 查找bind-address参数。将其注释或者修改为0.0.0.0或者服务器的IP地址。如果没有可以手写此配置
[root@localhost ~]# cd /etc
[root@localhost etc]#
[root@localhost etc]# ls
adjtime                  ethertypes          ld.so.cache               plymouth
crypttab                 hostname            my.cnf                    resolv.conf     tuned
csh.cshrc                hosts               my.cnf.d                  rpc             udev
[mysqld]
#
# Remove leading # and set to the amount of RAM for the most important data
# cache in MySQL. Start at 70% of total RAM for dedicated server, else 10%.
# innodb_buffer_pool_size = 128M
#
datadir=/var/lib/mysql
socket=/var/lib/mysql/mysql.sock
bind-address=0.0.0.0# Disabling symbolic-links is recommended to prevent assorted security risks
symbolic-links=0log-error=/var/log/mysqld.log
pid-file=/var/run/mysqld/mysqld.pid
到此又会有部分人访问数据库成功, 部分人访问数据库仍然失败, 如果还是悲剧的这部分人,还需要查看防火墙设置,Linux系统中,防火墙iptables可能会阻止MySQL的外部访问。使用下面的命令查看
[root@localhost etc]# sudo iptables -L
Chain INPUT (policy ACCEPT)
target     prot opt source               destination
ACCEPT     tcp  --  anywhere             anywhere             tcp dpt:cslistener
ACCEPT     all  --  anywhere             anywhere             ctstate RELATED,ESTABLISHED......略
此时列表中如果没有mysql 信息,那么可以执行下面的命令允许外部访问Myslq, 其中dport 指定3306, 3306是MySQL的默认端口。执行后再使用sudo iptables -L查看会出现mysql访问信息。如下
[root@localhost etc]# sudo  iptables -I INPUT -p tcp --dport 3306 -j ACCEPT
[root@localhost etc]#
[root@localhost etc]# sudo iptables -L
Chain INPUT (policy ACCEPT)
target     prot opt source               destination
ACCEPT     tcp  --  anywhere             anywhere             tcp dpt:mysql
ACCEPT     tcp  --  anywhere             anywhere             tcp dpt:cslistener
ACCEPT     all  --  anywhere             anywhere             ctstate RELATED,ESTABLISHED......略
最后重启MySQL后就可以访问MySQL数据库了

上一篇:Linux 安装MySQL-5.7.30