Three——四、几何体、高光网络材质、锯齿模糊以及GUI库的使用
文章:
- Three——一、初识Three以及基础的前端场景搭建(结尾含源码)
- Three——二、加强对三维空间的认识
- Three——三、动画执行、画布大小、渲染帧率和相机适配体验
- Three——四、几何体、高光网络材质、锯齿模糊以及GUI库的使用
- Three——五、点线模型对象、三角形概念、几何体顶点位置,顶点索引、法线以及对几何体进行旋转缩放和平移
Threejs 常见几何体简介
Three.js 常见的几何体:
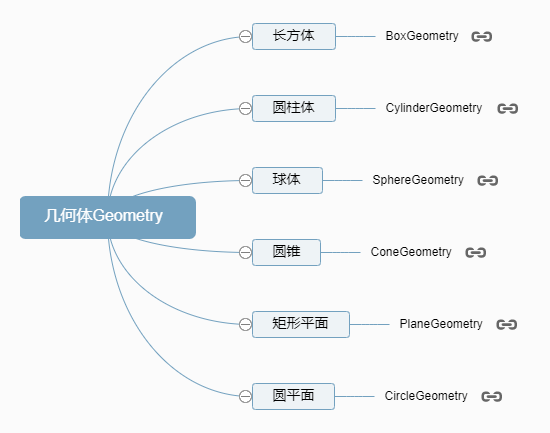
常见的几何体:
//BoxGeometry:长方体
const geometry = new THREE.BoxGeometry(100, 100, 100);
// SphereGeometry:球体
const geometry = new THREE.SphereGeometry(50);
// CylinderGeometry:圆柱
const geometry = new THREE.CylinderGeometry(50, 50, 100);
// PlaneGeometry:矩形平面
const geometry = new THREE.PlaneGeometry(100, 50);
// CircleGeometry:圆形平面
const geometry = new THREE.CircleGeometry(50);
这里拿平面做示例:
双面可见
Three.js 的材质默认正面可见,反面不可见,对于矩形平面PlaneGeometry、圆形平面如果你想看到两面,可以设置side: THREE.DoubleSide。
new THREE.MeshBasicMaterial({side: THREE.FrontSide, //默认只有正面可见
});
new THREE.MeshBasicMaterial({side: THREE.DoubleSide, //两面可见
});

高光网络材质
高光网格材质MeshPhongMaterial和基础网格材质MeshBasicMaterial、漫反射网格材质MeshLambertMaterial一样都是网格模型的 Mesh 的材质。
注意:高光网格材质MeshPhongMaterial和漫反射网格材质MeshLambertMaterial一样会受到光照的影响。
MeshPhongMaterial 对光照反射特点
MeshPhongMaterial和MeshLambertMaterial都会收到光照的影响区别在于,对光线反射方式有差异。
MeshPhongMaterial可以实现高光反射效果,而MeshLamberMaterial恰恰相反。所谓的高光,就比如你在一个太阳下方去看一个小汽车,你会在特定的角度及位置看到玻璃表面某个位置特别亮。
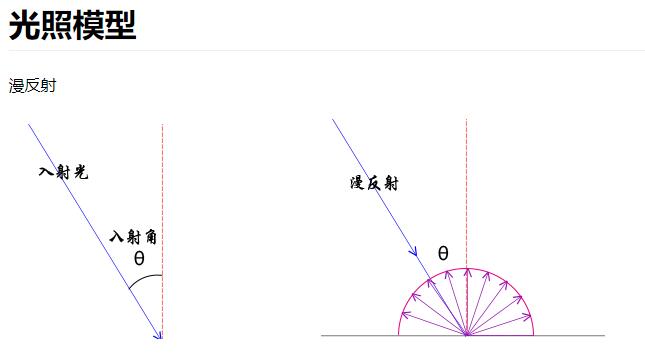
镜面反射与漫反射
MeshPhongMaterial可以提供一个镜面的反射效果,可以类比你生活中拿一面镜子,放在太阳光下,调整角度,可以把太阳光反射到其它地方,如果反射光对着眼睛,也就是反射光线和视线平行的时候,会非常刺眼。
MeshLambertMaterial对应的 Mesh 受到光线照射,没有镜面反射的效果,只是一个漫反射,也就是光线向四周反射。
高光亮度属性shininess
通过MeshPhongMaterial的高光亮度shininess属性,可以控制高光反射效果
// 模拟镜面反射,产生一个高光效果
const material = new THREE.MeshPhongMaterial({color: 0x00ffff,shininess: 500, //高光部分的亮度,默认30
});
数字越大,光越亮
对比效果:

下面是使用MeshLambertMaterial材质的效果:

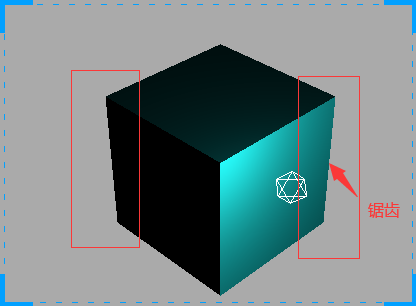
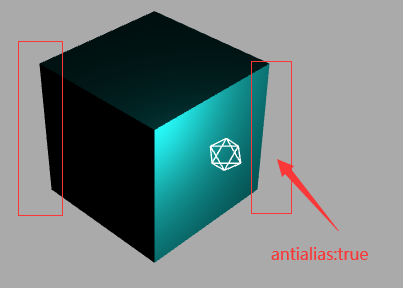
WebGL 渲染器设置(锯齿模糊)
设置渲染器锯齿属性:antialias
const renderer = new THREE.WebGLRenderer({antialias: true,
});
对比:
设置背景的两种方式
scene.background = new THREE.Color(0xaaaaaa);
// or
// renderer.setClearColor(0xffffff, 1); //设置背景颜色
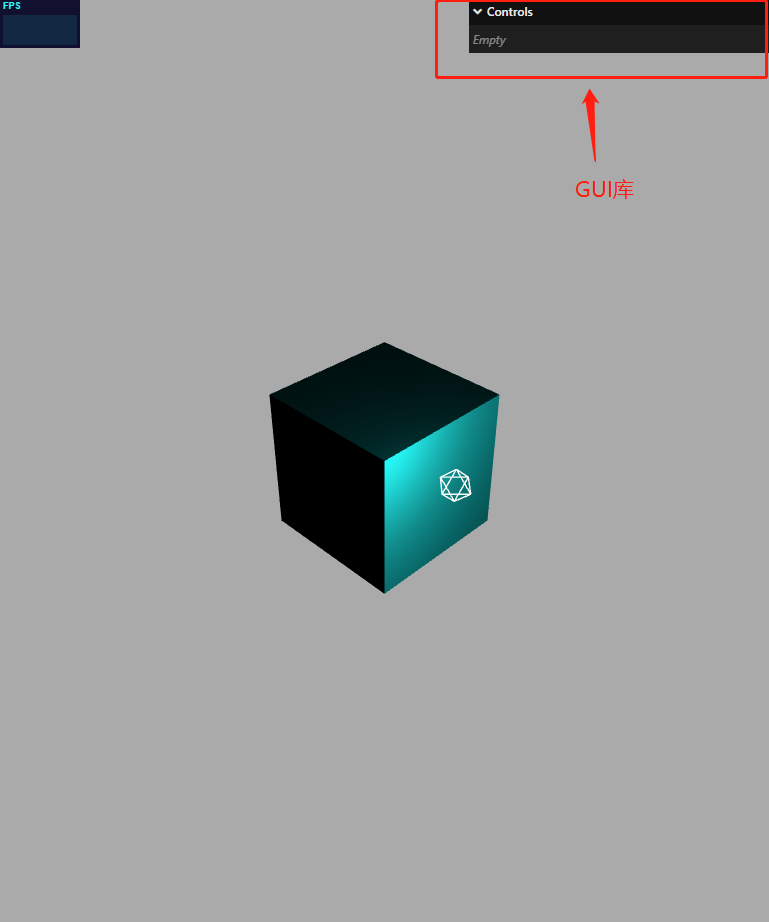
gui.js 库
简介
借助gui.js可以快速创建控制三维场景的UI交互界面
gihtub地址:https://github.com/dataarts/dat.gui
npm地址:https://www.npmjs.com/package/dat.gui
three中自带了gui库
import { GUI } from "three/addons/libs/lil-gui.module.min.js";
创建 GUI 对象
const gui = new GUI();
通过domElement改变 GUI 界面默认的 style 属性
尝试改变他的位置和长度
const gui = new GUI();
gui.domElement.style.right = "0px";
gui.domElement.style.width = "300px";

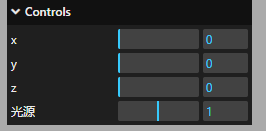
add()方法
add()方法可以创建一个交互界面,例如滚动条,从而改变 js 对象属性的属性值
.add(控制对象,对象具体属性,其它参数)
其他参数,可以一个或多个,数据类型也可以不同,gui 会自动根据参数形式,自动生成对应的交互界面。
参数 3 和参数 4,分别是一个数字,交互界面是一个鼠标可以拖动的拖动条,可以在一个区间改变属性的值
const obj = {x: 30,
};
gui.add(obj, "x", 0, 100);

gui 改变 js 对象多个属性
const obj = {x: 30,y: 60,z: 300,
};
// gui界面上增加交互界面,改变obj对应属性
gui.add(obj, "x", 0, 100);
gui.add(obj, "y", 0, 50);
gui.add(obj, "z", 0, 60);
通过 gui 改变 threejs 光照强度测试
给光源绑定intensity属性,通过 gui 的拖动条来改变光源属性
// 需要光源和光源位置信息
// const pointLight = new THREE.PointLight(0xffffff, 1.0);
// pointLight.position.set(100, 60, 50);gui.add(pointLight, "intensity", 0, 2.0);
scene.add(pointLight);// 光源辅助观察
// const pointLightHelper = new THREE.PointLightHelper(pointLight, 10);
// scene.add(pointLightHelper);
效果:会将下方绑定模型位置同时进行演示
gui 绑定模型位置
mesh.position是 JavaScript 对象,具有 x、y、z 属性,这三个属性分别表示模型的 xyz 坐标,这就是说,gui 改变mesh.position的 x、y、z 属性,就可以可视化改变 mesh 的位置。
function guiFun() {gui.add(mesh.position, "x", 0, 100);gui.add(mesh.position, "y", 0, 50);gui.add(mesh.position, "z", 0, 60);
}
效果演示:

name()
name 属性可以将默认值改成所需文字
gui.add(pointLight, "intensity", 0, 2.0).name("光源");
step()步长
每次拖动的间隔
gui.add(pointLight, "intensity", 0, 2.0).name("光源").step(0.1);
onChange()方法
当 gui 界面某个值的时候,.onChange()方法就会执行,这时候你可以根据需要通过.onChange()执行某些代码。就是可以将老值被新值替换。
let obj = {x: 30,y: 30,z: 30,
};
gui.add(obj, "x", 0, 180).onChange(function (value) {mesh.position.x = value;
});
gui 改变材质颜色
const obj = {color: 0x00ffff,
};
// .addColor()生成颜色值改变的交互界面
gui.addColor(obj, "color").onChange(function (value) {mesh.material.color.set(value);
});
gui 下拉菜单
通过.add()方法创建新的 UI 交互界面,下拉框、单选框
1、 .add()方法参数 3 和 4 数据类型:数字
此方法如上
add(控制对象,对象具体属性,其他参数)
其他参数,可以一个或多个,数据类型也可以不同,gui 会自动根据参数形式,自动生成对应的交互界面。
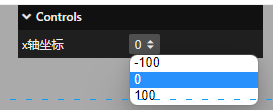
2、.add()方法参数 3 数据类型:数组
参数 3 如果是一个数组的话,那么他的交互界面是下拉菜单
例如:
const obj = {scale: 0,
};
gui.add(obj, "scale", [-100, 0, 100]).name("x轴坐标").onChange(function (value) {mesh.position.x = value;});
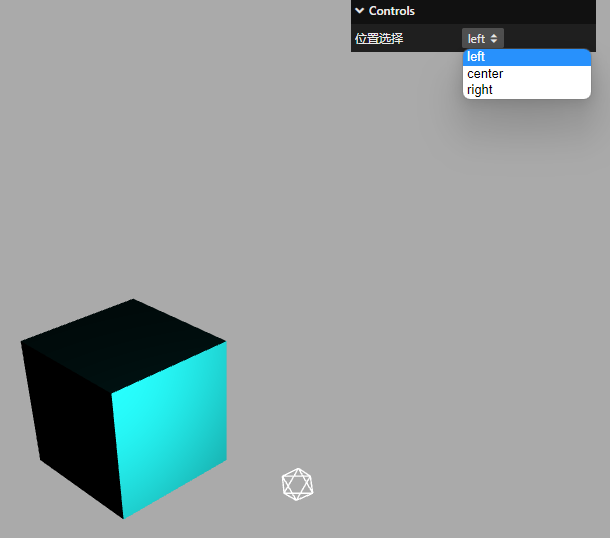
3、 .add()方法参数 3 数据类型:对象
参数 3 如果为对象,那么生成的交互界面也会是下拉菜单
例如:
const obj = {scale: 0,
};
// 参数3数据类型:对象(下拉菜单)
gui.add(obj, "scale", {left: -100,center: 0,right: 100,// 左: -100,//可以用中文// 中: 0,// 右: 100}).name("位置选择").onChange(function (value) {mesh.position.x = value;});
4、.add()方法对应属性的数据类型:布尔值
如果.add()改变属性的数据类型如果是布尔值,那么交互界面就是一个单选按钮
例如:
const obj = {bool: false,
};
// 改变的obj属性数据类型是布尔值,交互界面是单选框
gui.add(obj, "bool").name("是否旋转");
gui.add(obj, "bool").onChange(function (value) {// 点击单选框,控制台打印obj.bool变化console.log("obj.bool", value);
});
案例:控制旋转模型
const obj = {bool: false,
};
gui.add(obj, "bool").name("旋转动画");
const render = () => {if (obj.bool) mesh.rotateY(0.01);renderer.render(scene, camera);requestAnimationFrame(render);
};
render();
效果:
gui.js 库(分组)
如果页面出现控制的属性较多时,为了避免混合,可以适当进行分组管理
例如:
const gui = new GUI(); //创建GUI对象
//创建一个对象,对象属性的值可以被GUI库创建的交互界面改变
const obj = {color: 0x00ffff, // 材质颜色specular: 0x111111, // 材质高光颜色
};// 材质颜色color
gui.addColor(obj, "color").onChange(function (value) {material.color.set(value);
});
// 材质高光颜色specular
gui.addColor(obj, "specular").onChange(function (value) {material.specular.set(value);
});// 环境光强度
gui.add(ambient, "intensity", 0, 2);
// 平行光强度
gui.add(directionalLight, "intensity", 0, 2);
// 平行光位置
gui.add(directionalLight.position, "x", -400, 400);
gui.add(directionalLight.position, "y", -400, 400);
gui.add(directionalLight.position, "z", -400, 400);
使用.addFolder()分组
环境光子菜单部分
const gui = new GUI();
let obj = {color: 0x00ffff, // 材质颜色specular: 0xff0000,
};
const matFolder = gui.addFolder("材质");// 材质子菜单部分
matFolder.close();
matFolder.addColor(obj, "color").onChange(function (value) {material.color.set(value);console.log(material.specular.set(value));
});
matFolder.addColor(obj, "specular").onChange(function (value) {material.specular.set(value);
});
环境光子菜单部分
const ambientFolder = gui.addFolder("环境光");
ambientFolder.add(pointLight, "intensity", 0, 2);
平行光
const dirFolder = gui.addFolder("平行光强度");// 光源辅助观察
// const pointLightHelper = new THREE.PointLightHelper(pointLight, 10);
// scene.add(pointLightHelper);
// const directionalLight = new THREE.DirectionalLight(0xffffff, 1.0);
// directionalLight.position.set(100, 0, 0);// // 方向光指向对象网格模型mesh,可以不设置,默认的位置是0,0,0
// directionalLight.target = mesh;
// // 辅助观察
// const dirLightHelper = new THREE.DirectionalLightHelper(
//   directionalLight,
//   5,
//   0xff0000
// );
// // 添加辅助标识
// scene.add(dirLightHelper);
// // 添加平行光到场景中
// scene.add(directionalLight);
// 平行光强度
dirFolder.add(directionalLight, "intensity", 0, 2);
// 平行光位置
dirFolder.add(directionalLight.position, "x", -400, 400);
dirFolder.add(directionalLight.position, "y", -400, 400);
dirFolder.add(directionalLight.position, "z", -400, 400);
显示效果如下:
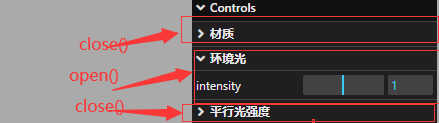
关闭.close()和展开.open()交互界面
用.close()和.open()方法可以设置默认是否折叠还是展开,默认状态为open()
// 菜单名称.close();
dirFolder.close();
matFolder.close();
效果如下:
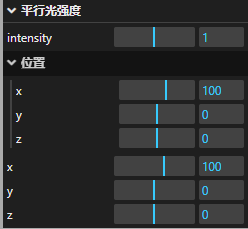
.addFolder()子菜单嵌套
通过 addFolder 可以再次进行 addFolder 完成子菜单嵌套
const dirFolder2 = dirFolder.addFolder("位置"); //子菜单的子菜单
dirFolder.add(directionalLight, "intensity", 0, 2);
const dirFolder2 = dirFolder.addFolder("位置"); //子菜单的子菜单
dirFolder2.close(); //关闭菜单
// 平行光位置
dirFolder2.add(directionalLight.position, "x", -400, 400);
dirFolder2.add(directionalLight.position, "y", -400, 400);
dirFolder2.add(directionalLight.position, "z", -400, 400);// 平行光位置
dirFolder.add(directionalLight.position, "x", -400, 400);
dirFolder.add(directionalLight.position, "y", -400, 400);
dirFolder.add(directionalLight.position, "z", -400, 400);
dirFolder.close();
至此可以基本的掌握了 three.js 中基本的用法,本专栏只用来学习交流,最后附上示例代码,详情可参考郭老师的电子书:http://www.webgl3d.cn/
<!-- author: Mr.J -->
<!-- date: 2023-04-12 11:43:45 -->
<!-- description: Vue3+JS代码块模板 -->
<template><div class="container" ref="container"></div>
</template><script setup>import * as THREE from "three";// 轨道import { OrbitControls } from "three/examples/jsm/controls/OrbitControls";import { ref, reactive, onMounted } from "vue";import { GUI } from "three/addons/libs/lil-gui.module.min.js";// 三个必备的参数let scene, camera, renderer, controls, mesh, stats, material;import Stats from "three/addons/libs/stats.module.js";// guiconst gui = new GUI();// 旋转控制let obj = {color: 0x00ffff, // 材质颜色specular: 0xff0000,};const matFolder = gui.addFolder("材质");const ambientFolder = gui.addFolder("环境光");const dirFolder = gui.addFolder("平行光强度");onMounted(() => {// 外层需要获取到dom元素以及浏览器宽高,来对画布设置长宽// clientWidth等同于container.value.clientWidthlet container = document.querySelector(".container");const { clientWidth, clientHeight } = container;console.log(clientHeight);init();render();// 首先需要获取场景,这里公共方法放在init函数中function init() {scene = new THREE.Scene();// 给相机设置一个背景scene.background = new THREE.Color(0xaaaaaa);// 透视投影相机PerspectiveCamera// 支持的参数:fov, aspect, near, farcamera = new THREE.PerspectiveCamera(60,clientWidth / clientHeight,0.001,6000);// 相机坐标camera.position.set(300, 300, 300);// 相机观察目标camera.lookAt(scene.position);// 渲染器renderer = new THREE.WebGLRenderer({antialias: true,});// 渲染多大的地方renderer.setSize(clientWidth, clientHeight);container.appendChild(renderer.domElement);stats = new Stats();container.appendChild(stats.domElement);addBox();console.log("查看当前屏幕设备像素比", window.devicePixelRatio);}function addBox() {// 模型部分// 几何体const geometry = new THREE.BoxGeometry(100, 100, 100);// 材质material = new THREE.MeshPhongMaterial({color: 0x00ffff,transparent: true, //开启透明// opacity: 0.5, //设置透明度// side: THREE.DoubleSide, //两面可见shininess: 500,specular: 0xff0000, //高光部分的颜色});mesh = new THREE.Mesh(geometry, material);mesh.position.set(0, 0, 0);scene.add(mesh);guiFun();}function guiFun() {matFolder.close();matFolder.addColor(obj, "color").onChange(function (value) {material.color.set(value);console.log(material.specular.set(value));});matFolder.addColor(obj, "specular").onChange(function (value) {material.specular.set(value);});/*     const obj = {scale: 0,};// 参数3数据类型:对象(下拉菜单)gui.add(obj, "scale", {left: -100,center: 0,right: 100,// 左: -100,//可以用中文// 中: 0,// 右: 100}).name("位置选择").onChange(function (value) {mesh.position.x = value;}); *//*     const obj = {bool: false,};// 改变的obj属性数据类型是布尔值,交互界面是单选框gui.add(obj, "bool").name("是否旋转").onChange(function (value) {// 点击单选框,控制台打印obj.bool变化console.log("obj.bool", value);}); */}// 相机控件const control = () => {controls = new OrbitControls(camera, renderer.domElement);controls.addEventListener("change", function () {// 浏览器控制台查看相机位置变化// console.log("camera.position", camera.position);});};control();// 光源const linght = () => {const pointLight = new THREE.PointLight(0xffffff, 1.0);pointLight.position.set(100, 60, 50);ambientFolder.add(pointLight, "intensity", 0, 2);scene.add(pointLight);// 光源辅助观察const pointLightHelper = new THREE.PointLightHelper(pointLight, 10);scene.add(pointLightHelper);const directionalLight = new THREE.DirectionalLight(0xffffff, 1.0);directionalLight.position.set(100, 0, 0);// 方向光指向对象网格模型mesh,可以不设置,默认的位置是0,0,0directionalLight.target = mesh;// 辅助观察const dirLightHelper = new THREE.DirectionalLightHelper(directionalLight,5,0xff0000);// 添加辅助标识scene.add(dirLightHelper);// 添加平行光到场景中scene.add(directionalLight);// 平行光强度dirFolder.add(directionalLight, "intensity", 0, 2);const dirFolder2 = dirFolder.addFolder("位置"); //子菜单的子菜单dirFolder2.close(); //关闭菜单// 平行光位置dirFolder2.add(directionalLight.position, "x", -400, 400);dirFolder2.add(directionalLight.position, "y", -400, 400);dirFolder2.add(directionalLight.position, "z", -400, 400);// 平行光位置dirFolder.add(directionalLight.position, "x", -400, 400);     bdirFolder.add(directionalLight.position, "y", -400, 400);dirFolder.add(directionalLight.position, "z", -400, 400);dirFolder.close();};linght();// gui.add(obj, "bool").name("旋转动画");function render() {// if (obj.bool) mesh.rotateY(0.01);renderer.render(scene, camera);requestAnimationFrame(render);}window.addEventListener("resize", () => {// 更新摄像头camera.aspect = window.innerWidth / window.innerHeight;camera.updateProjectionMatrix();renderer.setSize(window.innerWidth, window.innerHeight);});/*   const obj = {bool: false,};gui.add(obj, "bool").name("旋转动画");const render = () => {if (obj.bool) mesh.rotateY(0.01);renderer.render(scene, camera);requestAnimationFrame(render);};render(); */});
</script><style>.container {width: 100%;height: 100vh;position: relative;z-index: 1;}
</style>