微前端 qiankun@2.10.5 源码分析(二)
微前端 qiankun@2.10.5 源码分析(二)
我们继续上一节的内容。
loadApp 方法
找到 src/loader.ts 文件的第 244 行:
export async function loadApp<T extends ObjectType>(app: LoadableApp<T>,configuration: FrameworkConfiguration = {},lifeCycles?: FrameworkLifeCycles<T>,
): Promise<ParcelConfigObjectGetter> {...// 根据入口文件获取应用信息const { template, execScripts, assetPublicPath, getExternalScripts } = await importEntry(entry, importEntryOpts);// 在执行应用入口文件的之前先加载其它的资源文件// 比如:http://127.0.0.1:7101/static/js/chunk-vendors.js 文件await getExternalScripts();...// 创建当前应用元素,并且替换入口文件的 head 元素为 qiankun-headconst appContent = getDefaultTplWrapper(appInstanceId, sandbox)(template);...// 创建 css scoped,跟 vue scoped 的一样const scopedCSS = isEnableScopedCSS(sandbox);let initialAppWrapperElement: HTMLElement | null = createElement(appContent,strictStyleIsolation,scopedCSS,appInstanceId,);const initialContainer = 'container' in app ? app.container : undefined;// 获取渲染器,也就是在第一步中执行的 render 方法const render = getRender(appInstanceId, appContent, legacyRender);// 第一次加载设置应用可见区域 dom 结构// 确保每次应用加载前容器 dom 结构已经设置完毕// 将子应用的 initialAppWrapperElement 元素插入挂载节点 initialContainerrender({ element: initialAppWrapperElement, loading: true, container: initialContainer }, 'loading');// 创建一个 initialAppWrapperElement 元素的获取器const initialAppWrapperGetter = getAppWrapperGetter(appInstanceId,!!legacyRender,strictStyleIsolation,scopedCSS,() => initialAppWrapperElement,);let global = globalContext;let mountSandbox = () => Promise.resolve();let unmountSandbox = () => Promise.resolve();const useLooseSandbox = typeof sandbox === 'object' && !!sandbox.loose;// enable speedy mode by defaultconst speedySandbox = typeof sandbox === 'object' ? sandbox.speedy !== false : true;let sandboxContainer;if (sandbox) {// 创建沙盒sandboxContainer = createSandboxContainer(appInstanceId,// FIXME should use a strict sandbox logic while remount, see https://github.com/umijs/qiankun/issues/518initialAppWrapperGetter,scopedCSS,useLooseSandbox,excludeAssetFilter,global,speedySandbox,);// 用沙箱的代理对象作为接下来使用的全局对象global = sandboxContainer.instance.proxy as typeof window;mountSandbox = sandboxContainer.mount;unmountSandbox = sandboxContainer.unmount;}const {beforeUnmount = [],afterUnmount = [],afterMount = [],beforeMount = [],beforeLoad = [],} = mergeWith({}, getAddOns(global, assetPublicPath), lifeCycles, (v1, v2) => concat(v1 ?? [], v2 ?? []));// 调用 beforeLoad 生命周期await execHooksChain(toArray(beforeLoad), app, global);// 获取子应用模块信息const scriptExports: any = await execScripts(global, sandbox && !useLooseSandbox, {scopedGlobalVariables: speedySandbox ? cachedGlobals : [],});// 获取子应用模块信息导出的生命周期const { bootstrap, mount, unmount, update } = getLifecyclesFromExports(scriptExports,appName,global,sandboxContainer?.instance?.latestSetProp,);// 全局状态const { onGlobalStateChange, setGlobalState, offGlobalStateChange }: Record<string, CallableFunction> =getMicroAppStateActions(appInstanceId);// 返回 spa 需要的钩子信息const parcelConfig: ParcelConfigObject = {name: appInstanceId,bootstrap, // bootstrap 钩子信息mount: [ // mount 钩子信息...],unmount: [ // unmount 钩子信息...],};// update 钩子信息if (typeof update === 'function') {parcelConfig.update = update;}return parcelConfig;};return parcelConfigGetter;
}
代码有点多,loadApp 算是 qiankun 框架最重要的一个方法了,不要慌,我们一步一步的来!
importEntry 方法
在 loadApp 方法中,使用了 importEntry 方法去根据子应用入口加载子应用信息:
export async function loadApp<T extends ObjectType>(app: LoadableApp<T>,configuration: FrameworkConfiguration = {},lifeCycles?: FrameworkLifeCycles<T>,
): Promise<ParcelConfigObjectGetter> {...// 根据入口文件获取应用信息const { template, execScripts, assetPublicPath, getExternalScripts } = await importEntry(entry, importEntryOpts);// 在执行应用入口文件的之前先加载其它的资源文件// 比如:http://127.0.0.1:7101/static/js/chunk-vendors.js 文件await getExternalScripts();...
}
importEntry 方法是 import-html-entry 库中提供的方法:
import-html-entry
以 html 文件为应用的清单文件,加载里面的(css、js),获取入口文件的导出内容。
Treats the index html as manifest and loads the assets(css,js), get the exports from entry script.
<!-- subApp/index.html --><!DOCTYPE html>
<html lang="en">
<head><meta charset="UTF-8"><title>test</title>
</head>
<body><!-- mark the entry script with entry attribute -->
<script src="https://unpkg.com/mobx@5.0.3/lib/mobx.umd.js" entry></script>
<script src="https://unpkg.com/react@16.4.2/umd/react.production.min.js"></script>
</body>
</html>
import importHTML from 'import-html-entry';importHTML('./subApp/index.html').then(res => {console.log(res.template);res.execScripts().then(exports => {const mobx = exports;const { observable } = mobx;observable({name: 'kuitos'})})
});
更多 import-html-entry 库的内容,小伙伴们自己去看官网哦!
我们可以来测试一下,比如我们在第一步中注册的子应用信息:
{name: 'vue',entry: '//localhost:7101',container: '#subapp-viewport',loader,activeRule: '/vue',
}
vue 子应用的入口是 //localhost:7101,我们首先用 fetch 直接访问一下入口文件:

ok,可以看到,这是一个很普通的 vue 项目的入口文件,接着我们用 import-html-entry 库中提供的 importEntry 方法去测试一下:
import {importEntry} from "import-html-entry";
;(async ()=>{const { template, execScripts, assetPublicPath, getExternalScripts } = await importEntry("//localhost:7101");console.log("template", template);const externalScripts = await getExternalScripts();console.log("externalScripts", externalScripts);const module = await execScripts();console.log("module", module);console.log("assetPublicPath", assetPublicPath);console.log("assetPublicPath", assetPublicPath);
})()
我们运行看效果:

console.log("template", template) 的结果:
<html lang=""><head><meta charset="utf-8"><meta http-equiv="X-UA-Compatible" content="IE=edge"><meta name="viewport" content="width=device-width,initial-scale=1.0"><title>Vue App</title><!-- prefetch/preload link /static/js/about.js replaced by import-html-entry --><!-- prefetch/preload link /static/js/app.js replaced by import-html-entry --><!-- prefetch/preload link /static/js/chunk-vendors.js replaced by import-html-entry --></head><body><div id="app"></div><!--  script http://localhost:7101/static/js/chunk-vendors.js replaced by import-html-entry --><!--  script http://localhost:7101/static/js/app.js replaced by import-html-entry --></body>
</html>
可以看到,我们的 js 文件都被 import-html-entry 框架给注释掉了,所以 template 返回的是一个被处理过后的入口模版文件,里面的 js、css 资源文件都被剔除了。
console.log("externalScripts", externalScripts); 的结果:
返回了原模版文件中两个 js 文件:
<script type="text/javascript" src="/static/js/chunk-vendors.js"></script>
<script type="text/javascript" src="/static/js/app.js"></script>
的文本内容了:

console.log("module", module); 结果:

返回的是 vue 项目入口文件 examples/vue/src/main.js 导出的几个生命周期方法:
...
export async function bootstrap() {console.log('[vue] vue app bootstraped');
}export async function mount(props) {console.log('[vue] props from main framework', props);storeTest(props);render(props);
}export async function unmount() {instance.$destroy();instance.$el.innerHTML = '';instance = null;router = null;
}
console.log("assetPublicPath", assetPublicPath); 返回的是入口文件的公共路径 publishPath:
http://localhost:7101/
ok,到这里我们已经获取到子应用的信息了,我们继续分析 loadApp 方法。
接下来看看 qiankun 是如何做到子应用样式隔离的。
scoped css
export async function loadApp<T extends ObjectType>(app: LoadableApp<T>,configuration: FrameworkConfiguration = {},lifeCycles?: FrameworkLifeCycles<T>,
): Promise<ParcelConfigObjectGetter> {...// 根据入口文件获取应用信息const { template, execScripts, assetPublicPath, getExternalScripts } = await importEntry(entry, importEntryOpts);// 在执行应用入口文件的之前先加载其它的资源文件// 比如:http://127.0.0.1:7101/static/js/chunk-vendors.js 文件await getExternalScripts();...
}  // 获取子应用模版节点const appContent = getDefaultTplWrapper(appInstanceId, sandbox)(template);const strictStyleIsolation = typeof sandbox === 'object' && !!sandbox.strictStyleIsolation;const scopedCSS = isEnableScopedCSS(sandbox);// 创建 css scoped,跟 vue scoped 的一样let initialAppWrapperElement: HTMLElement | null = createElement(appContent,strictStyleIsolation,scopedCSS,appInstanceId,);// 获取挂载节点const initialContainer = 'container' in app ? app.container : undefined;const legacyRender = 'render' in app ? app.render : undefined;// 获取渲染器,也就是在第一步中执行的 render 方法const render = getRender(appInstanceId, appContent, legacyRender);// 第一次加载设置应用可见区域 dom 结构// 确保每次应用加载前容器 dom 结构已经设置完毕// 将子应用的 initialAppWrapperElement 元素插入挂载节点 initialContainerrender({ element: initialAppWrapperElement, loading: true, container: initialContainer }, 'loading');const initialAppWrapperGetter = getAppWrapperGetter(appInstanceId,!!legacyRender,strictStyleIsolation,scopedCSS,() => initialAppWrapperElement,);...
}
可以看到,获取子应用的入口文件后,首先调用了 getDefaultTplWrapper 方法创建了一个子应用模版节点:
// 获取子应用模版节点
const appContent = getDefaultTplWrapper(appInstanceId, sandbox)(template);
在 src/utils.ts 文件中找到该方法:
export function getDefaultTplWrapper(name: string, sandboxOpts: FrameworkConfiguration['sandbox']) {return (tpl: string) => {let tplWithSimulatedHead: string;// 替换入口模版文件中的 <head> 标签为 <qiankun-head>if (tpl.indexOf('<head>') !== -1) {tplWithSimulatedHead = tpl.replace('<head>', `<${qiankunHeadTagName}>`).replace('</head>', `</${qiankunHeadTagName}>`);} else {tplWithSimulatedHead = `<${qiankunHeadTagName}></${qiankunHeadTagName}>${tpl}`;}// 创建模版入口元素 div,将子应用的信息设置到该节点的属性中return `<div id="${getWrapperId(name,)}" data-name="${name}" data-version="${version}" data-sandbox-cfg=${JSON.stringify(sandboxOpts,)}>${tplWithSimulatedHead}</div>`;};
}
可以看到,替换了原来的 head 元素,然后在入口模版元素外包裹了一个 div 元素,最后将应用的基本信息设置到该节点的属性中。
获取到 appContent 节点后,然后就进行 css 样式隔离:
const scopedCSS = isEnableScopedCSS(sandbox);
// 创建 css scoped,跟 vue scoped 的一样
let initialAppWrapperElement: HTMLElement | null = createElement(appContent,strictStyleIsolation,scopedCSS,appInstanceId,
);
我们重点看一下 qiankun 是如何做到子应用样式隔离。
首先找到 src/loader.ts 第 67 行的 createElement 方法:
function createElement(appContent: string,strictStyleIsolation: boolean,scopedCSS: boolean,appInstanceId: string,
): HTMLElement {const containerElement = document.createElement('div');containerElement.innerHTML = appContent;// appElement 节点const appElement = containerElement.firstChild as HTMLElement;// 如果设置了强行样式隔离,就利用 ShadowDOM 进行样式隔离  if (strictStyleIsolation) {// 判断是否支持 ShadowDOM 节点if (!supportShadowDOM) {console.warn('[qiankun]: As current browser not support shadow dom, your strictStyleIsolation configuration will be ignored!',);} else {// 利用 ShadowDOM 进行样式隔离 const { innerHTML } = appElement;appElement.innerHTML = '';let shadow: ShadowRoot;if (appElement.attachShadow) {shadow = appElement.attachShadow({ mode: 'open' });} else {// createShadowRoot was proposed in initial spec, which has then been deprecatedshadow = (appElement as any).createShadowRoot();}shadow.innerHTML = innerHTML;}}// 对入口文件中的 <style> 标签中的样式进行深度遍历,全部加上 scopedif (scopedCSS) {const attr = appElement.getAttribute(css.QiankunCSSRewriteAttr);if (!attr) {appElement.setAttribute(css.QiankunCSSRewriteAttr, appInstanceId);}const styleNodes = appElement.querySelectorAll('style') || [];forEach(styleNodes, (stylesheetElement: HTMLStyleElement) => {css.process(appElement!, stylesheetElement, appInstanceId);});}return appElement;
}
ok,有小伙伴可以要问了,为什么需要样式隔离干什么呢?
我们来测试一下不加样式隔离的场景。
我们修改一下主应用的 examples/main/render/VueRender.js:
import Vue from 'vue/dist/vue.esm';function vueRender({ loading }) {return new Vue({template: `<div id="subapp-container"><!-- 主应用中的样式测试隔离元素 --><h1 class="test-class">test-class</h1><h4 v-if="loading" class="subapp-loading">Loading...</h4><!-- 子应用挂载节点 --><div id="subapp-viewport"></div></div>`,el: '#subapp-container',data() {return {loading,};},});
}let app = null;export default function render({ loading }) {if (!app) {app = vueRender({ loading });} else {app.loading = loading;}
}
接着我们修改一下子应用 react16 的入口文件 examples/react16/public/index.html:
<!DOCTYPE html>
<html lang="en">
<head><meta charset="utf-8"/><link href="%PUBLIC_URL%/favicon.ico" rel="icon"/><meta content="width=device-width, initial-scale=1" name="viewport"/><meta content="#000000" name="theme-color"/><metacontent="Web site created using create-react-app"name="description"/><link href="logo192.png" rel="apple-touch-icon"/><link href="%PUBLIC_URL%/manifest.json" rel="manifest"/><title>React App</title><!-- 样式隔离测试样式 --><style>.test-class {color: red;}</style>
</head>
<body>
<noscript>You need to enable JavaScript to run this app.</noscript>
<div id="root"></div>
</body>
</html>
可以看到,我们在子应用中添加了一个测试样式:
<style>.test-class {color: red;}
</style>
保存运行看效果:

可以看到,如果我们没有进行子应用样式隔离,子应用中的样式会污染主应用中的样式。
那在 qiankun 中如何启用样式隔离呢?
我们只需要在启动应用的时候传给 qiankun 就可以了,我们修改一下 examples/main/index.js 文件开启样式隔离:
/*** Step4 启动应用*/
start({sandbox: {strictStyleIsolation: true, // 开启子应用样式隔离,默认 false 关闭}
});
运行看效果:

可以看到,当开启了样式隔离后,子应用中的样式就不会污染主应用了。
那么为什么 qiankun 默认关闭样式隔离呢?我想可以能是考虑以下原因:
- ShadowDOM 兼容性不太好。
- 一般子应用中都会有样式命名规范,比如 vue 的 scoped、BEM 命名规范等,所以一般不用考虑。
- 子应用切换后节点都会被移除,所以不会引起子应用样式相互污染。
扩展:
qiankun 还可以对入口模版的 <style> 标签中的模版做深度遍历,对每个元素加上 scoped,从而来做到样式隔离。
对应的源码为:
function createElement(appContent: string,strictStyleIsolation: boolean,scopedCSS: boolean,appInstanceId: string,
): HTMLElement {...// 对入口文件中的 <style> 标签中的样式进行深度遍历,全部加上 scopedif (scopedCSS) {const attr = appElement.getAttribute(css.QiankunCSSRewriteAttr);if (!attr) {appElement.setAttribute(css.QiankunCSSRewriteAttr, appInstanceId);}const styleNodes = appElement.querySelectorAll('style') || [];forEach(styleNodes, (stylesheetElement: HTMLStyleElement) => {css.process(appElement!, stylesheetElement, appInstanceId);});}return appElement;
}
那么如何开启 scopedCSS 呢?也是在启动 qiankun 的时候。
我们修改一下 examples/main/index.js 入口的 start 方法:
/*** Step4 启动应用*/
start({sandbox: {experimentalStyleIsolation: true, // 开启 scopedCSS(还在实验中的属性,不推荐使用!!!)}
});
运行看效果:

可以看到,当我们启用了 scopedCSS 后,qiankun 会给在每一个样式加上一个 div[data-qiankun="react16"] 元素,将当前元素作为该元素的后代样式。
具体源码就不分析了,大概就是利用 css 元素深度遍历,然后添加 scoped 元素,最后利用 MutationObserver 监听节点的变化,给每一个节点都加上 scoped 元素。
了解一下原理就行了,目前该属性还在试验中,不推荐使用!!!
ok,介绍完样式隔离,下面就到了最重要的应用沙盒隔离了。
sandbox 沙盒
why:为什么需要沙盒隔离?
因为我们的应用都运行在一个主应用中,我们会用的全局变量 window 中的任何东西,也会对它进行各种改造,所以为了避免对全局变量的污染,qiankun 会为每一个应用创建一个 sanbox 环境,这样就不会污染全局变量了。
ok,了解为什么需要 sanbox 后,我们继续分析我们的源码。
回到 src/loader.ts 文件的 loadApp 方法:
export async function loadApp<T extends ObjectType>(app: LoadableApp<T>,configuration: FrameworkConfiguration = {},lifeCycles?: FrameworkLifeCycles<T>,
): Promise<ParcelConfigObjectGetter> {...// 根据入口文件获取应用信息const { template, execScripts, assetPublicPath, getExternalScripts } = await importEntry(entry, importEntryOpts);// 在执行应用入口文件的之前先加载其它的资源文件// 比如:http://127.0.0.1:7101/static/js/chunk-vendors.js 文件await getExternalScripts();...
}  // 获取子应用模版节点const appContent = getDefaultTplWrapper(appInstanceId, sandbox)(template);const strictStyleIsolation = typeof sandbox === 'object' && !!sandbox.strictStyleIsolation;const scopedCSS = isEnableScopedCSS(sandbox);// 创建 css scoped,跟 vue scoped 的一样let initialAppWrapperElement: HTMLElement | null = createElement(appContent,strictStyleIsolation,scopedCSS,appInstanceId,);// 获取挂载节点const initialContainer = 'container' in app ? app.container : undefined;const legacyRender = 'render' in app ? app.render : undefined;// 获取渲染器,也就是在第一步中执行的 render 方法const render = getRender(appInstanceId, appContent, legacyRender);// 第一次加载设置应用可见区域 dom 结构// 确保每次应用加载前容器 dom 结构已经设置完毕// 将子应用的 initialAppWrapperElement 元素插入挂载节点 initialContainerrender({ element: initialAppWrapperElement, loading: true, container: initialContainer }, 'loading');...let sandboxContainer;// 如果开启了沙盒,就给每一个应用创建一个沙盒环境(默认开启)if (sandbox) {sandboxContainer = createSandboxContainer(appInstanceId,// FIXME should use a strict sandbox logic while remount, see https://github.com/umijs/qiankun/issues/518initialAppWrapperGetter,scopedCSS,useLooseSandbox,excludeAssetFilter,global,speedySandbox,);// 用沙箱的代理对象作为接下来使用的全局对象global = sandboxContainer.instance.proxy as typeof window;mountSandbox = sandboxContainer.mount;unmountSandbox = sandboxContainer.unmount;}...
}
可以看到,当应用开启了沙盒后,qiankun 会利用 createSandboxContainer 方法给每一个应用创建一个沙盒容器 sandboxContainer。
找到 src/sandbox/index.ts 文件中的createSandboxContainer 方法:
export function createSandboxContainer(appName: string,elementGetter: () => HTMLElement | ShadowRoot,scopedCSS: boolean,useLooseSandbox?: boolean,excludeAssetFilter?: (url: string) => boolean,globalContext?: typeof window,speedySandBox?: boolean,
) {let sandbox: SandBox;// 兼容性处理if (window.Proxy) {sandbox = useLooseSandbox? new LegacySandbox(appName, globalContext): new ProxySandbox(appName, globalContext, { speedy: !!speedySandBox });} else {sandbox = new SnapshotSandbox(appName);}// some side effect could be invoked while bootstrapping, such as dynamic stylesheet injection with style-loader, especially during the development phaseconst bootstrappingFreers = patchAtBootstrapping(appName,elementGetter,sandbox,scopedCSS,excludeAssetFilter,speedySandBox,);// mounting freers are one-off and should be re-init at every mounting timelet mountingFreers: Freer[] = [];let sideEffectsRebuilders: Rebuilder[] = [];return {instance: sandbox,/*** 沙箱被 mount* 可能是从 bootstrap 状态进入的 mount* 也可能是从 unmount 之后再次唤醒进入 mount*/async mount() {/* ------------------------------------------ 因为有上下文依赖(window),以下代码执行顺序不能变 ------------------------------------------ *//* ------------------------------------------ 1. 启动/恢复 沙箱------------------------------------------ */sandbox.active();const sideEffectsRebuildersAtBootstrapping = sideEffectsRebuilders.slice(0, bootstrappingFreers.length);const sideEffectsRebuildersAtMounting = sideEffectsRebuilders.slice(bootstrappingFreers.length);// must rebuild the side effects which added at bootstrapping firstly to recovery to nature stateif (sideEffectsRebuildersAtBootstrapping.length) {sideEffectsRebuildersAtBootstrapping.forEach((rebuild) => rebuild());}/* ------------------------------------------ 2. 开启全局变量补丁 ------------------------------------------*/// render 沙箱启动时开始劫持各类全局监听,尽量不要在应用初始化阶段有 事件监听/定时器 等副作用mountingFreers = patchAtMounting(appName, elementGetter, sandbox, scopedCSS, excludeAssetFilter, speedySandBox);/* ------------------------------------------ 3. 重置一些初始化时的副作用 ------------------------------------------*/// 存在 rebuilder 则表明有些副作用需要重建if (sideEffectsRebuildersAtMounting.length) {sideEffectsRebuildersAtMounting.forEach((rebuild) => rebuild());}// clean up rebuilderssideEffectsRebuilders = [];},/*** 恢复 global 状态,使其能回到应用加载之前的状态*/async unmount() {// record the rebuilders of window side effects (event listeners or timers)// note that the frees of mounting phase are one-off as it will be re-init at next mountingsideEffectsRebuilders = [...bootstrappingFreers, ...mountingFreers].map((free) => free());sandbox.inactive();},};
}
可以看到,主要就是创建了一个 sandbox 沙盒对象,然后返回了 mount 跟 unmount 方法给 single-spa 调用,当子应用渲染的时候会调用 mount 方法,当子应用销毁的时候会调用 unmount 方法:
- mount 方法:会调用
sandbox.active()方法启用沙盒,会创建并收集当前子应用的一些副作用,比如setTimeout、setInterval、addEventListener等。 - unmount 方法:会调用
sandbox.inactive()方法关闭沙盒,移除当前子应用的一些副作用,比如setTimeout、setInterval、addEventListener等。
可以看到,主要是为了在切换子应用的时候开启和关闭沙盒,清除一些副作用,来防止内存泄漏。
因为大多数浏览器是支持 window.Proxy 的,所以我们就直接分析这里的 ProxySandbox 对象了:
export function createSandboxContainer(appName: string,elementGetter: () => HTMLElement | ShadowRoot,scopedCSS: boolean,useLooseSandbox?: boolean,excludeAssetFilter?: (url: string) => boolean,globalContext?: typeof window,speedySandBox?: boolean,
) {
// 是否支持 window.Proxy
if (window.Proxy) {sandbox = useLooseSandbox? new LegacySandbox(appName, globalContext): new ProxySandbox(appName, globalContext, { speedy: !!speedySandBox });} else {sandbox = new SnapshotSandbox(appName);}...
}
找到 src/sandbox/proxySandbox.ts 文件:
// 伪造一个 window 对象
function createFakeWindow(globalContext: Window, speedy: boolean) {const fakeWindow = {} as FakeWindow;// 获取 window 所有不可以配置或者删除的属性Object.getOwnPropertyNames(globalContext).filter((p) => {const descriptor = Object.getOwnPropertyDescriptor(globalContext, p);return !descriptor?.configurable;}).forEach((p) => {const hasGetter = Object.prototype.hasOwnProperty.call(descriptor, 'get');...// 将这些属性都赋值给 fakeWindowrawObjectDefineProperty(fakeWindow, p, Object.freeze(descriptor));// 可以通过 fakeWindow 获取到的一些属性if (hasGetter) propertiesWithGetter.set(p, true);}});// 返回伪造的 window 对象return {fakeWindow,propertiesWithGetter,};
}let activeSandboxCount = 0;/*** 基于 Proxy 实现的沙箱*/
export default class ProxySandbox implements SandBox {...// 激活沙盒active() {if (!this.sandboxRunning) activeSandboxCount++;this.sandboxRunning = true;}// 关闭沙盒inactive() {...this.sandboxRunning = false;}constructor(name: string, globalContext = window, opts?: { speedy: boolean }) {...// 伪造一个 window 对象 fakeWindowconst { fakeWindow, propertiesWithGetter } = createFakeWindow(globalContext, !!speedy);...// 创建代理对象 proxy 去代理 fakeWindow 对象const proxy = new Proxy(fakeWindow, {// 触发 fakeWindow 对象的 get 方法set: (target: FakeWindow, p: PropertyKey, value: any): boolean => {if (this.sandboxRunning) {this.registerRunningApp(name, proxy){if (!target.hasOwnProperty(p) && globalContext.hasOwnProperty(p)) {const descriptor = Object.getOwnPropertyDescriptor(globalContext, p);const { writable, configurable, enumerable, set } = descriptor!;if (writable || set) {Object.defineProperty(target, p, { configurable, enumerable, writable: true, value });}} else {target[p] = value;}...return true;}// 在 strict-mode 下,Proxy 的 handler.set 返回 false 会抛出 TypeError,在沙箱卸载的情况下应该忽略错误return true;},// 触发 fakeWindow 对象的 set 方法get: (target: FakeWindow, p: PropertyKey): any => {this.registerRunningApp(name, proxy);if (p === Symbol.unscopables) return unscopables;// avoid who using window.window or window.self to escape the sandbox environment to touch the real window// see https://github.com/eligrey/FileSaver.js/blob/master/src/FileSaver.js#L13if (p === 'window' || p === 'self') {return proxy;}// hijack globalWindow accessing with globalThis keywordif (p === 'globalThis' || (inTest && p === mockGlobalThis)) {return proxy;}...return getTargetValue(boundTarget, value);},// 触发 fakeWindow 对象的 has 方法has(target: FakeWindow, p: string | number | symbol): boolean {// property in cachedGlobalObjects must return true to avoid escape from get trapreturn p in cachedGlobalObjects || p in target || p in globalContext;},...
}
这里简化了很多代码,主要就是创建了一个伪装的 window 对象 fakeWindow,然后对 fakeWindow 对象的get、set、has 等方法进行代理,最后返回这个 fakeWindow 对象的代理对象 proxy,这样每个子应用都有一个自己的 window 对象了。
ok,我们继续回到 src/loader.ts 文件的第 321 行:
export async function loadApp<T extends ObjectType>(app: LoadableApp<T>,configuration: FrameworkConfiguration = {},lifeCycles?: FrameworkLifeCycles<T>,
): Promise<ParcelConfigObjectGetter> {...// 根据入口文件获取应用信息const { template, execScripts, assetPublicPath, getExternalScripts } = await importEntry(entry, importEntryOpts);// 在执行应用入口文件的之前先加载其它的资源文件// 比如:http://127.0.0.1:7101/static/js/chunk-vendors.js 文件await getExternalScripts();...
}  // 获取子应用模版节点const appContent = getDefaultTplWrapper(appInstanceId, sandbox)(template);const strictStyleIsolation = typeof sandbox === 'object' && !!sandbox.strictStyleIsolation;const scopedCSS = isEnableScopedCSS(sandbox);// 创建 css scoped,跟 vue scoped 的一样let initialAppWrapperElement: HTMLElement | null = createElement(appContent,strictStyleIsolation,scopedCSS,appInstanceId,);// 获取挂载节点const initialContainer = 'container' in app ? app.container : undefined;const legacyRender = 'render' in app ? app.render : undefined;// 获取渲染器,也就是在第一步中执行的 render 方法const render = getRender(appInstanceId, appContent, legacyRender);// 第一次加载设置应用可见区域 dom 结构// 确保每次应用加载前容器 dom 结构已经设置完毕// 将子应用的 initialAppWrapperElement 元素插入挂载节点 initialContainerrender({ element: initialAppWrapperElement, loading: true, container: initialContainer }, 'loading');...let sandboxContainer;// 如果开启了沙盒,就给每一个应用创建一个沙盒环境(默认开启)if (sandbox) {sandboxContainer = createSandboxContainer(appInstanceId,// FIXME should use a strict sandbox logic while remount, see https://github.com/umijs/qiankun/issues/518initialAppWrapperGetter,scopedCSS,useLooseSandbox,excludeAssetFilter,global,speedySandbox,);// 用沙箱的代理对象作为接下来使用的全局对象global = sandboxContainer.instance.proxy as typeof window;// 返回沙盒容器的 mount 方法用来开启沙盒mountSandbox = sandboxContainer.mount;// 返回沙盒容器的 unmount 方法用来关闭沙盒unmountSandbox = sandboxContainer.unmount;}...
}
可以看到,接下来将使用沙箱的代理对象 global 作为全局对象 window,并且返回了开启沙盒和关闭沙盒的方法给 single-spa 调用。
ok,我们接着往下分析 loadApp 方法。
找到 src/loader.ts 文件的第 337 行:
export async function loadApp<T extends ObjectType>(app: LoadableApp<T>,configuration: FrameworkConfiguration = {},lifeCycles?: FrameworkLifeCycles<T>,
): Promise<ParcelConfigObjectGetter> {...// 根据入口文件获取应用信息const { template, execScripts, assetPublicPath, getExternalScripts } = await importEntry(entry, importEntryOpts);// 在执行应用入口文件的之前先加载其它的资源文件// 比如:http://127.0.0.1:7101/static/js/chunk-vendors.js 文件await getExternalScripts();...
}  // 获取子应用模版节点const appContent = getDefaultTplWrapper(appInstanceId, sandbox)(template);const strictStyleIsolation = typeof sandbox === 'object' && !!sandbox.strictStyleIsolation;const scopedCSS = isEnableScopedCSS(sandbox);// 创建 css scoped,跟 vue scoped 的一样let initialAppWrapperElement: HTMLElement | null = createElement(appContent,strictStyleIsolation,scopedCSS,appInstanceId,);// 获取挂载节点const initialContainer = 'container' in app ? app.container : undefined;const legacyRender = 'render' in app ? app.render : undefined;// 获取渲染器,也就是在第一步中执行的 render 方法const render = getRender(appInstanceId, appContent, legacyRender);// 第一次加载设置应用可见区域 dom 结构// 确保每次应用加载前容器 dom 结构已经设置完毕// 将子应用的 initialAppWrapperElement 元素插入挂载节点 initialContainerrender({ element: initialAppWrapperElement, loading: true, container: initialContainer }, 'loading');...let sandboxContainer;// 如果开启了沙盒,就给每一个应用创建一个沙盒环境(默认开启)if (sandbox) {sandboxContainer = createSandboxContainer(appInstanceId,// FIXME should use a strict sandbox logic while remount, see https://github.com/umijs/qiankun/issues/518initialAppWrapperGetter,scopedCSS,useLooseSandbox,excludeAssetFilter,global,speedySandbox,);// 用沙箱的代理对象作为接下来使用的全局对象global = sandboxContainer.instance.proxy as typeof window;// 返回沙盒容器的 mount 方法用来开启沙盒mountSandbox = sandboxContainer.mount;// 返回沙盒容器的 unmount 方法用来关闭沙盒unmountSandbox = sandboxContainer.unmount;}// 获取生命周期const {beforeUnmount = [],afterUnmount = [],afterMount = [],beforeMount = [],beforeLoad = [],} = mergeWith({}, getAddOns(global, assetPublicPath), lifeCycles, (v1, v2) => concat(v1 ?? [], v2 ?? []));// 调用 beforeLoad 生命周期 //在 beforeLoad 方法里主要给 window 的代理对象 fakeWindow 设置一些变量// 比如:global.__POWERED_BY_QIANKUN__ = true;await execHooksChain(toArray(beforeLoad), app, global);// 执行当前应用的入口文件const scriptExports: any = await execScripts(global, sandbox && !useLooseSandbox, {scopedGlobalVariables: speedySandbox ? cachedGlobals : [],});// 获取应用导出的 bootstrap、mount 等方法const { bootstrap, mount, unmount, update } = getLifecyclesFromExports(scriptExports,appName,global,sandboxContainer?.instance?.latestSetProp,);...const parcelConfigGetter: ParcelConfigObjectGetter = (remountContainer = initialContainer) => {let appWrapperElement: HTMLElement | null;let appWrapperGetter: ReturnType<typeof getAppWrapperGetter>;const parcelConfig: ParcelConfigObject = {name: appInstanceId,bootstrap, // 返回 bootstrap 方法// 返回 mount 方法mount: [// 如果设置了单个应用运行,则需要等待上一个应用结束                             async () => {if ((await validateSingularMode(singular, app)) && prevAppUnmountedDeferred) {return prevAppUnmountedDeferred.promise;}return undefined;},// initial wrapper element before app mount/remountasync () => {appWrapperElement = initialAppWrapperElement;appWrapperGetter = getAppWrapperGetter(appInstanceId,!!legacyRender,strictStyleIsolation,scopedCSS,() => appWrapperElement,);},// 添加 mount hook, 确保每次应用加载前容器 dom 结构已经设置完毕async () => {const useNewContainer = remountContainer !== initialContainer;if (useNewContainer || !appWrapperElement) {// element will be destroyed after unmounted, we need to recreate it if it not exist// or we try to remount into a new containerappWrapperElement = createElement(appContent, strictStyleIsolation, scopedCSS, appInstanceId);syncAppWrapperElement2Sandbox(appWrapperElement);}render({ element: appWrapperElement, loading: true, container: remountContainer }, 'mounting');},// 开启沙盒mountSandbox,// 调用 beforeMount 生命周期async () => execHooksChain(toArray(beforeMount), app, global),// 调用 mount 生命周期,开始渲染子应用async (props) => mount({ ...props, container: appWrapperGetter(), setGlobalState, onGlobalStateChange }),// 将子应用状态修改为 mountedasync () => render({ element: appWrapperElement, loading: false, container: remountContainer }, 'mounted'),// 触发 afterMount 生命周期async () => execHooksChain(toArray(afterMount), app, global),],unmount: [// 触发 beforeUnmount 生命周期async () => execHooksChain(toArray(beforeUnmount), app, global),// 调用 unmount 生命周期,开始卸载子应用async (props) => unmount({ ...props, container: appWrapperGetter() }),// 关闭沙盒unmountSandbox,// 调用 afterUnmount 生命周期async () => execHooksChain(toArray(afterUnmount), app, global),async () => {// 将子应用状态修改为 unmountedrender({ element: null, loading: false, container: remountContainer }, 'unmounted');offGlobalStateChange(appInstanceId);// for gcappWrapperElement = null;syncAppWrapperElement2Sandbox(appWrapperElement);},async () => {if ((await validateSingularMode(singular, app)) && prevAppUnmountedDeferred) {prevAppUnmountedDeferred.resolve();}},],};// 触发子应用的 update 方法if (typeof update === 'function') {parcelConfig.update = update;}return parcelConfig;};return parcelConfigGetter;
}
ok,可能有些童鞋要问了:“沙箱对象 sandbox(也就是我们当前 loadApp 方法中的 global 对象),到底是怎么被子应用使用的呢?”
我们可以重点看到这么一段代码:
// 执行当前应用的入口文件
const scriptExports: any = await execScripts(global, sandbox && !useLooseSandbox, {scopedGlobalVariables: speedySandbox ? cachedGlobals : [],
});
其实重点是 execScripts方法,那么它在执行子应用入口文件的时候,到底了什么呢?
其实原理很简单,就是用到了 with(){} 语句加 eval,我们来模拟一下 execScripts 方法的操作:
// 创建一个 fakeWindow
const fakeWindow = {name: "FakeWindow"
};
// 给 fakeWindow 设置代理对象
const proxy = new Proxy(fakeWindow, {get(target, p){if("window" === p || "self" === p){return target;}return target[p];},set(target, p, value){target[p] = value;}
});
window.proxy = proxy;
// 根据子应用入口文件封装执行的代码
const functionWrappedCode = `(function(){;(function(window, self, globalThis){with(window){// 子应用入口文件代码--startwindow.mount = ()=>{console.log("mount");console.log(window);}window.unmount= ()=>{console.log("unmount");console.log(window);}// 子应用入口文件代码--end}}).bind(window.proxy)(window.proxy, window.proxy, window.proxy);})
`;
// 调用 eval 执行封装过后的代码
(0, eval)(functionWrappedCode).call(window);// 执行 mount 方法
proxy.mount();
// 执行 unmount 方法
proxy.unmount();
可以看到,假设我们子应用的入口文件代码为:
window.mount = ()=>{console.log("mount");console.log(window);}window.unmount= ()=>{console.log("unmount");console.log(window);}
我们在各自的子应用中随意用 window 对象,这是一个很正常的操作,经过我们 with 封装后,我们执行看效果:
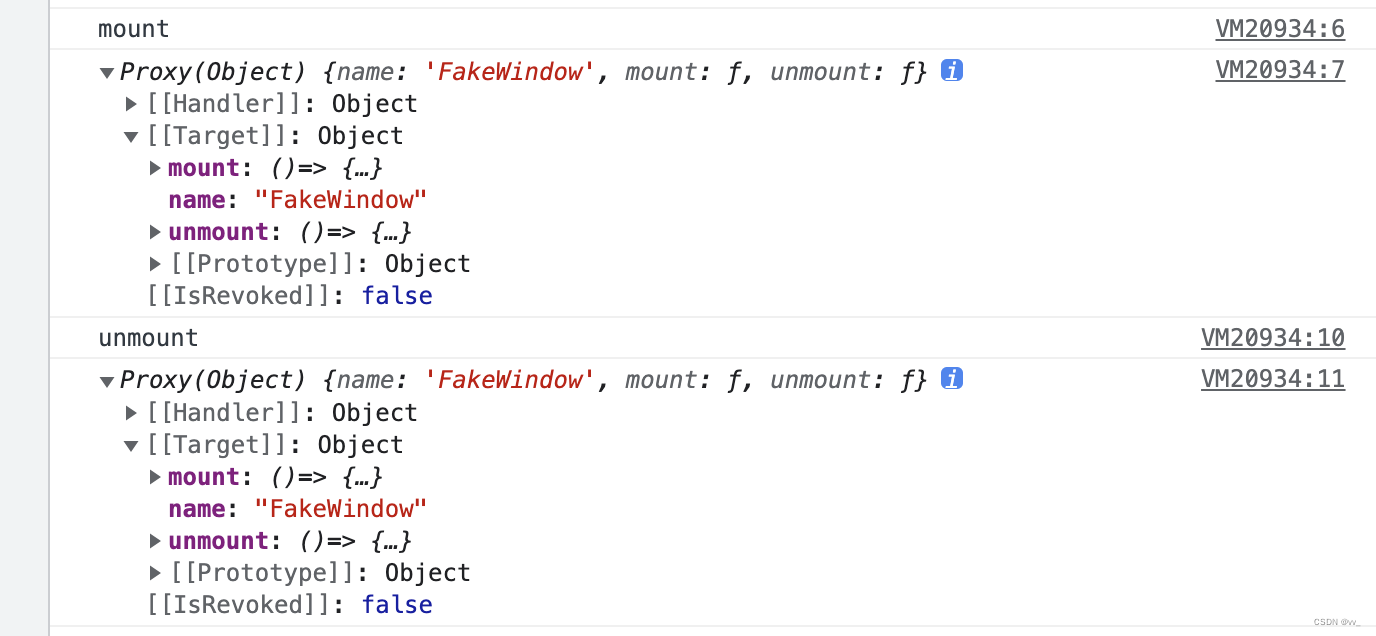
可以看到,经过处理后,我们在子应用中用到的 window 已经被我们替换成了 fakeWindow,这样每一个子应用就都有一个自己的全局变量 window 了,这样就不会污染全局对象,这就是一个沙盒。
ok,分析完 loadApp 方法后,我们回到最初的 registerMicroApps 方法中。
找到 src/apis.ts 文件的第 80 行:
export function registerMicroApps<T extends ObjectType>(apps: Array<RegistrableApp<T>>,lifeCycles?: FrameworkLifeCycles<T>,
) {// 过滤未注册过的应用,防止多次注册const unregisteredApps = apps.filter((app) => !microApps.some((registeredApp) => registeredApp.name === app.name));microApps = [...microApps, ...unregisteredApps];// 遍历每一个未注册的应用unregisteredApps.forEach((app) => {const { name, activeRule, loader = noop, props, ...appConfig } = app;// 注册应用registerApplication({name,app: async () => {// 修改页面状态为 loadingloader(true);// 等待 start 方法的调用await frameworkStartedDefer.promise;// 加载当前子应用,获取子应用的 mount 方法const { mount, ...otherMicroAppConfigs } = (await loadApp({ name, props, ...appConfig }, frameworkConfiguration, lifeCycles))();return {mount: [async () => loader(true), ...toArray(mount), async () => loader(false)],...otherMicroAppConfigs,};},activeWhen: activeRule,customProps: props,});});
}
single-spa
可以看到,当 loadApp 方法执行完成后,会返回应用的 mount、bootstrap、unmount 等方法,接下来会将这些方法传给 single-spa 的 registerApplication 方法,最后就是 single-spa 的事情了。
single-spa 会监听当前路由的变化,通过每个应用提供的的 activeWhen 来匹配出需要渲染的应用,接着调用该应用的 mount 方法对其进行渲染。
ok, qiankun 框架的源码到这我们就算是分析完了。
总结
整个源码分析下来我们会发现,要写出这么牛逼的框架,除了需要很扎实的 js 基础外,还需要有很强的架构意识,真的由衷佩服作者大大,请收下我的膝盖!!!
下一个 wujie 见!!!