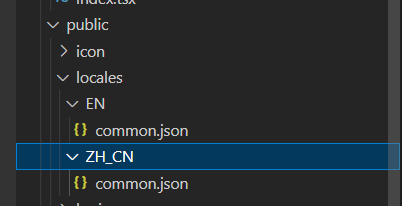
国际化语言,多语言三种方式
可以用透传的方式,自己写local的json文件,不需要配置什么,直接传,自己写方法
i18n nextjs
i18n umi4
一、透传的方式 export const AppContext = React.createContext<any>({})
app.tsx 用context包裹
import type { AppProps } from 'next/app'
import React, { useState } from 'react';
import { appWithTranslation } from 'next-i18next'import enUs from '../public/locales/EN/common.json';
import zhCN from '../public/locales/ZH_CN/common.json';export const AppContext = React.createContext<any>({})
const App = ({ Component, pageProps }: AppProps) => {const [locale, setLocal] = useState(zhCN);return <AppContext.Provider value={{locale,setLocal}} ><Component {...pageProps} /></AppContext.Provider>
}
export default appWithTranslation(App)
写local.json文件

//中文{"welcome": "欢迎"
}//英文{"welcome": "welcome"
}
封装方法
import { useContext } from "react";
import { AppContext } from "../pages/_app";const useLocale = () => {const { locale } = useContext(AppContext);const getLocale = (key: string) => {if (!key) throw new Error(`key is not defined`);const keys = key.split('.');let nowValue = locale;let res = null;try {keys.forEach((item, index) => {const subItem = nowValue[item];if (index === keys.length - 1) {res = subItem;} else {if (typeof subItem === 'object' && subItem !== null) {nowValue = subItem;} else {res = null;console.log(res)}}});} catch (err) {console.log(err)}return res;}return getLocale;
}export default useLocale;
使用:
  const Home = (props:any) => {const { setLocal } = useContext(AppContext);const getLocale = useLocale();// 语言切换const handleLanguageChange = (value: string) => {if(value==='EN'){setLocal(enUs)}if(value==='ZH_CN'){setLocal(zhCN)}};
return({
<>
<p> { getLocale('welcome')}</p>  //应用<div className={styles.selectBtn}><SelectdefaultValue="ZH_CN"onChange={handleLanguageChange}getPopupContainer={() => document.getElementById('area') !}options={[{ value: "EN", label: "英文" },{ value: "ZH_CN", label: "中文" },]}/></div>}
</>
})
二、场景二:next.js下载配置
npm install next-i18next根目录下新建文件 next-i18next.config.js
module.exports = {i18n: {defaultLocale: "en",locales: ["en",  "zh-CN"],localePath: "./locales",},
};
next.config.js
const { i18n } = require("./next-i18next.config");const nextConfig = {// other stuffi18n,
};module.exports = nextConfig;
local文件夹,文件夹在public下面新建locales
.
└── locales├── en|   └── common.json|   └── home.json└── zh-CH|   └── common.json|   └── home.json
高阶组件引用:pages/_app.jsx
import { appWithTranslation } from "next-i18next";
import Header from "../components/Header";
import "../styles/globals.css";function MyApp({ Component, pageProps }) {return (<><Header /><Component {...pageProps} /></>);
}export default appWithTranslation(MyApp);
index.tsx文件里面使用 pages/index.jsx
import { serverSideTranslations } from "next-i18next/serverSideTranslations";
import { useRouter } from "next/router";// export default function Home...const { route, asPath, push } = useRouter();// 语言切换const handleLanguageChange = (value: string) => {push(route, asPath, {locale: value as any})};<div className={styles.selectBtn}><SelectdefaultValue="ZH_CN"onChange={handleLanguageChange}getPopupContainer={() => document.getElementById('area') !}options={[{ value: "EN", label: "英文" },{ value: "ZH_CN", label: "中文" },]}/></div>export async function getStaticProps({ locale }) {return {props: {...(await serverSideTranslations(locale, ["common", "home"])),// Will be passed to the page component as props},};
}
pages/index.jsx
// other imports
import { useTranslation } from "next-i18next";export default function Home() {// We want to get the translations from `home.json`const { t } = useTranslation("home");// Get the translation for `greeting` keyreturn <main>{t("welcome")}</main>;
}// export async function getStaticProps...
此处:nextjs的多语言就能使用了
如果我们希望它使用默认的语言环境值(在我们的例子中是en),我们可以省略一些翻译键。
还有个例子可以参考:
{"title": "保持最新状态","form": {"email": "电子邮箱","action": {"cancel": "取消"}}
}
import { useTranslation } from "next-i18next";
import React from "react";const SubscribeForm = () => {const { t } = useTranslation("newsletter");return (<section><h3>{t("title")}</h3><h4>{t("subtitle")}</h4><form><input placeholder={t("form.firstName")} /><input placeholder={t("form.email")} /><button>{t("form.action.signUp")}</button><button>{t("form.action.cancel")}</button></form>{/* For styling only */}<style jsx>{`form {max-width: 300px;display: flex;flex-direction: column;}input {margin-bottom: 0.5rem;}`}</style></section>);
};export default SubscribeForm;
next 如果只打包静态页面,i18n会报错,可以用第一种透传的方式。
三、场景三:umi里面的多语言i18n
index.tsx
import { SelectLang } from '@umijs/max';<SelectLang className={styless.action} />locales.js和前面一样{ },如果是locales.ts的话,注意export default暴露这样写:
export default{
"welcome":"welcome"
}
umirc.ts
import { defineConfig } from '@umijs/max';
import routes from './src/routes/index';
import proxy from './config/proxy';
const { APP_ENV } = process.env;export default defineConfig({history: { type: 'hash' },dva: {},antd: {},access: {},model: {},initialState: {},request: {},locale: {antd: true, // 如果项目依赖中包含 `antd`,则默认为 true  一定要设置 否则SelectLang不显示baseNavigator: true,baseSeparator: '-',default: 'zh-CN',title: false,useLocalStorage: true,},ignoreMomentLocale: true,// Option+Click/Alt+Click 点击组件跳转至编辑器源码位置clickToComponent: { editor: 'vscode' },
});
封装hooks
import { getIntl } from "@umijs/max";let intl = getIntl ();function useLocale(name:string,values?:{[key:string]:any}):string{if(!name)return '';return intl.formatMessage({id:name},{...values})|| name;
}export default useLocale;
index.tsx
<div> {useLocale('welcome')}</div>如果没有封装hook,可以使用 FormattedMessage ,index.tsx里:
import { FormattedMessage, useIntl } from '@umijs/max';const Home = ()=>{const { formatMessage } = useIntl();
return({<p>{formatMessage({ id: 'welcome' })}</p>})}
ok,三种解决国际化多语言的方式。
