JavaWeb--Student2025项目:增删改查
文章目录
- 条件查询的实现
- 1. 表单以及按钮的页面显示
- 2.添加事件---日期弹窗
- 3.重置事件
- 4.查询事件
- 1.获取参数并将参数封装:
- 2.AJAX往后台传递参数
- 3.servlet获取参数并响应结果返回
- 4.js里面执行回调函数输出内容
- 5.根据条件查询显示总记录数
- 6.批量删除
- 1.前端页面展示部分:
- 2.全选和取消全选事件:
- 3.选中一行
- 3.删除按钮操作:
- 4.获取参数并给后台传参
- 5.servlet调用函数完成响应
- 7.新增事件
- 1.前端页面展示:add.jsp
- 2.添加css修饰:
- 3.添加事件实现新增页面的弹窗以及出生日期的弹窗和渲染:
- 4.获取前端新增的参数信息,校验,发送给后端
- 5.前端发送请求,后端就要响应:
- 8、修改事件
- 1、edit.jsp进行展示
- 2、CSS进行修饰
- 3.添加新增页面的事件绑定以及页面的日期弹窗修饰:
- 4.获取前端要修改的参数信息,校验,发送给后端
- 5.前端发送请求,后端就要响应:
之前我们已经实现了简单的分页查询功能,实现的效果:
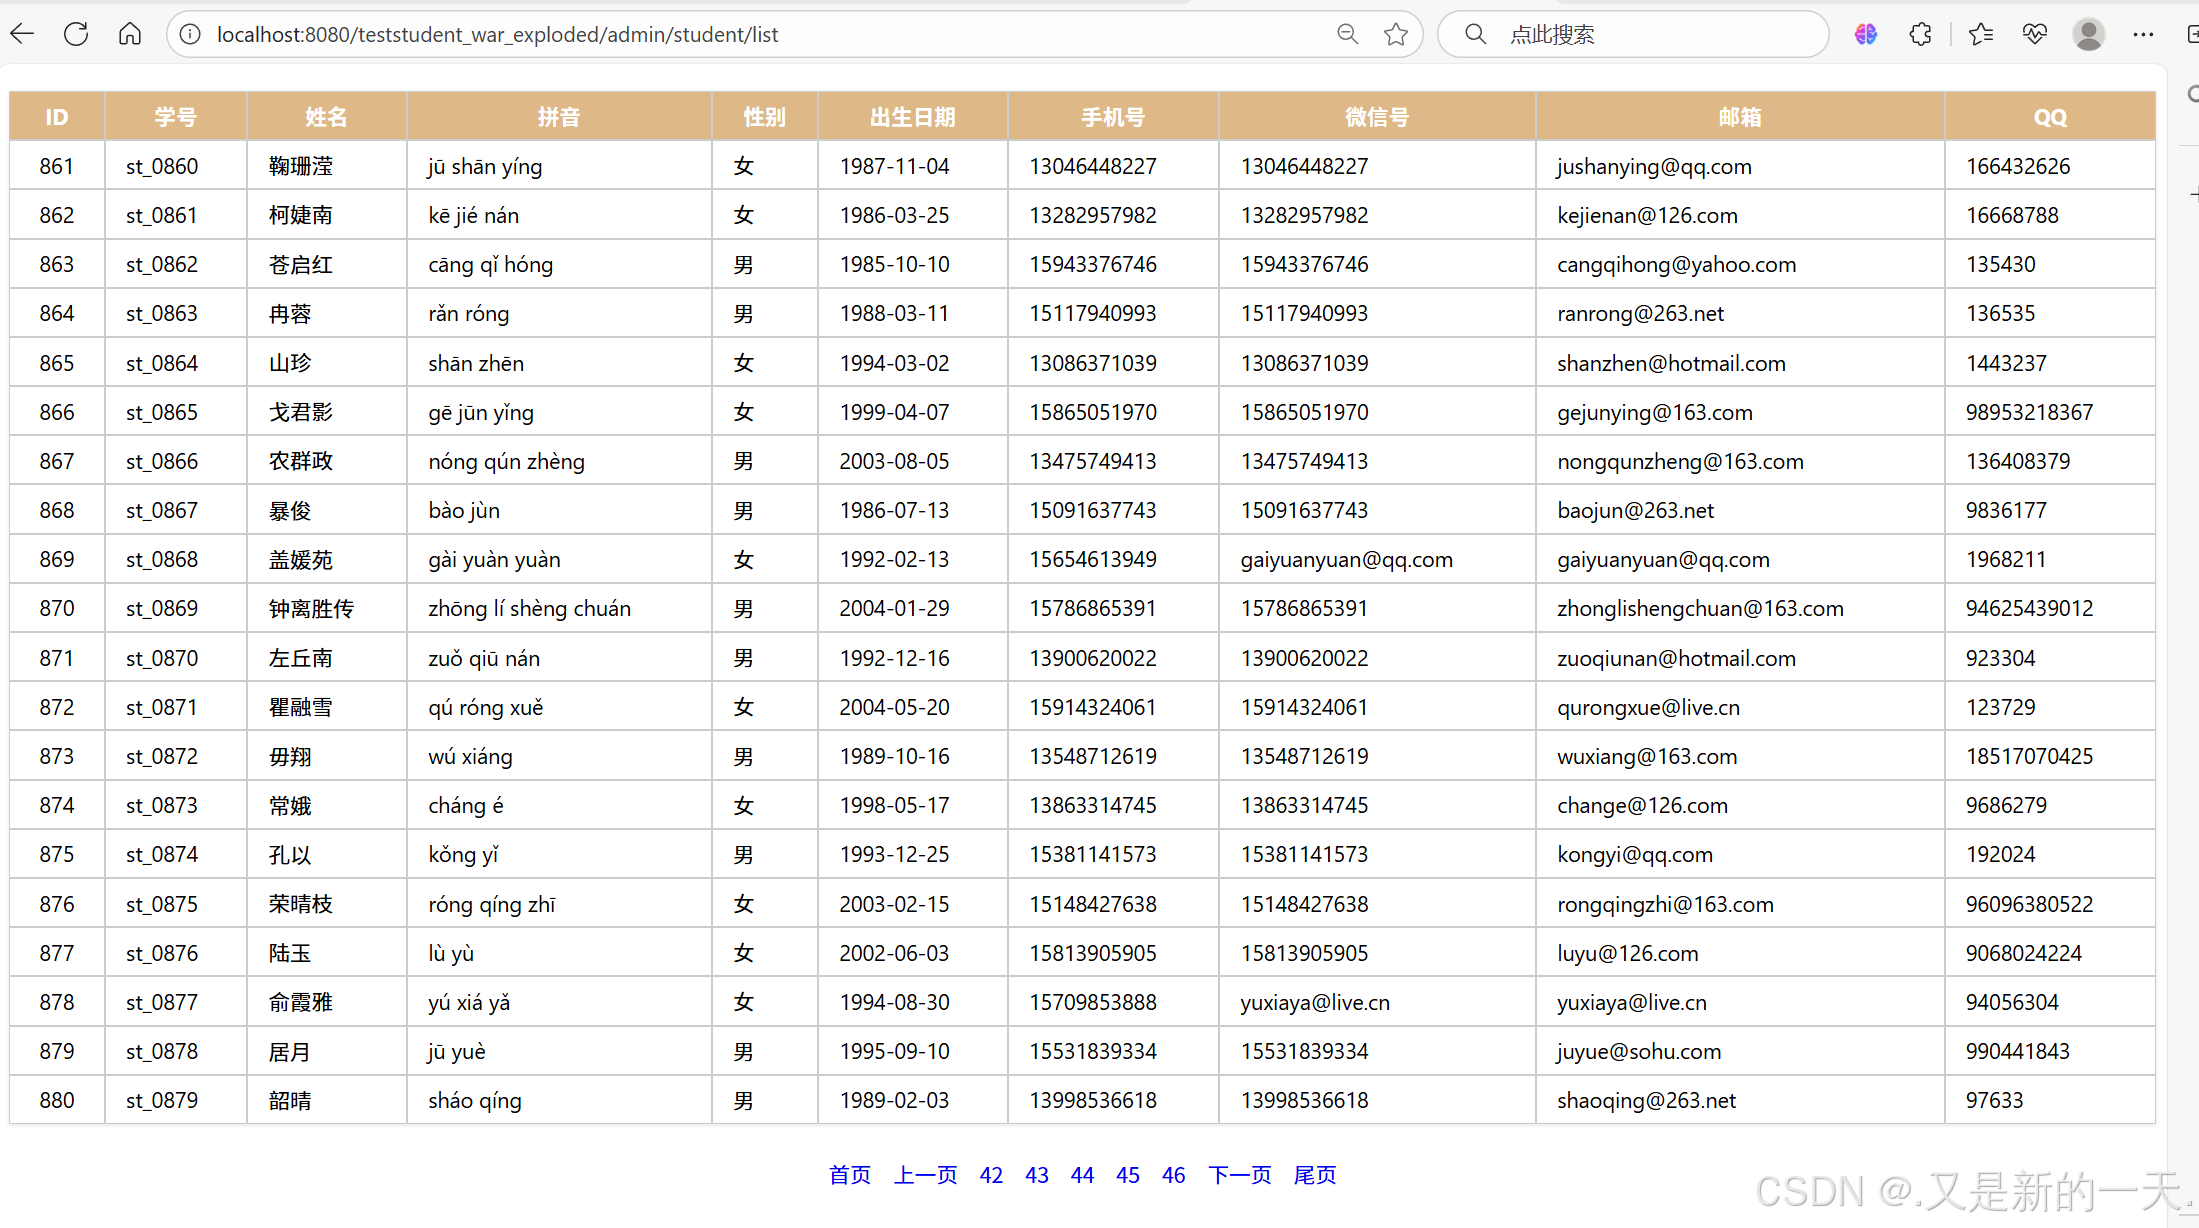
分页查询
相关源码已经上传,有需要可以自行下载。
接下来继续进行完善。
条件查询的实现
1. 表单以及按钮的页面显示
条件查询:就是视图—就是list.jsp里面添加表单元素,在浏览器页面上呈现:
对关键的元素添加属性,方便我们渲染和展示:
表单:
<div class="search"><form id="search-form" action=""><div><label for="stuId">学号:</label><input id="stuId" type="text" name="stuId" placeholder="请输入学号" autocomplete="off"></div><div><label for="name">姓名:</label><input id="name" type="text" name="name" placeholder="请输入姓名" autocomplete="off"></div><div><label for="sex">性别:</label><select id="sex" name="sex"><option value="">不限</option><option value="男">男</option><option value="女">女</option></select></div><div class="layui-form-item"><label>出生日期:</label><div class="layui-inline" id="birth-range"><div class="layui-input-inline"><input type="text" autocomplete="off" id="birth-start" class="layui-input"placeholder="开始日期"></div><div class="layui-form-mid">~</div><div class="layui-input-inline"><input type="text" autocomplete="off" id="birth-end" class="layui-input"placeholder="结束日期"></div></div></div><div><label for="phone">手机号:</label><input id="phone" type="text" name="phone" placeholder="请输入手机号" autocomplete="off"></div></form>
</div>
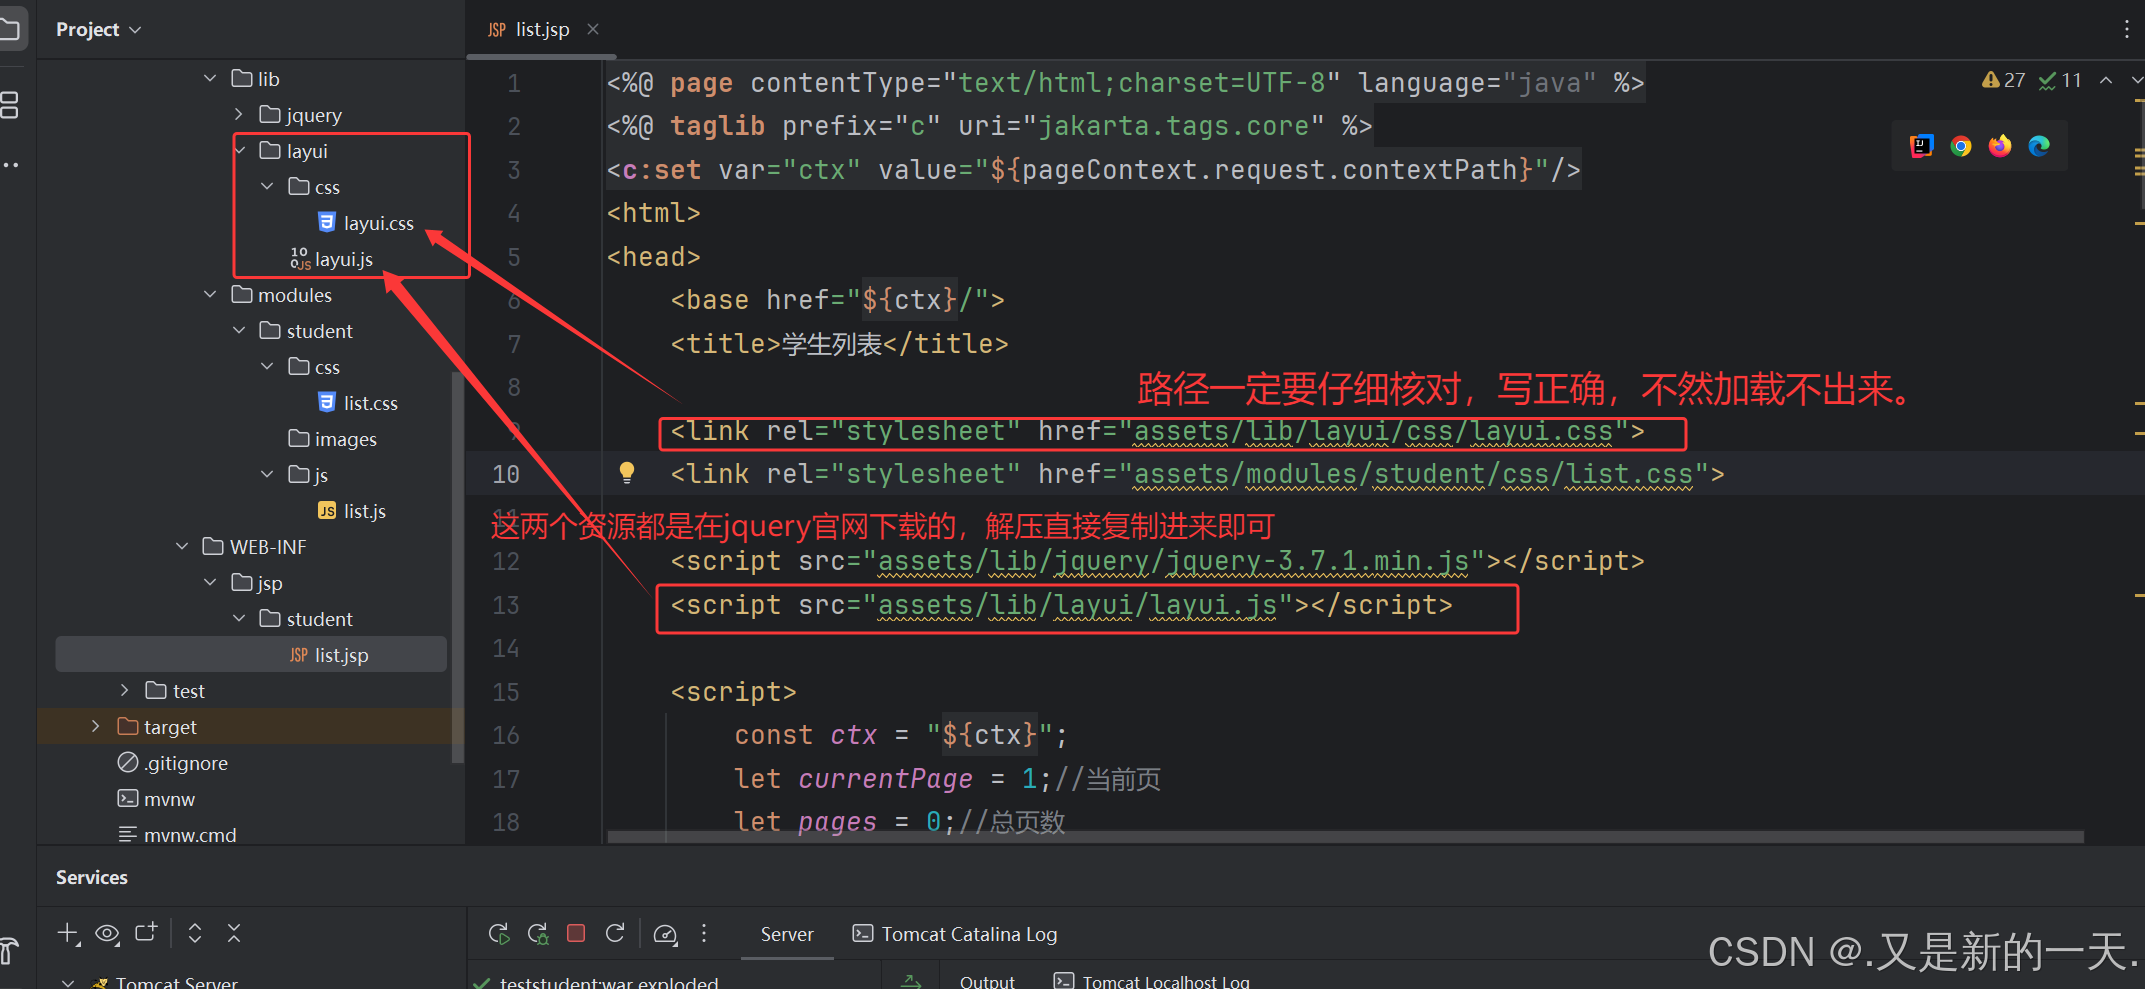
关于这个出生日期部分我们想要弹窗出来选的结果,这样结果就是输入正确的,我们这里使用专门的组件layui进行修饰,所以需要在list.jsp当前页面中引入layui。
https://layui.dev/

这个font也要引入进去,里面有很多图标,不引入这个在弹出日期的时候图标会出现问题。
有表单了再添加按钮:
<%--按钮区--%>
<div class="action"><button type="button">新增</button><button type="button">修改</button><button type="button" id="search">查询</button><button type="button" id="reset">重置</button><button type="button">删除</button>
</div>
并添加样式修饰,总的css样式以及list.jsp展示页面代码如下:
list.css:
@charset "UTF-8";body, table {font-size: 14px;
}#tbl {border-collapse: collapse;width: 100%;margin-top: 10px;
}#tbl tr > :is(td,th) {border: 1px solid #ccc;padding: 6px 15px;
}.paginate-div {margin-top: 8px;
}.paginate {list-style-type: none;margin: 0;padding: 0;
}.paginate > li {float: left;
}.paginate > li > a {display: inline-block;padding: 5px 8px;text-align: center;text-decoration: none;
}.paginate::after {content: "";display: block;clear: both;width: 0;
}/*查询表单样式*/
.search > form > div {display: inline-block;
}.search > form > div > :is(input,select) {outline: none;border: 1px solid #ccc;width: 160px;padding: 5px 0 5px 5px;
}.search > form > div > label {margin-left: 15px;
}.action > button {background-color: #409EFF;padding: 7px 20px;outline: none;border: 1px solid transparent;color: #fff;
}
list.jsp:
<%@ page contentType="text/html;charset=UTF-8" language="java" %>
<%@ taglib prefix="c" uri="jakarta.tags.core" %>
<c:set var="ctx" value="${pageContext.request.contextPath}"/>
<html>
<head><base href="${ctx}/"><title>学生列表</title><link rel="stylesheet" href="assets/lib/layui/css/layui.css"><link rel="stylesheet" href="assets/modules/student/css/list.css"><script src="assets/lib/jquery/jquery-3.7.1.min.js"></script><script src="assets/lib/layui/layui.js"></script><script>const ctx = "${ctx}";let currentPage = 1;//当前页let pages = 0;//总页数</script><script src="assets/modules/student/js/list.js"></script>
</head><body><%--条件查询的表单:--%>
<div class="search"><form id="search-form" action=""><div><label for="stuId">学号:</label><input id="stuId" type="text" name="stuId" placeholder="请输入学号" autocomplete="off"></div><div><label for="name">姓名:</label><input id="name" type="text" name="name" placeholder="请输入姓名" autocomplete="off"></div><div><label for="sex">性别:</label><select id="sex" name="sex"><option value="">不限</option><option value="男">男</option><option value="女">女</option></select></div><div class="layui-form-item"><label>出生日期:</label><div class="layui-inline" id="birth-range"><div class="layui-input-inline"><input type="text" autocomplete="off" id="birth-start" class="layui-input"placeholder="开始日期"></div><div class="layui-form-mid">~</div><div class="layui-input-inline"><input type="text" autocomplete="off" id="birth-end" class="layui-input"placeholder="结束日期"></div></div></div><div><label for="phone">手机号:</label><input id="phone" type="text" name="phone" placeholder="请输入手机号" autocomplete="off"></div></form>
</div><%--按钮区--%>
<div class="action"><button type="button">新增</button><button type="button">修改</button><button type="button" id="search">查询</button><button type="button" id="reset">重置</button><button type="button">删除</button>
</div><table id="tbl"><thead><tr><th>ID</th><th>学号</th><th>姓名</th><th>拼音</th><th>性别</th><th>出生日期</th><th>手机号</th><th>微信号</th><th>邮箱</th><th>QQ</th></tr></thead><tbody></tbody>
</table><%--分页条--%>
<div class="paginate-div"><ul class="paginate"><li class="first"><a href="javascript:void(0)">首页</a></li><li class="prev"><a href="#">上一页</a></li><li class="next"><a href="#">下一页</a></li><li class="last"><a href="#">尾页</a></li></ul>
</div>
</body>
</html>显示结果:相关文本框以及css样式展示如下:

上述只是展示的效果,但是因为还没有添加事件,所以不能点击,接下来添加事件。
2.添加事件—日期弹窗
添加事件,也就是js里面:
list.js
//渲染日期时间范围:点击日期选择的时候能够弹出页面:layui.use(()=>{let laydate = layui.laydate;laydate.render({elem:"#birth-range",range:["#birth-start,#birth-end"]})})
由此实现了选择日期的时候弹出窗口:

3.重置事件
就是给重置按钮添加事件,我们以后会经常遇到表单清空问题。
我们给list.jsp里面的div标签添加属性,就是给按钮元素添加属性,然后选中属性,进行清空操作。同样对事件操作在list.js里面:
autocomplete="off"是自动完成,=off就是禁止掉,不会自动弹出来信息了,这个在元素里面添加,比如:
<div><label for="phone">手机号:</label><input id="phone" type="text" name="phone" placeholder="请输入手机号" autocomplete="off"></div>
list.js里面添加重置按钮事件:
//重置(属性是reset)按钮事件:$("#reset").click(function (){//表单的dom元素。这个[0]就是使用dom元素,然后里面有reset()方法进行清空$("#search-form")[0].reset();});
实现的效果:

重置后:

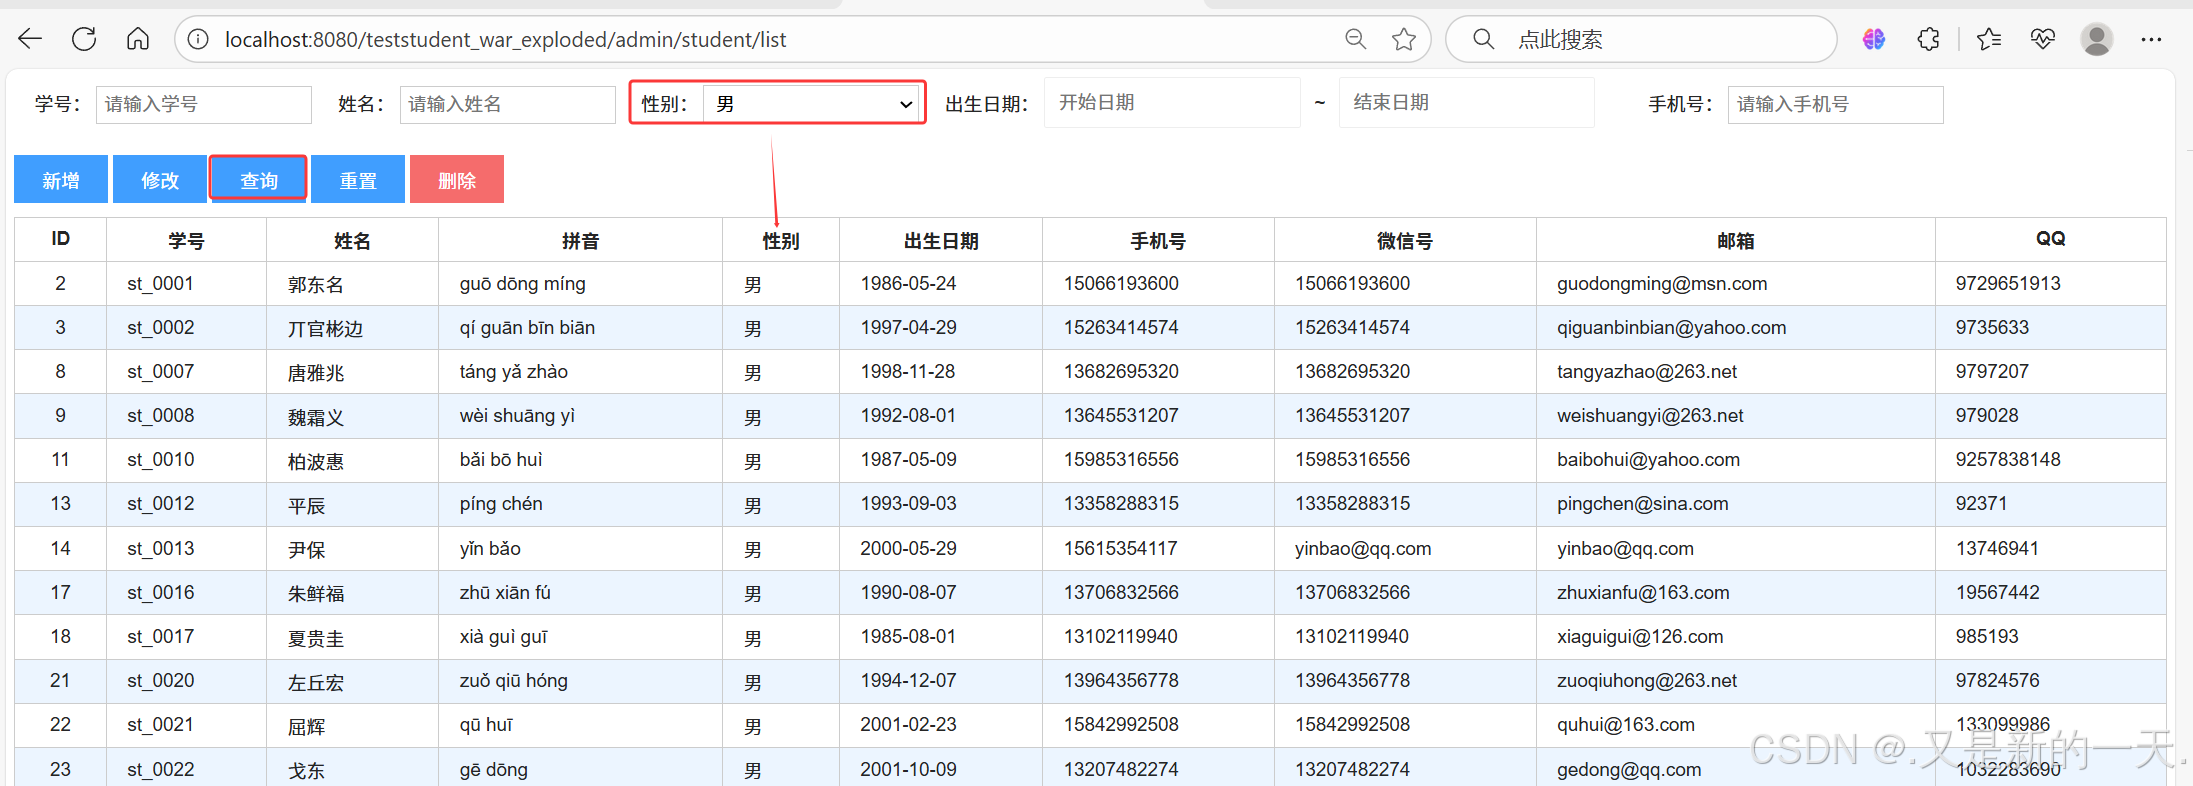
4.查询事件
实现的目标:点击查询的时候,根据条件查询搜索,并且分页条能够显示出来查询条数。实现:先给查询的div元素添加属性(在list.jsp里面)。然后给这个按钮添加事件在list.js里面)
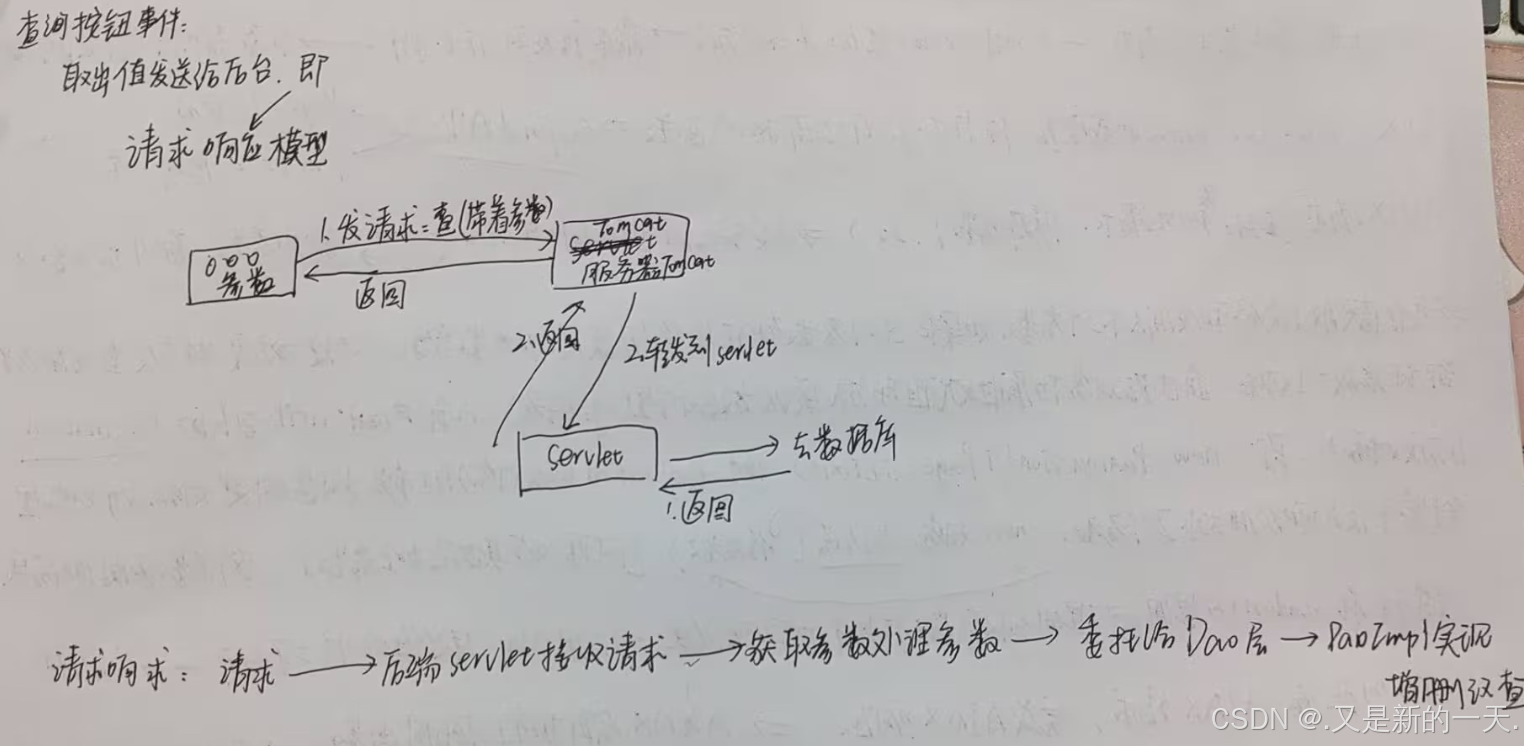
也就是请求响应模型:先获取参数,然后往后台传递参数,在servlet里面获取参数,执行对应的查询,返回结果响应,层层返回回去。
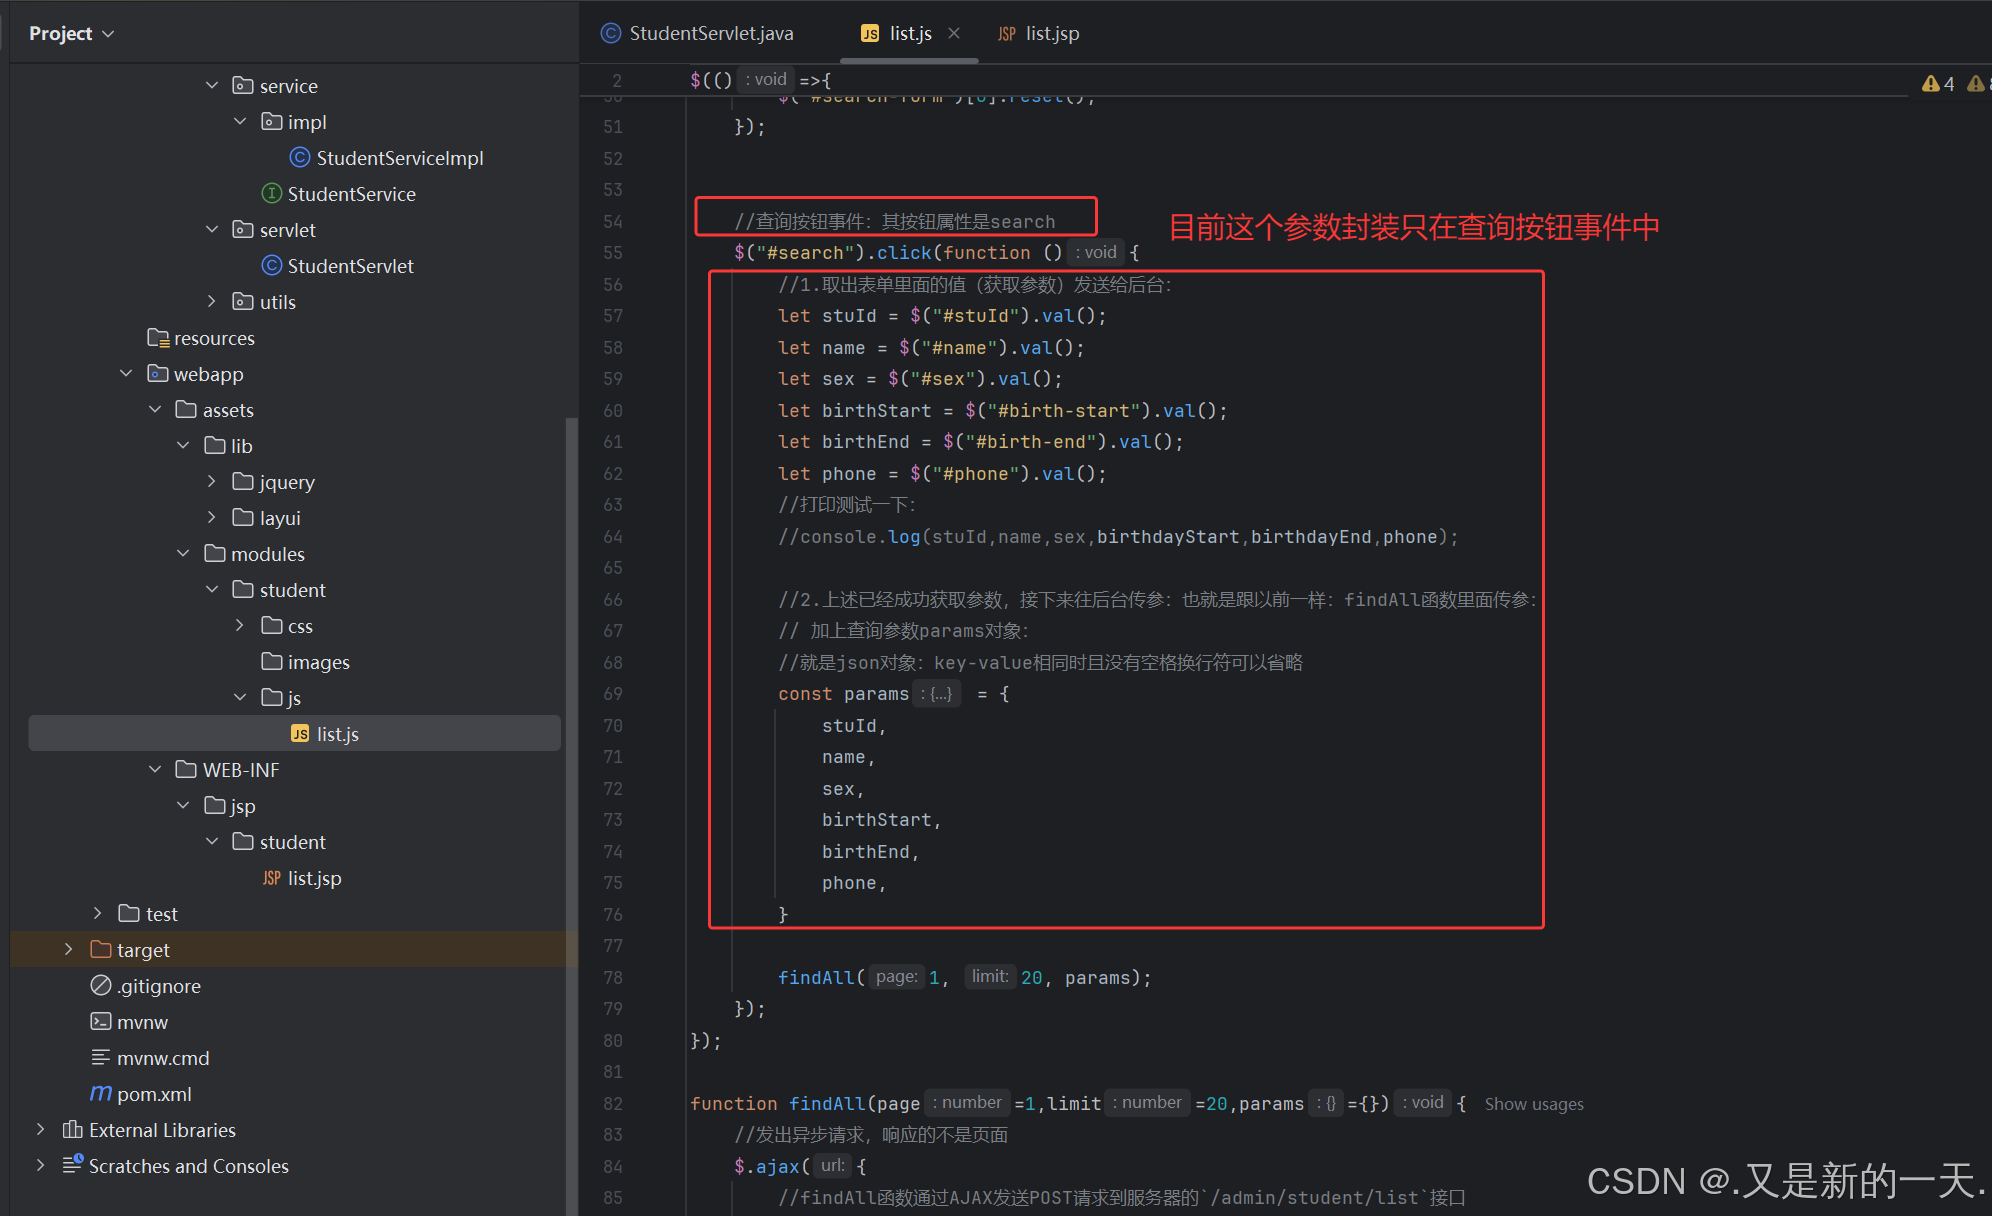
1.获取参数并将参数封装:
//查询按钮事件:其按钮属性是search$("#search").click(function (){//1.取出表单里面的值(获取参数)发送给后台:let stuId = $("#stuId").val();let name = $("#name").val();let sex = $("#sex").val();let birthStart = $("#birth-start").val();let birthEnd = $("#birth-end").val();let phone = $("#phone").val();//打印测试一下://console.log(stuId,name,sex,birthdayStart,birthdayEnd,phone);//2.上述已经成功获取参数,接下来往后台传参:也就是跟以前一样:findAll函数里面传参:// 加上查询参数params对象://就是json对象:key-value相同时且没有空格换行符可以省略const params = {stuId,name,sex,birthStart,birthEnd,phone,}});//传递参数:findAll(1, 20, params);
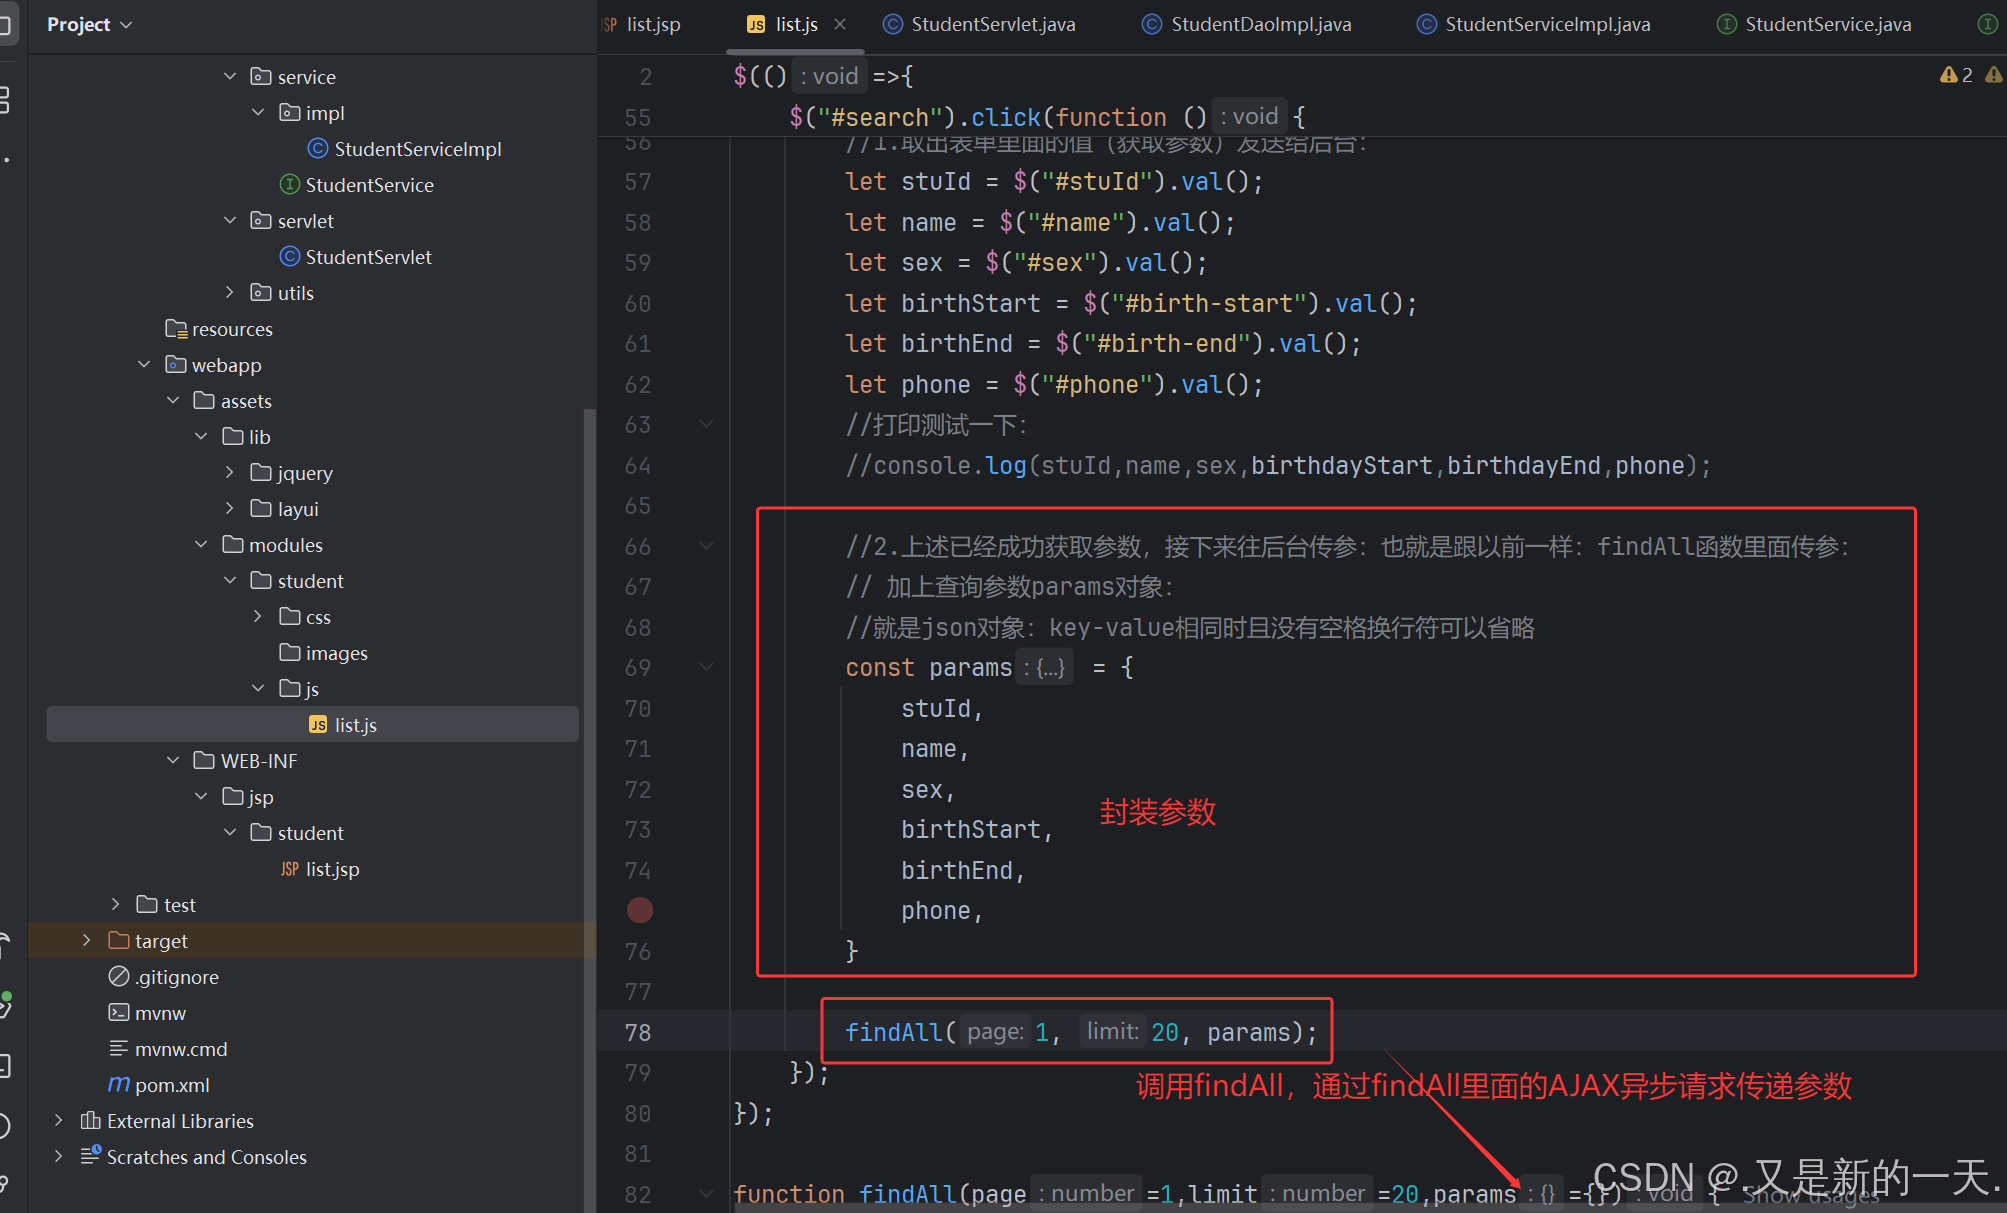
2.AJAX往后台传递参数
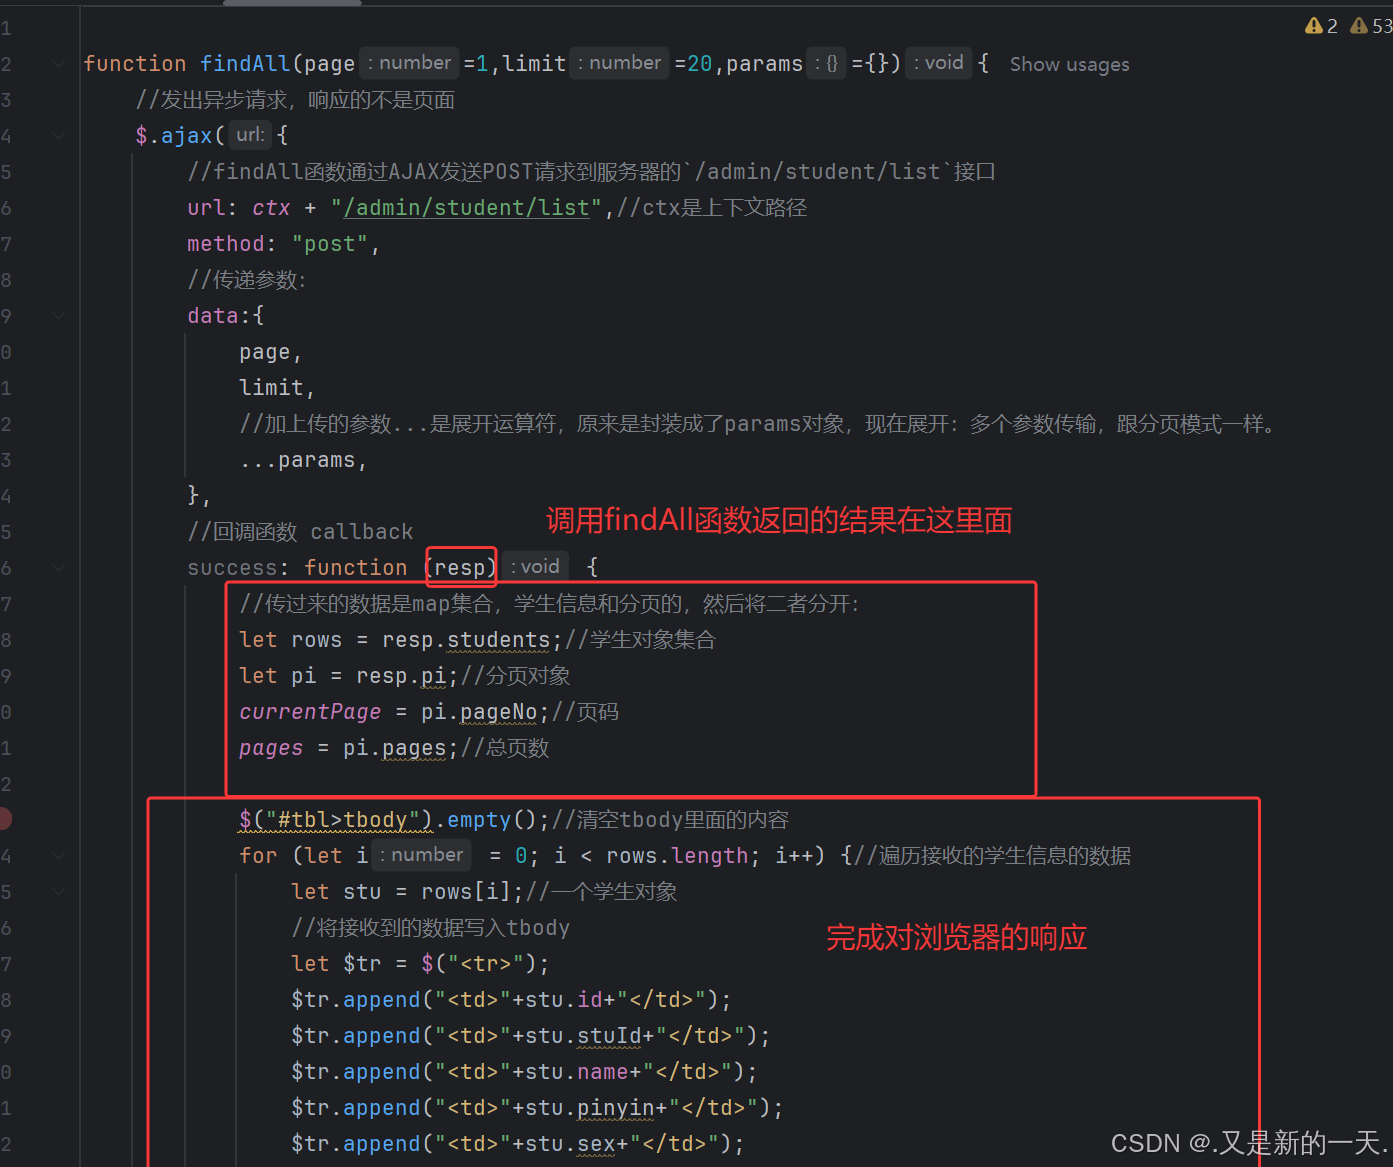
function findAll(page=1,limit=20,params={}){//发出异步请求,响应的不是页面$.ajax({//findAll函数通过AJAX发送POST请求到服务器的`/admin/student/list`接口url: ctx + "/admin/student/list",//ctx是上下文路径method: "post",//传递参数:data:{page,limit,//加上传的参数...是展开运算符,原来是封装成了params对象,现在展开:多个参数传输,跟分页模式一样。...params,},findAll(1, 20, params);//传递参数//回调函数 callback
3.servlet获取参数并响应结果返回
AJAX发出了异步请求,是post请求,所以servlet的doPost方法获取参数并做出响应:
doPost方法获取参数:
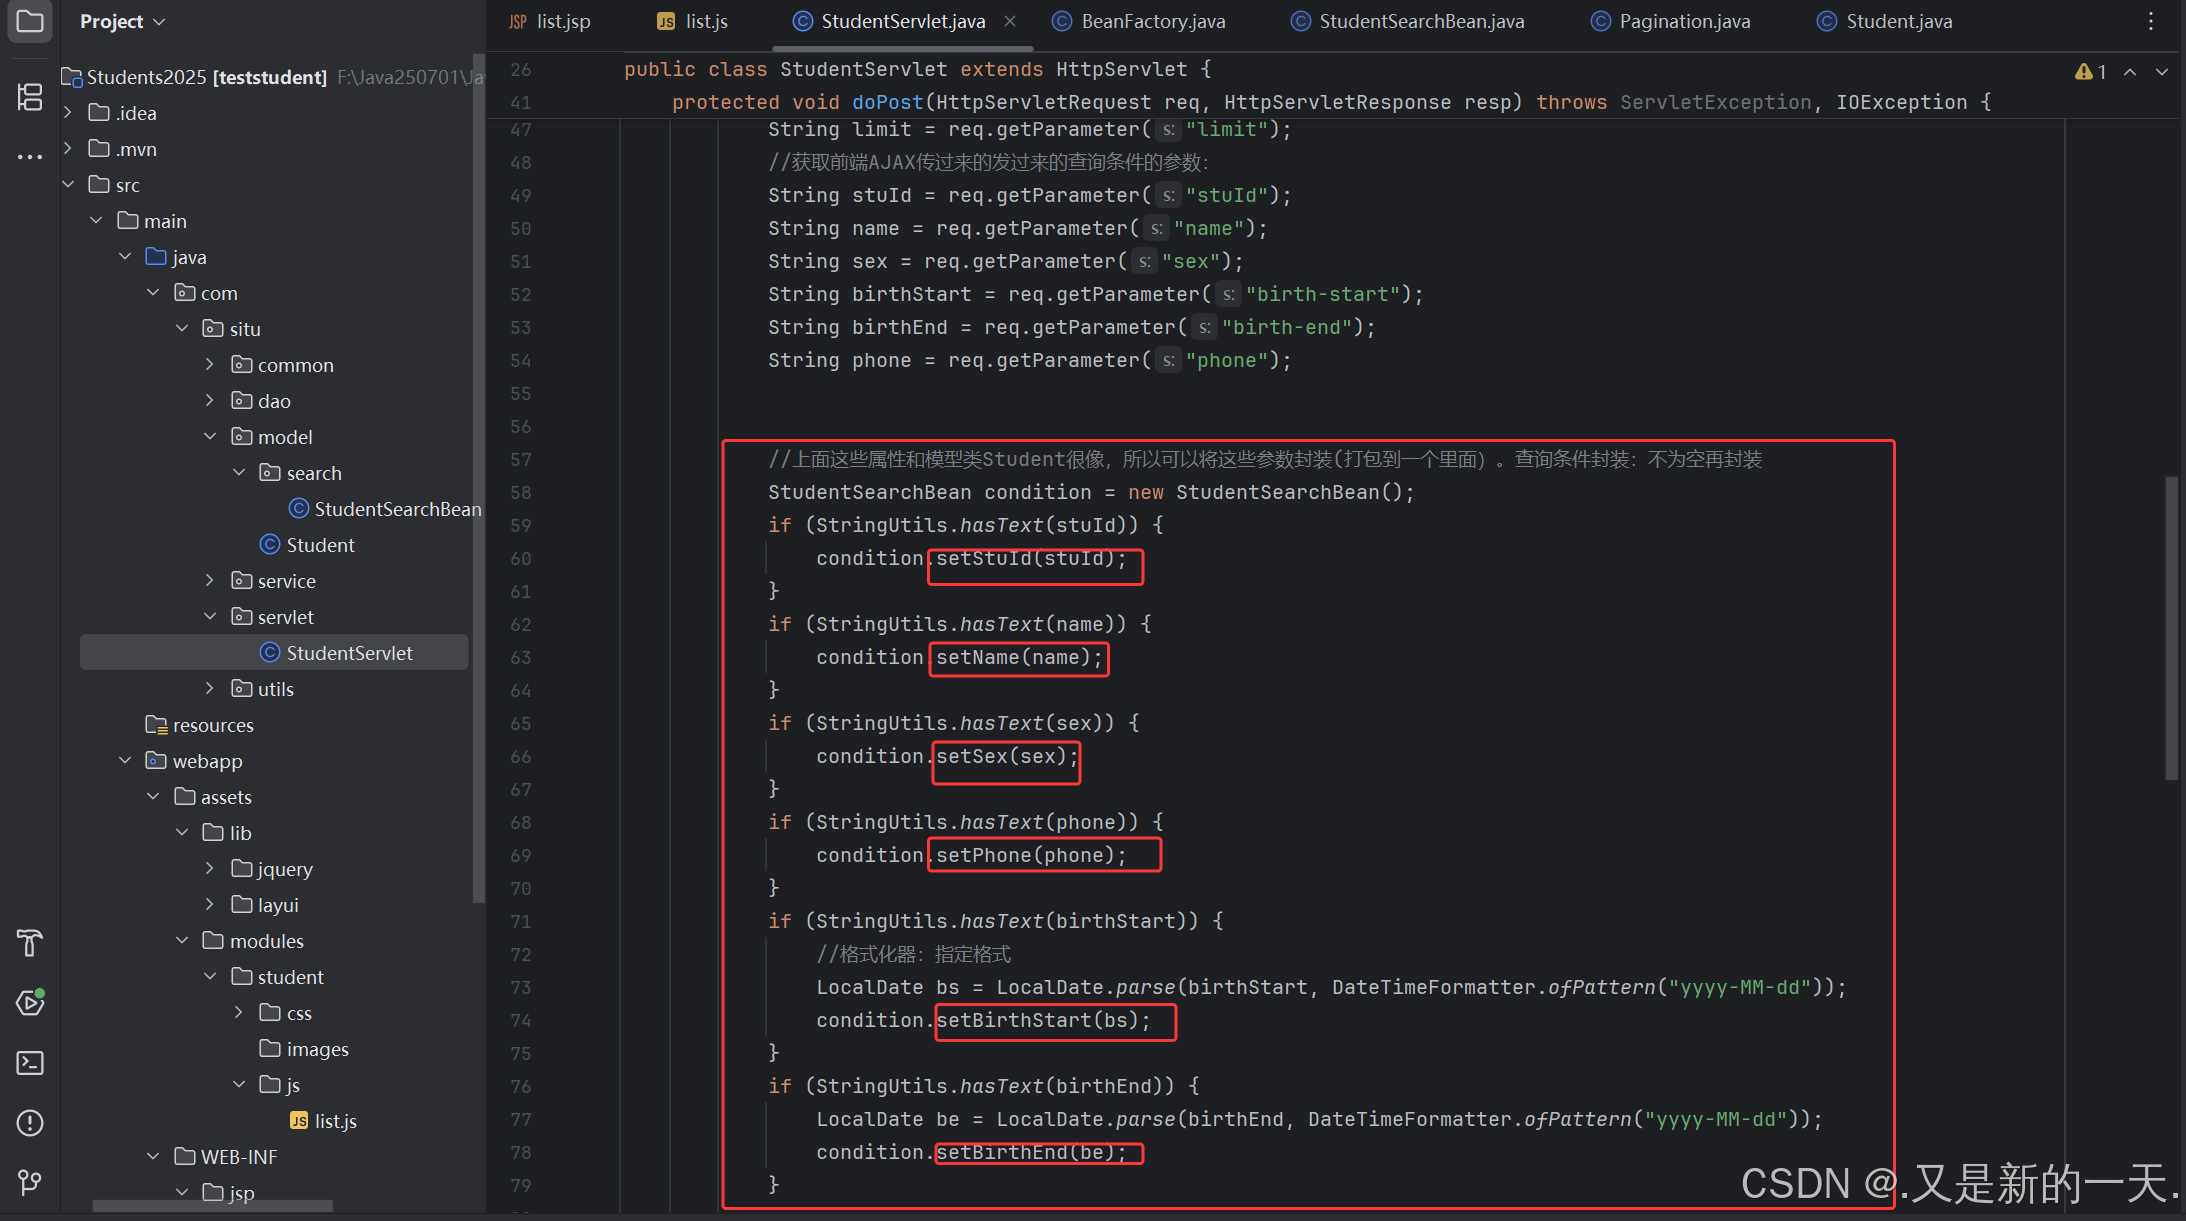
//获取前端AJAX传过来的发过来的查询条件的参数:String stuId = req.getParameter("stuId");String name = req.getParameter("name");String sex = req.getParameter("sex");String birthStart = req.getParameter("birthStart");String birthEnd = req.getParameter("birthEnd");String phone = req.getParameter("phone");上面这些属性又和模型类Student很像,而这些属性其实就是学生对象的基础上多了两个属性:birthStart和birthEnd,所以我们可以创建子包,创建一个新的模型类,这个类继承自Studnet类额外扩展日期起始时间两个属性,进行继续封装对象。
StudentSearchBean:
package com.situ.model.search;import com.situ.model.Student;
import lombok.*;
import java.time.LocalDate;@Setter
@Getter
@AllArgsConstructor
@NoArgsConstructor
@ToString
public class StudentSearchBean extends Student {private LocalDate birthStart;private LocalDate birthEnd;
}
封装好之后我们交给业务部分去处理,也就是给findAll()传参,现在的findAll()函数只接收分页对象的参数,所以我们进行二次改造:
原本的:
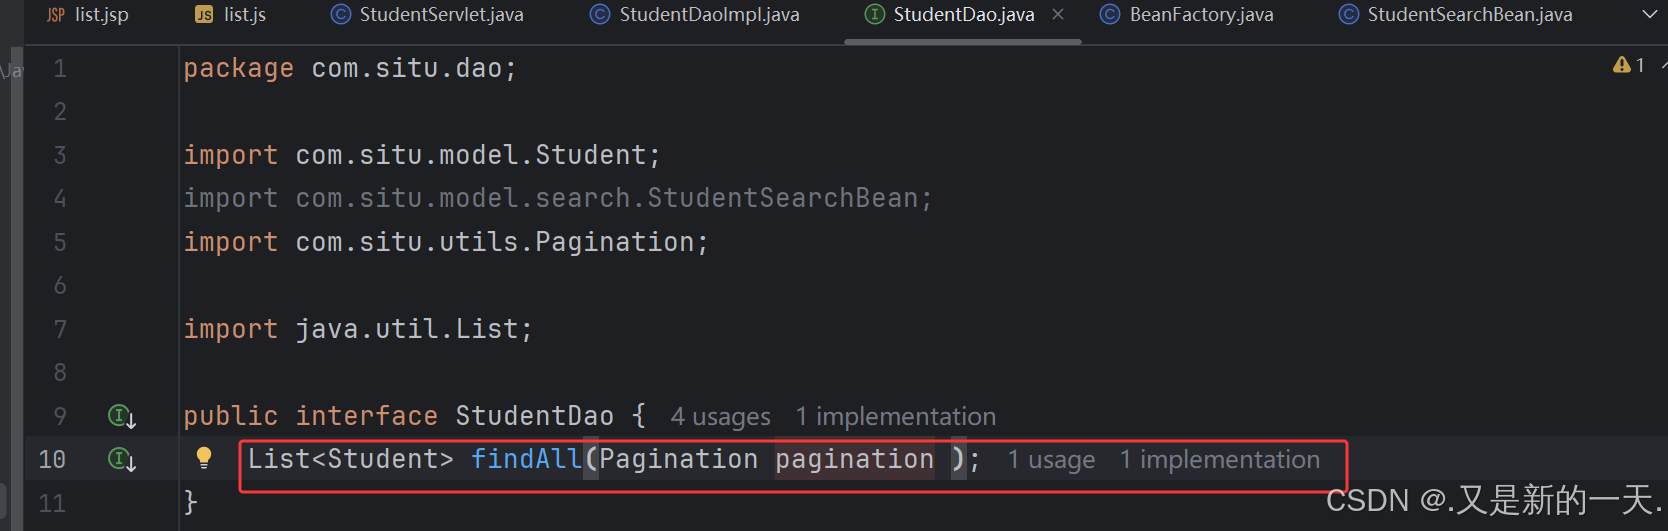

然后改造:增加参数:
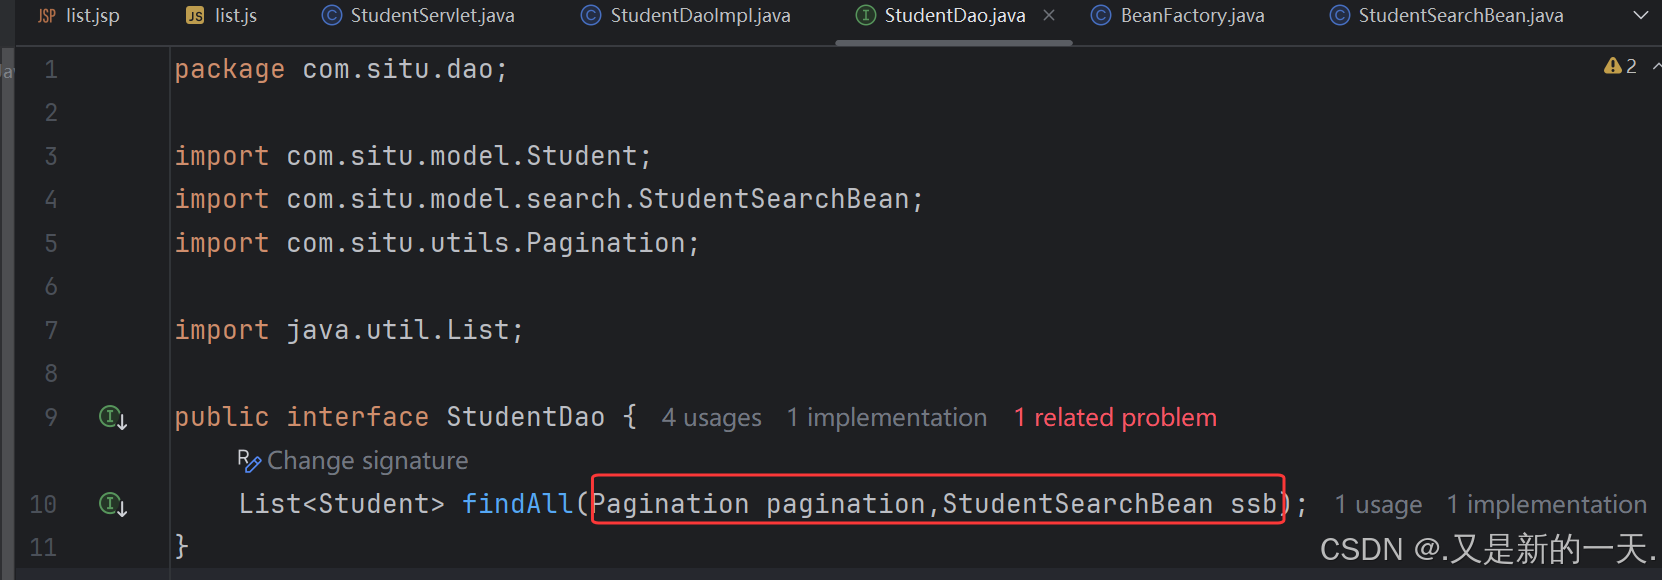
同理把实现类相关的全部多传入一个参数。
我们目前是根据条件进行查询,所以将实现类StudentDaoImpl层进行改造:
package com.situ.dao.impl;import com.situ.common.Global;
import com.situ.dao.StudentDao;
import com.situ.model.Student;
import com.situ.model.search.StudentSearchBean;
import com.situ.utils.Pagination;
import org.springframework.jdbc.core.BeanPropertyRowMapper;
import org.springframework.jdbc.core.JdbcTemplate;
import org.springframework.jdbc.core.RowMapper;
import org.springframework.util.StringUtils;import java.util.ArrayList;
import java.util.List;public class StudentDaoImpl implements StudentDao {//数据结果转成对象:private final RowMapper<Student> rowMapper = new BeanPropertyRowMapper<Student>(Student.class);@Overridepublic List<Student> findAll(Pagination pagination, StudentSearchBean ssb) {
//        //从数据库完成获取数据:先获取连接
//        JdbcTemplate jdbcTemplate = Global.getJdbcTemplate();
//        //查询记录总数
//        String sql = "select count(0) from t_student";
//        //记录总数
//        Long count = jdbcTemplate.queryForObject(sql, Long.class);
//        pagination.setTotal(count);//设置总记录数
//        //sql语句:sql语句中的字段要和数据库里面的字段完全一致
//        sql = "select id,stu_id,name,sex,birthday,pinyin,phone,email,qq,wechat from t_student limit ?,?";
//        //执行查询操作,发送查询语句:
//        List<Student> students = jdbcTemplate.query(sql, rowMapper, pagination.getOffset(), pagination.getLimit());
//        return students;//获取数据库连接:连接池的方式获取JdbcTemplate jdbcTemplate = Global.getJdbcTemplate();List<Object> args = new ArrayList<>();//查询参数,因为有的里面有可能是空,所以直接创建新的list集合来保存不为空的查询参数//sql语句:拼接操作、条件查询String select = "select id,stu_id,name,sex,birthday,pinyin,phone,email,qq,wechat from t_student";StringBuilder where = new StringBuilder();where.append(" where 1=1");if (StringUtils.hasText(ssb.getStuId())) {//不为空,就追加进查询条件且设置参数属性的值where.append(" and stu_id = ?");args.add(ssb.getStuId());}if (StringUtils.hasText(ssb.getName())) {where.append(" and name like ?");args.add("%" + ssb.getName() + "%");}if (StringUtils.hasText(ssb.getSex())) {where.append(" and sex = ?");args.add(ssb.getSex());}if (StringUtils.hasText(ssb.getPhone())) {where.append(" and phone like ?");args.add("%" + ssb.getPhone() + "%");}if (ssb.getBirthStart() != null) {//范围写成有开有闭方便我们区间拼接,不要写成全开全闭。where.append(" and birthday >= ?");args.add(ssb.getBirthStart());}if (ssb.getBirthEnd() != null) {where.append(" and birthday < ?");args.add(ssb.getBirthEnd());}//查询记录总数:表子查询,t是别名String countSql = "select count(0) from (" + (select + where.toString()) + ") t";//记录总数Long count = jdbcTemplate.queryForObject(countSql, Long.class, args.toArray());pagination.setTotal(count);//设置总记录数//分页查询sqlString limitSql = select + where.toString() + " limit ?,?";args.add(pagination.getOffset());//将分页查询参数也封装进args里面了args.add(pagination.getLimit());//将分页查询参数也封装进args里面了//执行查询操作:传数组args.toArray(),rowMapper将结果集的一行数据封装到student对象上面,args就是全部的 查询条件参数+分页参数List<Student> students = jdbcTemplate.query(limitSql, rowMapper, args.toArray());return students;}
}
4.js里面执行回调函数输出内容
这个部分和分页查询的逻辑完全一样:
至此完成条件查询,显示效果:
5.根据条件查询显示总记录数
先添加视图进行前端的展示,然后css样式修饰,最后添加js事件。
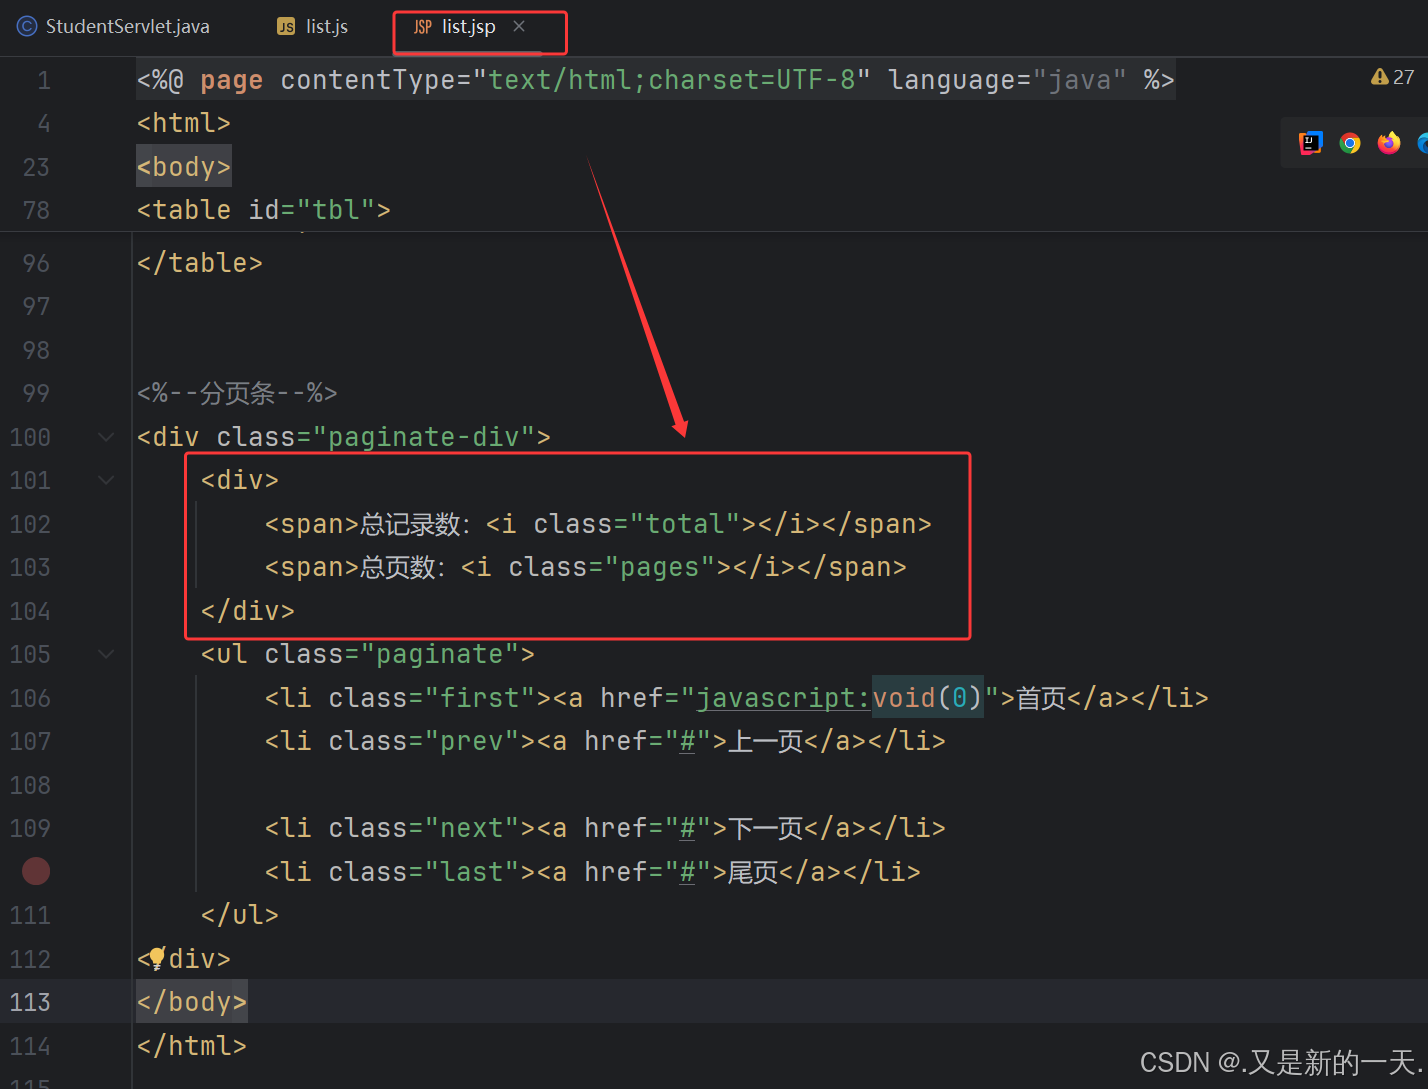
1.前端页面展示(list.jsp)
<div><span>总记录数:<i class="total"></i></span><span>总页数:<i class="pages"></i></span></div>
2.设置css样式
3.添加事件(list.js):
//总记录数和总页数$(".paginate-div .total").text(pi.total);$(".paginate-div .pages").text(pi.pages);
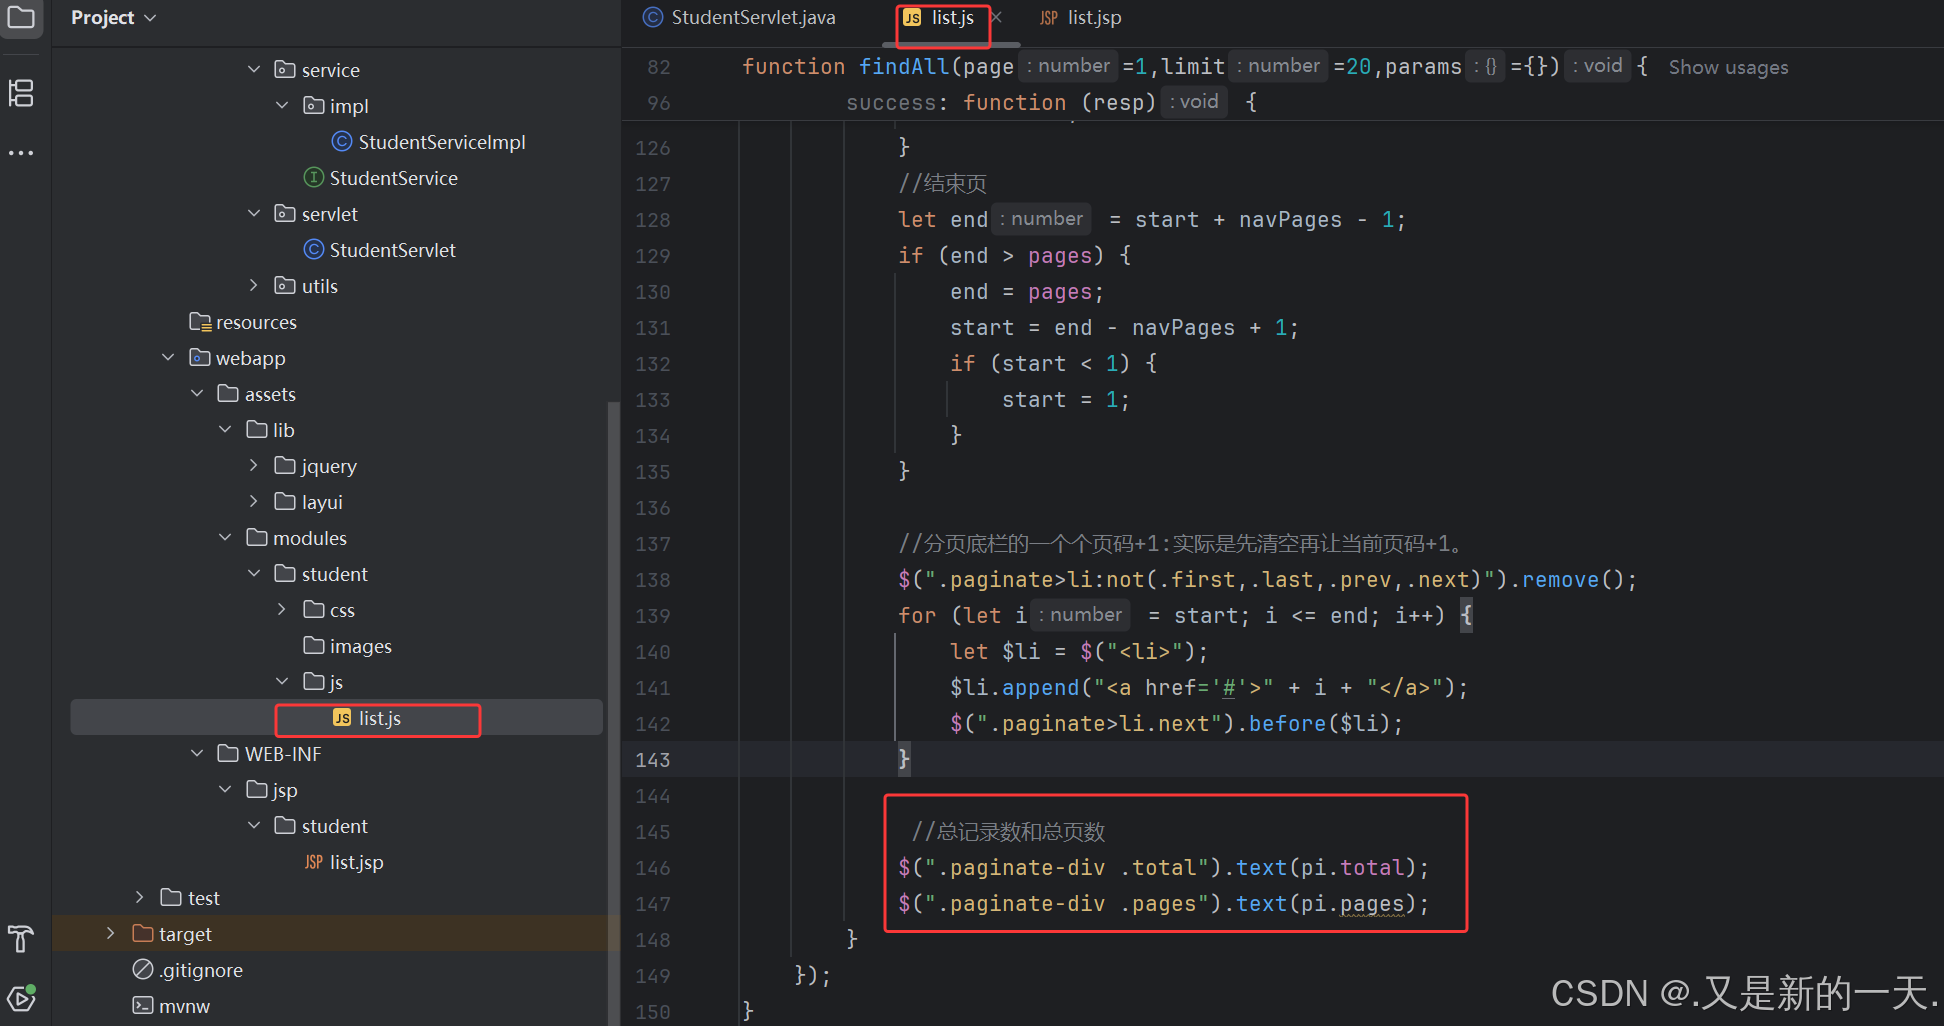
展示效果:
目前存在的问题,虽然显示了记录条数,但是,当我们点击下一页的时候,这个查询到效果就失效了。这是因为我们只在点击查询按钮的时候封装了这个参数,但是我们在分页的时候(比如点击下一页)没有封装这个,所以我们可以把这个部分抽取出来写成函数,需要的时候就调用。
写成函数处理:

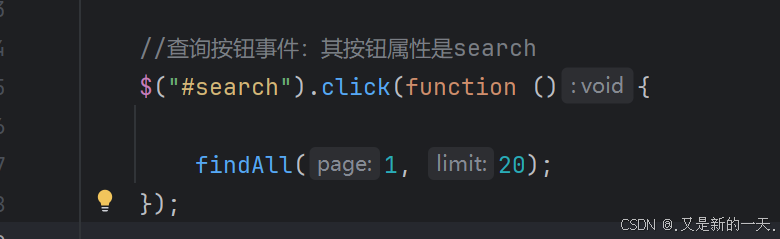
这样就改造完毕了。
6.批量删除
请求响应模型:在页面进行任何一个操作,都是以请求开始,以响应结束。
1.前端页面展示部分:
关于删除:就是选中哪几条数据,然后进行删除操作
那么先对前端页面(list.jsp)进行改造:添加复选框选中。
<table id="tbl"><thead><tr><%--  添加复选框,全选,多了一列框      --%><th><input id="check-all" type="checkbox"/></th><th>ID</th><th>学号</th><th>姓名</th><th>拼音</th><th>性别</th><th>出生日期</th><th>手机号</th><th>微信号</th><th>邮箱</th><th>QQ</th></tr></thead><tbody></tbody>
</table>
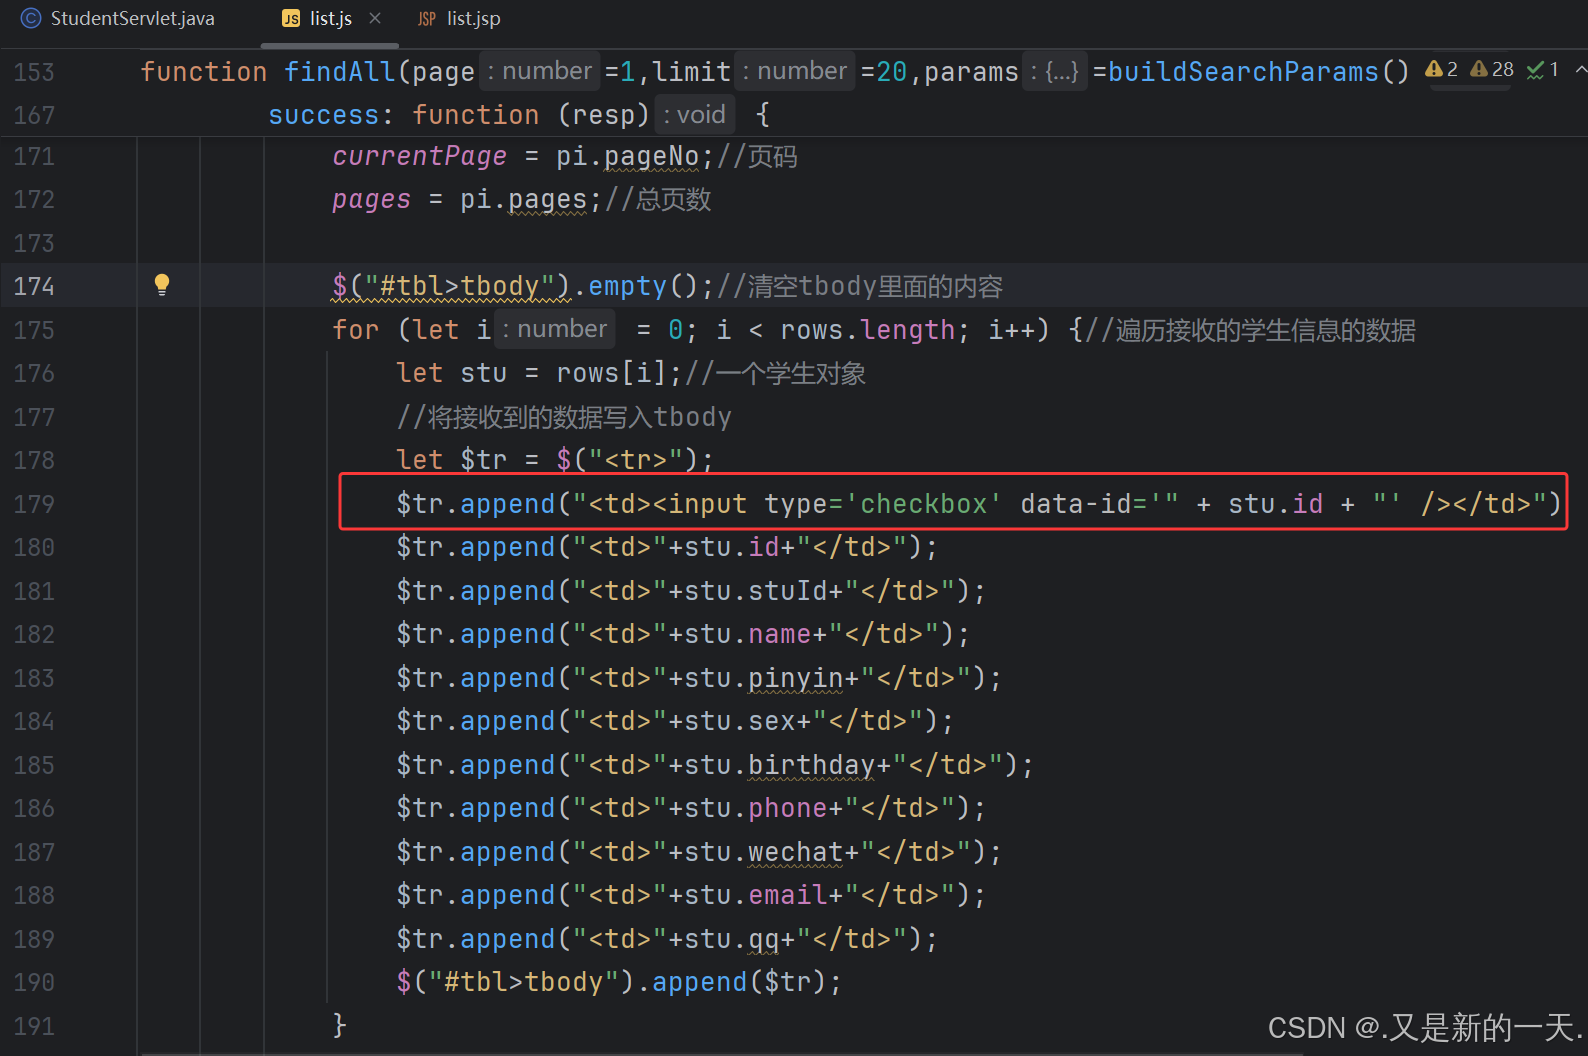
目前其实只是在页面上多了一列,但是数据并没有多了一列。往浏览器上面输出内容是在list.js里面实现,所以:
添加一列的内容:
添加css修饰,实现效果如下:
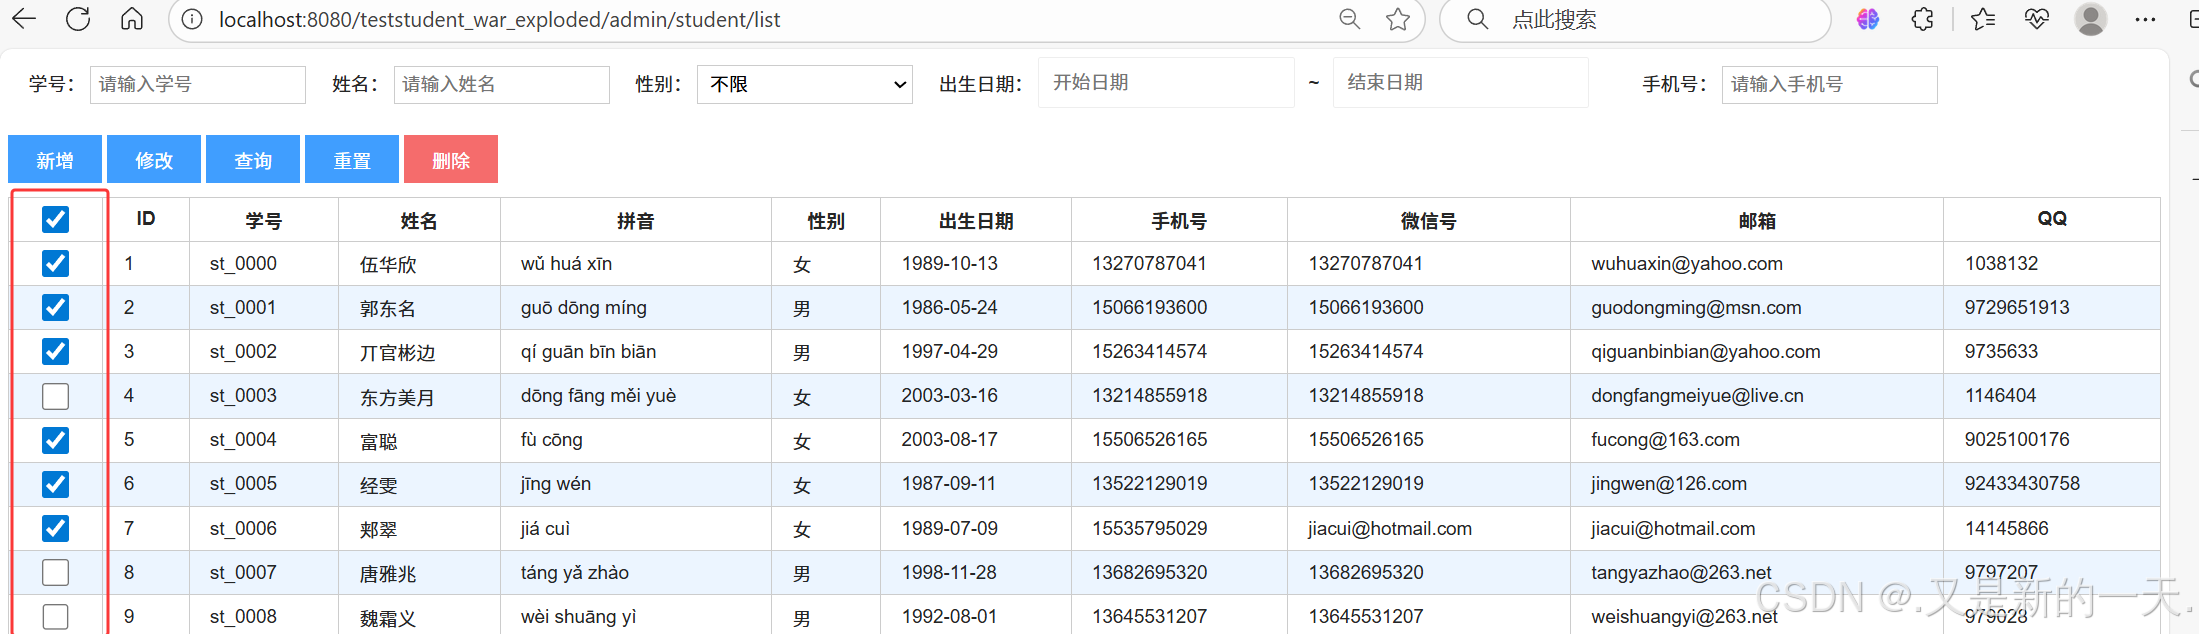
2.全选和取消全选事件:
事件都在js里面,所以在list.js里面添加全选和取消全选事件:
//全选和取消全选事件$("#check-all").click(function (){//获取第一个复选框的选中状态,然后让底下那些跟他保持一致即可://取当前被操作的复选框(this指代的是当前被点击或操作的复选框)的选中状态(checked)。// 通过 $(this).prop("checked") 获取该复选框是否被选中,并将结果保存在变量 checked 中。// 如果复选框被选中,则 checked 为 true,否则为 false。let checked = $(this).prop("checked");//>:checkbox: 表示选择每个第一个单元格内的复选框元素(checkbox)。// .prop("checked", checked): 设置这些复选框的选中状态为 checked 变量的值。// 换句话说,它会根据第一个复选框的选中状态来决定是否选中所有行的第一个单元格中的复选框。$("#tbl tr>td:first-child>:checkbox").prop("checked", checked);});
3.选中一行
//点击行选中$("#tbl").on("click", "tr>td:not(:first-child)", function () {let $tr = $(this).parent();const $chk = $tr.children().first().children();const checked = $chk.prop("checked");$chk.prop("checked", !checked);});
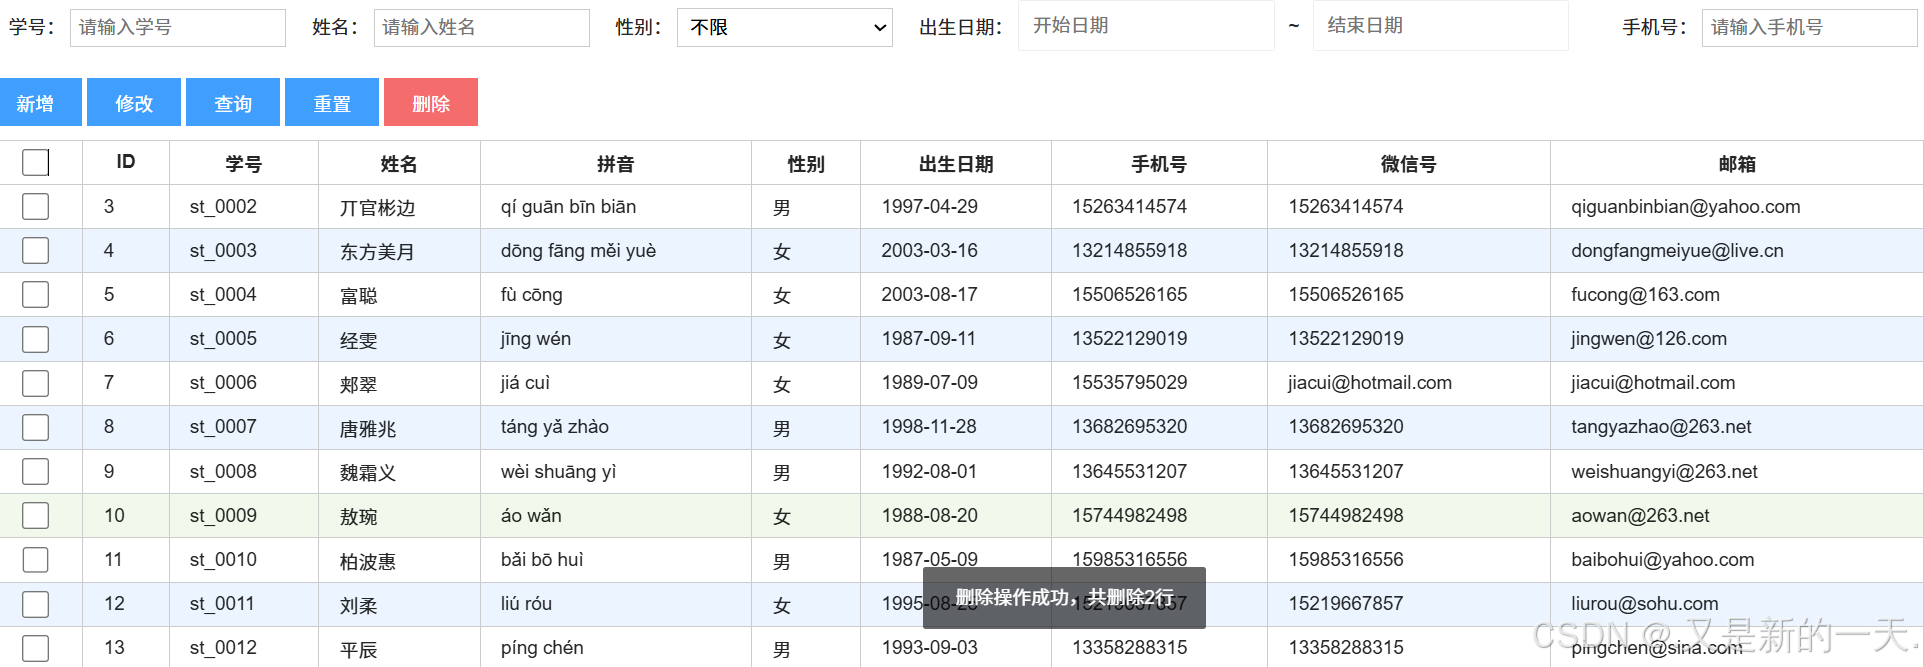
3.删除按钮操作:
删除的时候添加提示信息:
//删除按钮操作$("#del").click(function () {let $checked = $("#tbl tr>td:first-child>:checked");if ($checked.length === 0) {layer.msg("请选中您要删除的行");} else {layer.confirm("是否确认删除选中的行?", function (handler) {//删除所有选中的行let ids = [];$checked.each(function (idx, item) {ids.push(parseInt($(item).attr("data-id")));});//console.log(ids);deleteByIds(ids, function (count) {if (count > 0) {layer.msg("删除操作成功,共删除" + count + "行");} else {layer.msg("删除操作失败");}findAll();});layer.close(handler);});}});
4.获取参数并给后台传参
删除按钮事件里面获取了参数
//删除按钮操作$("#del").click(function () {let $checked = $("#tbl tr>td:first-child>:checked");if ($checked.length === 0) {layer.msg("请选中您要删除的行");} else {layer.confirm("是否确认删除选中的行?", function (handler) {//删除所有选中的行let ids = [];//ids是一个数组$checked.each(function (idx, item) {ids.push(parseInt($(item).attr("data-id")));//获取了要删除的数据});//调用函数并将要删除的参数传递,deleteByIds(ids, function (count) {if (count > 0) {layer.msg("删除操作成功,共删除" + count + "行");} else {layer.msg("删除操作失败");}findAll();});layer.close(handler);});}});
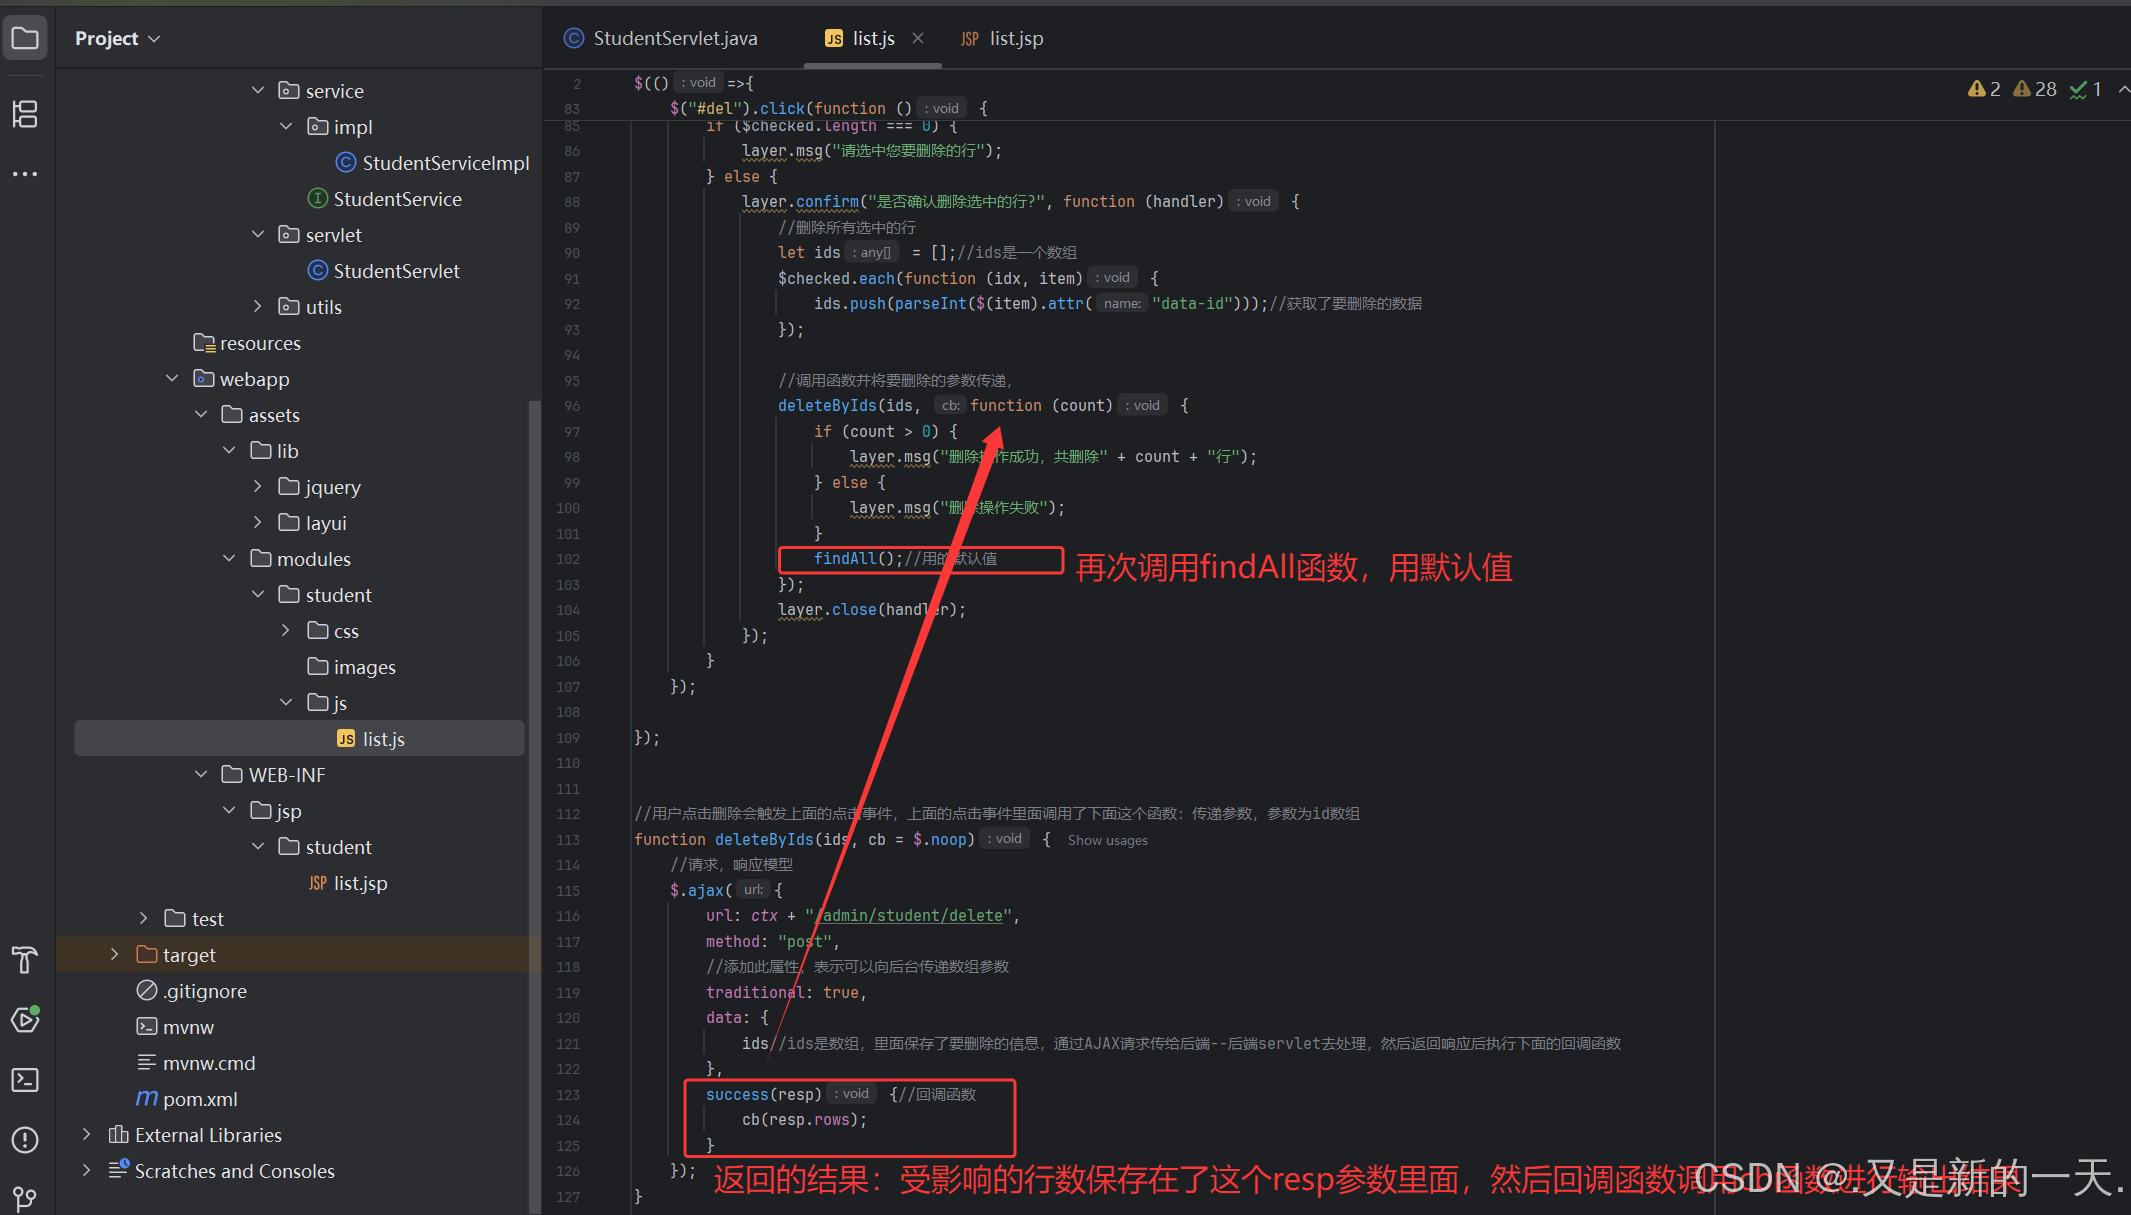
通过调用删除的函数,里面有AJAX请求,实现传递参数:
//用户点击删除会触发上面的点击事件,上面的点击事件里面调用了下面这个函数:传递参数,参数为id数组
function deleteByIds(ids, cb = $.noop) {//请求,响应模型$.ajax({url: ctx + "/admin/student/delete",method: "post",//添加此属性,表示可以向后台传递数组参数traditional: true,data: {ids//ids是数组,里面保存了要删除的信息,通过AJAX请求传给后端--后端servlet去处理,然后返回响应后执行下面的回调函数},success(resp) {//回调函数cb(resp.rows);}});
}
ids是数组,里面保存了要删除的信息,通过AJAX请求传给后端–后端servlet去处理,然后返回响应后执行下面的回调函数
5.servlet调用函数完成响应
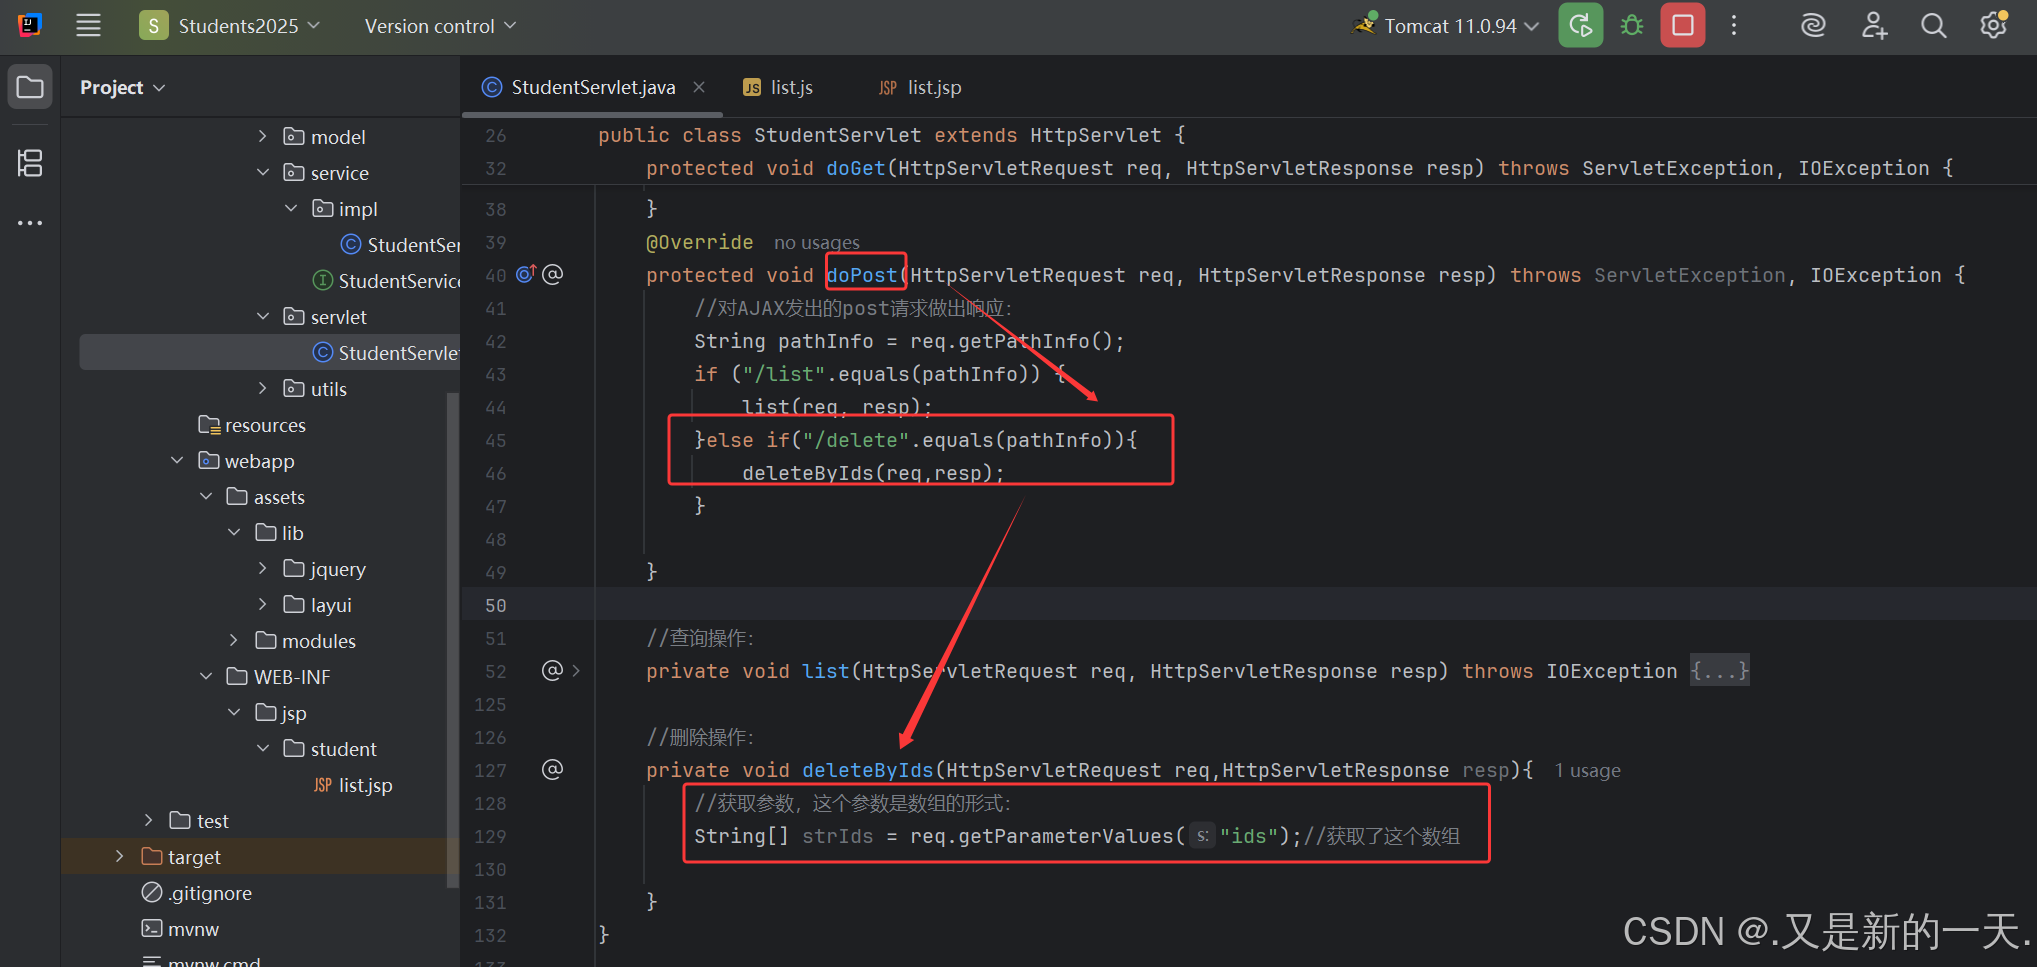
取出来ids之后,我们servlet去new 对象,调用方法实现对请求的响应,具体的业务逻辑交给业务层实现:
所以改造业务相关的层:
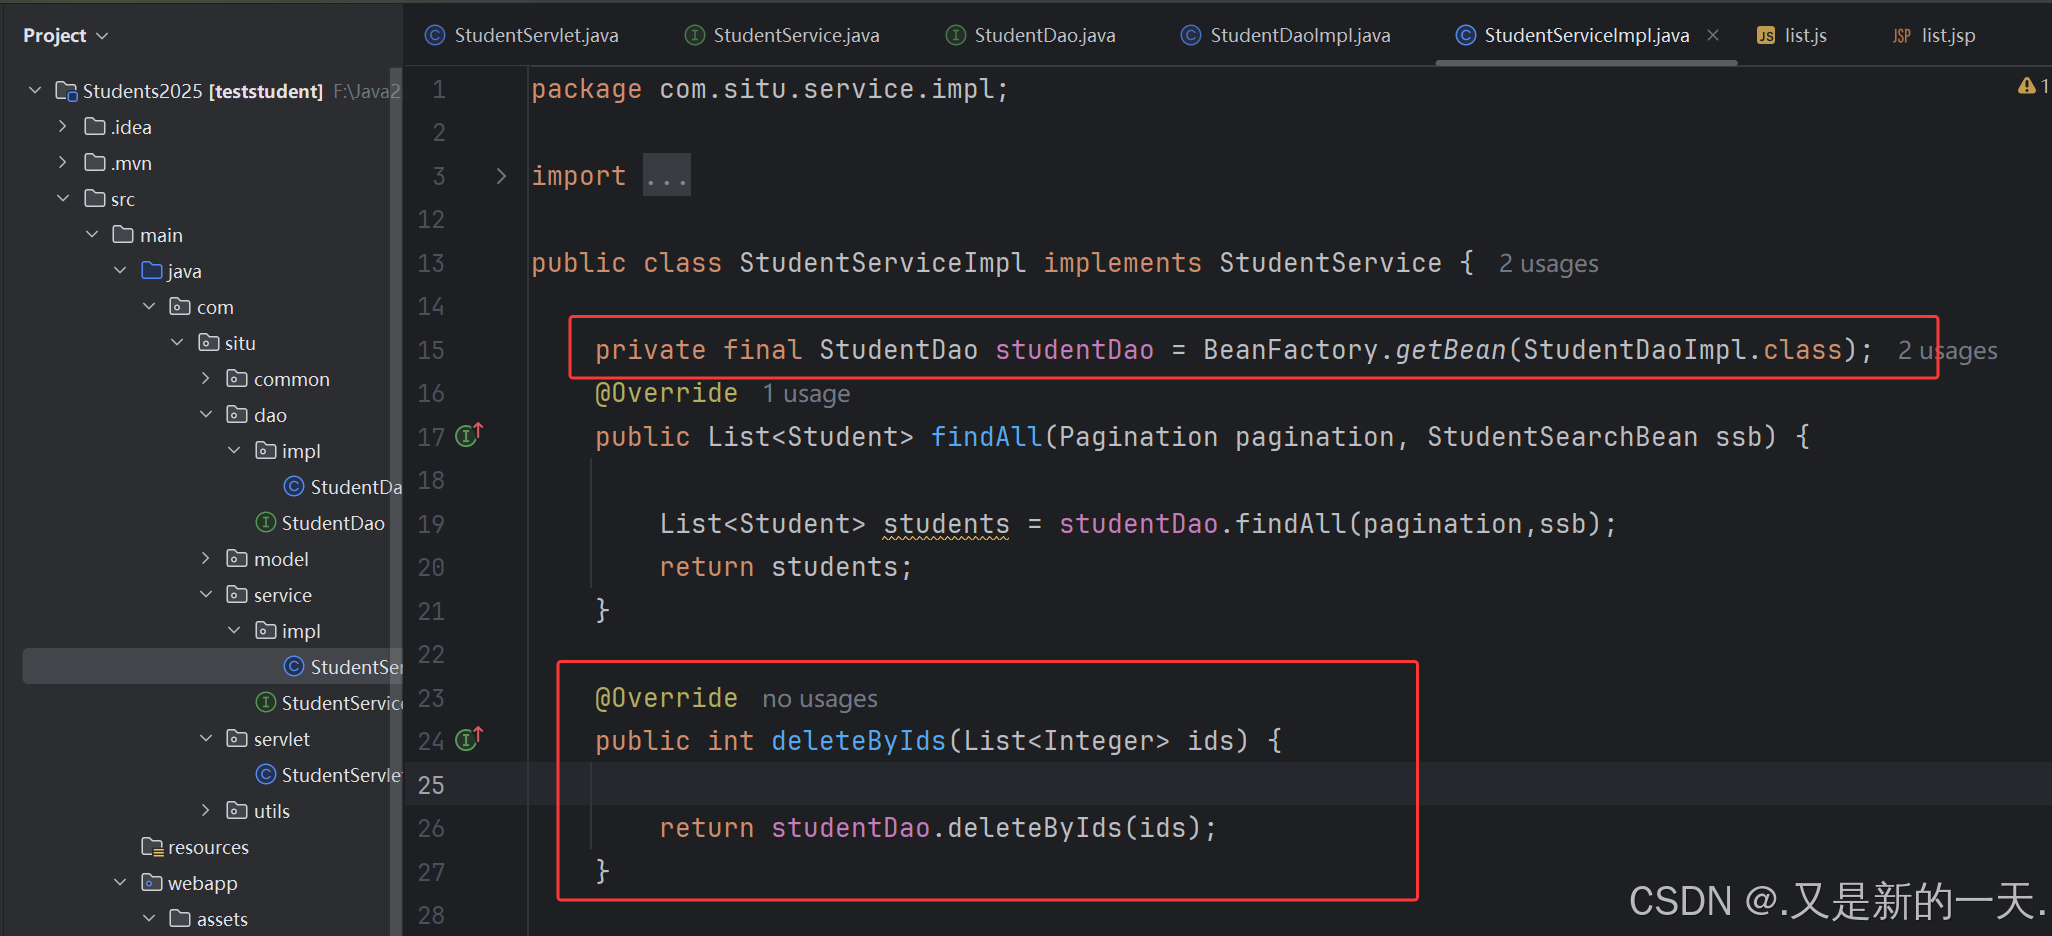
具体的实现类:
package com.situ.dao.impl;import com.situ.common.Global;
import com.situ.dao.StudentDao;
import com.situ.model.Student;
import com.situ.model.search.StudentSearchBean;
import com.situ.utils.Pagination;
import org.springframework.jdbc.core.BeanPropertyRowMapper;
import org.springframework.jdbc.core.JdbcTemplate;
import org.springframework.jdbc.core.RowMapper;
import org.springframework.util.StringUtils;import java.util.ArrayList;
import java.util.List;public class StudentDaoImpl implements StudentDao {//数据结果转成对象:private final RowMapper<Student> rowMapper = new BeanPropertyRowMapper<Student>(Student.class);@Overridepublic List<Student> findAll(Pagination pagination, StudentSearchBean ssb) {
//        //从数据库完成获取数据:先获取连接
//        JdbcTemplate jdbcTemplate = Global.getJdbcTemplate();
//        //查询记录总数
//        String sql = "select count(0) from t_student";
//        //记录总数
//        Long count = jdbcTemplate.queryForObject(sql, Long.class);
//        pagination.setTotal(count);//设置总记录数
//        //sql语句:sql语句中的字段要和数据库里面的字段完全一致
//        sql = "select id,stu_id,name,sex,birthday,pinyin,phone,email,qq,wechat from t_student limit ?,?";
//        //执行查询操作,发送查询语句:
//        List<Student> students = jdbcTemplate.query(sql, rowMapper, pagination.getOffset(), pagination.getLimit());
//        return students;//获取数据库连接:连接池的方式获取JdbcTemplate jdbcTemplate = Global.getJdbcTemplate();List<Object> args = new ArrayList<>();//查询参数,因为有的里面有可能是空,所以直接创建新的list集合来保存不为空的查询参数//sql语句:拼接操作、条件查询String select = "select id,stu_id,name,sex,birthday,pinyin,phone,email,qq,wechat from t_student";StringBuilder where = new StringBuilder();where.append(" where 1=1");if (StringUtils.hasText(ssb.getStuId())) {//不为空,就追加进查询条件且设置参数属性的值where.append(" and stu_id = ?");args.add(ssb.getStuId());}if (StringUtils.hasText(ssb.getName())) {where.append(" and name like ?");args.add("%" + ssb.getName() + "%");}if (StringUtils.hasText(ssb.getSex())) {where.append(" and sex = ?");args.add(ssb.getSex());}if (StringUtils.hasText(ssb.getPhone())) {where.append(" and phone like ?");args.add("%" + ssb.getPhone() + "%");}if (ssb.getBirthStart() != null) {//范围写成有开有闭方便我们区间拼接,不要写成全开全闭。where.append(" and birthday >= ?");args.add(ssb.getBirthStart());}if (ssb.getBirthEnd() != null) {where.append(" and birthday < ?");args.add(ssb.getBirthEnd());}//查询记录总数:表子查询,t是别名String countSql = "select count(0) from (" + (select + where.toString()) + ") t";//记录总数Long count = jdbcTemplate.queryForObject(countSql, Long.class, args.toArray());pagination.setTotal(count);//设置总记录数//分页查询sqlString limitSql = select + where.toString() + " limit ?,?";args.add(pagination.getOffset());//将分页查询参数也封装进args里面了args.add(pagination.getLimit());//将分页查询参数也封装进args里面了//执行查询操作:传数组args.toArray(),rowMapper将结果集的一行数据封装到student对象上面,args就是全部的 查询条件参数+分页参数List<Student> students = jdbcTemplate.query(limitSql, rowMapper, args.toArray());return students;}@Overridepublic int deleteByIds(List<Integer> ids) {//删除的实现://模板类:对JDBC的上层抽象JdbcTemplate jdbcTemplate = Global.getJdbcTemplate();//判断获取的ids数组是否是空:为空就直接结束:传输数据不合法。if(ids==null|| ids.isEmpty()){return -1;}//要删除的不是空,有值:用sql语句进行删除:采用拼接?形式防止sql注入//获取里面到底多少个:遍历StringBuilder sb = new StringBuilder();for (int i = 0; i <ids.size(); i++) {sb.append("?,");}//字符串截取,丢弃最后一个符号:,:String ph = sb.substring(0,sb.length()-1);//拼接String sql = "delete from t_student where id in (" + ph + ")";//调用,返回受影响行数int rows = jdbcTemplate.update(sql, ids.toArray());//返回受影响的行数return rows;}
}
所以在servlet里面直接调用这个实现类,层层调用层层返回即可。
package com.situ.servlet;import com.alibaba.fastjson2.JSON;
import com.situ.model.Student;
import com.situ.model.search.StudentSearchBean;
import com.situ.service.StudentService;
import com.situ.service.impl.StudentServiceImpl;
import com.situ.utils.BeanFactory;
import com.situ.utils.Pagination;
import jakarta.servlet.ServletException;
import jakarta.servlet.annotation.WebServlet;
import jakarta.servlet.http.HttpServlet;
import jakarta.servlet.http.HttpServletRequest;
import jakarta.servlet.http.HttpServletResponse;
import org.springframework.util.StringUtils;import java.io.IOException;
import java.io.PrintWriter;
import java.time.LocalDate;
import java.time.format.DateTimeFormatter;
import java.util.ArrayList;
import java.util.List;
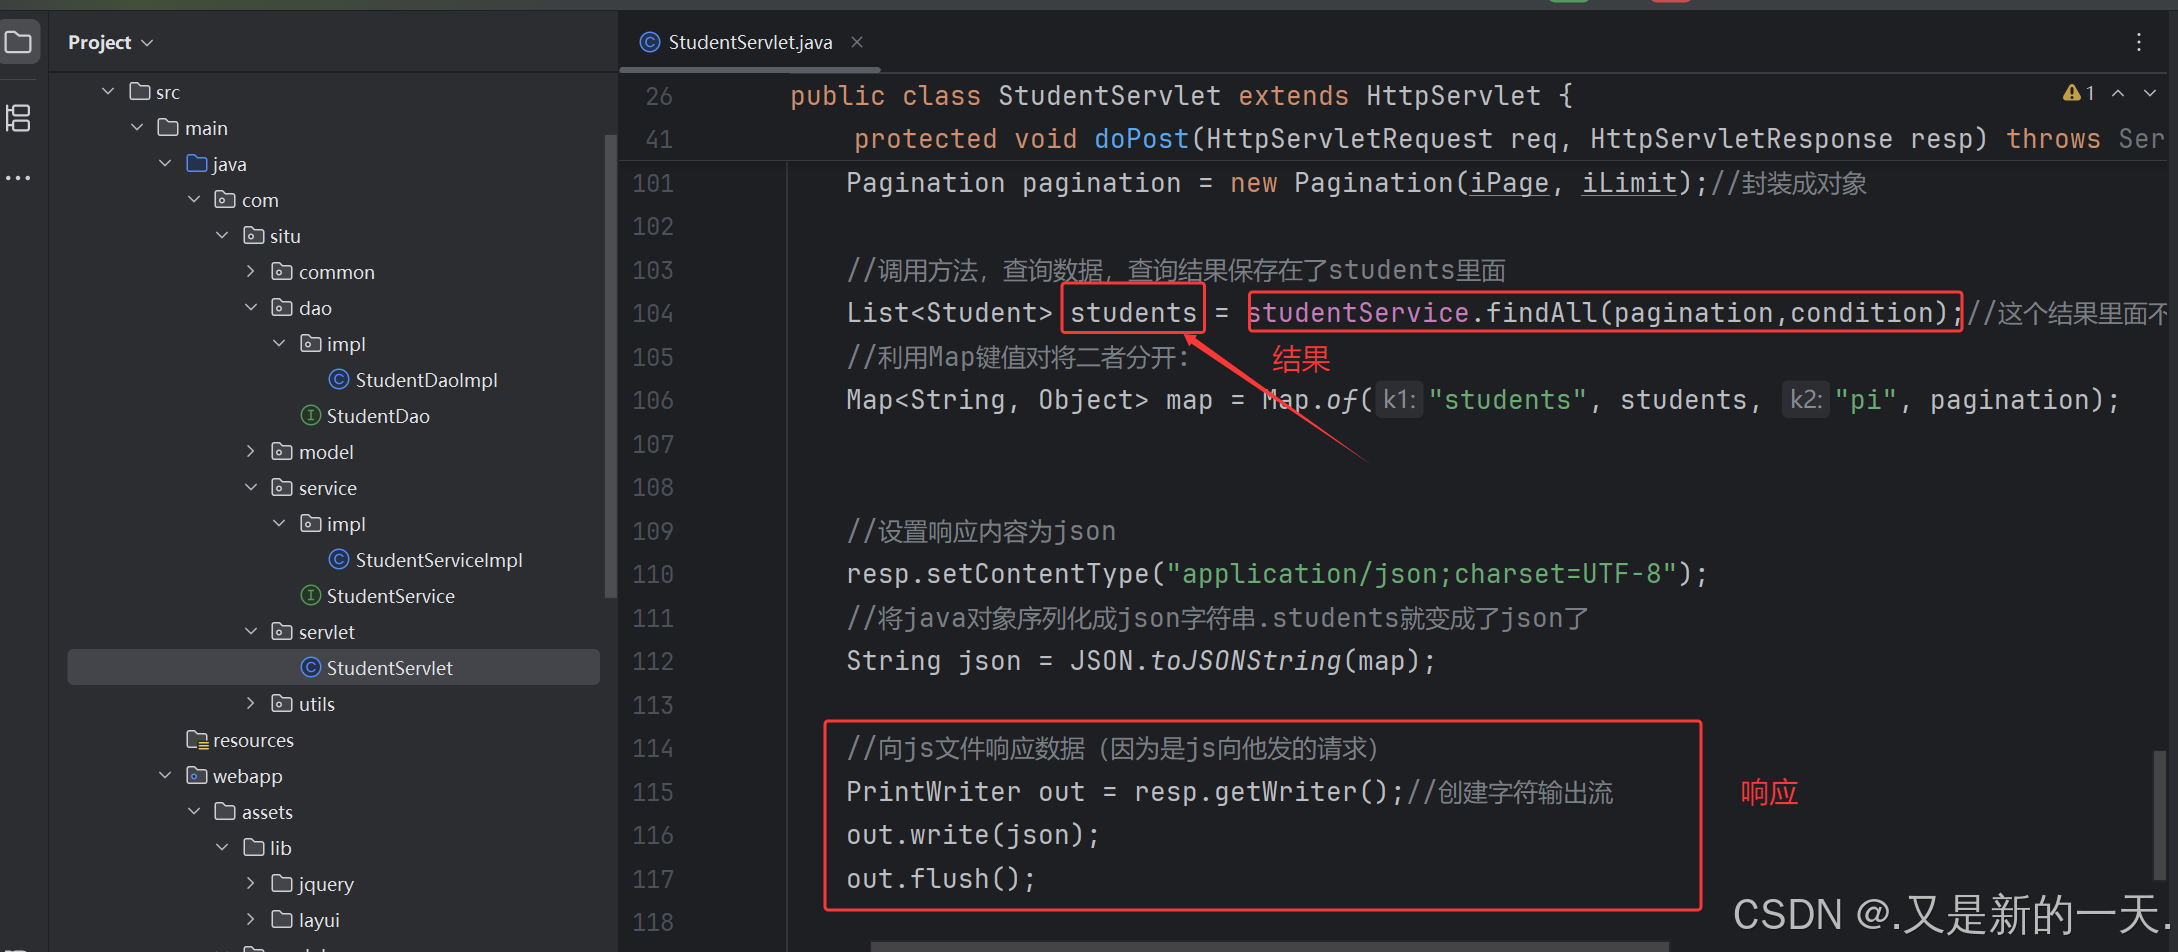
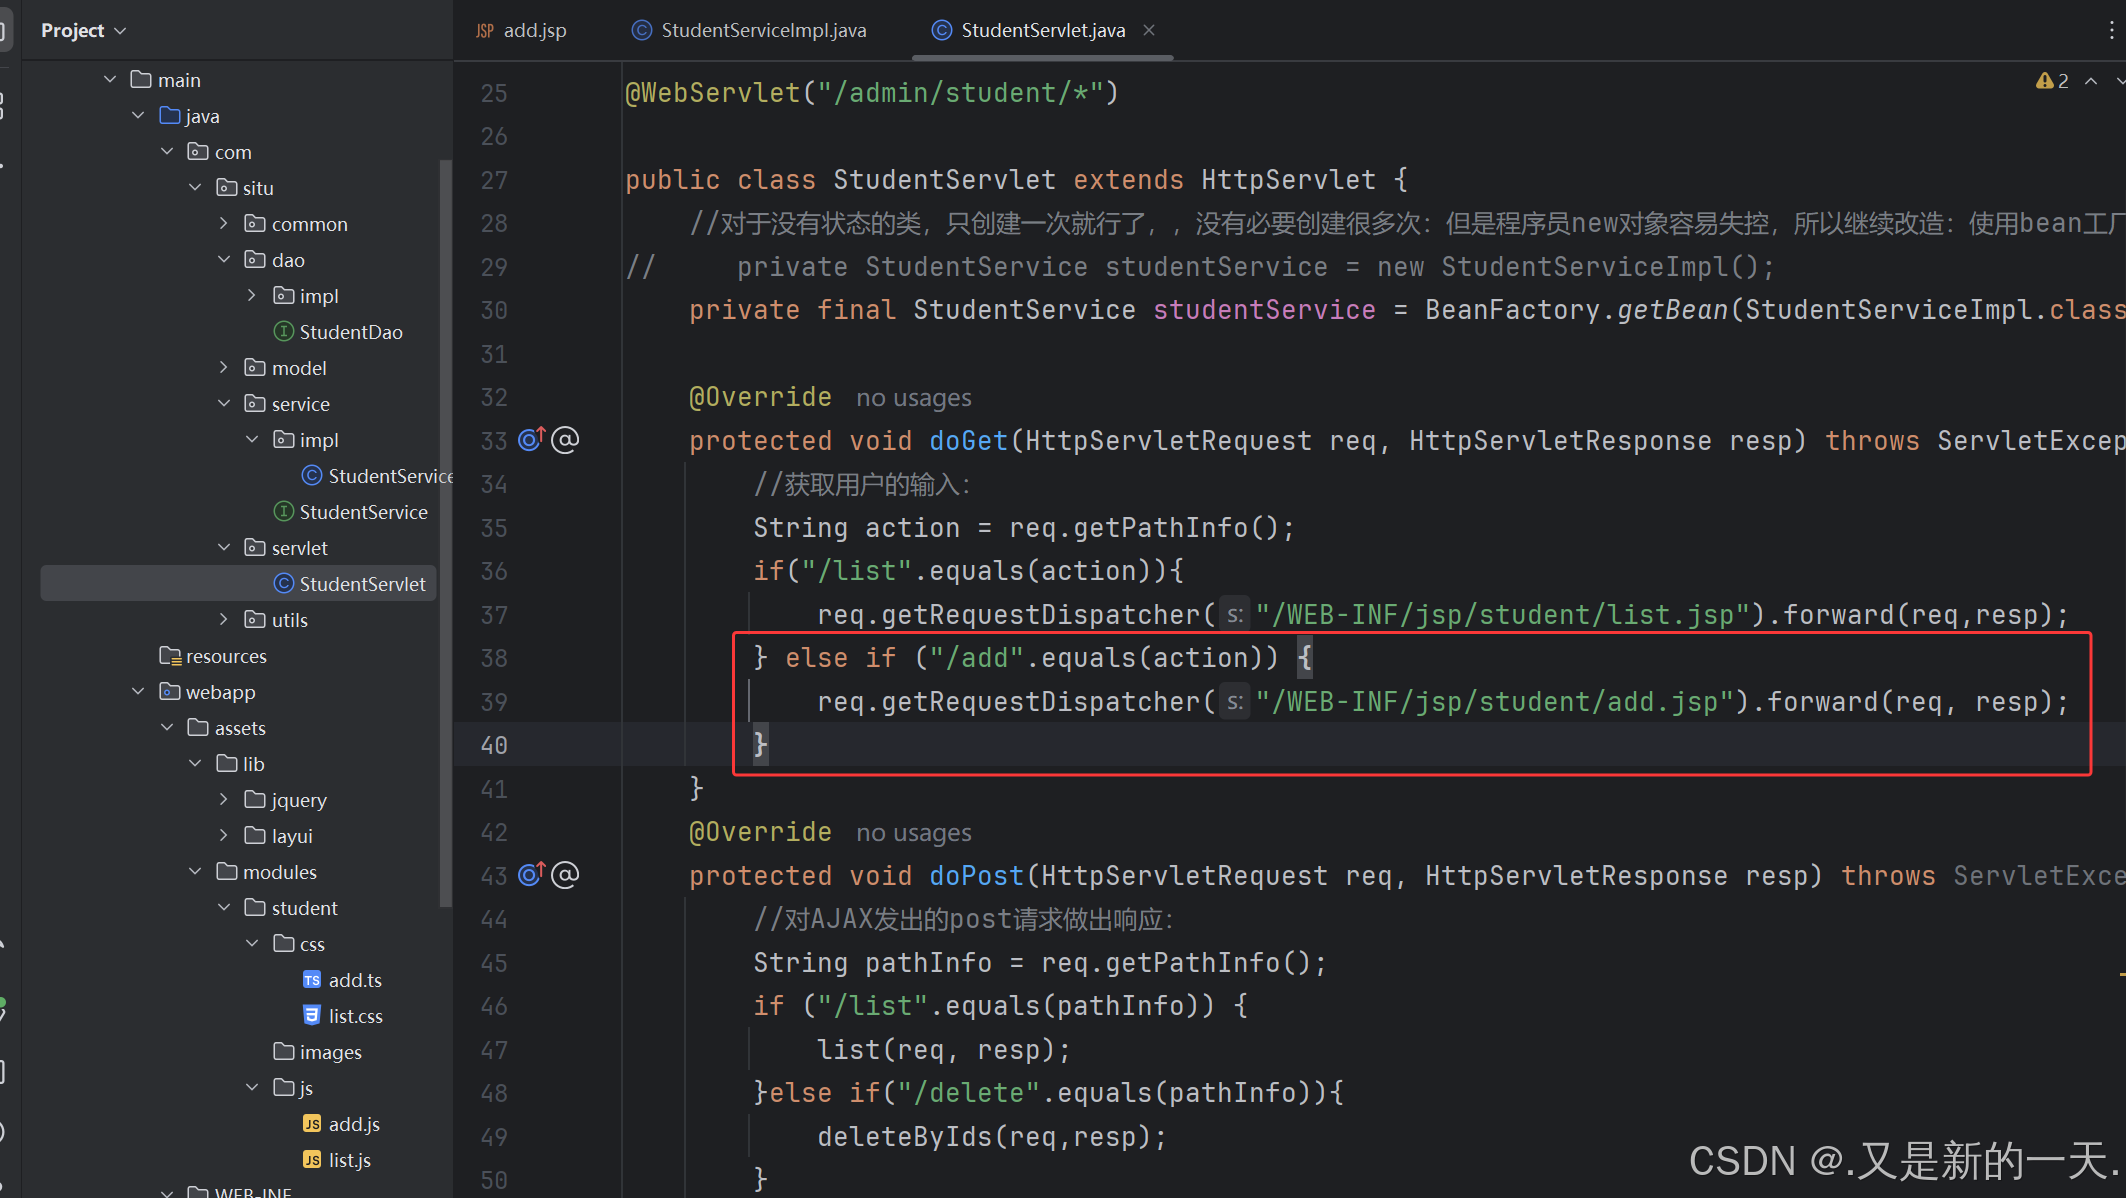
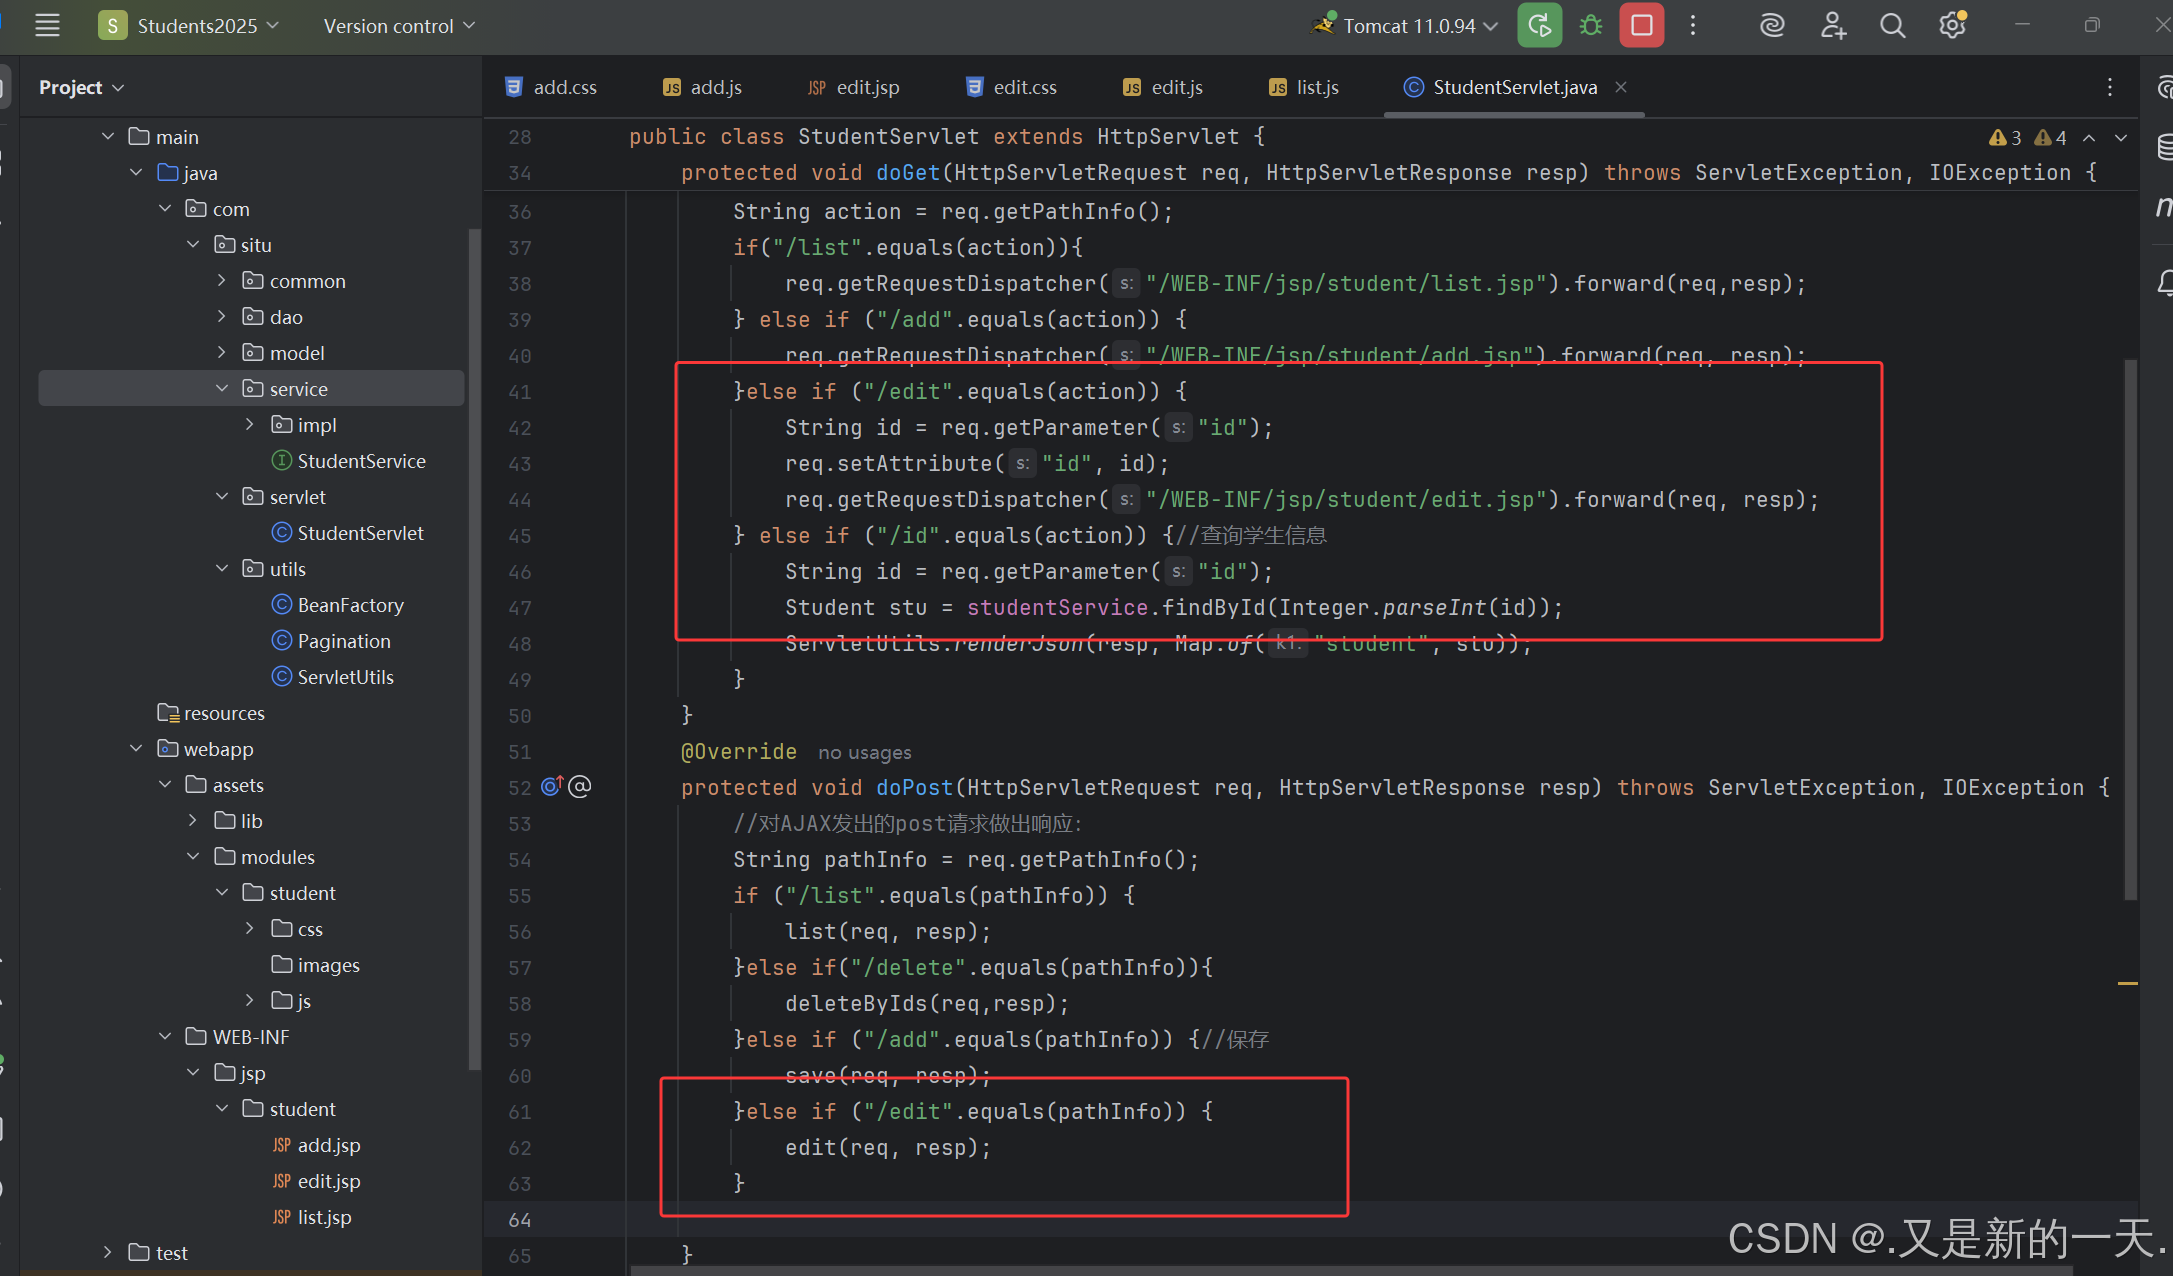
import java.util.Map;@WebServlet("/admin/student/*")public class StudentServlet extends HttpServlet {//对于没有状态的类,只创建一次就行了,,没有必要创建很多次:但是程序员new对象容易失控,所以继续改造:使用bean工厂new
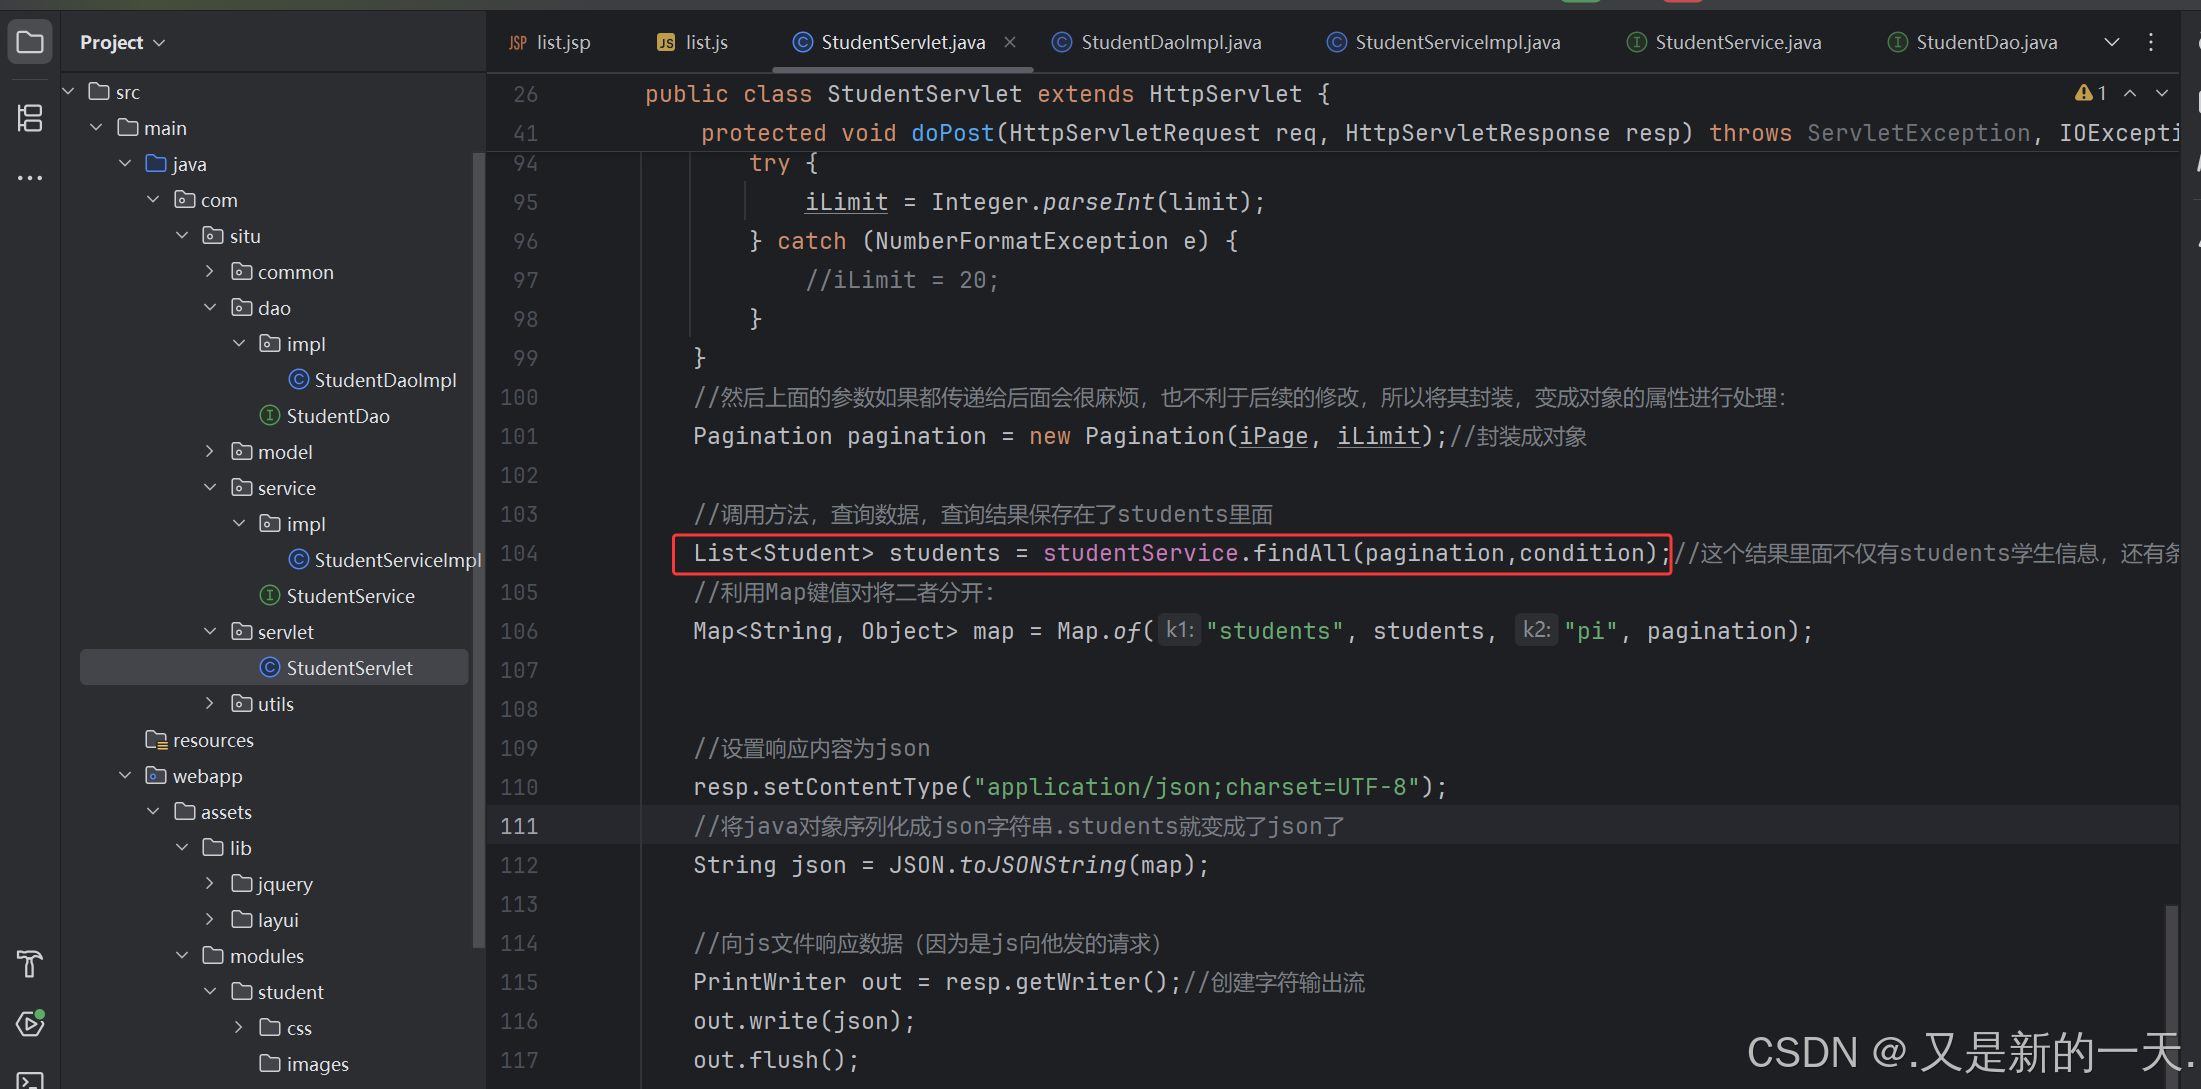
// private StudentService studentService = new StudentServiceImpl();private final StudentService studentService = BeanFactory.getBean(StudentServiceImpl.class);@Overrideprotected void doGet(HttpServletRequest req, HttpServletResponse resp) throws ServletException, IOException {//获取用户的输入:String action = req.getPathInfo();if("/list".equals(action)){req.getRequestDispatcher("/WEB-INF/jsp/student/list.jsp").forward(req,resp);}}@Overrideprotected void doPost(HttpServletRequest req, HttpServletResponse resp) throws ServletException, IOException {//对AJAX发出的post请求做出响应:String pathInfo = req.getPathInfo();if ("/list".equals(pathInfo)) {list(req, resp);}else if("/delete".equals(pathInfo)){deleteByIds(req,resp);}}//查询操作:private void list(HttpServletRequest req, HttpServletResponse resp) throws IOException {//获取参数:AJAX传过来的:String page = req.getParameter("page");String limit = req.getParameter("limit");//获取前端AJAX传过来的发过来的查询条件的参数:String stuId = req.getParameter("stuId");String name = req.getParameter("name");String sex = req.getParameter("sex");String birthStart = req.getParameter("birthStart");String birthEnd = req.getParameter("birthEnd");String phone = req.getParameter("phone");//上面这些属性和模型类Student很像,所以可以将这些参数封装(打包到一个里面)。查询条件封装:不为空再封装StudentSearchBean condition = new StudentSearchBean();if (StringUtils.hasText(stuId)) {condition.setStuId(stuId);}if (StringUtils.hasText(name)) {condition.setName(name);}if (StringUtils.hasText(sex)) {condition.setSex(sex);}if (StringUtils.hasText(phone)) {condition.setPhone(phone);}if (StringUtils.hasText(birthStart)) {//格式化器:指定格式LocalDate bs = LocalDate.parse(birthStart, DateTimeFormatter.ofPattern("yyyy-MM-dd"));condition.setBirthStart(bs);}if (StringUtils.hasText(birthEnd)) {LocalDate be = LocalDate.parse(birthEnd, DateTimeFormatter.ofPattern("yyyy-MM-dd"));condition.setBirthEnd(be);}//将获取请求的参数转成字符串:int iPage = 1;if (StringUtils.hasText(page)) {try {iPage = Integer.parseInt(page);} catch (NumberFormatException e) {//iPage = 1;}}int iLimit = 20;if (StringUtils.hasText(limit)) {try {iLimit = Integer.parseInt(limit);} catch (NumberFormatException e) {//iLimit = 20;}}//然后上面的参数如果都传递给后面会很麻烦,也不利于后续的修改,所以将其封装,变成对象的属性进行处理:Pagination pagination = new Pagination(iPage, iLimit);//封装成对象//调用方法,查询数据,查询结果保存在了students里面List<Student> students = studentService.findAll(pagination,condition);//这个结果里面不仅有students学生信息,还有条数,返回多少条数据也在里面了//利用Map键值对将二者分开:Map<String, Object> map = Map.of("students", students, "pi", pagination);//设置响应内容为jsonresp.setContentType("application/json;charset=UTF-8");//将java对象序列化成json字符串.students就变成了json了String json = JSON.toJSONString(map);//向js文件响应数据(因为是js向他发的请求)PrintWriter out = resp.getWriter();//创建字符输出流out.write(json);out.flush();}//删除操作:private void deleteByIds(HttpServletRequest req,HttpServletResponse resp) throws IOException {//获取参数,这个参数是数组的形式:String[] strIds = req.getParameterValues("ids");//获取了这个数组//交给业务层实现,在本层里面只需要new对象(定义过了),调用方法即可。//将string[] 转成列表。我们传参的时候类型是列表List<Integer> ids = new ArrayList<>();for (int i = 0; i < strIds.length; i++) {ids.add(Integer.parseInt(strIds[i]));}//调用方法,返回受影响的行数int rows = studentService.deleteByIds(ids);//JSON必须有键值对,所以转成键值对:Map<String, Object> map = Map.of("rows", rows);//写,响应给前端。完成get请求resp.setContentType("application/json;charset=UTF-8");PrintWriter out = resp.getWriter();out.write(JSON.toJSONString(map));out.flush();}
}响应数据给AJAX的请求了,然后js里面会往下执行回调函数:
展示结果:
7.新增事件
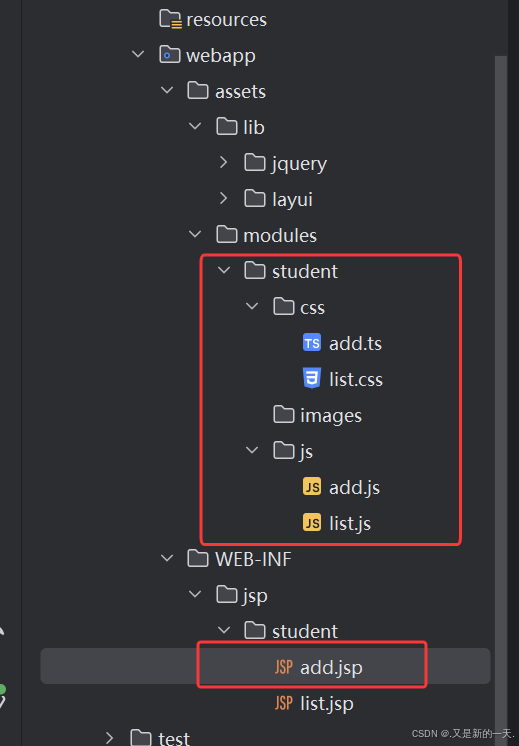
1.前端页面展示:add.jsp
add.jsp:
<%@ page contentType="text/html;charset=UTF-8" language="java" %>
<%@ taglib prefix="c" uri="jakarta.tags.core" %>
<c:set var="ctx" value="${pageContext.request.contextPath}"/>
<html>
<head><base href="${ctx}/"><title>新增学生</title><link rel="stylesheet" href="assets/lib/layui/css/layui.css"><link rel="stylesheet" href="assets/modules/student/css/add.css"><script src="assets/lib/jquery/jquery-3.7.1.min.js"></script><script src="assets/lib/layui/layui.js"></script><script>const ctx = "${ctx}";</script><script src="assets/modules/student/js/add.js"></script>
</head>
<body>
<div><form id="student-form" action=""><div><label for="stuId">学号:</label><input type="text" id="stuId" name="stuId" autocomplete="off" placeholder="请输入学生学号"></div><div><label for="name">姓名:</label><input type="text" id="name" name="name" autocomplete="off" placeholder="请输入学生姓名"></div><div><label for="pinyin">拼音:</label><input type="text" id="pinyin" name="pinyin" autocomplete="off" placeholder="请输入学生拼音"></div><div><label for="male">性别:</label><input type="radio" id="male" name="sex" checked value="男"><label for="male">男</label><input type="radio" id="female" name="sex" value="女"><label for="female">女</label></div><div><label for="birthday">出生日期:</label><input type="text" id="birthday" name="birthday" autocomplete="off"placeholder="请输入学生出生日期" readonly></div><div><label for="phone">手机号:</label><input type="text" id="phone" name="phone" autocomplete="off" placeholder="请输入学生手机号"></div><div><label for="wechat">微信号:</label><input type="text" id="wechat" name="wechat" autocomplete="off" placeholder="请输入学生微信号"></div></form>
</div>
</body>
</html>
2.添加css修饰:
body {padding: 8px;
}#student-form > div > label:first-child {display: inline-block;width: 100px;text-align: right;
}#student-form > div {margin-bottom: 8px;
}#student-form > div > input:not(#male,#female) {outline: none;border: 1px solid #ccc;width: 350px;padding: 10px 0 10px 8px;
}
展示效果:

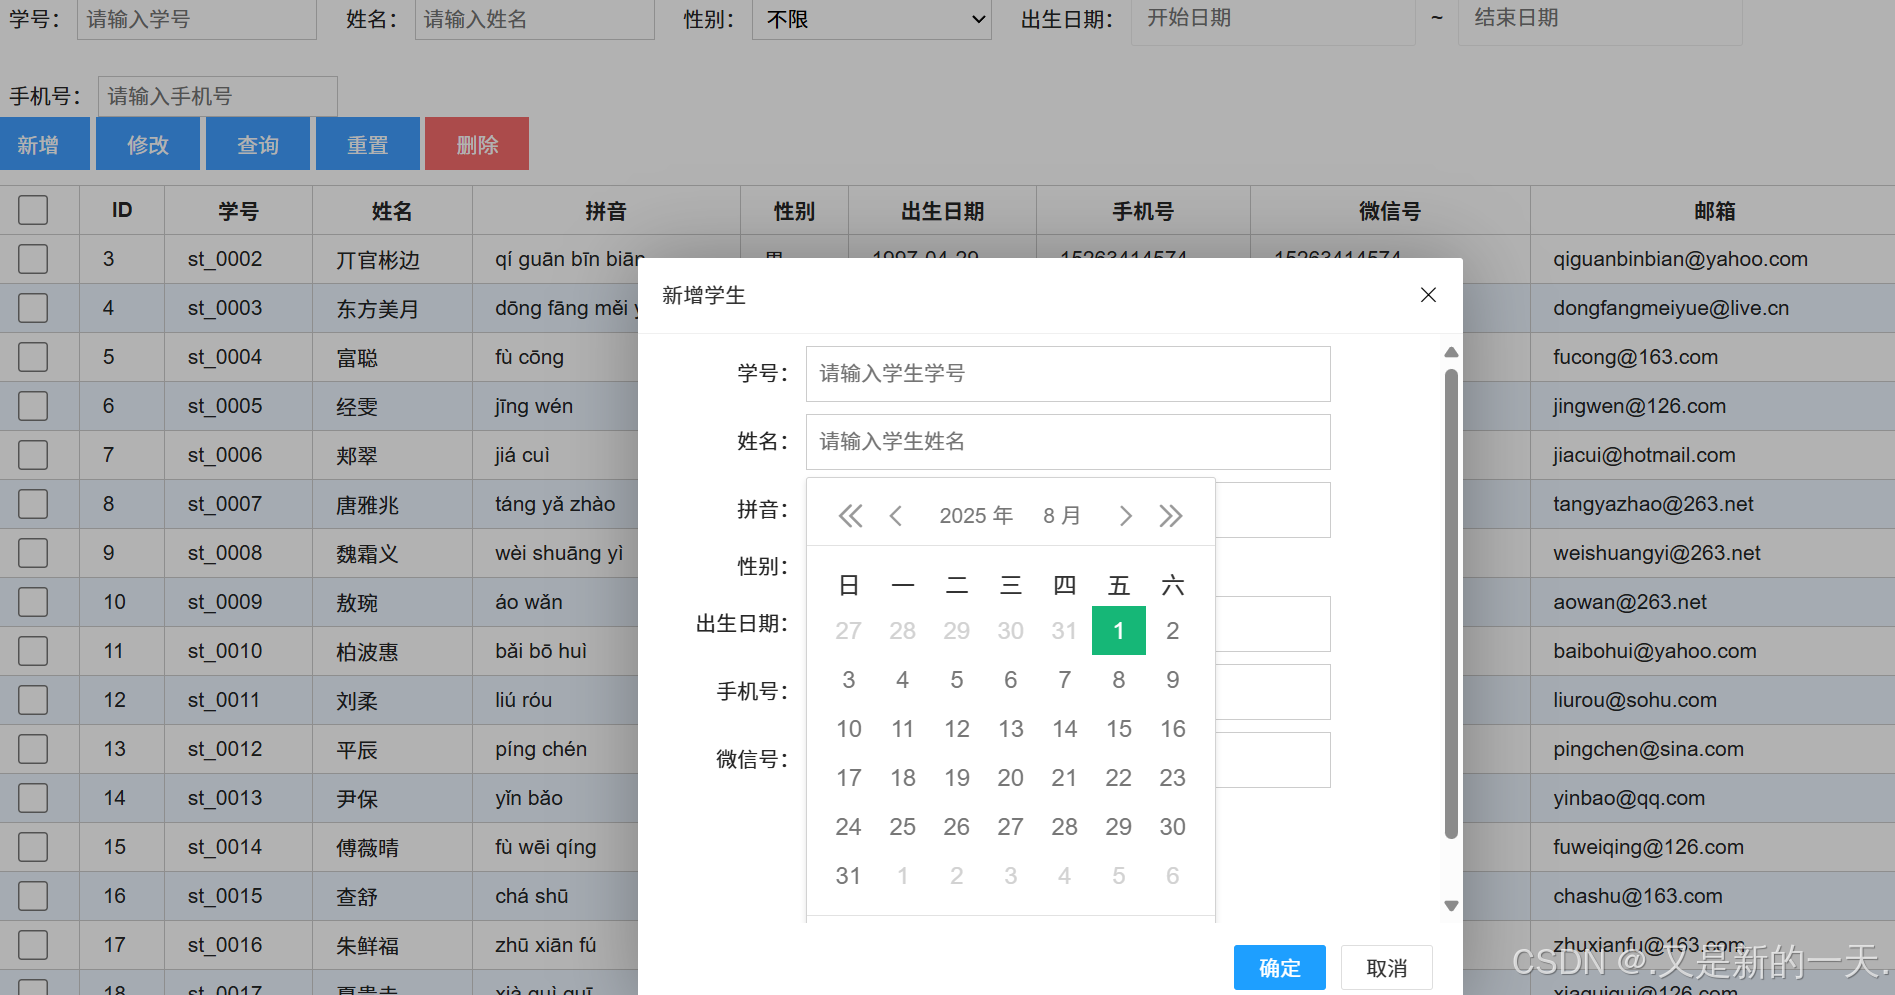
3.添加事件实现新增页面的弹窗以及出生日期的弹窗和渲染:
先给添加按钮标签设置属性:
<%--按钮区--%>
<div class="action"><button type="button" id="add">新增</button><button type="button" id="edit">修改</button><button type="button" id="search">查询</button><button type="button" id="reset">重置</button><button type="button" id="del">删除</button>
</div>
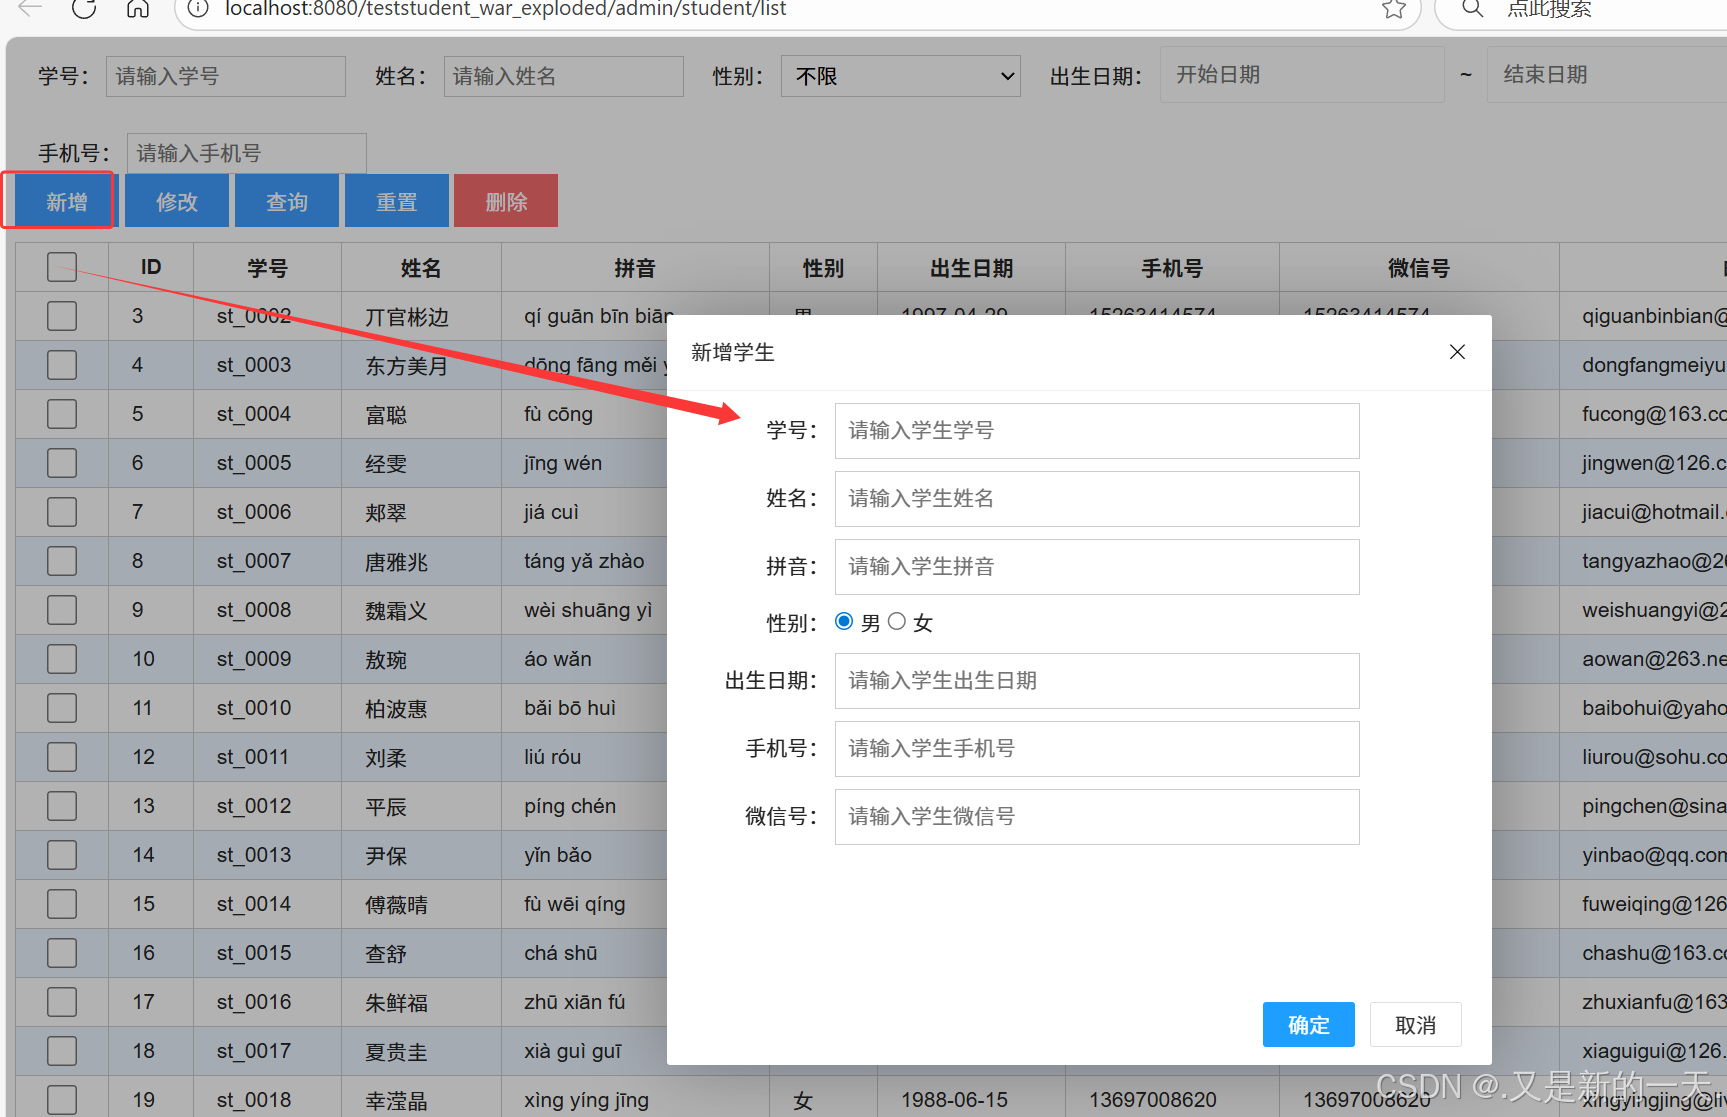
然后去Js里面绑定:
//新增按钮操作$("#add").click(function () {layer.open({title: "新增学生",content: ctx + "/admin/student/add",type: 2,//2指iframe,area: ["550px", "500px"],btn: ["确定", "取消"],yes: function (handler, $jq) {const win = $jq.find("iframe")[0].contentWindow;win.submit(function (success) {if (success) {layer.msg("保存操作成功");findAll();layer.close(handler);} else {layer.msg("保存操作失败");}});}});});
目前实现的:实现了点击按钮能够弹出来窗口
但是出生日期还不能弹窗,所以我们添加弹窗的:
add.js里面添加弹窗的代码,并实现对新增的信息的验证:
//让新增的弹出来的新增页面日期弹窗,渲染日期:
$(() => {//渲染出生日期layui.use(function () {const laydate = layui.laydate;laydate.render({elem: "#birthday",type: "date"});});
});
实现的效果:
弹窗函数:
获取前端数据的校验:
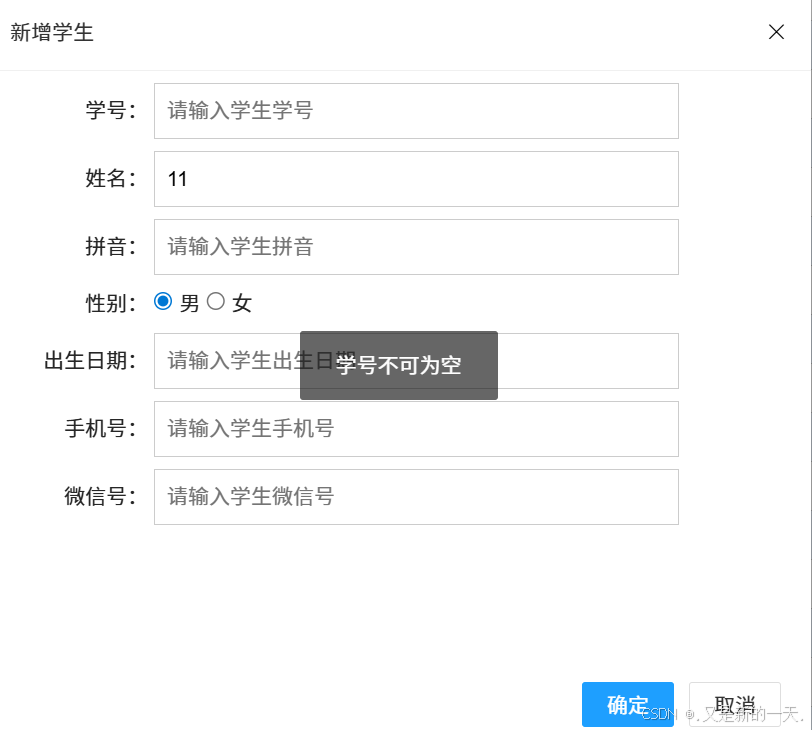
4.获取前端新增的参数信息,校验,发送给后端
获取前端新增的参数信息,校验,校验完成以后这是正确的信息了,然后可以往后端传送数据了:
//让新增的弹出来的新增页面日期弹窗,渲染日期:
$(() => {//渲染出生日期layui.use(function () {const laydate = layui.laydate;laydate.render({elem: "#birthday",type: "date"});});
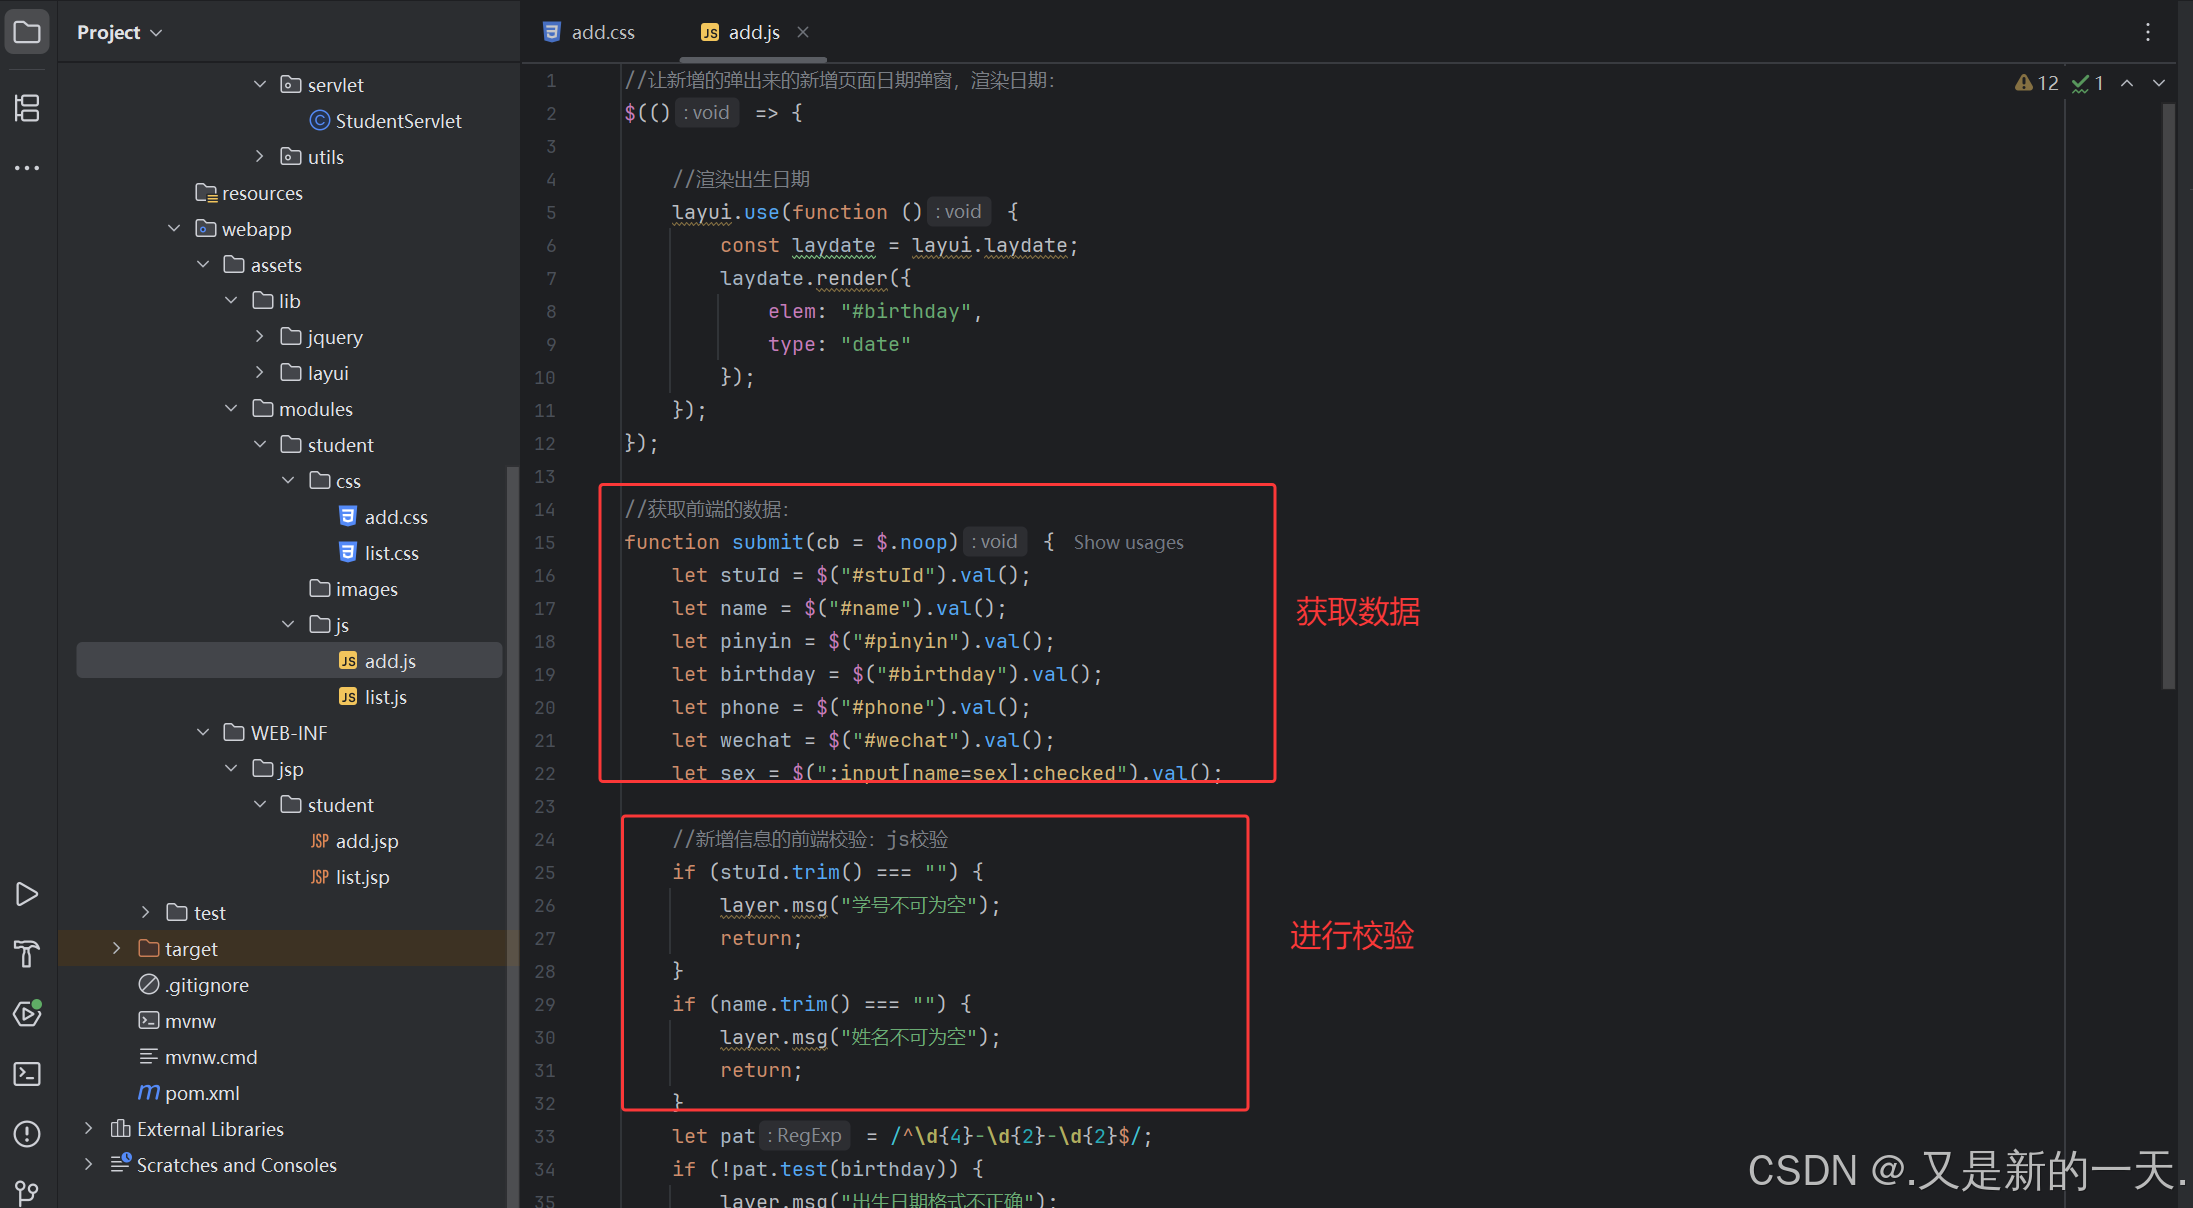
});//获取前端的数据:
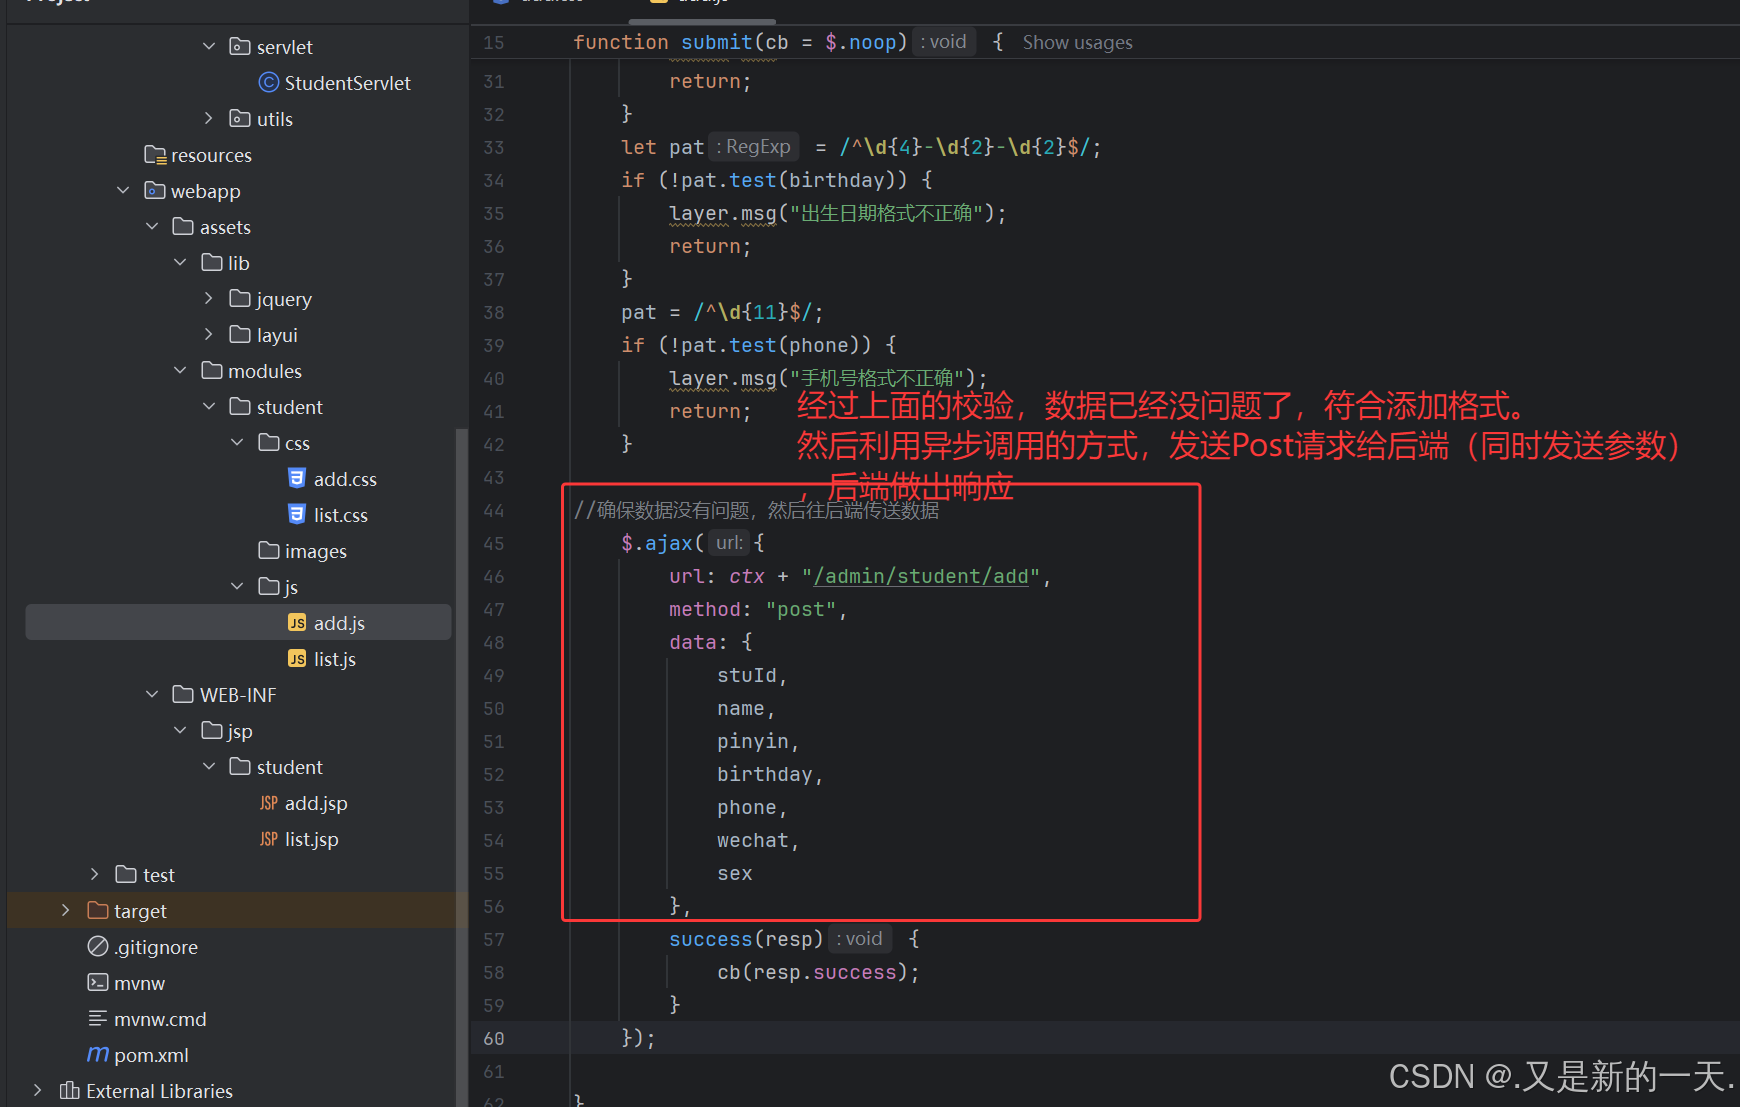
function submit(cb = $.noop) {let stuId = $("#stuId").val();let name = $("#name").val();let pinyin = $("#pinyin").val();let birthday = $("#birthday").val();let phone = $("#phone").val();let wechat = $("#wechat").val();let sex = $(":input[name=sex]:checked").val();//新增信息的前端校验:js校验if (stuId.trim() === "") {layer.msg("学号不可为空");return;}if (name.trim() === "") {layer.msg("姓名不可为空");return;}let pat = /^\d{4}-\d{2}-\d{2}$/;if (!pat.test(birthday)) {layer.msg("出生日期格式不正确");return;}pat = /^\d{11}$/;if (!pat.test(phone)) {layer.msg("手机号格式不正确");return;}//确保数据没有问题,然后往后端传送数据$.ajax({url: ctx + "/admin/student/add",method: "post",data: {stuId,name,pinyin,birthday,phone,wechat,sex},success(resp) {cb(resp.success);}});}
5.前端发送请求,后端就要响应:
AJAX发送的是post请求,所以在Servlet里面的调用post方法:
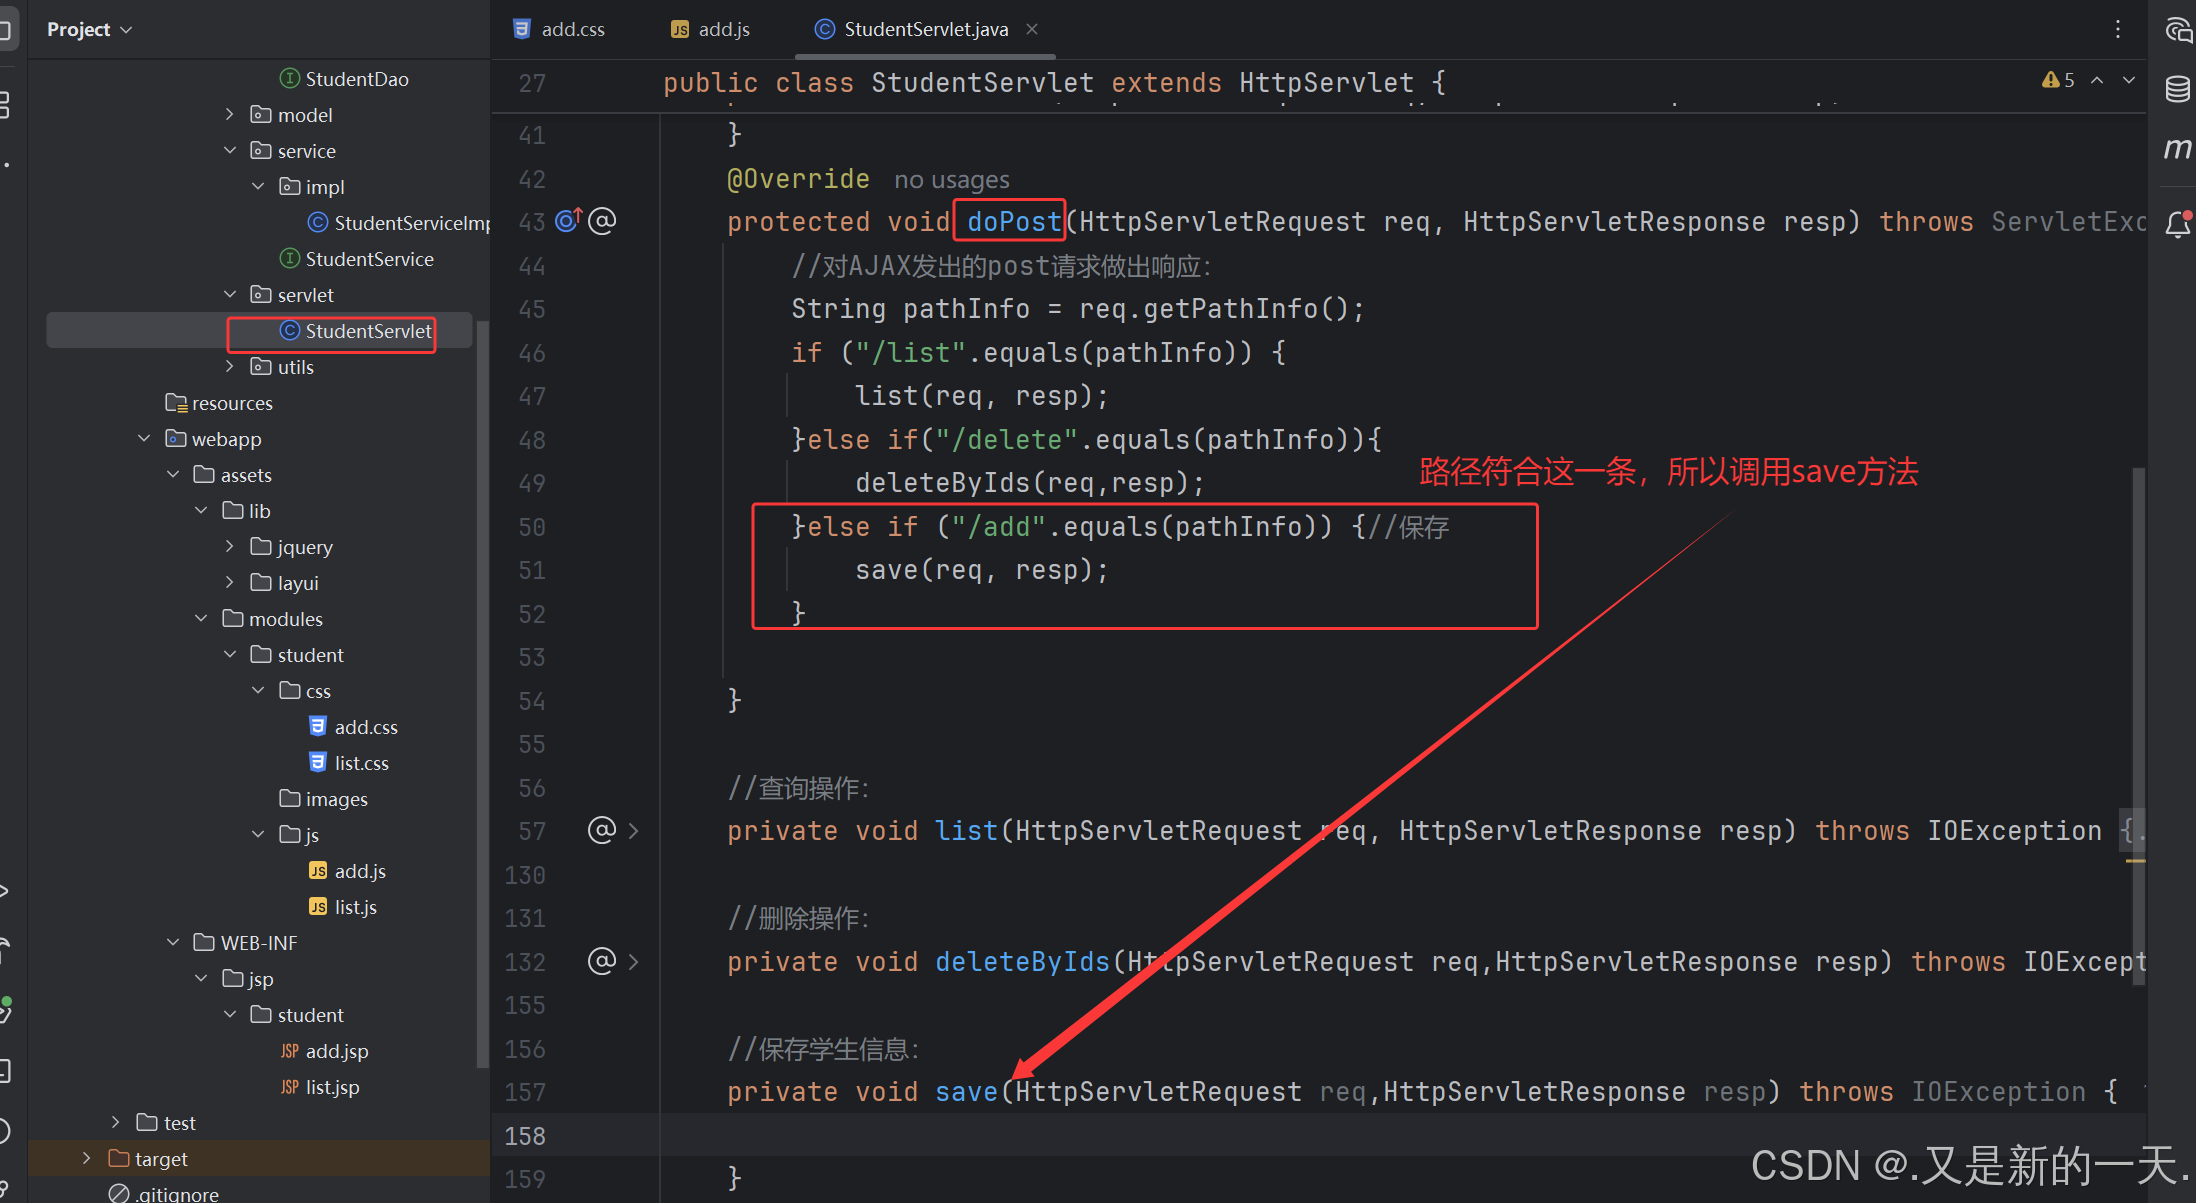
接下来完成具体的save方法:
我们发现向前端响应成JSON的这部分代码一直在重复使用,所以可以抽取出来作为工具类,然后通过调用工具类进行响应:
工具类:ServletUtils
package com.situ.student.util;import com.alibaba.fastjson2.JSON;
import jakarta.servlet.http.HttpServletResponse;import java.io.IOException;
import java.io.PrintWriter;public class ServletUtils {//响应json给客户端public static void renderJson(HttpServletResponse resp, Object obj) throws IOException {resp.setContentType("application/json;charset=UTF-8");PrintWriter out = resp.getWriter();out.write(JSON.toJSONString(obj));out.flush();}
}
具体的方法实现:
//保存学生信息:private void save(HttpServletRequest req,HttpServletResponse resp) throws IOException {//获取前端传递的参数:String stuId = req.getParameter("stuId");String name = req.getParameter("name");String sex = req.getParameter("sex");String birthday = req.getParameter("birthday");String pinyin = req.getParameter("pinyin");String phone = req.getParameter("phone");String wechat = req.getParameter("wechat");//进行参数校验,判断是否为空:Student student = new Student();//用于参数封装if (!StringUtils.hasText(stuId)) {//如果是空的就向前端响应,利用的是工具类里面的Json:ServletUtils.renderJson(resp, Map.of("error", "学号不可为空"));return;}student.setStuId(stuId);//合法数据就直接给对象设置属性的值,相当于进行封装操作student.setName(name);//合法就保存//性别的非空校验if (!sex.equals("男") && !sex.equals("女")) {ServletUtils.renderJson(resp, Map.of("error", "性别数据不合法"));return;}student.setSex(sex);//性别合法就设置进去try {//日期格式转换LocalDate ld = LocalDate.parse(birthday, DateTimeFormatter.ofPattern("yyyy-MM-dd"));student.setBirthday(ld);} catch (Exception e) {//日期不合理:ServletUtils.renderJson(resp, Map.of("error", "出生日期格式不正确"));return;}if (!phone.matches("^\\d{11}$")) {//验证手机号ServletUtils.renderJson(resp, Map.of("error", "手机号不正确"));return;}student.setPhone(phone);//手机号数据合法就设置进去student.setPinyin(pinyin);student.setWechat(wechat);//至此,完成了对前端传递参数的校验和封装,接下来,把这些数据通过调用业务类的方式保存到数据库里面//并且给AJAX的请求的响应://调用业务类boolean success = studentService.save(student);//结果保存在success里面了ServletUtils.renderJson(resp, Map.of("success", success));//将结果响应回去,用的是工具类响应}}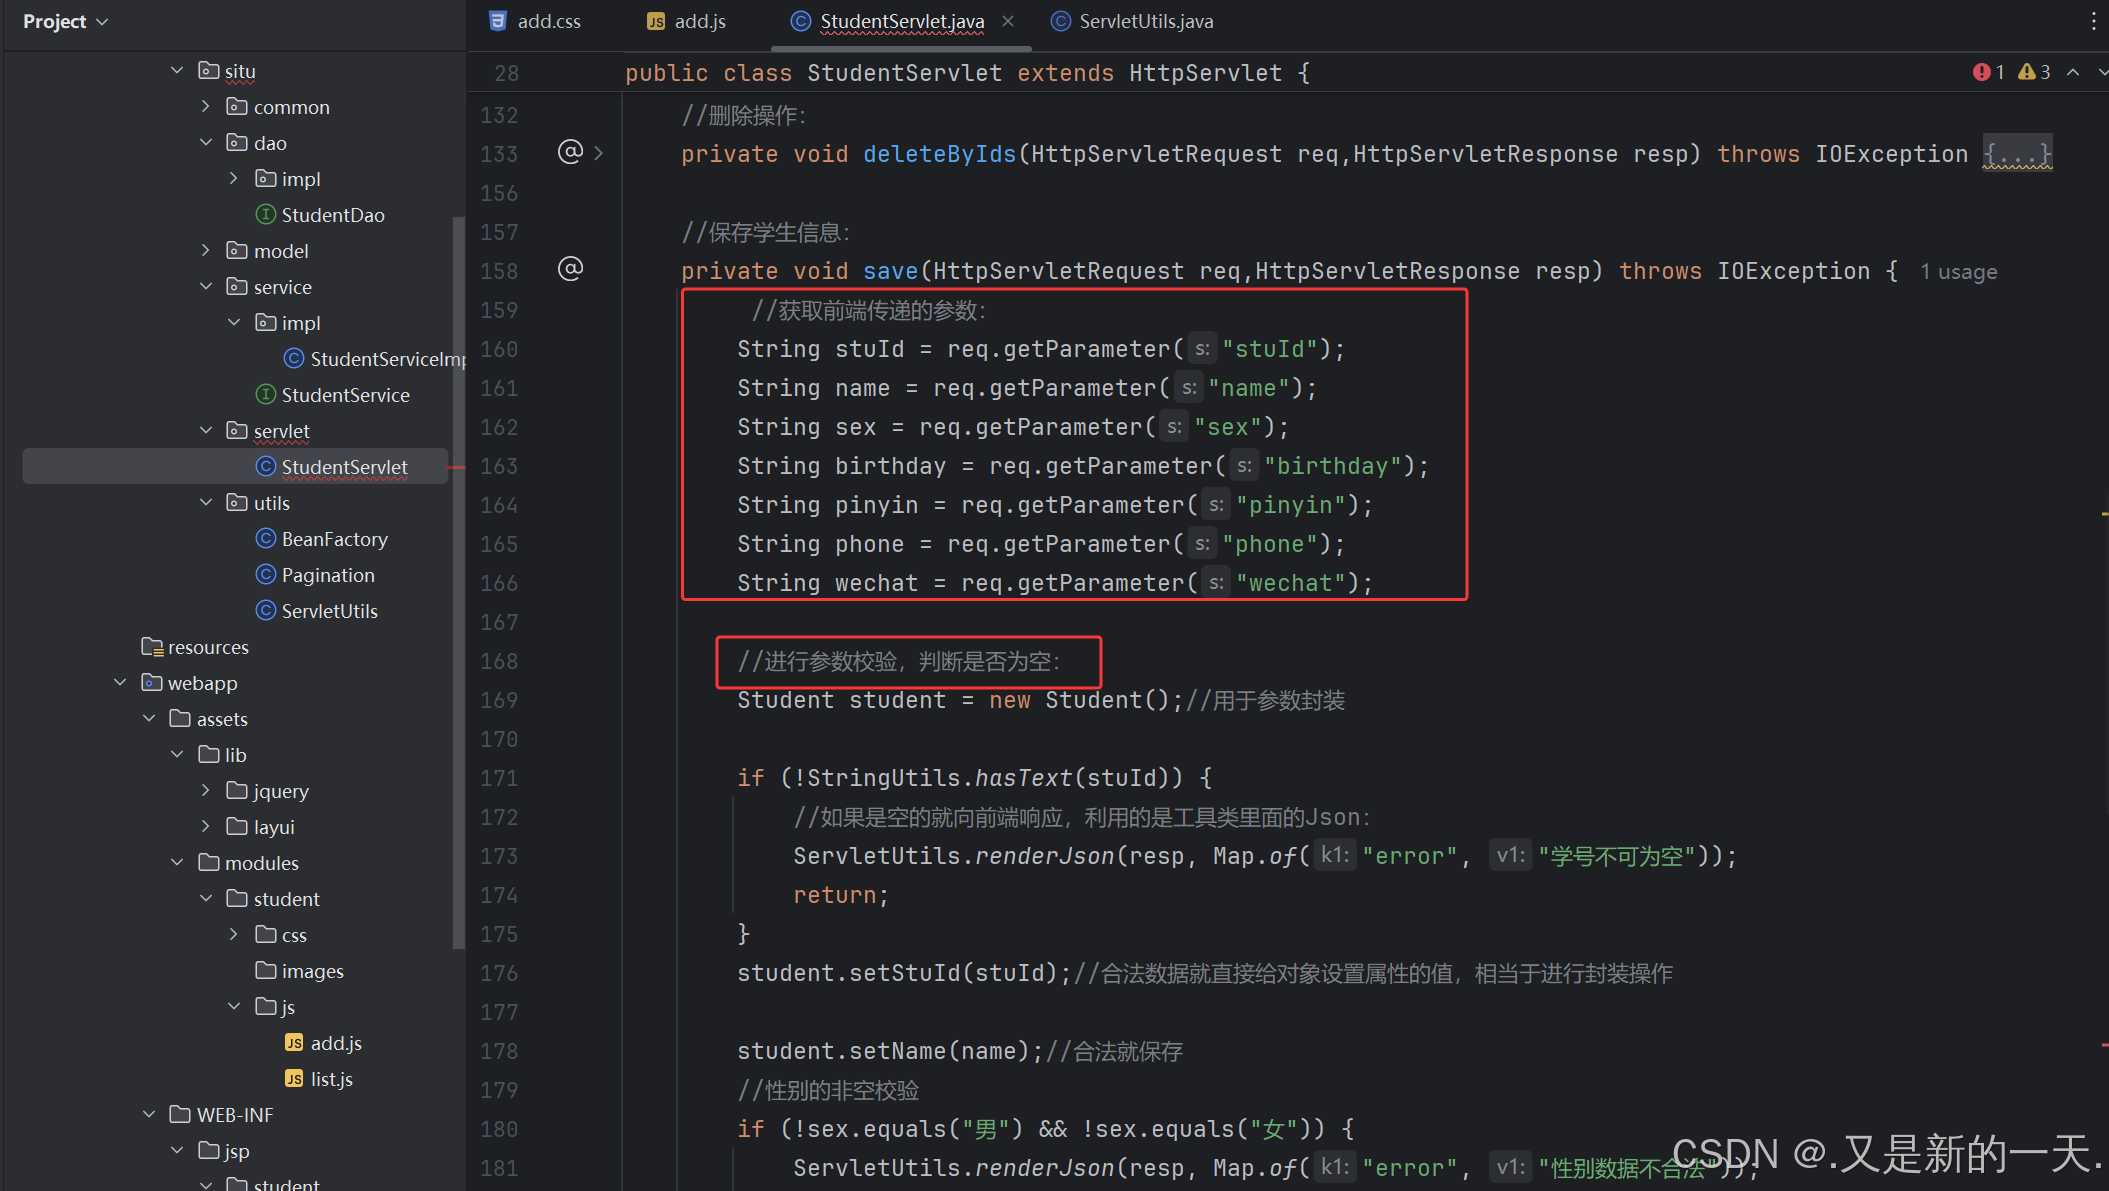
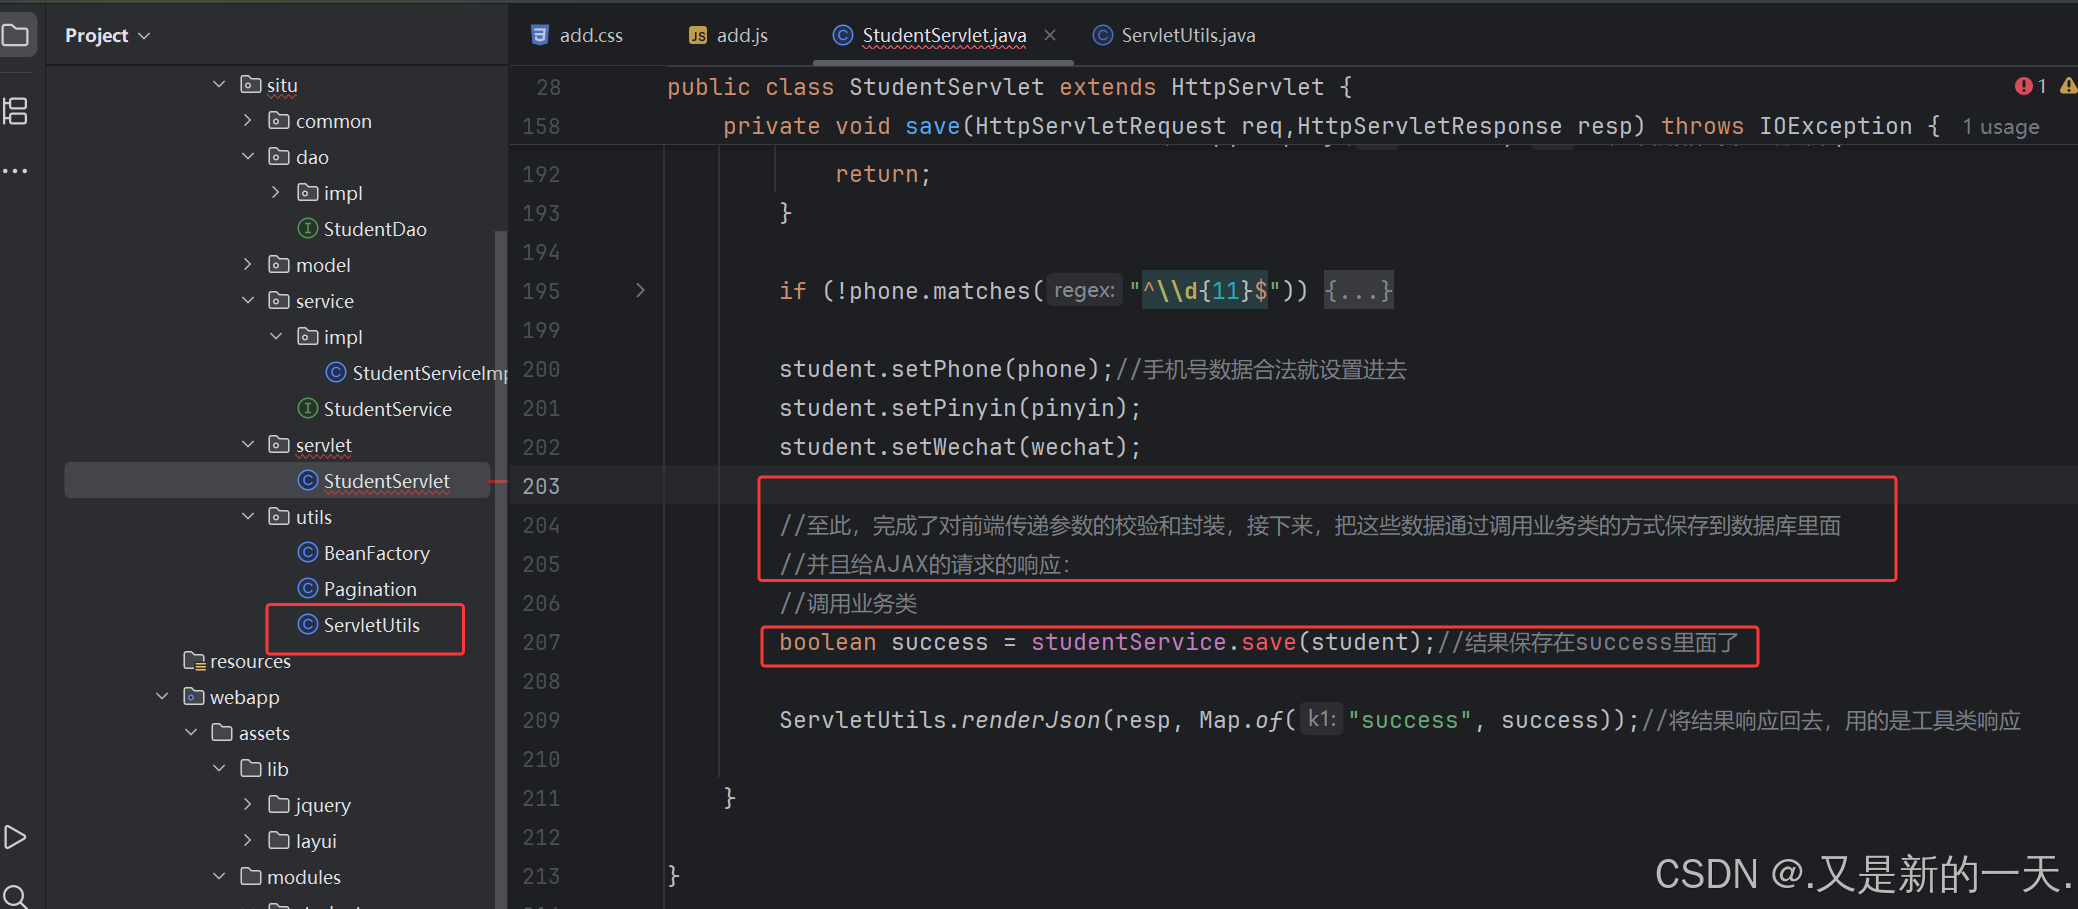
然后去实体类里面补充完整,具体实现这个save方法即可。然后返回给AJAX部分,AJAX执行回调函数向浏览器做出响应,至此全部完成。
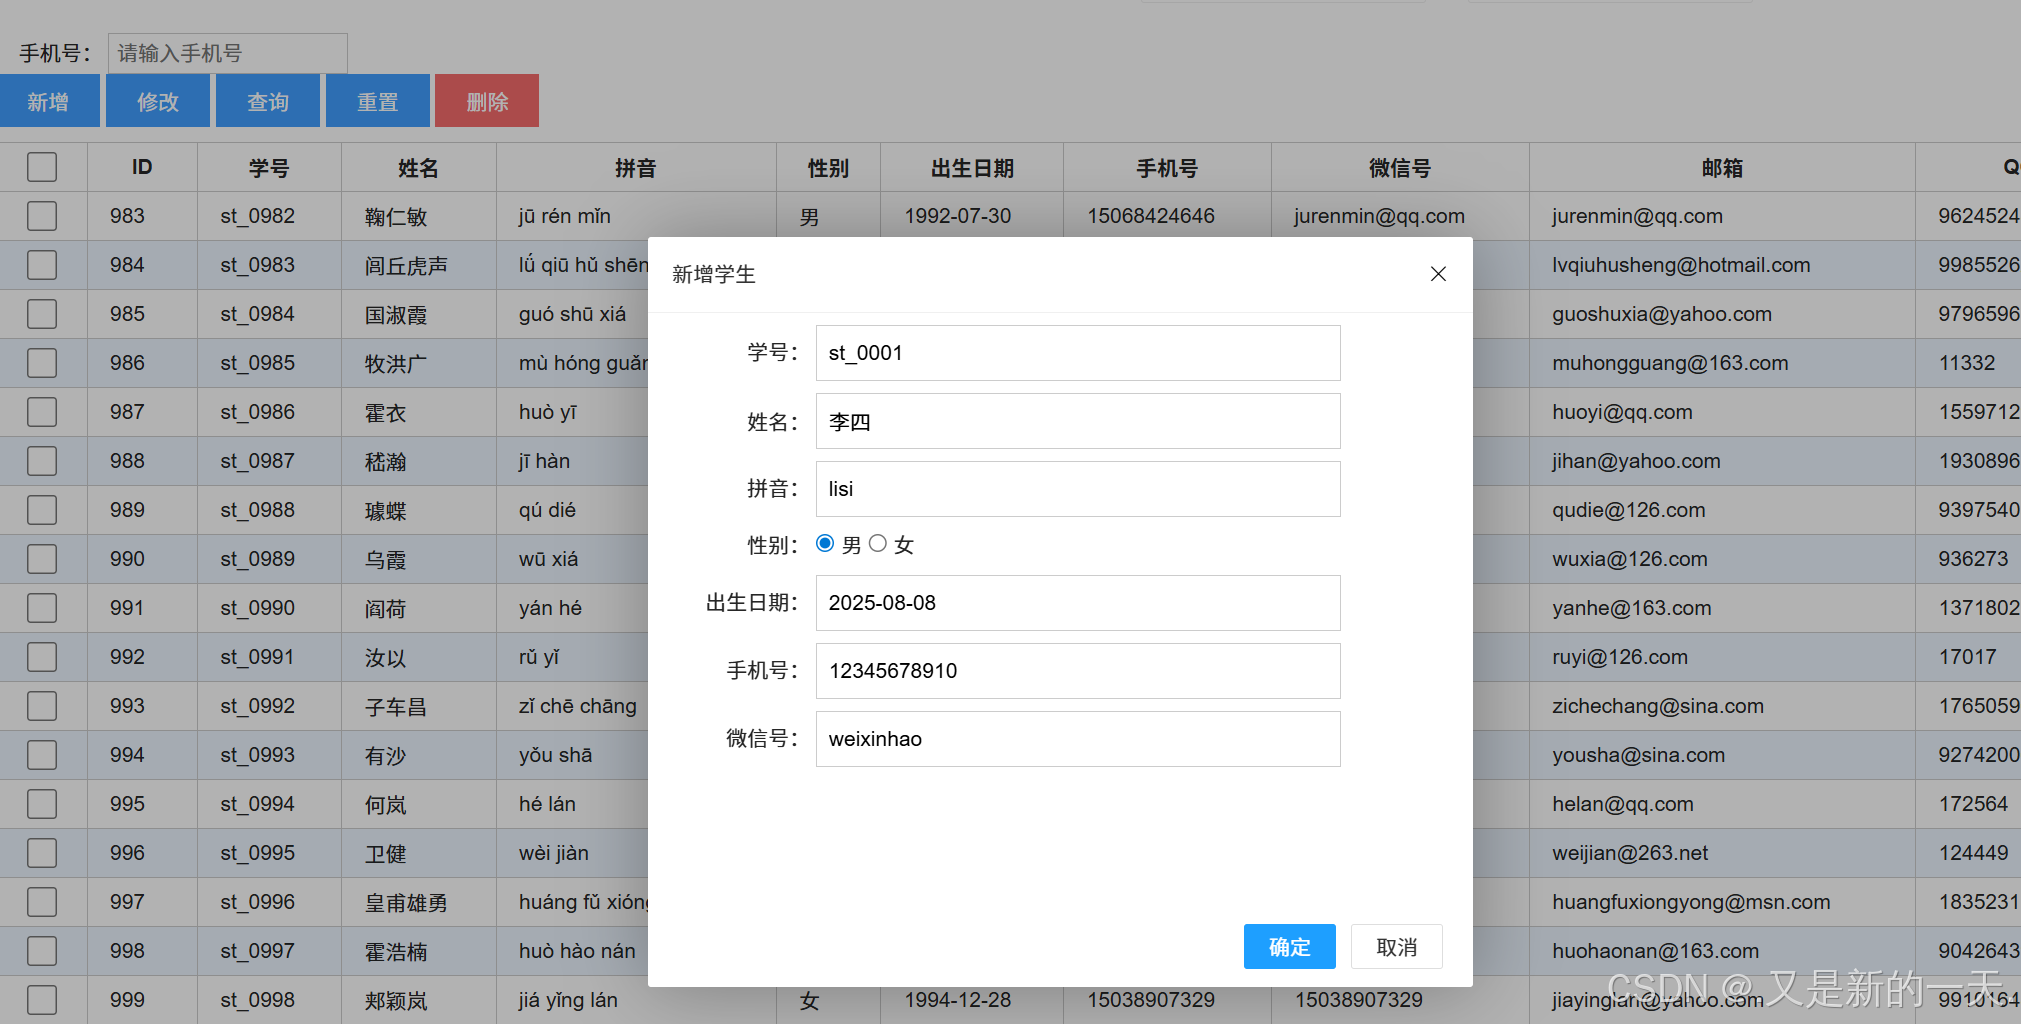
展示效果:
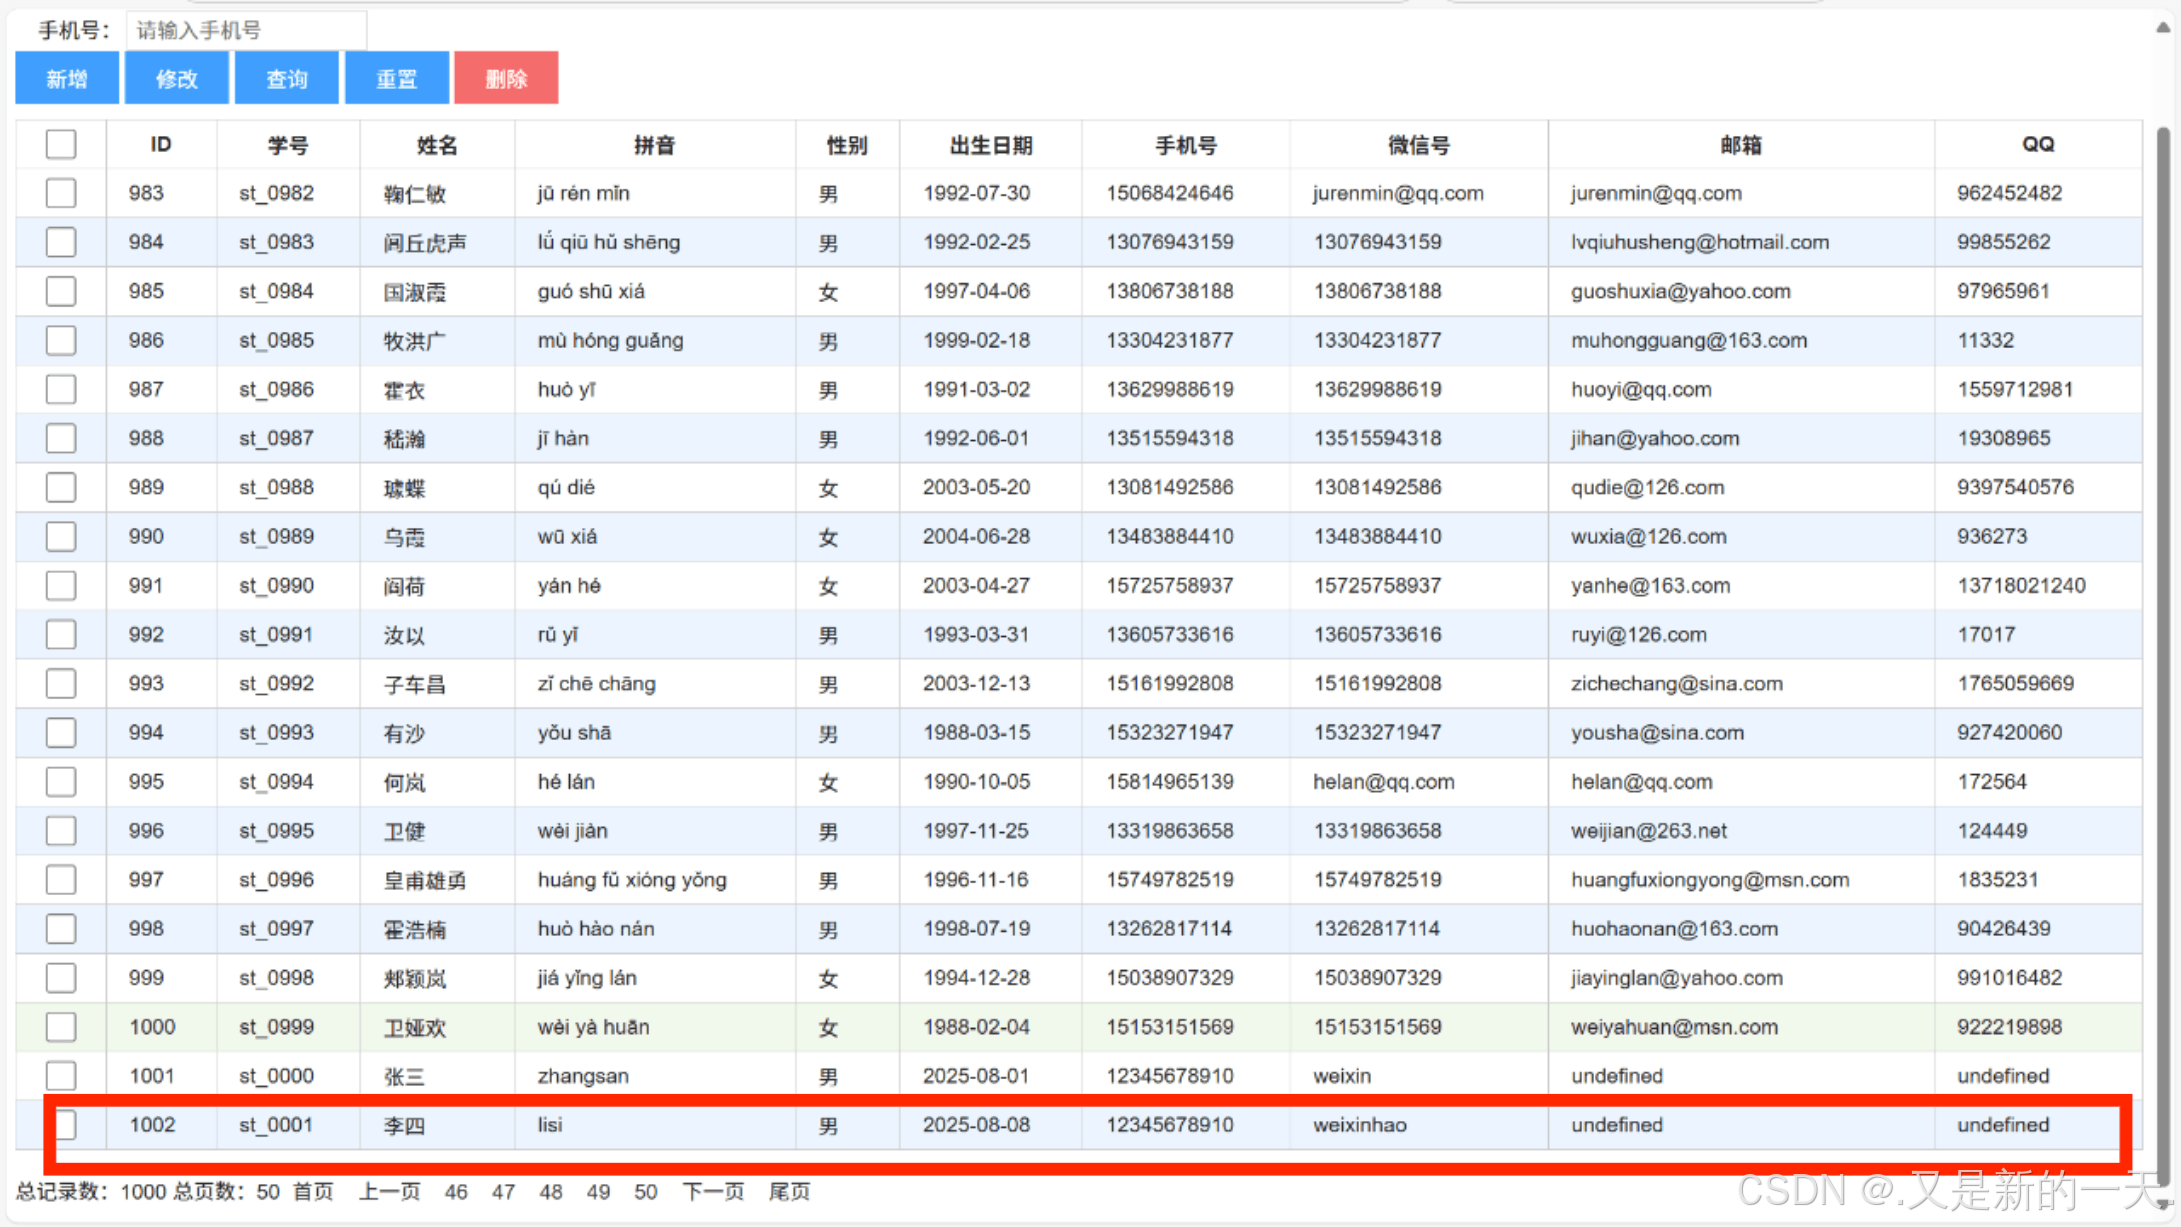
8、修改事件
与之前的事件同理,先写div标签,然后进行添加属性,事件绑定,AJAX发送请求,servlet进行响应。然后向浏览器响应。完全一样的步骤,这里就不再赘述了。
相关代码:
1、edit.jsp进行展示
<%@ page contentType="text/html;charset=UTF-8" language="java" %>
<%@ taglib prefix="c" uri="jakarta.tags.core" %>
<c:set var="ctx" value="${pageContext.request.contextPath}"/>
<html>
<head><base href="${ctx}/"><title>修改学生</title><link rel="stylesheet" href="assets/lib/layui/css/layui.css"><link rel="stylesheet" href="assets/modules/student/css/edit.css"><script src="assets/lib/jquery/jquery-3.7.1.min.js"></script><script src="assets/lib/layui/layui.js"></script><script>const ctx = "${ctx}";const id = "${id}";</script><script src="assets/modules/student/js/edit.js"></script>
</head>
<body>
<div><form id="student-form" action=""><div><label for="stuId">学号:</label><input type="text" id="stuId" name="stuId" autocomplete="off" placeholder="请输入学生学号"></div><div><label for="name">姓名:</label><input type="text" id="name" name="name" autocomplete="off" placeholder="请输入学生姓名"></div><div><label for="pinyin">拼音:</label><input type="text" id="pinyin" name="pinyin" autocomplete="off" placeholder="请输入学生拼音"></div><div><label for="male">性别:</label><input type="radio" id="male" name="sex" checked value="男"><label for="male">男</label><input type="radio" id="female" name="sex" value="女"><label for="female">女</label></div><div><label for="birthday">出生日期:</label><input type="text" id="birthday" name="birthday" autocomplete="off"placeholder="请输入学生出生日期" readonly></div><div><label for="phone">手机号:</label><input type="text" id="phone" name="phone" autocomplete="off" placeholder="请输入学生手机号"></div><div><label for="wechat">微信号:</label><input type="text" id="wechat" name="wechat" autocomplete="off" placeholder="请输入学生微信号"></div></form>
</div>
</body>
</html>
2、CSS进行修饰
edit.css:
body {padding: 8px;
}#student-form > div > label:first-child {display: inline-block;width: 100px;text-align: right;
}#student-form > div {margin-bottom: 8px;
}#student-form > div > input:not(#male,#female) {outline: none;border: 1px solid #ccc;width: 350px;padding: 10px 0 10px 8px;
}
3.添加新增页面的事件绑定以及页面的日期弹窗修饰:
事件绑定:添加属性id,然后通过js绑定事件出来
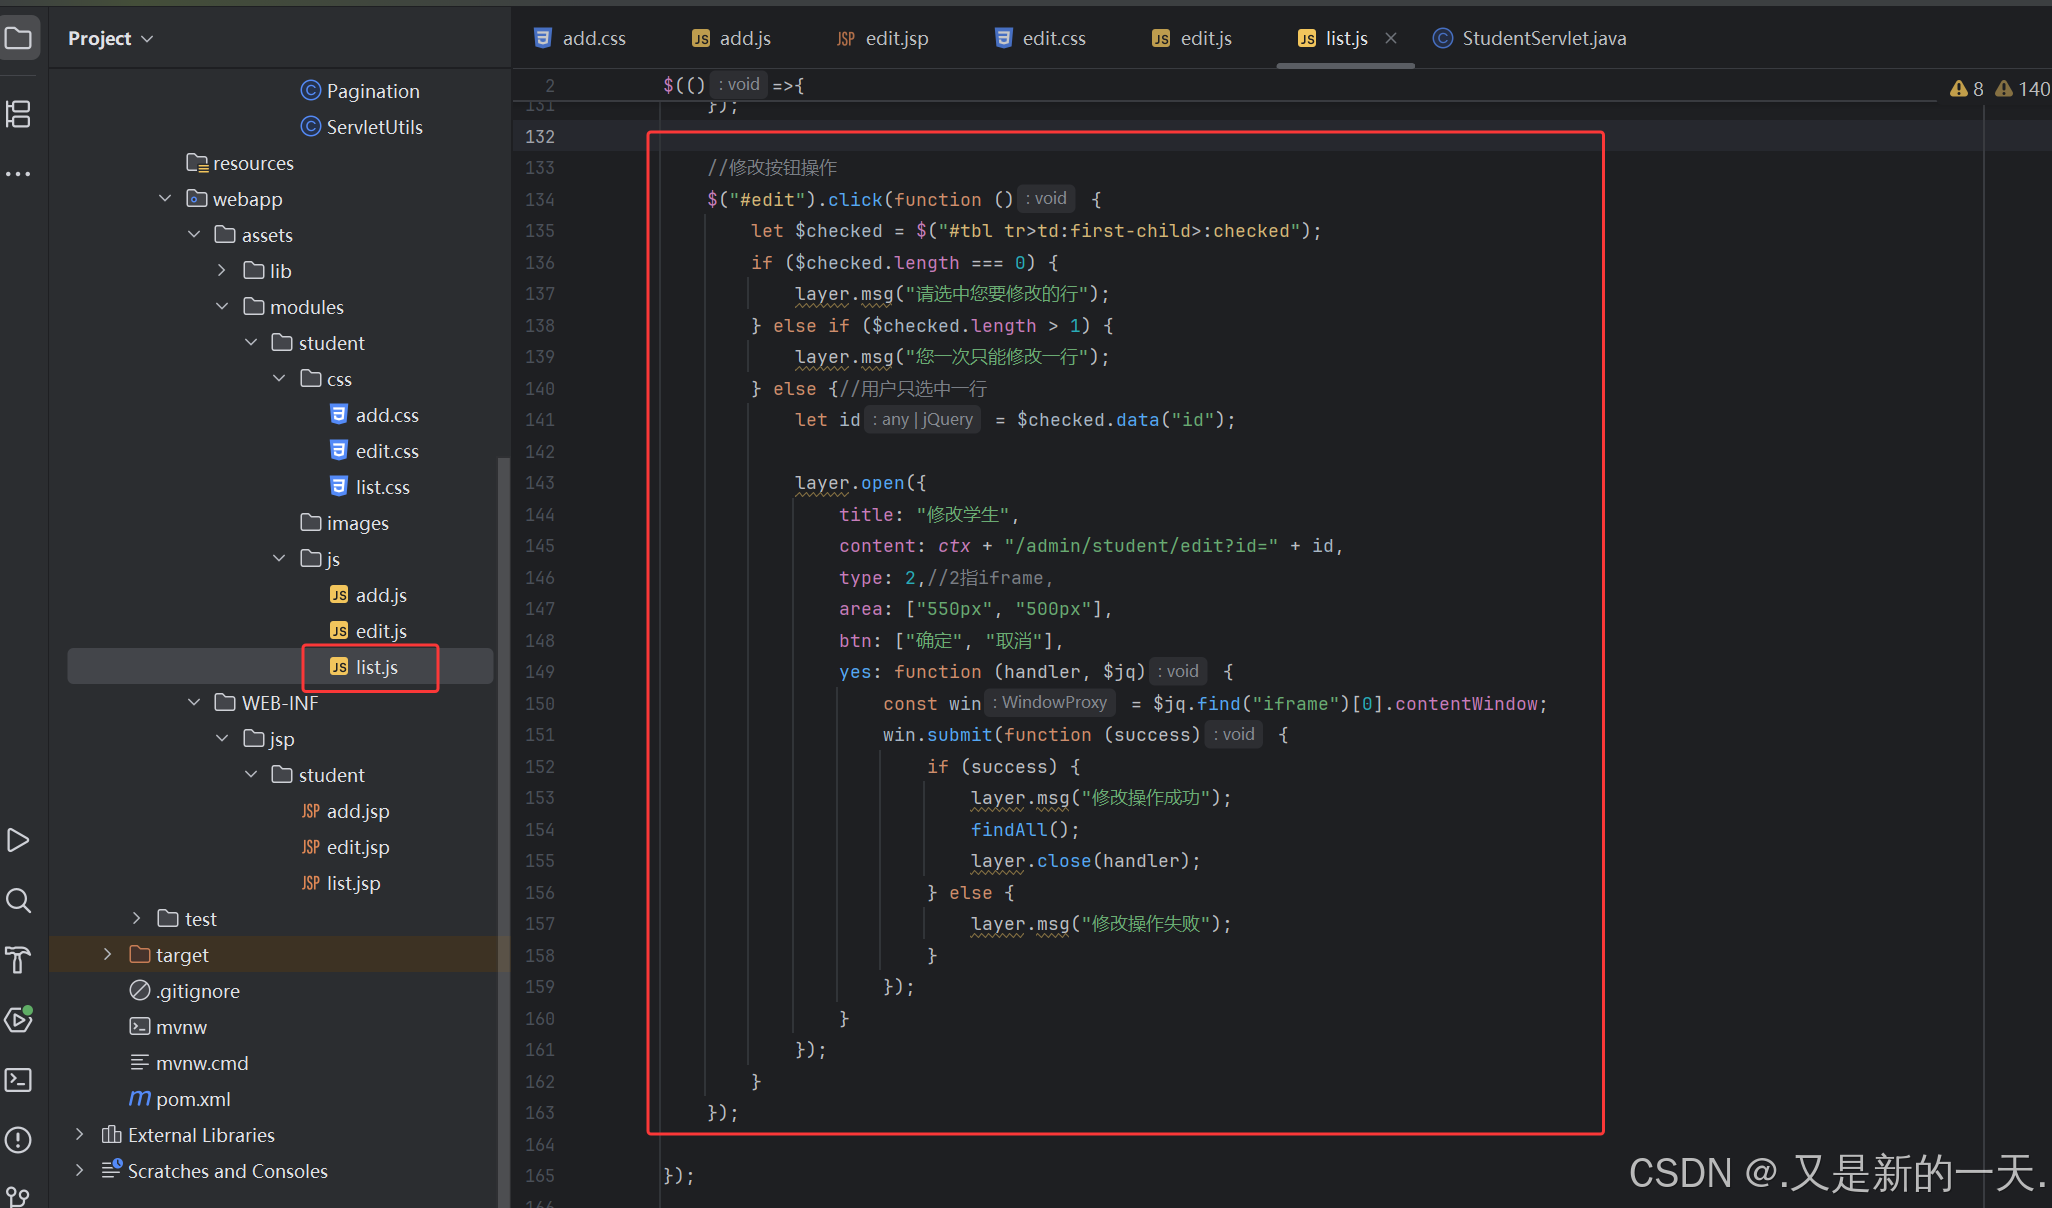
新增页面的事件绑定:list.js
//修改按钮操作$("#edit").click(function () {let $checked = $("#tbl tr>td:first-child>:checked");if ($checked.length === 0) {layer.msg("请选中您要修改的行");} else if ($checked.length > 1) {layer.msg("您一次只能修改一行");} else {//用户只选中一行let id = $checked.data("id");layer.open({title: "修改学生",content: ctx + "/admin/student/edit?id=" + id,type: 2,//2指iframe,area: ["550px", "500px"],btn: ["确定", "取消"],yes: function (handler, $jq) {const win = $jq.find("iframe")[0].contentWindow;win.submit(function (success) {if (success) {layer.msg("修改操作成功");findAll();layer.close(handler);} else {layer.msg("修改操作失败");}});}});}});
});
这个是渲染出生日期和往后传递参数的:edit.js
<%--按钮区--%>
<div class="action"><button type="button" id="add">新增</button><button type="button" id="edit">修改</button><button type="button" id="search">查询</button><button type="button" id="reset">重置</button><button type="button" id="del">删除</button>
</div>
$(() => {findById(id);//渲染出生日期layui.use(function () {const laydate = layui.laydate;laydate.render({elem: "#birthday",type: "date"});});
});//查询指定id的学生信息,这个部分是因为我们想修改的时候的弹窗中直接显示出来学生原本的信息。
function findById(id) {$.ajax({url: ctx + "/admin/student/id",method: "get",data: {id},success(resp) {const stu = resp.student;$("#stuId").val(stu.stuId);$("#name").val(stu.name);$("#birthday").val(stu.birthday);$("#phone").val(stu.phone);$("#wechat").val(stu.wechat);$("#pinyin").val(stu.pinyin);$(":radio[name=sex][value=" + stu.sex + "]").prop("checked", true);}});
}//修改
function submit(cb = $.noop) {let stuId = $("#stuId").val();let name = $("#name").val();let pinyin = $("#pinyin").val();let birthday = $("#birthday").val();let phone = $("#phone").val();let wechat = $("#wechat").val();let sex = $(":input[name=sex]:checked").val();//前端校验:js校验if (stuId.trim() === "") {layer.msg("学号不可为空");return;}if (name.trim() === "") {layer.msg("姓名不可为空");return;}let pat = /^\d{4}-\d{2}-\d{2}$/;if (!pat.test(birthday)) {layer.msg("出生日期格式不正确");return;}pat = /^\d{11}$/;if (!pat.test(phone)) {layer.msg("手机号格式不正确");return;}$.ajax({url: ctx + "/admin/student/edit",method: "post",data: {id,stuId,name,pinyin,birthday,phone,wechat,sex},success(resp) {cb(resp.success);}});
}

4.获取前端要修改的参数信息,校验,发送给后端
$(() => {findById(id);//渲染出生日期layui.use(function () {const laydate = layui.laydate;laydate.render({elem: "#birthday",type: "date"});});
});//查询指定id的学生信息
function findById(id) {$.ajax({url: ctx + "/admin/student/id",method: "get",data: {id},success(resp) {const stu = resp.student;$("#stuId").val(stu.stuId);$("#name").val(stu.name);$("#birthday").val(stu.birthday);$("#phone").val(stu.phone);$("#wechat").val(stu.wechat);$("#pinyin").val(stu.pinyin);$(":radio[name=sex][value=" + stu.sex + "]").prop("checked", true);}});
}//修改
function submit(cb = $.noop) {let stuId = $("#stuId").val();let name = $("#name").val();let pinyin = $("#pinyin").val();let birthday = $("#birthday").val();let phone = $("#phone").val();let wechat = $("#wechat").val();let sex = $(":input[name=sex]:checked").val();//前端校验:js校验if (stuId.trim() === "") {layer.msg("学号不可为空");return;}if (name.trim() === "") {layer.msg("姓名不可为空");return;}let pat = /^\d{4}-\d{2}-\d{2}$/;if (!pat.test(birthday)) {layer.msg("出生日期格式不正确");return;}pat = /^\d{11}$/;if (!pat.test(phone)) {layer.msg("手机号格式不正确");return;}$.ajax({url: ctx + "/admin/student/edit",method: "post",data: {id,stuId,name,pinyin,birthday,phone,wechat,sex},success(resp) {cb(resp.success);}});}
5.前端发送请求,后端就要响应:
AJAX发送的是post请求,所以在Servlet里面的调用post方法:
调用edit方法来实现:
//修改private void edit(HttpServletRequest req, HttpServletResponse resp) throws ServletException, IOException {String id = req.getParameter("id");String stuId = req.getParameter("stuId");String name = req.getParameter("name");String sex = req.getParameter("sex");String birthday = req.getParameter("birthday");String pinyin = req.getParameter("pinyin");String phone = req.getParameter("phone");String wechat = req.getParameter("wechat");Student student = new Student();student.setId(Integer.parseInt(id));if (!StringUtils.hasText(stuId)) {ServletUtils.renderJson(resp, Map.of("error", "学号不可为空"));return;}student.setStuId(stuId);student.setName(name);if (!sex.equals("男") && !sex.equals("女")) {ServletUtils.renderJson(resp, Map.of("error", "性别数据不合法"));return;}student.setSex(sex);try {LocalDate ld = LocalDate.parse(birthday, DateTimeFormatter.ofPattern("yyyy-MM-dd"));student.setBirthday(ld);} catch (Exception e) {ServletUtils.renderJson(resp, Map.of("error", "出生日期格式不正确"));return;}if (!phone.matches("^\\d{11}$")) {ServletUtils.renderJson(resp, Map.of("error", "手机号不正确"));return;}student.setPhone(phone);student.setPinyin(pinyin);student.setWechat(wechat);//调用业务类boolean success = studentService.update(student);ServletUtils.renderJson(resp, Map.of("success", success));}至此,完成了对AJAX请求的响应。然后AJAX将执行回调函数将结果返回给前端页面。
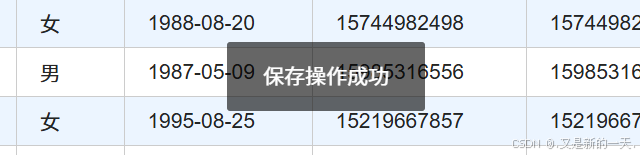
结果演示:

至此,增删改查功能已经实现。