注解退散!纯XML打造MyBatis持久层的终极形态

继上一篇文章讲解了如何使用注解来实现MyBatis的开发,本篇文章将讲解第二种方式——XML
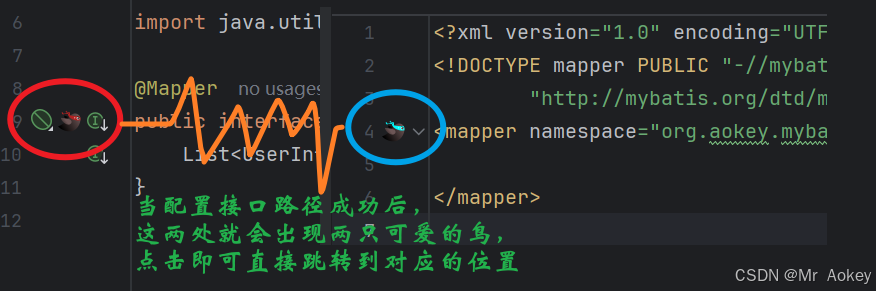
一、XML文件配置
在 resources/mapper 目录下配置 MyBatis XML 文件路径,并为所有数据表创建对应的 XML 映射文件
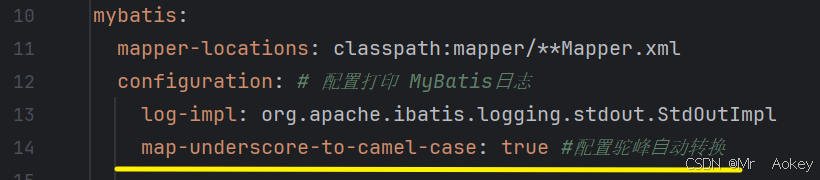
mybatis:mapper-locations: classpath:mapper/**Mapper.xml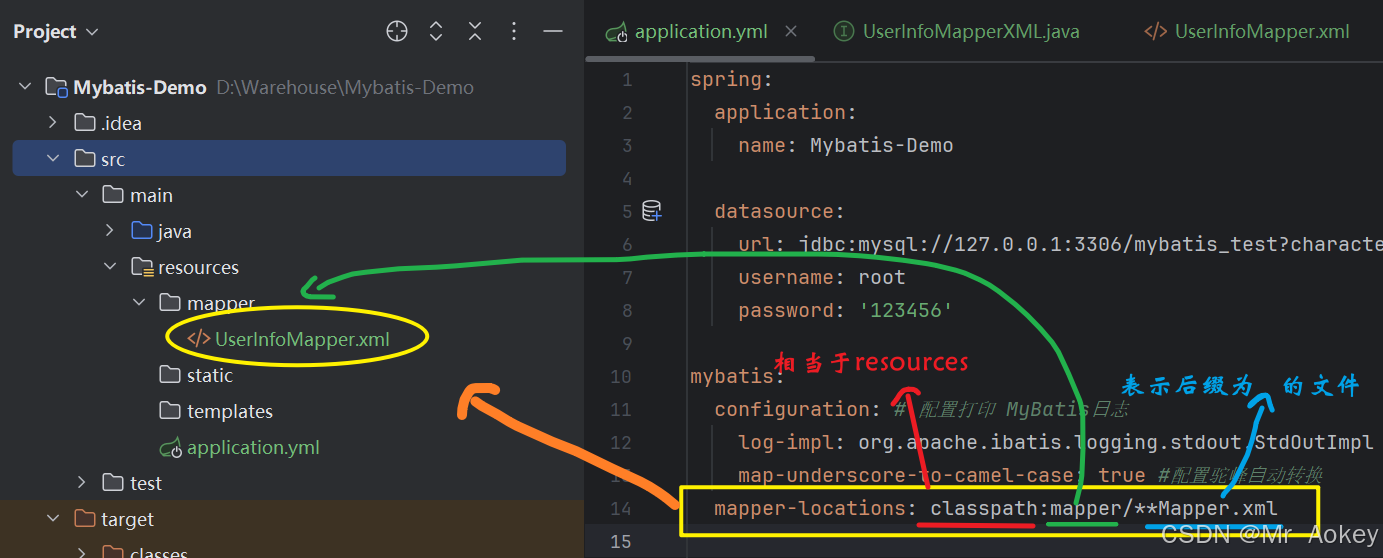
二、XML实现持久层代码
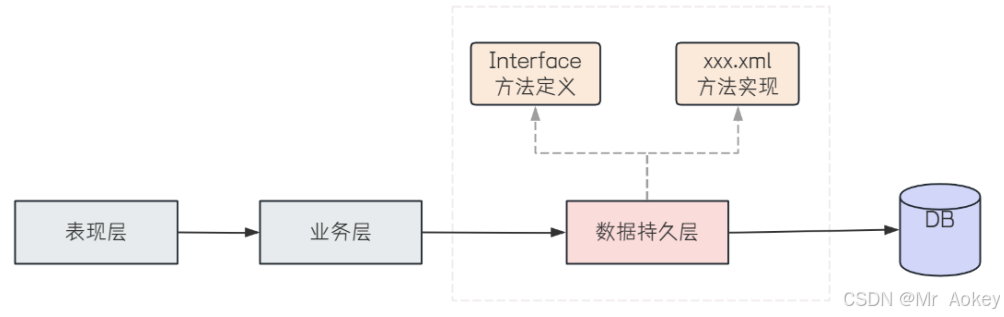
2.1、添加Mapper接口
我们先定义一个简单的接口,里面声明一个方法
@Mapper
public interface UserInfoMapperXML {List<UserInfo> selectAll();
}
2.2、实现UserInfoMapper.xml
2.2.1、配置标准模板
在XML文件中添加 MyBatis 的标准配置模板
<?xml version="1.0" encoding="UTF-8"?>
<!DOCTYPE mapper PUBLIC "-//mybatis.org//DTD Mapper 3.0//EN""http://mybatis.org/dtd/mybatis-3-mapper.dtd">
<mapper namespace="org.aokey.mybatisdemo.mapper.UserInfoMapperXML"></mapper>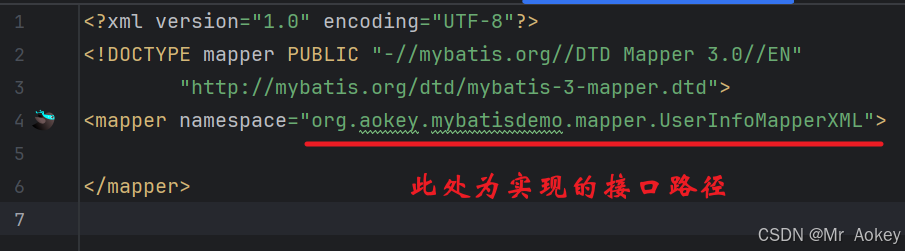
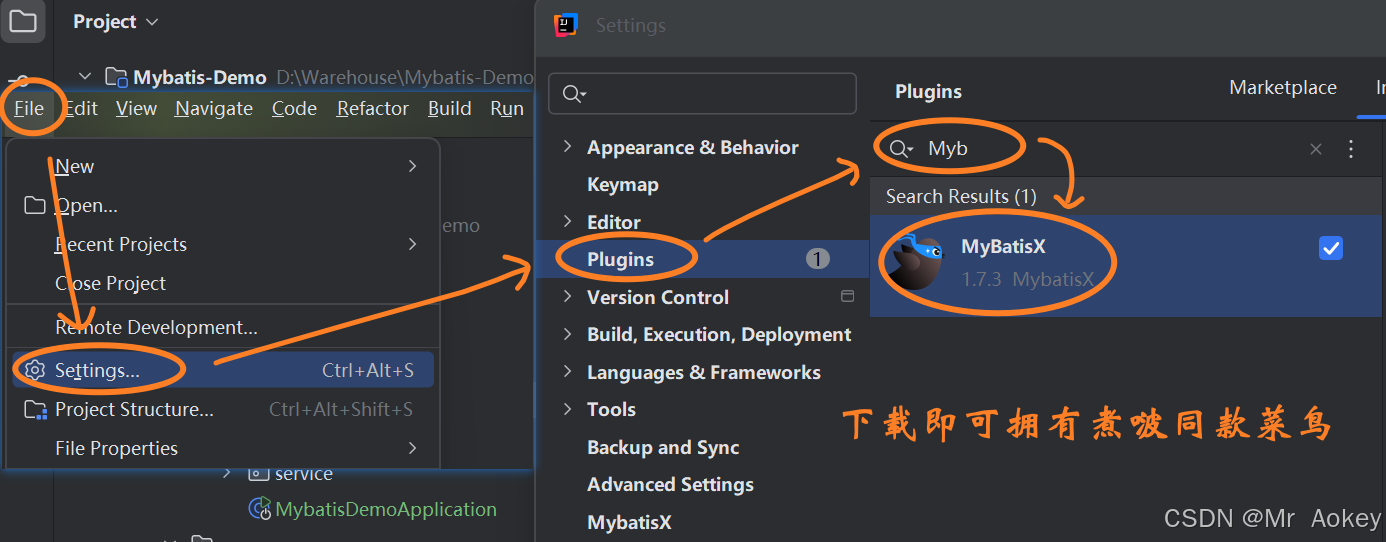
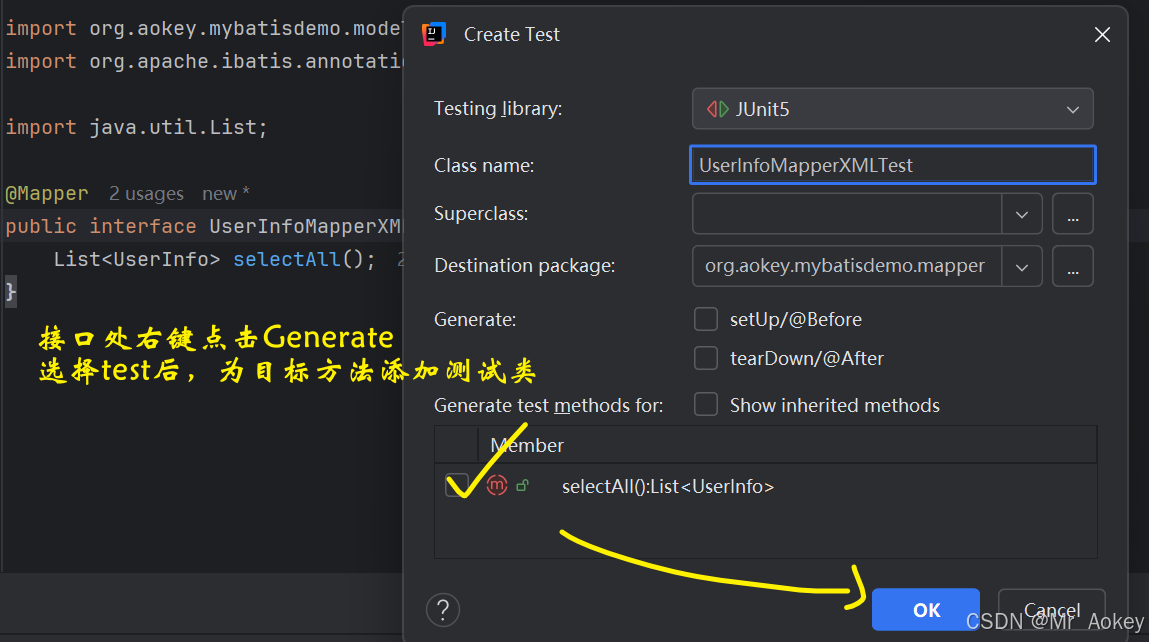
2.2.2、MybatisX 插件
当然,此功能并非IDEA自带的功能,而是需要插件才能生效,按照以下步骤:
2.3、单元测试
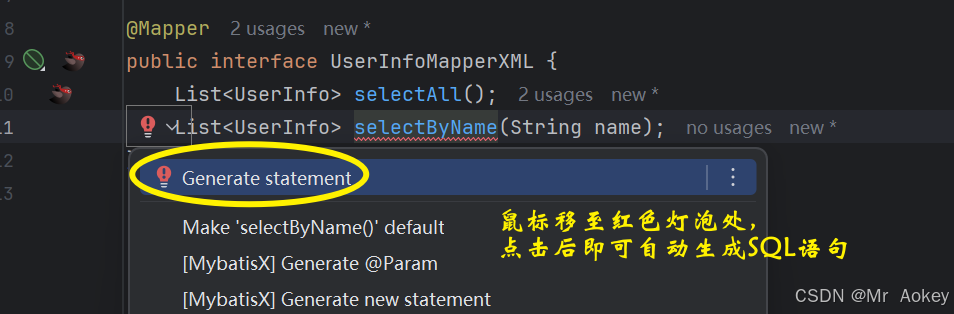
点击 Generate statement 后发现xml文件中多了 <select> 标签
<?xml version="1.0" encoding="UTF-8"?>
<!DOCTYPE mapper PUBLIC "-//mybatis.org//DTD Mapper 3.0//EN""http://mybatis.org/dtd/mybatis-3-mapper.dtd">
<mapper namespace="org.aokey.mybatisdemo.mapper.UserInfoMapperXML"><select id="selectAll" resultType="org.aokey.mybatisdemo.model.UserInfo">select * from user_info</select></mapper>
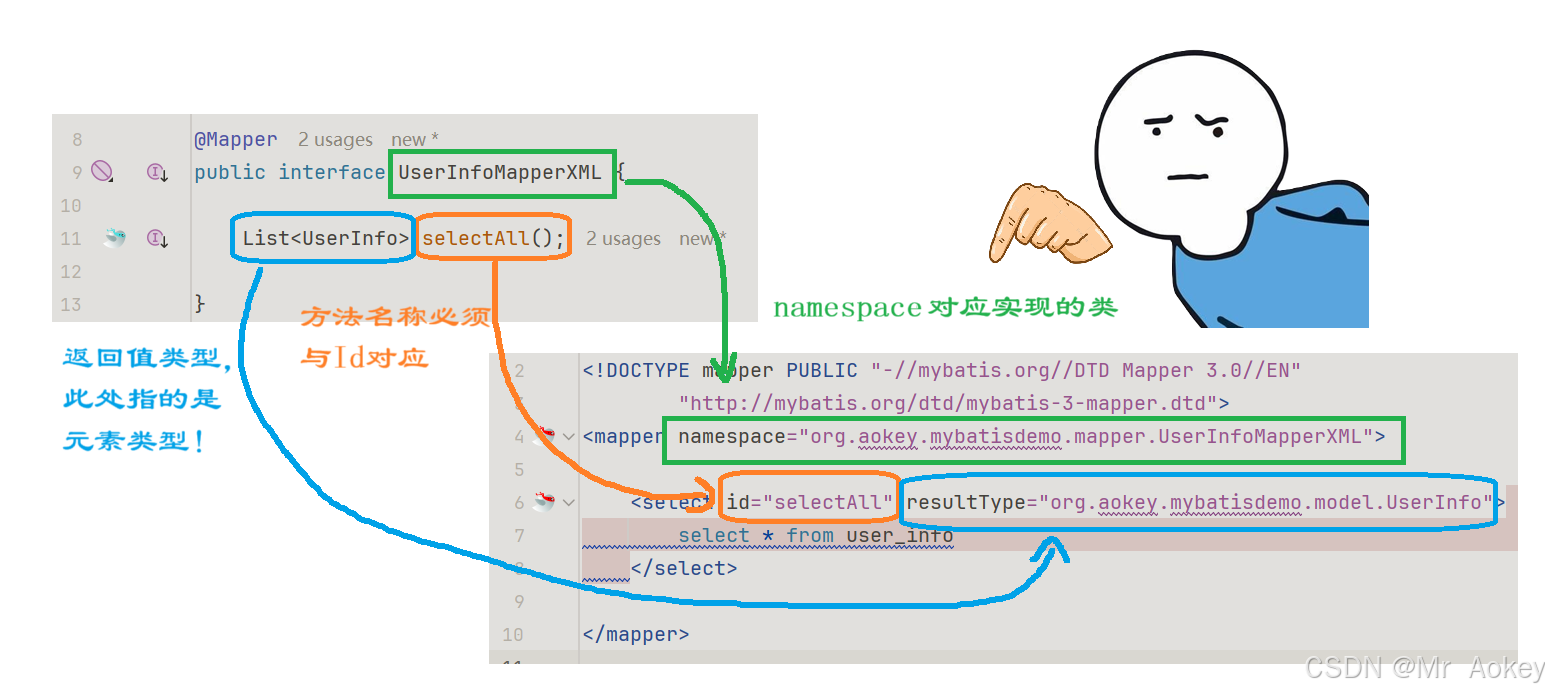
以下是对标签的详细说明:
mapper 标签:必须指定 namespace 属性,其值为对应 mapper 接口的全限定名(完整包名+类名)
查询标签:用于执行数据库查询操作,包含以下关键属性:
- Id :与接口中定义的方法名称一致,表示对该方法的具体实现
- resultType:指定返回结果的数据类型,通常为定义的实体类
然后在 <select> 标签之间写入目标SQL语句,返回接口处,如下自动生成测试类
@SpringBootTest
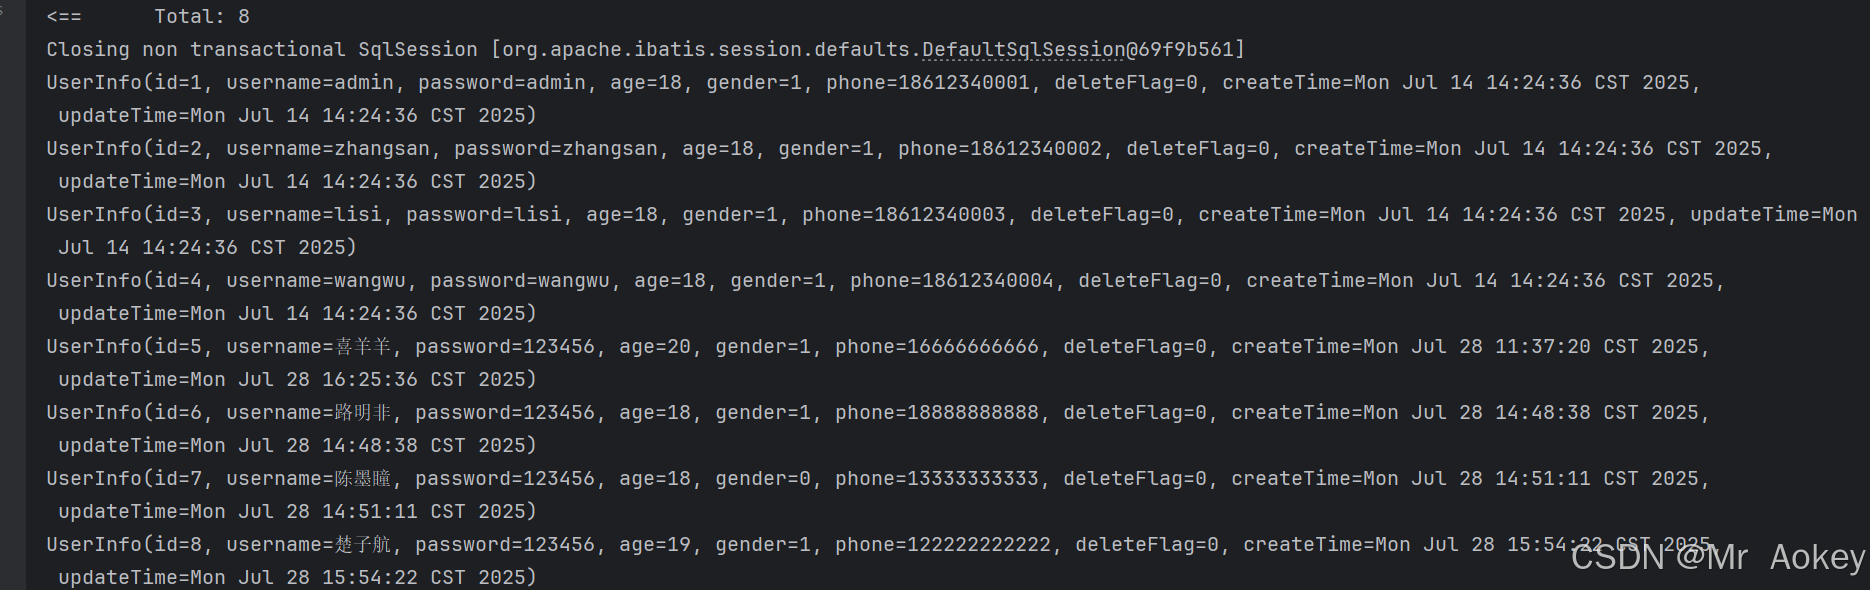
class UserInfoMapperXMLTest {@Autowiredprivate UserInfoMapperXML userInfoMapperXML;@Testvoid selectAll() {userInfoMapperXML.selectAll().stream().forEach(x->System.out.println(x));}
}运行后观察到,成功查询到所有用户信息
三、XML实现增删改查
3.1、增(insertr)
3.1.1、传参插入数据
继续在接口处添加插入方法
Integer insertUserInfo(UserInfo userInfo);
<insert id="insertUserInfo">insert into user_info (username, password, age, gender,phone) values(#{username},#{password},#{age},#{gender},#{phone})</insert>
@Testvoid insertUserInfo() {UserInfo userInfo=new UserInfo();userInfo.setId(9);userInfo.setUsername("灰太狼");userInfo.setPassword("123456");userInfo.setAge(18);userInfo.setGender(1);userInfo.setPhone("19999999999");userInfoMapperXML.insertUserInfo(userInfo);}观察运行结果:显示成功插入!

3.1.2、@Param注解
使用@Param设置参数名称时,其用法与注解类似,当参数为对象时,传入的属性应采用 对象.属性 的形式
<insert id="insertUser">insert into user_info (username, `password`, age, gender, phone) values(#{userInfo.username},#{userInfo.password},#{userInfo.age},#{userInfo.gender},#{userInfo.phone})</insert>3..1.3、返回自增 Id
保持接口定义不变,在 xml 中实现时设置 useGeneratedKeys 和 keyProperty 属性
<insert id="insertUser" useGeneratedKeys="true" keyProperty="id">insert into user_info (username, `password`, age, gender, phone) values(#{userInfo.username},#{userInfo.password},#{userInfo.age},#{userInfo.gender},#{userInfo.phone})</insert>3.2、删(delete)
Integer deleteUserInfo(Integer id);
<delete id="deleteUserInfo">delete from user_info where id = 10</delete>
3.3、改(update)
Integer updateUserInfo(UserInfo userInfo);
<update id="updateUserInfo">update user_info set phone = #{phone} where id = #{id}</update>
3.4、查(select)
同样地,采用XML格式进行查询也存在数据封装的问题,上述查询代码能够正常显示全部数据的原因是 yml 配置文件中配置了驼峰自动转换
当然除此之外,还有注解和起别名的方法(参考上一篇),Aokey已经测试过使用 as 关键字起别名方法对于 xml 同样适用,那么我们来使用第三种方法解决数据封装问题:
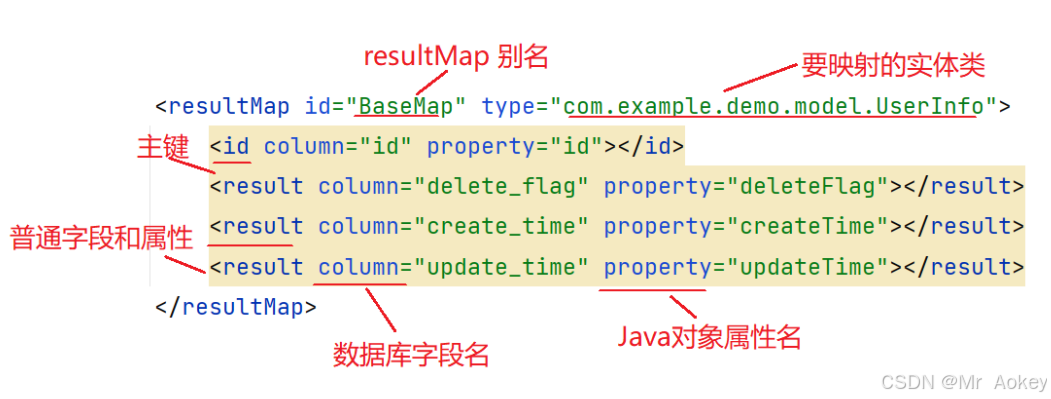
<resultMap id="BaseMap" type="org.aokey.mybatisdemo.model.UserInfo"><id column="id" property="id"></id><result column="delete_flag" property="deleteFlag"></result><result column="create_time" property="createTime"></result><result column="update_time" property="updateTime"></result></resultMap><select id="selectAll" resultMap="BaseMap">select id, username,`password`, age, gender, phone, delete_flag,create_time, update_time from user_info</select>只需在要执行的SQL标签中添加 resultMap 的 ID 即可
四、# { } 和 $ { }
4.1、传递 Interger 类型参数
我们在代码中大量使用了 # { } 进行变量插入赋值
<select id="selectByAge" resultType="org.aokey.mybatisdemo.model.UserInfo">select id, username,`password`, age, gender, phone from user_info where age = #{age}</select>
@Testvoid selectByAge() {List<UserInfo> userInfos = userInfoMapperXML.selectByAge(20);userInfos.stream().forEach(x->System.out.println(x));}查看运行结果:
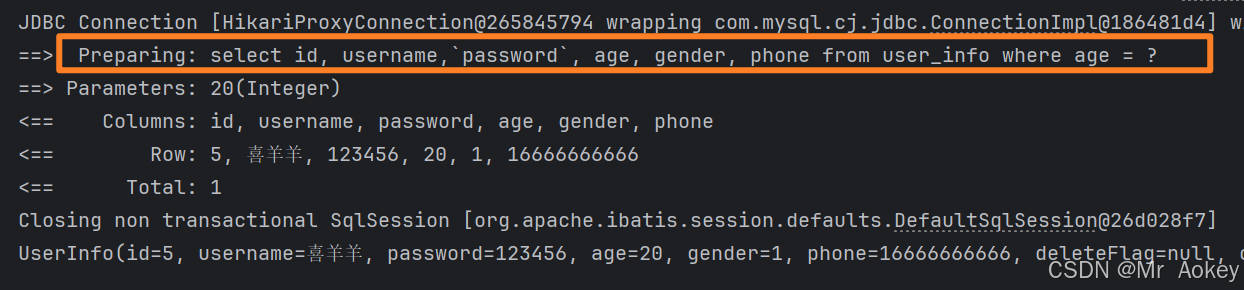
输入的参数并未直接拼接在后面,而是使用 " ? " 作为占位符来传递 id 值。这种SQL语句被称为 " 预编译SQL "
预编译SQL(Prepared Statement)是一种数据库操作技术,先将SQL语句模板发送到数据库服务器进行编译和优化,后续只需传递参数即可重复执行,无需重新解析SQL结构
我们修改 # { } 为 $ { } 后重新查看日志输出:
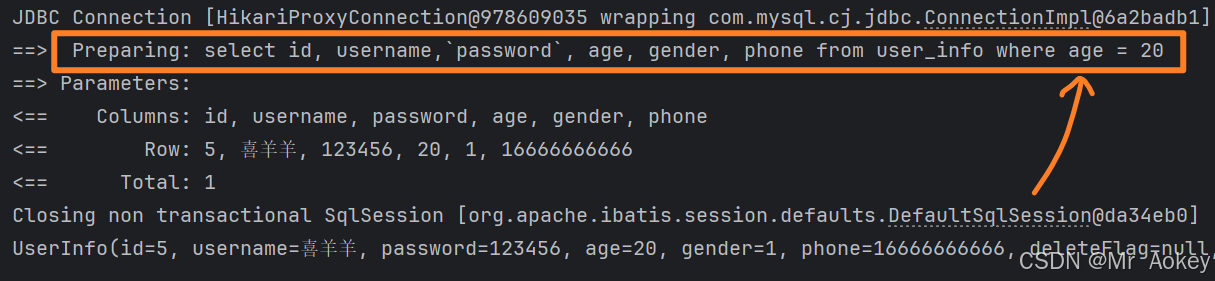
上图可观察到:输入参数直接拼接到SQL语句后面了
4.2、传递 String 类型的参数
<select id="selectByName" resultType="org.aokey.mybatisdemo.model.UserInfo">select id, username,`password`, age, gender, phone from user_infowhere username = #{username}</select>
完成控制台日志输出:
 我们修改 # { } 为 $ { } 后重新查看日志输出:
<select id="selectByName" resultType="org.aokey.mybatisdemo.model.UserInfo">select id, username,`password`, age, gender, phone from user_infowhere username = ${username}</select> 报错 :where中的子句喜羊羊在未知列;仔细观察可见,此处喜羊羊直接拼接在SQL语句后面,但是传递参数是字符串,而喜羊羊并未加引号,我们手动添加引号后再次查找:
<select id="selectByName" resultType="org.aokey.mybatisdemo.model.UserInfo">select id, username,`password`, age, gender, phone from user_info where username = "${username}"</select>查询结果显示成功,"喜羊羊"参数作为字符串类型被直接拼接到SQL语句中

从上述两个示例可以看出:
# { } 采用预编译 SQL 的方式,通过 ? 占位符提前对 SQL 进行编译,再将参数填充到语句中。它会根据参数类型自动添加引号 ''
$ { } 会直接进行字符串替换,与 SQL 一起编译。如果参数是字符串类型,需要添加引号 ''
4.3、# { } 和 $ { } 的区别
# { } 和 $ { } 的区别就是 预编译SQL 和 即时SQL 的区别
4.3.1、性能
通常情况下,同一条SQL语句往往会被重复执行,或者每次执行时仅参数值有所不同。如果每次都要完整经历语法解析、SQL优化和编译过程,执行效率就会明显降低
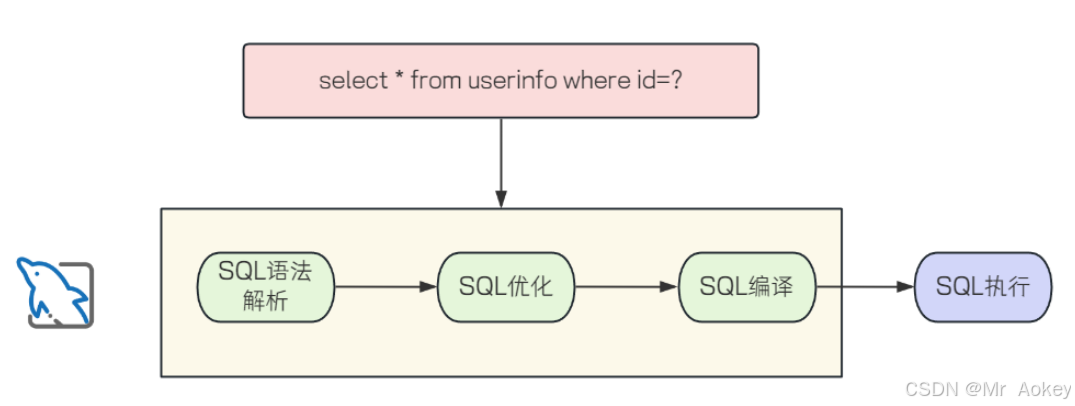
预编译SQL会将编译后的语句缓存起来,当后续执行相同SQL时(仅参数不同),无需重复编译。这种方式避免了重复解析和优化过程,从而显著提高了执行效率
4.3.2、SQL注入问题
SQL注入:通过篡改输入数据来修改预定义的SQL语句,从而实现恶意代码执行并攻击服务器的技术手段(由于未对用户输入进行有效验证,同时采用字符串拼接方式构造SQL语句,攻击者可在输入参数中嵌入SQL关键字,从而篡改SQL执行逻辑,实现恶意攻击目的 )
正常访问:
@Testvoid selectByName() {UserInfo userInfo=userInfoMapperXML.selectByName("喜羊羊");System.out.println(userInfo);}
<select id="selectByName" resultType="org.aokey.mybatisdemo.model.UserInfo">select id, username,`password`, age, gender, phone from user_infowhere username = '${username}'</select>访问结果:

SQL注入场景:
@Testvoid selectByName() {List<UserInfo> userInfo=userInfoMapperXML.selectByName("' or 1 = '1");userInfo.stream().forEach(x->System.out.println(x));}访问结果:

从查询结果可以看出,当前获取的数据与预期不符,因此,建议在查询字段中使用 # { } 预编译方式(若使用 $ { } 时参数加上单引号,或者加上参数校验,另外SQL注入问题并非使用 $ { } 就一定会出现,只是有可能)
4.4、排序功能
日常生活中,我们在淘宝、京东或者拼多多等网站购买一颗给商品时,最注重的问题无非是价格和质量,我们搜索一件商品后, 通过会点击价格或者销量排序,此功能就是 $ { } 实现的应用场景

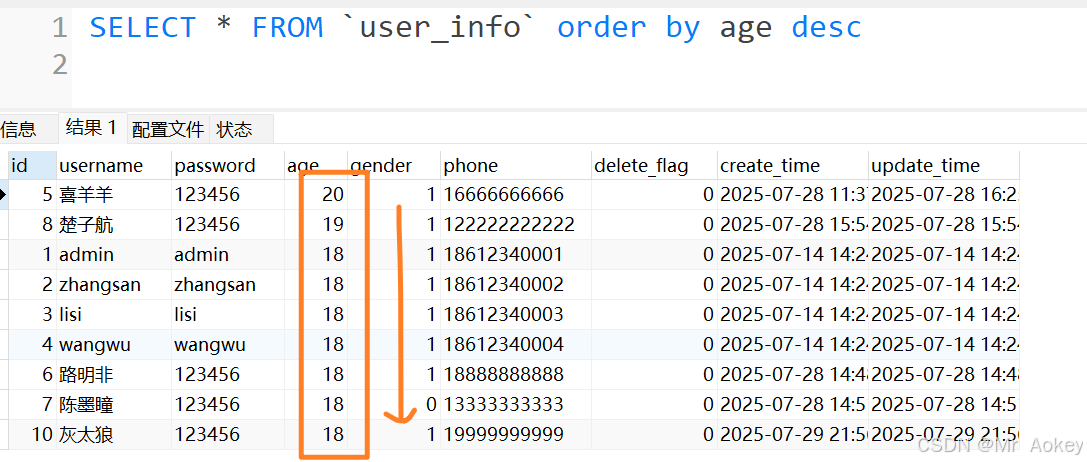
我们对用户表进行排序:
我们在代码中进行实现:
<select id="selectByOrder" resultType="org.aokey.mybatisdemo.model.UserInfo">SELECT * FROM `user_info` order by age #{order}</select>
//测试代码@Testvoid selectByOrder() {userInfoMapperXML.selectByOrder("desc").stream().forEach(x->System.out.println(x));}//接口处代码List<UserInfo> selectByOrder(String order);观察控制台输出日志:
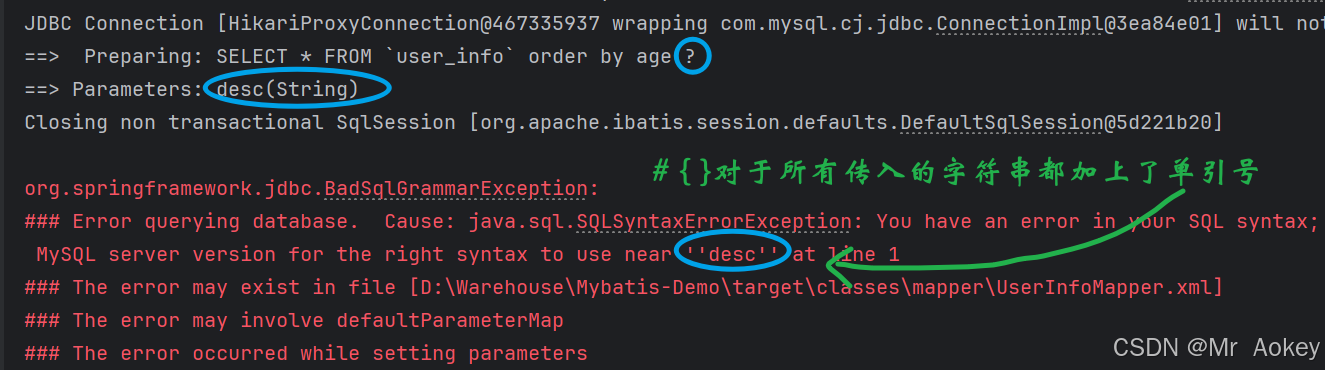
而在MySQL中排序时 DESC(降序) 和 ASC(升序)这两个关键词是不加单引号的,否则会报错,这时 $ { } 不加引号的机制就能应用在此场景了,观察查询结果:
<select id="selectByOrder" resultType="org.aokey.mybatisdemo.model.UserInfo">SELECT * FROM `user_info` order by age ${order}</select> 注意:除排序功能外,若把表名作为参数,也必须使用 $ { }
4.5、like 查询
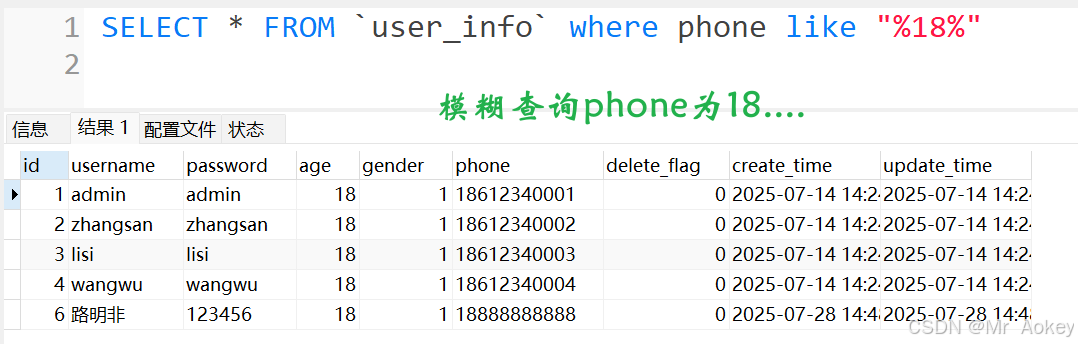
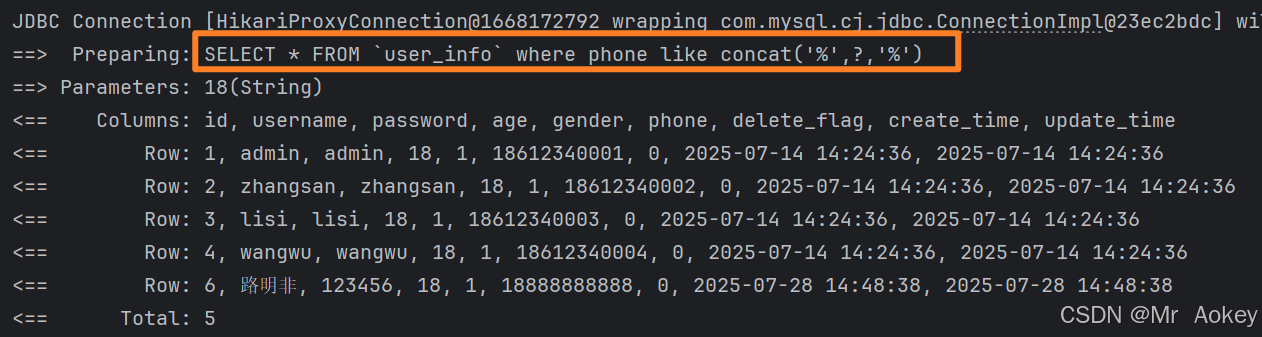
//测试用例@Testvoid selectByLike() {userInfoMapperXML.selectByLike("18").stream().forEach(x->System.out.println(x));}//接口处List<UserInfo> selectByLike(String likes);
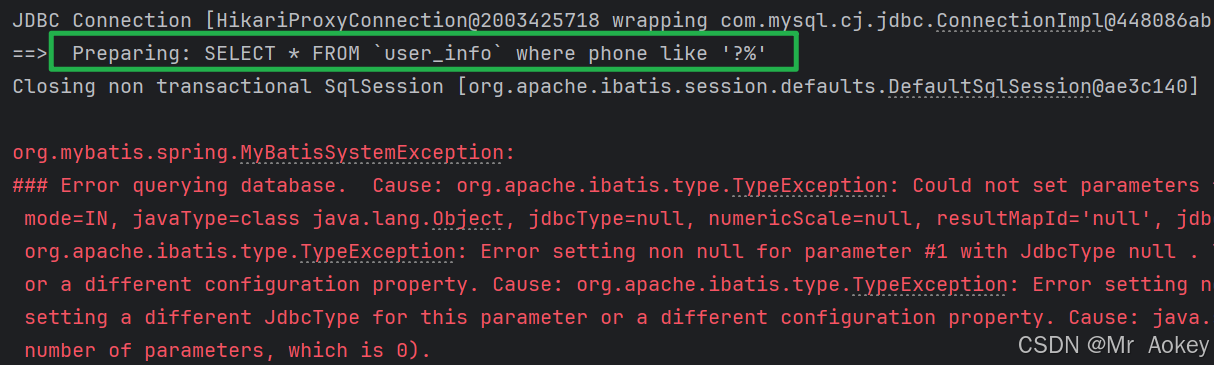
<select id="selectByLike" resultType="org.aokey.mybatisdemo.model.UserInfo">SELECT * FROM `user_info` where phone like '#{likes}%'</select>观察控制台输出日志:
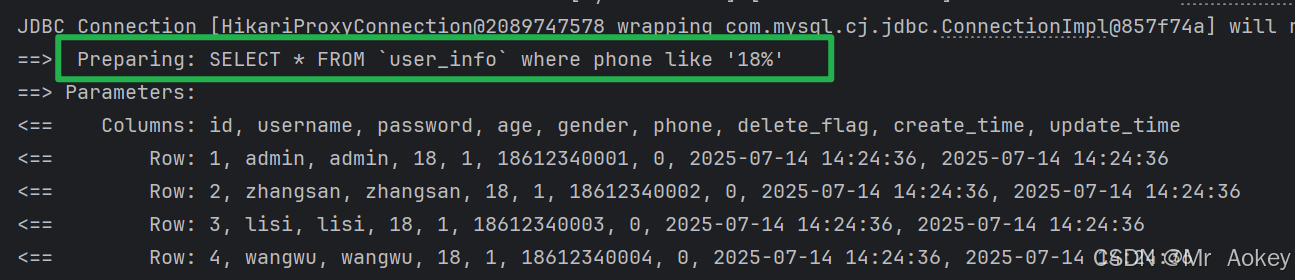
更改为:$ { } 再次观察输出结果
MySQL 的 CONCAT() 函数 用于将两个或多个字符串连接成一个字符串;支持任意数量的参数,若参数中包含 Null,则返回结果为 Null
解决方法:利用 MySQL 内置的 CONCAT() 函数进行处理,具体实现代码如下:
<select id="selectByLike" resultType="org.aokey.mybatisdemo.model.UserInfo">SELECT * FROM `user_info` where phone like concat('%',#{likes},'%')</select>