DeepSeek笔记(三):结合Flask实现以WEB方式访问本地部署的DeepSeek-R1模型
经过硬件升级改造,将显卡升级GeForce RTX 5090,按照前两篇关于DeepSeek笔记,重新搭建了DeepSeek-R1:32b模型。为了后续能通过多终端通过URL访问使用本地的DeepSeek模型,结合Python+Flask+Ollama+DeepSeek-R1:32b模型构建一个Web服务。其原理如下所示:
一、安装必要的库
1.关于Ollama库
在DeepSeek笔记一中安装成功后,可以不需要安装Ollama库。如果不放心,也可以执行下列指令:
pip install ollama
2.安装Flask库
运行cmd,启动控制台中,在控制台执行下列命令:
pip install flask
二、使用Ollama库访问本地部署的DeepSeek-R1模型
新建一个Python文件,代码如下:
"""利用Ollama封装来调用
"""
from ollama import chat
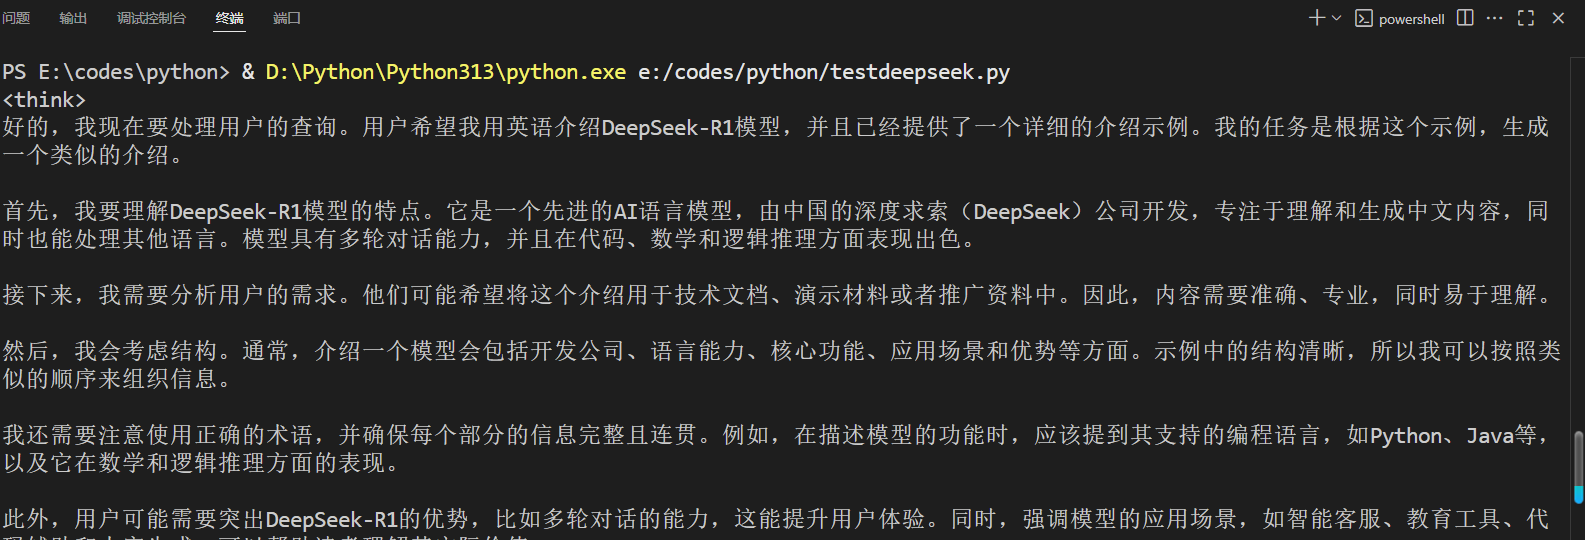
from ollama import ChatResponsedef getFrmOllama(content:str):"""通过Ollama封装调用Args:content (str): _消息_"""print("client")response:ChatResponse = chat(model="deepseek-r1:32b",messages=[{"role":"user","content":f"{content}"}],)print(response['message']['content'])print(response.message.content)if __name__ =="__main__":getFrmOllama("请用英语介绍DeepSeek-R1模型,谢谢!")
测试上述程序,运行结果是:
三、利用Flask生成简单访问DeepSeek-R1模型的Web服务
1.搭建简单的WEB服务
Flask框架可以快速搭建简单的WEB服务。在这里,将搭建一个访问DeepSeek-R1模型的Web简单应用,响应的结果为json数据。代码如下:
"""结合Ollama和flask生成访问DeepSeek模型的api接口
"""from flask import Flask,request,jsonify
from ollama import chat,ChatResponseapp = Flask("__main__")def getFrmOllama(content:str):"""表示从Args:content (str): 表示发送给DeepSeek模型的文本’"""response:ChatResponse = chat(model = "deepseek-r1:32b",messages=[{"role":"user","content":f"{content}"}])result ={"content":f"{content}","response":f"{response.message.content}"}return result@app.route("/result/<string:content>",methods=["GET","POST"])
def getResult(content):"""表示相应的结果Args:content (_type_): _发出咨询的消息_"""response = getFrmOllama(content)return jsonify(response)if __name__ == "__main__":app.run()
运行上述代码,Flask顺利启动,但是在浏览器却显示500错误,表示服务器出现内部问题。注意到访问本地部署的DeepSeek-R1模型,响应时间比较久,估计是因为这个原因导致服务出现500错误。因此考虑使用简单的协程方式来处理。将上述的代码修改为如下形式:
"""结合Ollama和flask生成访问DeepSeek模型的api接口
"""from flask import Flask,request,jsonify
from ollama import chat,ChatResponseapp = Flask("__main__")async def getFrmOllama(content:str):"""表示从Args:content (str): 表示发送给DeepSeek模型的文本’"""response:ChatResponse = chat(model = "deepseek-r1:32b",messages=[{"role":"user","content":f"{content}"}])result ={"content":f"{content}","response":f"{response.message.content}"}return result@app.route("/result/<string:content>",methods=["GET","POST"])
def getResult(content):"""表示相应的结果Args:content (_type_): _发出咨询的消息_"""response = asyncio.run(getFrmOllama(content))return jsonify(response)if __name__ == "__main__":app.run()
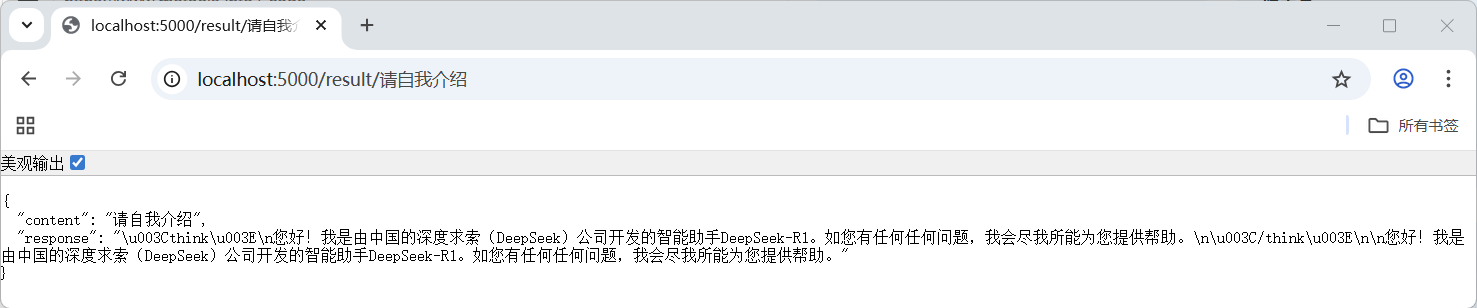
然后启动Flask服务,这时运行结果类似下图所示:
2.在服务中关闭DeepSeek的思考的代码处理
从上述运行结果可以发现,response的信息包括了DeepSeek-R1模型思考的过程,有时并不希望出现思考信息,需要关闭DeepSeek的思考。
# -*- coding:utf-8 -*-"""结合Ollama和flask生成访问DeepSeek模型的api接口
"""from flask import Flask,request,jsonify
from ollama import chat,ChatResponseimport asyncioapp = Flask("__main__")async def getFrmOllama(content:str,think:bool):"""表示从Args:content (str): 表示发送给DeepSeek模型的文本’"""response:ChatResponse = chat(model = "deepseek-r1:32b",messages=[{"role":"user","content":f"{content}"}],think = think)result ={"content":f"{content}","response":f"{response.message.content}"}return result@app.route("/result/<string:content>",methods=["GET","POST"])
def getResult(content):"""表示相应的结果Args:content (_type_): _发出咨询的消息_"""response = asyncio.run(getFrmOllama(content,True))return jsonify(response)@app.route("/resultnothink/<string:content>",methods=["GET","POST"])
def getResultWithoutThink(content):"""表示相应的结果Args:content (_type_): _发出咨询的消息_"""response = asyncio.run(getFrmOllama(content,False))return jsonify(response)if __name__ == "__main__":app.run()
针对上述代码修改如下几处:
- 修改getFrmOllama函数,增加一个think参数,参数类型为bool,当think取值为True,表示可以思考,当取值为False,表示关闭思考;
- 真实启动或关闭DeepSeek-R1模型的思考过程,是通过设置ollama.chat()函数的think参数来实现的;
- 分别定义getResult函数和getResultWithoutThink函数处理两种不同情况:启动思考和关闭思考;
运行上述修改后代码,测试关闭思考过程,运行结果如下所示:
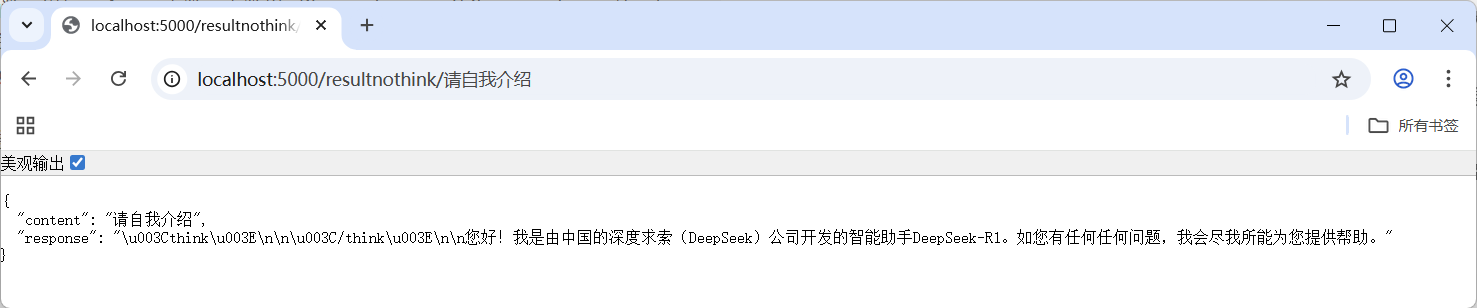
从运行结果可以发现,思考过程的确没有出现。