微服务的编程测评系统8-题库管理-竞赛管理
提示:文章写完后,目录可以自动生成,如何生成可参考右边的帮助文档
文章目录
- 前言
- 1. 添加题目
- 1.1 service方法
- 1.2 画页面-引入富文本和代码编辑框
- 1.3 子组件中发送请求
- 2. 获取题目详情
- 3. 编辑题目
- 4. 删除题目
- 5. Vue生命周期函数
- 5.1 创建阶段
- 5.2 挂载阶段
- 5.3 更新阶段
- 5.4 卸载阶段
- 6. 竞赛管理
- 6.1 表结构设计
- 7. 竞赛列表功能
- 7.1 后端开发
- 7.2 前端开发
- 总结
前言
1. 添加题目
1.1 service方法
先在question.js里面添加方法
export function addQuestionService(params = {}) {return service({url: "/question/add",method: "post",data: params,});
}export function getQuestionDetailService(questionId) {return service({url: "/question/detail",method: "get",params: { questionId },});
}export function editQuestionService(params = {}) {return service({url: "/question/edit",method: "put",data: params,});
}export function delQuestionService(questionId) {return service({url: "/question/delete",method: "delete",params: { questionId },});
}
1.2 画页面-引入富文本和代码编辑框
npm install @vueup/vue-quill@1.2.0
这个是富文本的
npm install ace-builds@1.4.13
这个是代码编辑框
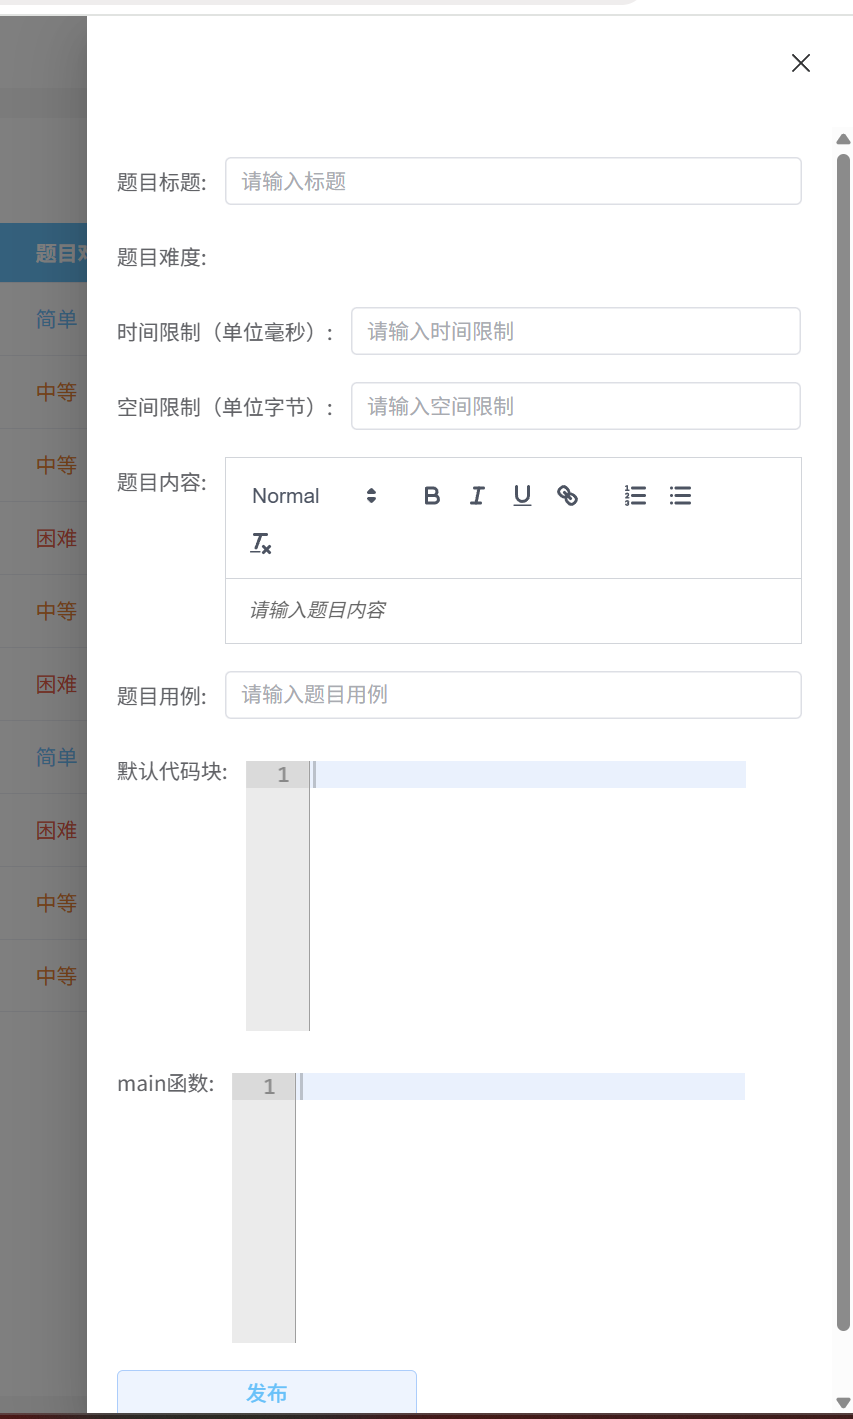
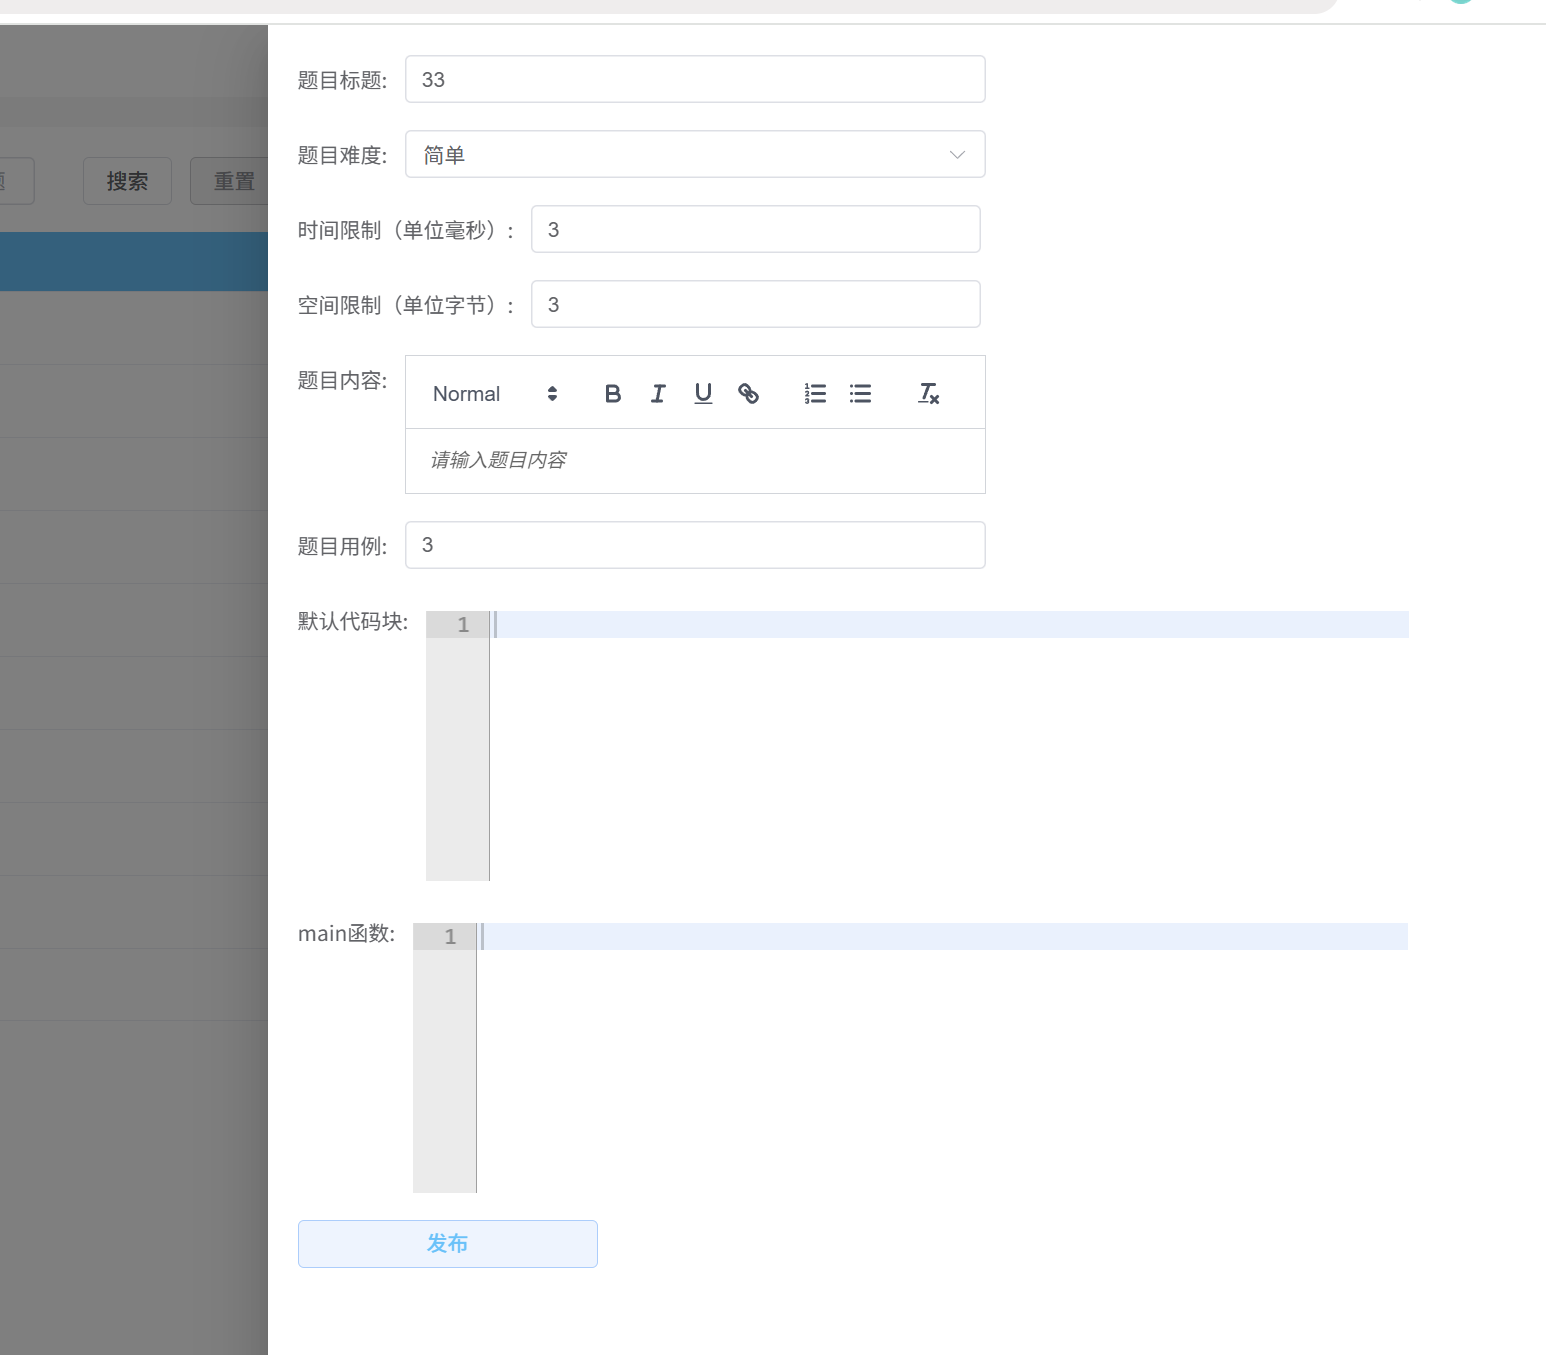
添加题目的前端我们可以提取为一个组件QuestionDrawer.vue
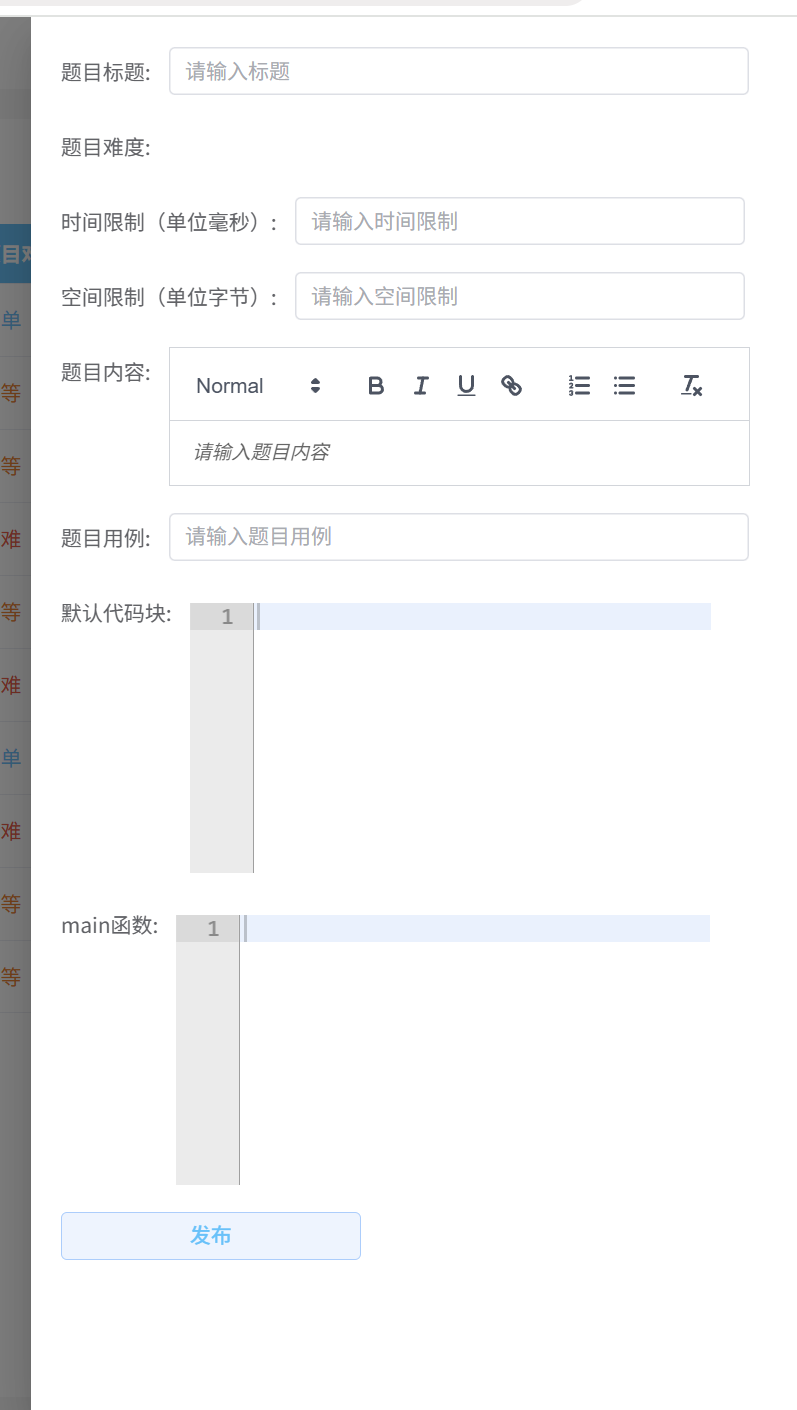
<template><el-drawer><el-form :model="formModel" ref="formRef"><el-form-item label="题⽬标题:"><el-input style="width:387px !important" v-model="formQuestion.title" placeholder="请输⼊标题"></el-input></el-form-item><el-form-item label="题⽬难度:"><selector style="width:387px !important" vmodel="formQuestion.difficulty" width="100%"placeholder="请选择题⽬难度"></selector></el-form-item><el-form-item label="时间限制(单位毫秒):"><el-input style="width:300px !important" vmodel="formQuestion.timeLimit"placeholder="请输⼊时间限制"></el-input></el-form-item><el-form-item label="空间限制(单位字节):"><el-input style="width:300px !important" vmodel="formQuestion.spaceLimit"placeholder="请输⼊空间限制"></el-input></el-form-item><el-form-item label="题⽬内容:"><div class="editor"><quill-editor placeholder="请输⼊题⽬内容" v-model:content="formQuestion.content"></quill-editor></div></el-form-item><el-form-item label="题⽬⽤例:"><el-input style="width:387px !important" vmodel="formQuestion.questionCase"placeholder="请输⼊题⽬⽤例"></el-input></el-form-item><el-form-item label="默认代码块:"><code-editor ref="addcodeform" :defaultCode="formQuestion.defaultCode"@update:value="handleEditorContent"></code-editor></el-form-item><el-form-item label="main函数:"><code-editor ref="addcodeform" :defaultCode="formQuestion.mainFuc"@update:value="handleEditorMainFunc"></code-editor></el-form-item><el-form-item><el-button class="question-button" type="primary" plain @click="onSubmit()">发布</el-button></el-form-item></el-form></el-drawer>
</template>
<script setup>
</script>
<style lang="scss">
.question-button {width: 200px;
}
</style>
el-drawer是抽屉
<div class="editor"><quill-editor placeholder="请输⼊题⽬内容" v-model:content="formQuestion.content"></quill-editor></div>
这个是富文本编辑器组件
<code-editor ref="addcodeform" :defaultCode="formQuestion.defaultCode"@update:value="handleEditorContent"></code-editor>
这个是代码编辑器
import { QuillEditor } from '@vueup/vue-quill';
import '@vueup/vue-quill/dist/vue-quill.snow.css'
富文本编辑器引入就可以直接用了
代码编辑器还有配置才可以使用
再次给代码编辑器创建一个子组件CodeEditor.vue
<template><div ref="editorform" class="ace-editor"></div>
</template>
<script setup>
import { ref, onMounted, onBeforeUnmount } from "vue"
import ace from "ace-builds"
import "ace-builds/src-noconflict/mode-java"
import "ace-builds/src-noconflict/theme-eclipse"
import "ace-builds/src-noconflict/ext-language_tools";
// 定义选项
const options = {theme: `ace/theme/eclipse`,mode: `ace/mode/java`,maxLines: 20,minLines: 10,fontSize: 15,
};
// 创建响应式引⽤
let editor = null;
const emit = defineEmits(['update:value']);
const editorform = ref(null);
// 初始化编辑器
onMounted(() => {editor = ace.edit(editorform.value, options);editor.setOptions({enableBasicAutocompletion: true,});editor.getSession().on('change', () => {// 当编辑器内容变化时,触发⾃定义事件并传递编辑器的内容emit('update:value', editor.getValue());});
});
// 销毁编辑器实例
onBeforeUnmount(() => {if (editor) {editor.destroy();editor = null;}
});
</script>
<style lang="scss" scoped>
.ace-editor {margin: 10px 0 0 0;width: 90%;
}
</style>
import CodeEditor from './CodeEditor.vue';
然后再question.vue中引入抽屉
import QuestionDrawer from "@/components/QuestionDrawer.vue";
    <el-drawer v-model="visibleDrawer">
const visibleDrawer = ref(true);
const formQuestion = reactive({title: '',difficulty: '',timeLimit: '',spaceLimit: '',content: '',questionCase: '',defaultCode: '',mainFuc: '',
});
因为都是let属性的,所以可以这样写,都写成字符串类型,前端的类型是可以自动变化的
最上边的空白是抽屉的titel
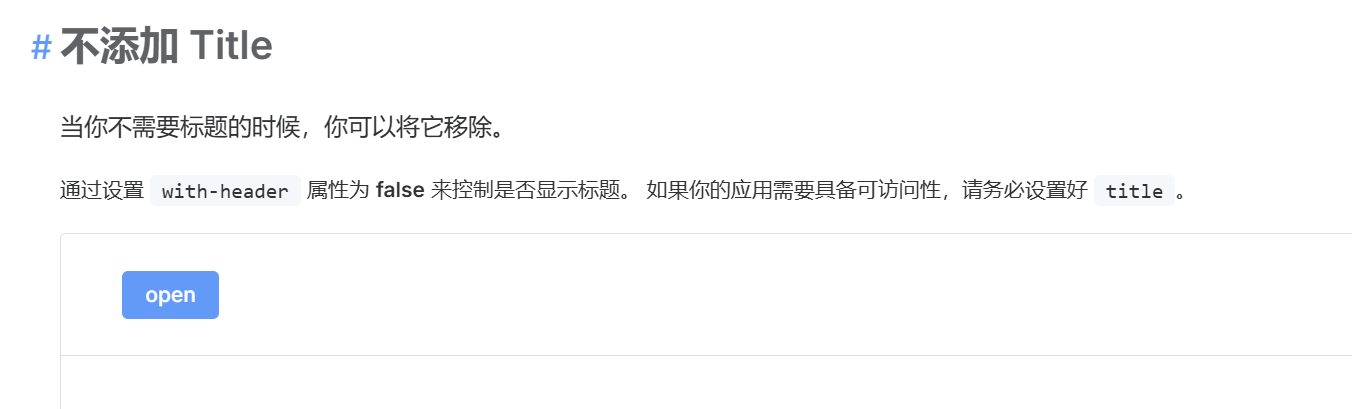
<el-drawer v-model="visibleDrawer" :with-header="false">
然后是题目难度的引入
<QuestionSelector style="width:387px !important" v-model="formQuestion.difficulty" width="100%"placeholder="请选择题⽬难度"></QuestionSelector>
import QuestionSelector from './QuestionSelector.vue';
或者
<QuestionSelector style="width:387px !important" v-model="formQuestion.difficulty" width="100%"placeholder="请选择题⽬难度"></QuestionSelector>
都是可以的
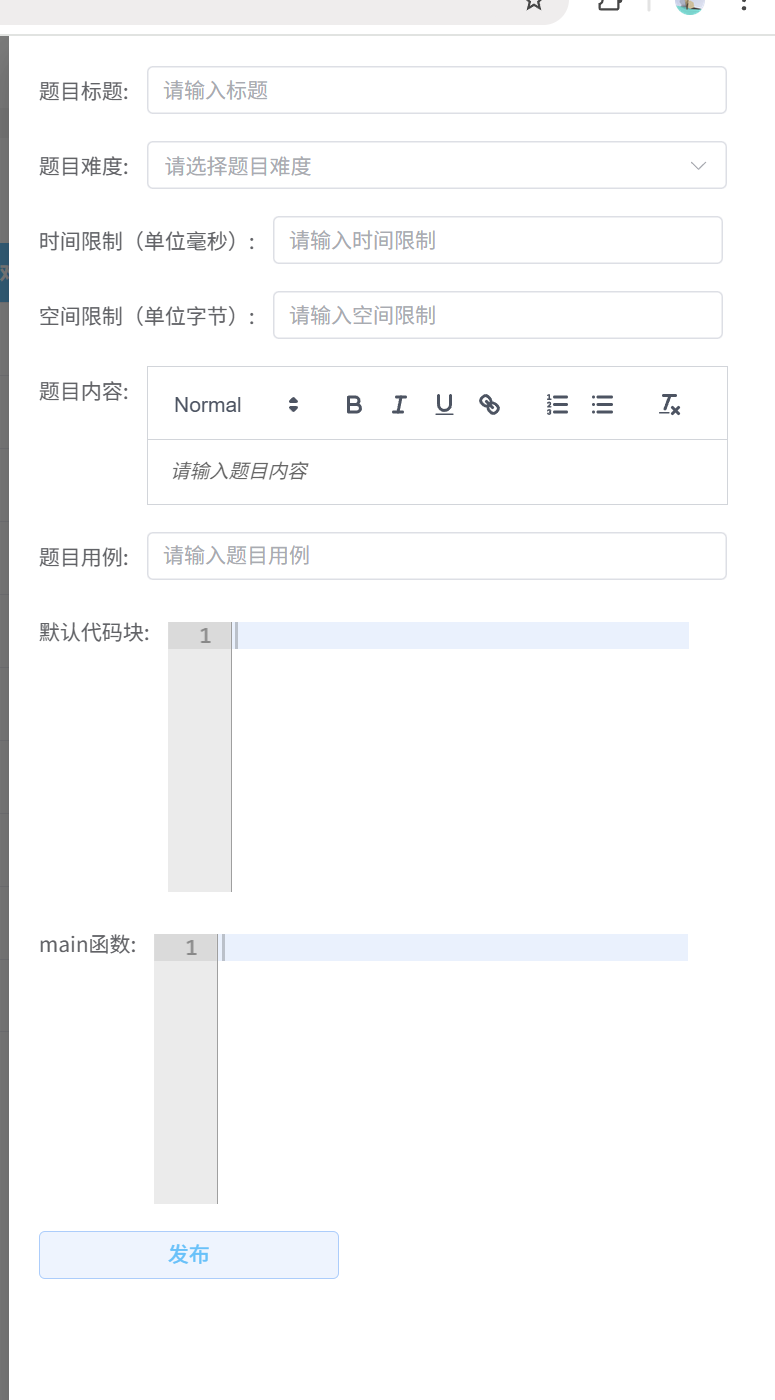
然后我们把宽度弄大一点

<el-drawer v-model="visibleDrawer" :with-header="false" size="50%">
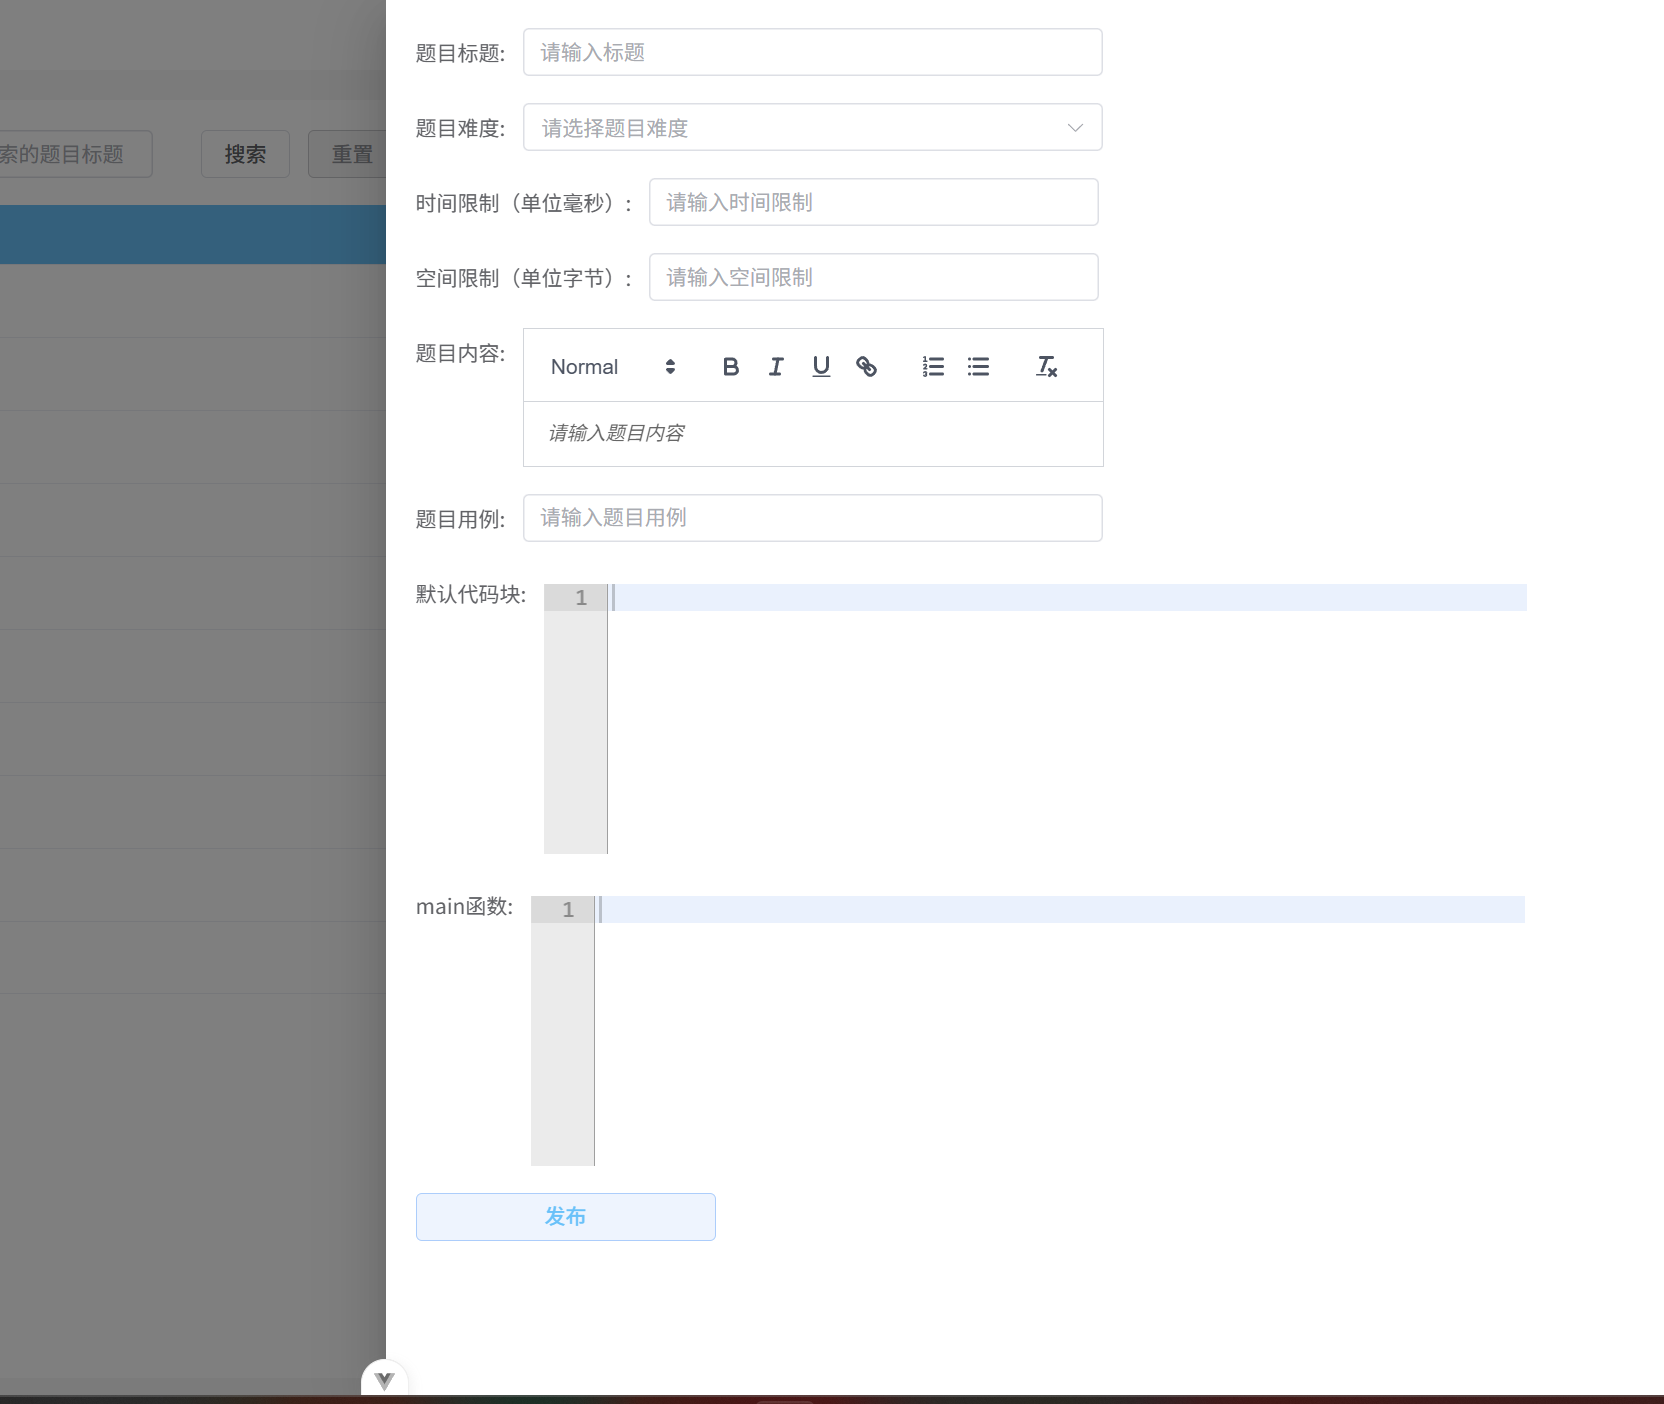
现在设置点击添加题目才弹出来
默认为收回状态
<el-button plain type="primary" :icon="Plus" @click="onAddQuetion">添加题⽬</el-button>
怎么在父组件里面修改子组件的属性呢
先获取子组件的实例
<question-drawer ref="questionDrawerRef"></question-drawer>
然后定义一个响应式数据来存储子组件实例
const questionDrawerRef = ref();
然后再子组件中定义修改属性的方法
function open() {visibleDrawer.value = true;
}
所以在父组件中调用这个方法就可以了
但是这个方法要暴露才可以
defineExpose({open,
});
这样就可以暴露
然后可以在父组件中调用了
function onAddQuetion(){questionDrawerRef.value.open();
}
这样就OK了
点击旁边的空白处就可以收回抽屉
1.3 子组件中发送请求
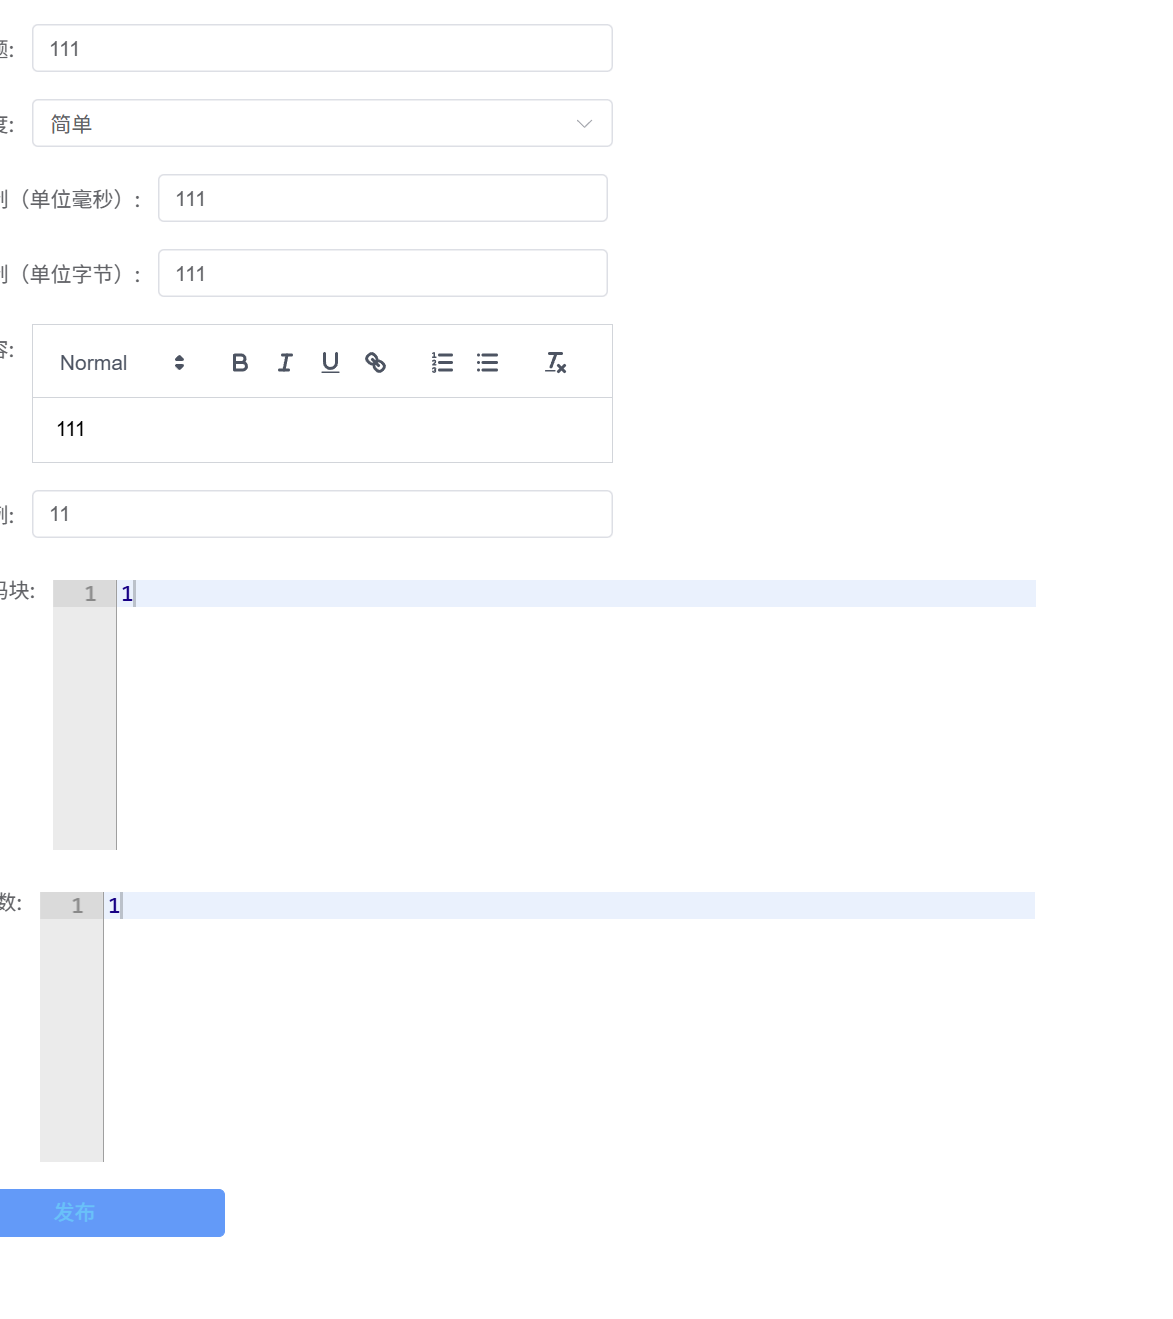
function validate() {let msg = ''if (!formQuestion.title) {msg = '请添加题目标题'} else if (formQuestion.difficulty == '') {msg = '请选择题目难度'} else if (!formQuestion.timeLimit) {msg = '请输入时间限制'} else if (!formQuestion.spaceLimit) {msg = '请输入空间限制'} else if (!formQuestion.content) {msg = '请输入题目内容信息'} else if (!formQuestion.questionCase) {msg = '请输入题目用例名称'} else if (!formQuestion.defaultCode) {msg = '请输入默认代码'} else if (!formQuestion.mainFuc) {msg = '请输入main函数'} else {msg = ''}return msg}async function onSubmit() {const errorMessage = validate()if (errorMessage) {ElMessage.error(errorMessage);return false}const fd = new FormData()for (let key in formQuestion) {fd.append(key, formQuestion[key])}console.log(formQuestion)await addQuestionService(fd)ElMessage.success('添加成功')visibleDrawer.value = false
}
validate是用来判断某个字段是不是没有填写
<el-form-item label="默认代码块:"><code-editor ref="addcodeform" :defaultCode="formQuestion.defaultCode"@update:value="handleEditorContent"></code-editor></el-form-item><el-form-item label="main函数:"><code-editor ref="addcodeform" :defaultCode="formQuestion.mainFuc"@update:value="handleEditorMainFunc"></code-editor></el-form-item>
这个又是子组件,怎么把子组件中的数据同步到父组件呢
let editor = null;
const emit = defineEmits(['update:value']);
const editorform = ref(null);
// 初始化编辑器
onMounted(() => {editor = ace.edit(editorform.value, options);editor.setOptions({enableBasicAutocompletion: true,});editor.getSession().on('change', () => {// 当编辑器内容变化时,触发⾃定义事件并传递编辑器的内容emit('update:value', editor.getValue());});
});
// 销毁编辑器实例
onBeforeUnmount(() => {if (editor) {editor.destroy();editor = null;}
});
定义了一个事件update:value
editor.getSession().on('change', () => {// 当编辑器内容变化时,触发⾃定义事件并传递编辑器的内容emit('update:value', editor.getValue());});
这个就是监听到内容发送变化的时候触发这个事件update:value
会把编辑器的内容作为参数传递给事件处理器update:value
<el-form-item label="默认代码块:"><code-editor ref="addcodeform" :defaultCode="formQuestion.defaultCode"@update:value="handleEditorContent"></code-editor></el-form-item><el-form-item label="main函数:"><code-editor ref="addcodeform" :defaultCode="formQuestion.mainFuc"@update:value="handleEditorMainFunc"></code-editor></el-form-item>
事件处理器的函数定义在父组件中,用于触发相应的逻辑
意思就是内容发送变化的时候会调用函数handleEditorContent
然后会把编辑器的你内容作为参数给这个函数
这样就可以获得编辑器的内容了
function handleEditorContent(content){formQuestion.defaultCode = content
}
function handleEditorMainFunc (content){formQuestion.mainFuc = content
}
<el-form-item label="默认代码块:"><code-editor ref="addcodeform" @update:value="handleEditorContent"></code-editor></el-form-item><el-form-item label="main函数:"><code-editor ref="addcodeform" @update:value="handleEditorMainFunc"></code-editor></el-form-item>
但是后端需要的是json,前端是表单数据,只需要设置一下请求头为json就可以了
service.defaults.headers["Content-Type"] = "application/json;charset=utf-8";
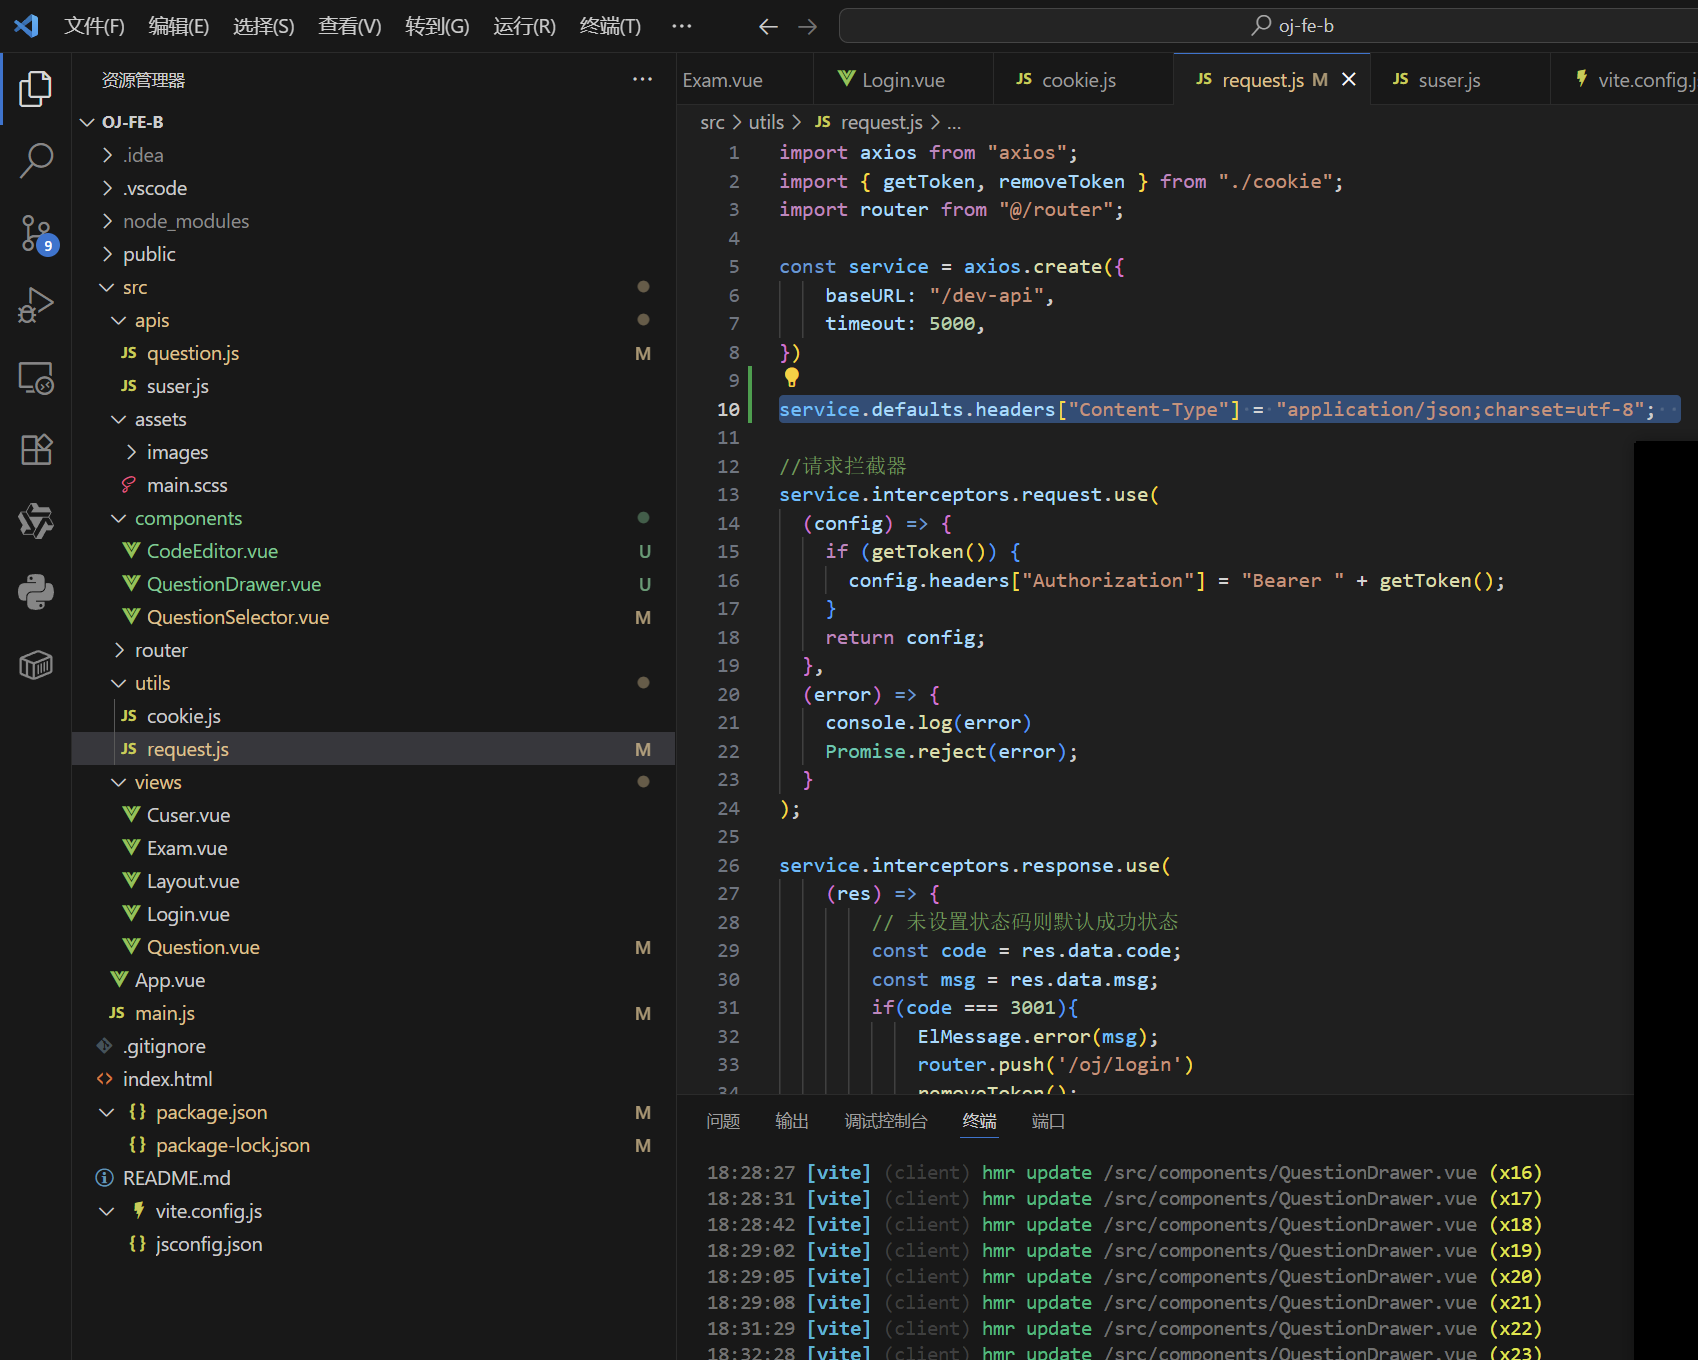
zairequest.js里面这样设置就可以了
但是我们还要设置一下,就是添加成功以后,刷新一下列表
但是添加题目的请求是在抽屉里面的,怎么弄到父组件呢,怎么告诉父组件呢
我们只需要学习一下编辑器,自己定义一个事件就可以了
const emit = defineEmits(['success']);
async function onSubmit() {const errorMessage = validate()if (errorMessage) {ElMessage.error(errorMessage);return false}const fd = new FormData()for (let key in formQuestion) {fd.append(key, formQuestion[key])}console.log(formQuestion)await addQuestionService(fd)ElMessage.success('添加成功')emit('success')visibleDrawer.value = false
}
定义一个事件。添加成功以后就会触发事件sucess
然后在queston组件里面定义这个事件来使用
    <question-drawer ref="questionDrawerRef" @success="onSuccess"></question-drawer>function onSuccess(){getQuestionList();
}
这样的话添加就会马上显示到列表了
但是页码应该也切换到第一页
function onSuccess(){paranms.pageNum = 1;  getQuestionList();
}
这样就行了
然后还有一个问题就是点击添加题目的时候,上一次添加的内容还有

配置这个属性就可以了
<el-drawer v-model="visibleDrawer" :with-header="false" size="50%" :destroy-on-close="true">
但是这个只能消除代码编辑器的内容,因为这个属性只是销毁子组件,而不能销毁v-model里面的数据
function open() {visibleDrawer.value = true;for(const key in formQuestion){formQuestion[key] = ''  }
}
这样就可以了
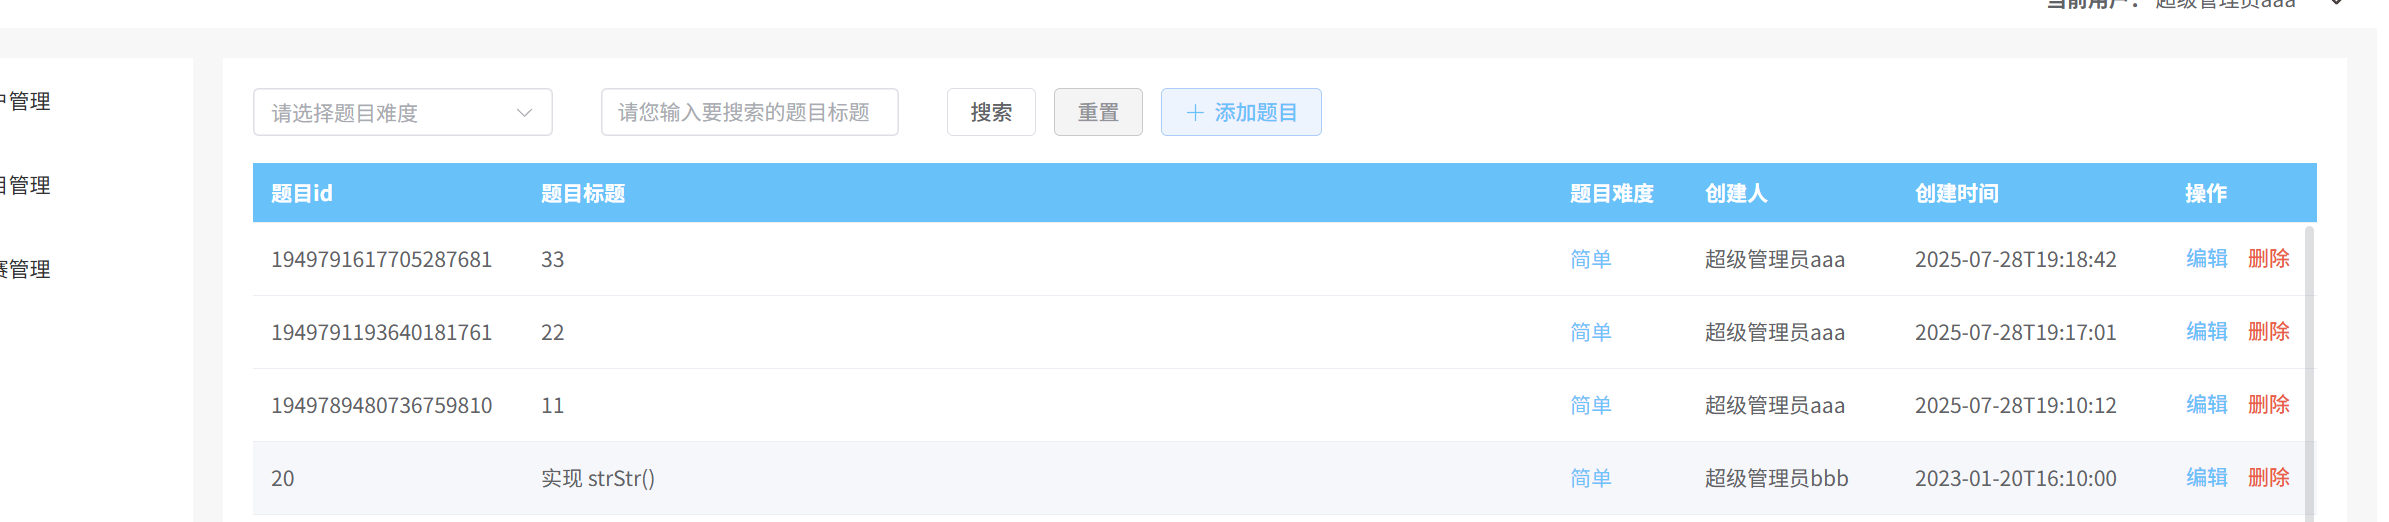
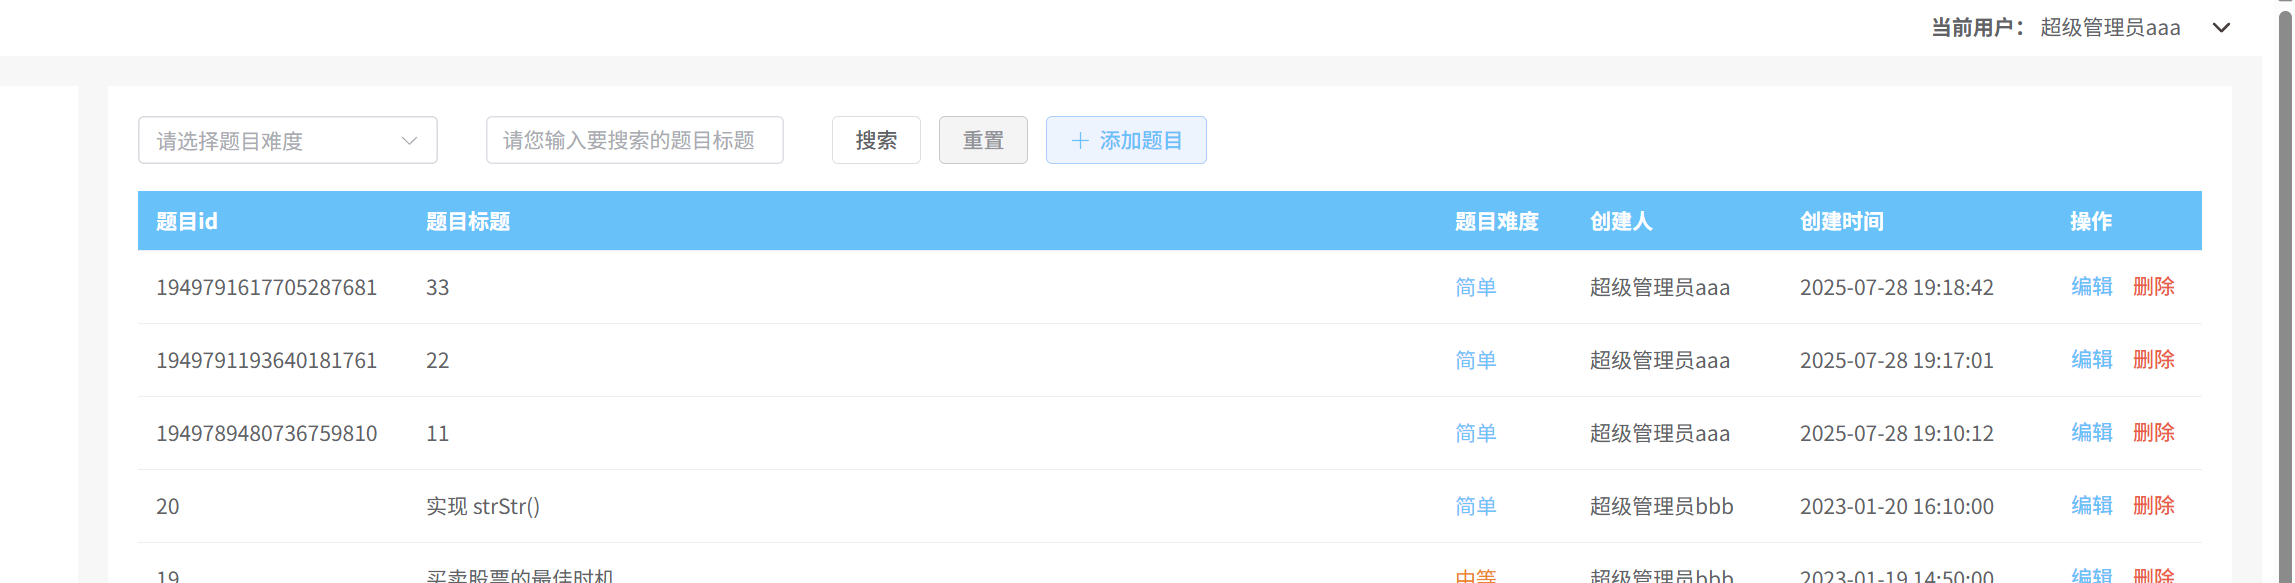
2. 获取题目详情
先写Question.vue
<template #default="{ row }"><el-button type="text" @click="onEdit(row.questionId)">编辑</el-button><el-button type="text" class="red">删除</el-button></template>
这样就可以了
主要就是把questionId传给子组件了
调用那个open方法就可以了
async function onEdit(questionId){ questionDrawerRef.value.open(questionId);
}
async function open(questionId) {visibleDrawer.value = true;for(const key in formQuestion){formQuestion[key] = ''  }if(questionId){const res = await getQuestionDetailService(questionId)Object.assign(formQuestion, res.data)   }
}
这样就可以把res.data里面的数据赋值给formQuestion
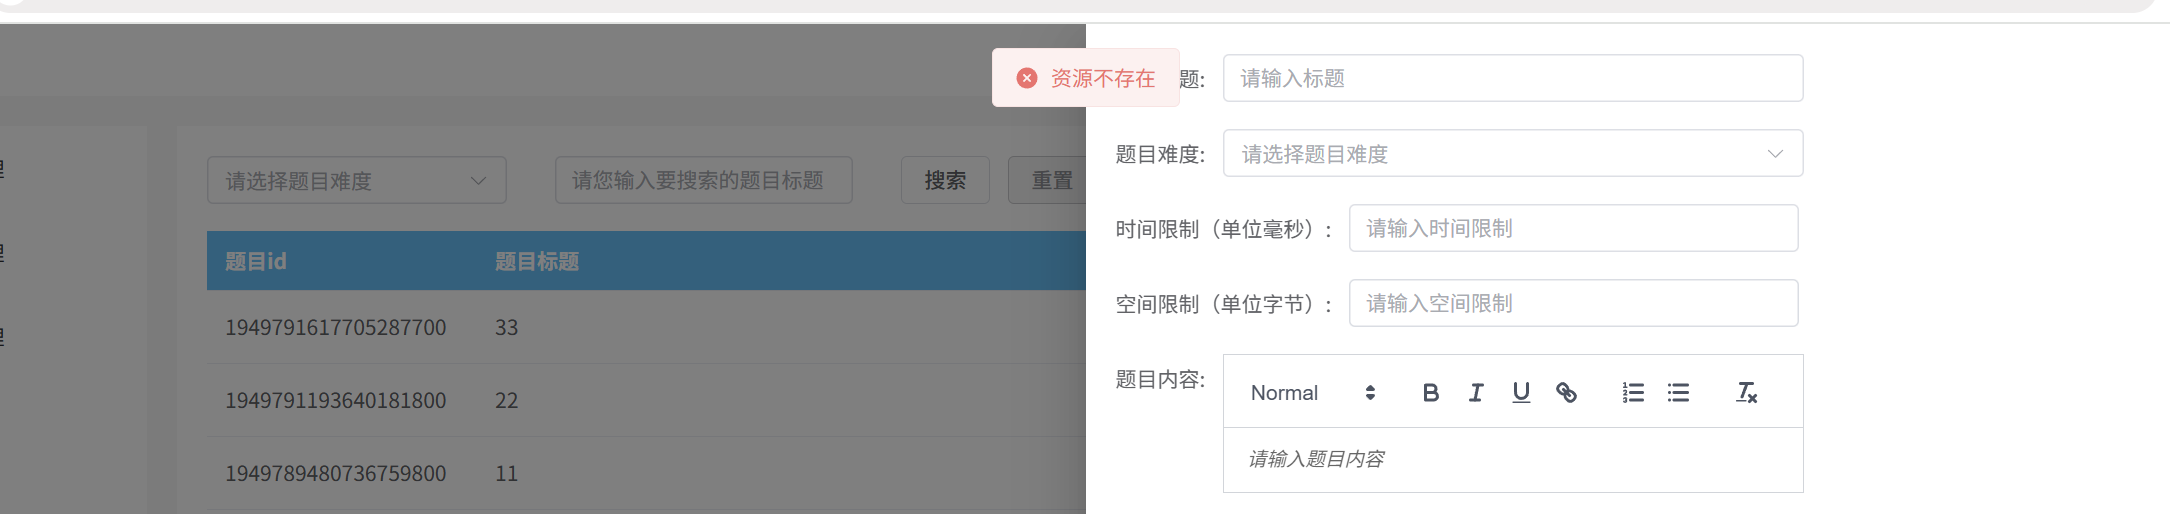
但是报了这个错怎么回事呢
我们在数据库中查看一下,不存在这个id
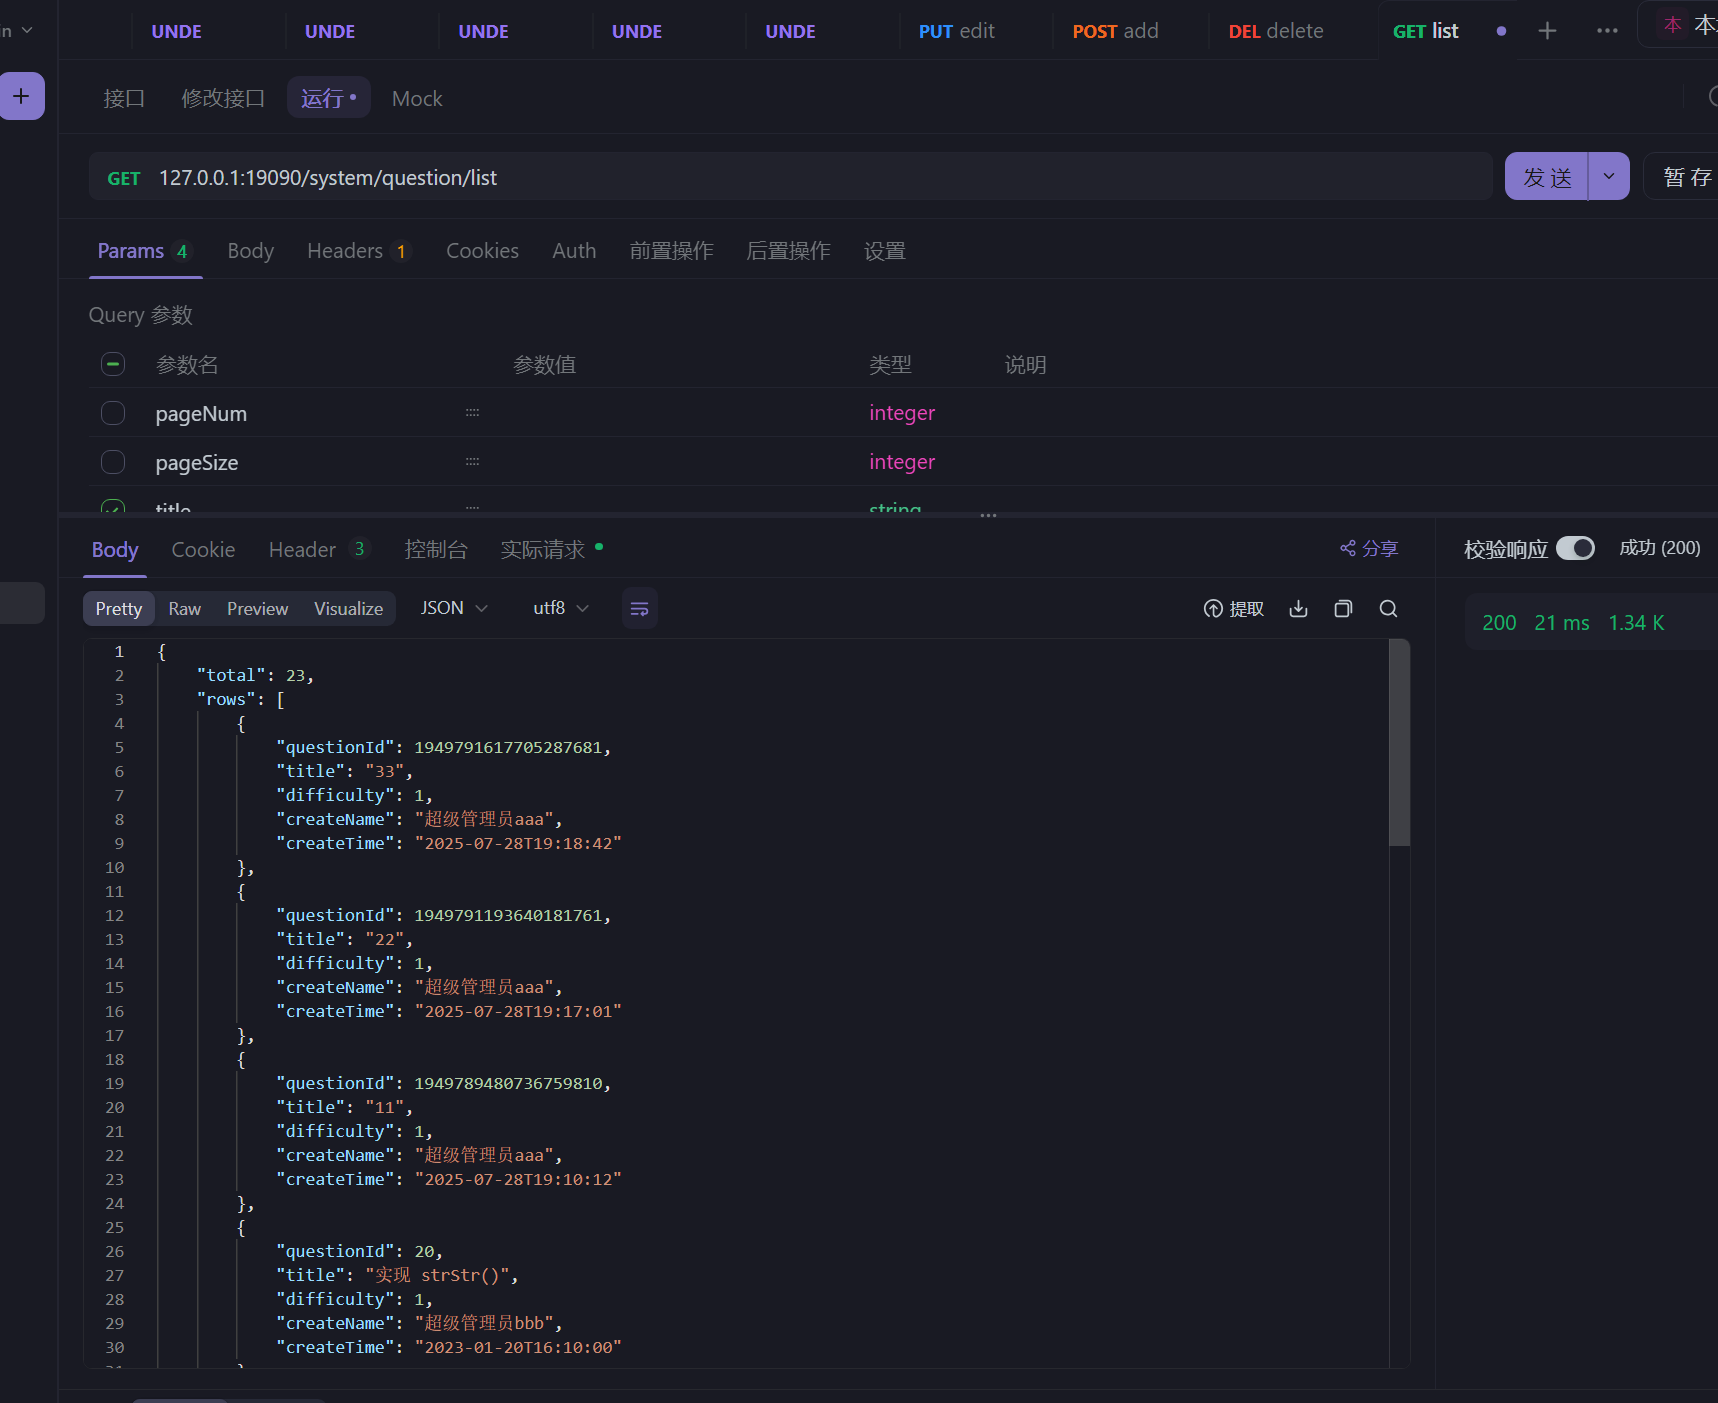
但我们用apifox查出来的id是这个,和前端展示的不一样,为什么呢
因为返回的是long,前端存储不了,就会截断,所以显示不对
所以我们可以把long变为string类型,再返回给前端
这样的话,就不会截断了
@Data
public class QuestionVO {@JsonSerialize(using = ToStringSerializer.class)private Long questionId;private String title;private Integer difficulty;private String createName;private LocalDateTime createTime;
}
这样就可以了
因为前端类型是任意变化的,所以我们不用改,它会随着后端的变化而变化
然后请求的时候,前端的questionId是string,但是后端要求为long,所以前端就会转为long,后端返回数据long,前端就用int来接受,后端返回string,前端就用string,所以前端是动态变化的类型
这样就OK了
然后还有创建时间那里也有问题,多了一个T
@Data
public class QuestionVO {@JsonSerialize(using = ToStringSerializer.class)private Long questionId;private String title;private Integer difficulty;private String createName;@JsonFormat(pattern = "yyyy-MM-dd HH:mm:ss")private LocalDateTime createTime;
}
这样就可以了
但是编辑器的内容没有呢
因为编辑器没有v-model
后端返回了数据,但是前端没有展示
题目内容没有显示的原始主要是因为我们没有指定这个富文本的内容格式
<quill-editor placeholder="请输⼊题⽬内容" v-model:content="formQuestion.content" contentType="html"></quill-editor>
至于代码框呢,主要是因为没有类似于v-model的指定
我们可以把数据传给子组件编辑器,怎么传呢,类似于open方法的使用就可以了
在CodeEditor里面
function setAceCode(content){editor.setValue(content);
}defineExpose({setAceCode
});
然后再quertionDrawer里面
<el-form-item label="默认代码块:"><code-editor @update:value="handleEditorContent" ref="defaultCodeRef"></code-editor></el-form-item><el-form-item label="main函数:"><code-editor @update:value="handleEditorMainFunc" ref="mainFuncRef"></code-editor></el-form-item>
const defaultCodeRef = ref();
const mainFuncRef = ref();async function open(questionId) {visibleDrawer.value = true;for(const key in formQuestion){formQuestion[key] = ''  }if(questionId){const res = await getQuestionDetailService(questionId)Object.assign(formQuestion, res.data)   defaultCodeRef.value.setAceCode(res.data.defaultCode)mainFuncRef.value.setAceCode(res.data.mainFuc)}
}
这样就可以了
3. 编辑题目
async function onSubmit() {const errorMessage = validate()if (errorMessage) {ElMessage.error(errorMessage);return false}const fd = new FormData()for (let key in formQuestion) {fd.append(key, formQuestion[key])}console.log(formQuestion)if(formQuestion.questionId){await editQuestionService(formQuestion.questionId)ElMessage.success('修改成功')emit('success','edit')}else{await addQuestionService(fd)ElMessage.success('添加成功')emit('success','add')}visibleDrawer.value = false
}
const formQuestion = reactive({questionId: '',title: '',difficulty: '',timeLimit: '',spaceLimit: '',content: '',questionCase: '',defaultCode: '',mainFuc: '',
});
然后在question.vue中
function onSuccess(params){if(params==='add'){paranms.pageNum = 1;  getQuestionList();  }else if(params==='edit'){getQuestionList(); }
}
修改数据不用把页面置为1,添加的话要把数据弄为1
@Data
public class QuestionDetailVO {@JsonSerialize(using = ToStringSerializer.class)private Long questionId;private String title;private Integer difficulty;private Long timeLimit;private Long spaceLimit;private String content;private String questionCase;private String defaultCode;private String mainFuc;
}
记得获取详细信息这里也要对questionId进行字符串的序列化
这样测试的时候就成功了
4. 删除题目
<el-button type="text" class="red" @click="onDelete(row.questionId)">删除</el-button>
async function onDelete(questionId){ await delQuestionService(questionId)paranms.pageNum = 1;ElMessage.success('删除成功');getQuestionList();
}
删除之后要变为第一页才可以
这样就成功了,很简单
5. Vue生命周期函数
就是特定时刻完成特定的工作
官网
在CodeEditor.vue中
onMounted(() => {editor = ace.edit(editorform.value, options);editor.setOptions({enableBasicAutocompletion: true,});editor.getSession().on('change', () => {// 当编辑器内容变化时,触发⾃定义事件并传递编辑器的内容emit('update:value', editor.getValue());});
});
// 销毁编辑器实例
onBeforeUnmount(() => {if (editor) {editor.destroy();editor = null;}
});
5.1 创建阶段
setup()
5.2 挂载阶段
onBeforeMount
onMounted
5.3 更新阶段
onBeforeUpdate
onUpdated
5.4 卸载阶段
onBeforeUnmount
onUnmounted
6. 竞赛管理
6.1 表结构设计
create table tb_exam (
exam_id  bigint unsigned not null comment '竞赛id(主键)',
title varchar(50) not null comment '竞赛标题',
start_time datetime not null comment '竞赛开始时间',
end_time datetime not null comment '竞赛结束时间',
status tinyint not null default '0' comment '是否发布 0:未发布  1:已发布',
create_by    bigint unsigned not null  comment '创建人',
create_time  datetime not null comment '创建时间',
update_by    bigint unsigned  comment '更新人',
update_time  datetime comment '更新时间',
primary key(exam_id)
)
是否开赛,我们可以在前端用目前时间和开始时间和结束时间进行判断
是否发布,我们用一个status进行判断了,默认是未发布
题目和竞赛是多对多的关系,所以我们可以新建一个表,来存储它们的关系
create table tb_exam_question (
exam_question_id  bigint unsigned not null comment '竞赛题目关系id(主键)',
question_id  bigint unsigned not null comment '题目id(主键)',
exam_id  bigint unsigned not null comment '竞赛id(主键)',
question_order int not null comment '题目顺序',
create_by    bigint unsigned not null  comment '创建人',
create_time  datetime not null comment '创建时间',
update_by    bigint unsigned  comment '更新人',
update_time  datetime comment '更新时间',
primary key(exam_question_id)
)
question_order int not null comment ‘题目顺序’,设置这个的原因主要是因为我们要把先选择的放在前面
发布还是不发布,就会影响用户能不能看到这个竞赛
结不结束这个竞赛的话,可以根据当前时间和结束和开始时间来判断
已经开始的竞赛不能报名了
未开始的比赛,才可以报名
竞赛有几个状态,发布,未发布
还有,未开始,开始,结束
还有,报名,未报名 —》用户和竞赛的关系
竞赛倒计时就是当前时间和结束时间之差
只有结束的比赛才可以去竞赛练习的,而且竞赛练习没有倒计时
7. 竞赛列表功能
7.1 后端开发
基础类
@Getter
@Setter
@TableName("tb_exam")
public class Exam extends BaseEntity {@TableId(value = "EXAM_ID", type = IdType.ASSIGN_ID)private Long examId;private String title;private LocalDateTime startTime;private LocalDateTime endTime;private Integer status;
}
@Getter
@Setter
@TableName("tb_exam_question")
public class ExamQuestion extends BaseEntity {@TableId(value = "EXAM_QUESTION_ID", type = IdType.ASSIGN_ID)private Long examQuestionId;private Long examId;private Long questionId;private Integer questionOrder;
}
@Data
public class ExamQueryDTO extends PageQueryDTO {private String title;private LocalDateTime startTime;private LocalDateTime endTime;
}
@Data
public class ExamVO {private Long examId;private String title;private LocalDateTime startTime;private LocalDateTime endTime;private Integer status;private LocalDateTime createTime;private String createName;}<?xml version="1.0" encoding="UTF-8" ?>
<!DOCTYPE mapperPUBLIC "-//mybatis.org//DTD Mapper 3.0//EN""http://mybatis.org/dtd/mybatis-3-mapper.dtd">
<mapper namespace="com.ck.system.mapper.exam.ExamMapper"><select id="selectExamList" resultType="com.ck.system.domain.exam.vo.ExamVO">SELECTte.exam_id,te.title,te.start_time,te.end_time,te.create_time,ts.nick_name as create_name,te.statusFROMtb_exam teleft jointb_sys_user tsonte.create_by = ts.user_id<where><if test="title !=null and title !='' ">AND te.title LIKE CONCAT('%',#{title},'%')</if><if test="startTime != null and startTime != '' ">AND te.start_time >= #{startTime}</if><if test="endTime != null and endTime != ''">AND te.end_time <= #{endTime}</if></where>ORDER BYte.create_time DESC</select>
</mapper>
时间的比较,时间戳大的反而比较小
@Overridepublic List<ExamVO> list(ExamQueryDTO examQueryDTO) {PageHelper.startPage(examQueryDTO.getPageNum(), examQueryDTO.getPageSize());return examMapper.selectExamList(examQueryDTO);}
就这样就可以了
但是前端传过来的是字符串,前端没有时间类型
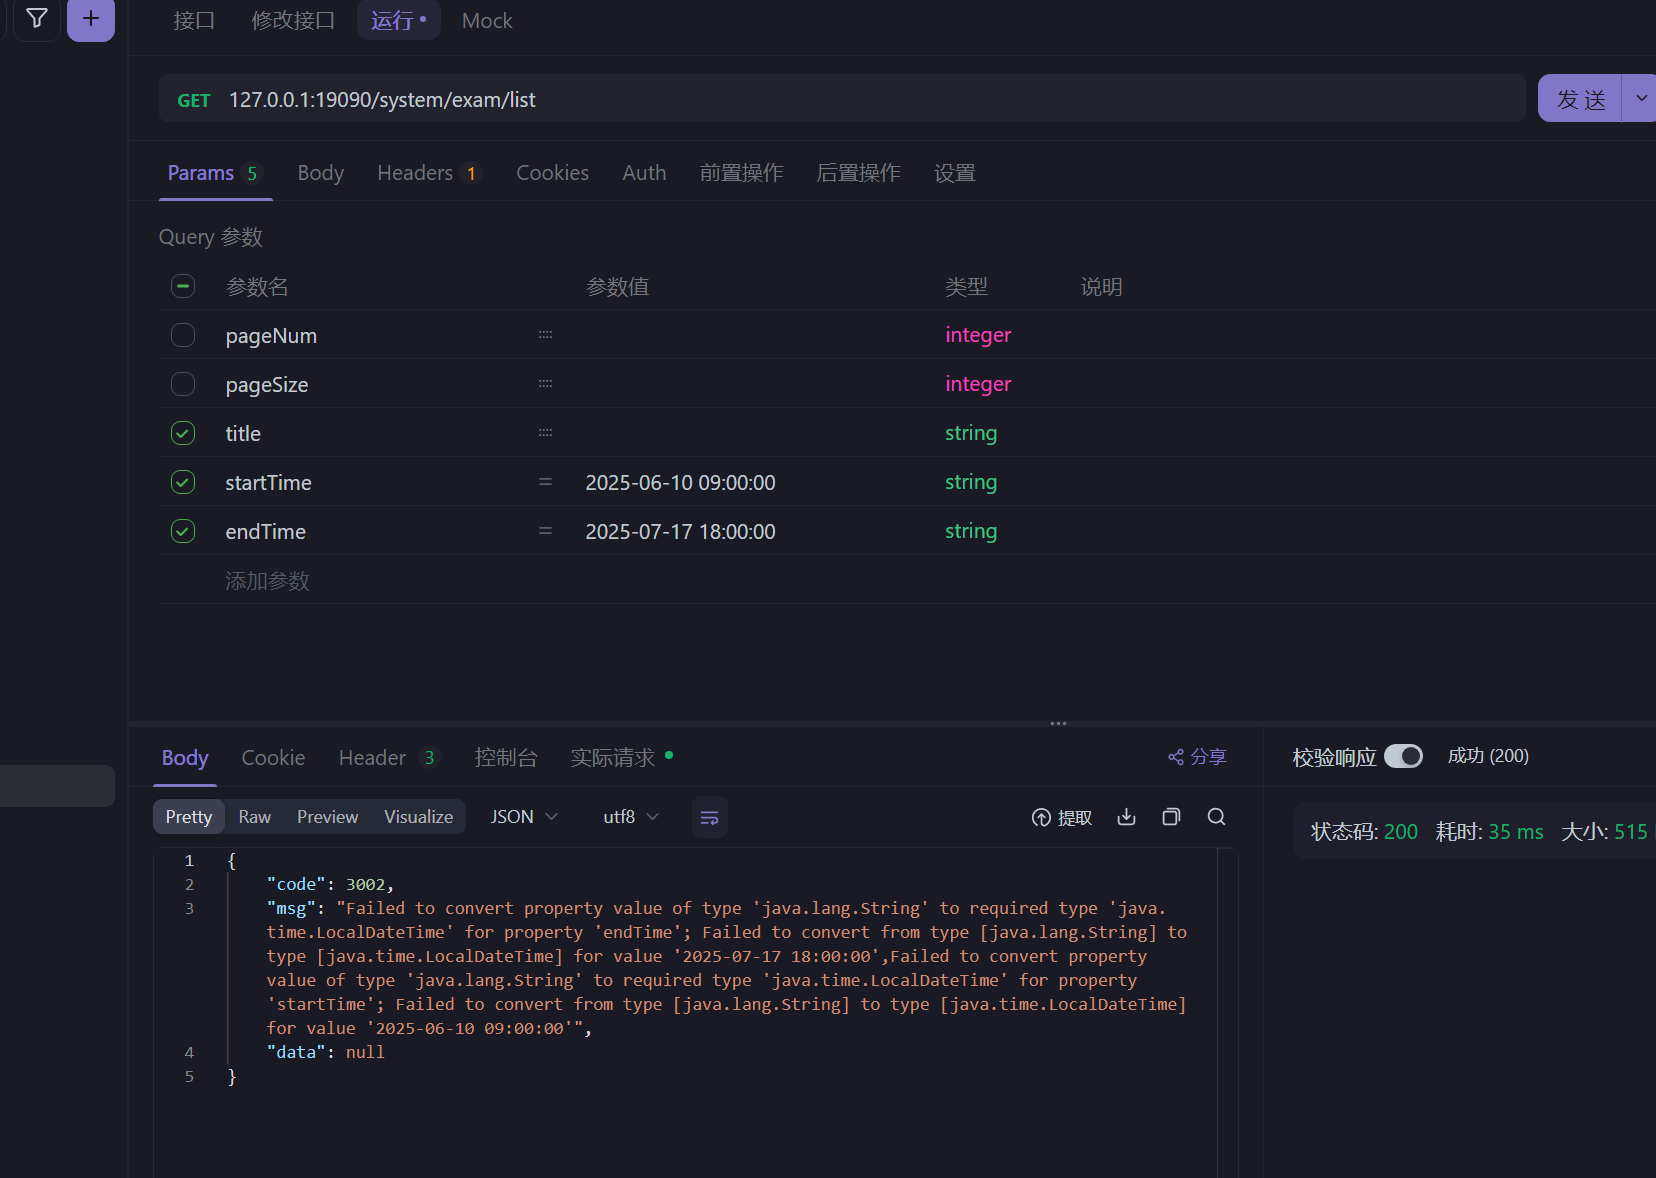
前端说无法把String转化为LocalDateTime
因为前端没有对应的LocalDateTime类型,只是apifox没有,浏览器的前端还是有的
@Data
public class ExamQueryDTO extends PageQueryDTO {private String title;private String startTime;private String endTime;
}
<if test="startTime != null and startTime != '' ">
而且xml也是用 把时间看为字符串来比较的
因为后端的mybatis是可以把string类型转化为时间类型进行比较的
7.2 前端开发
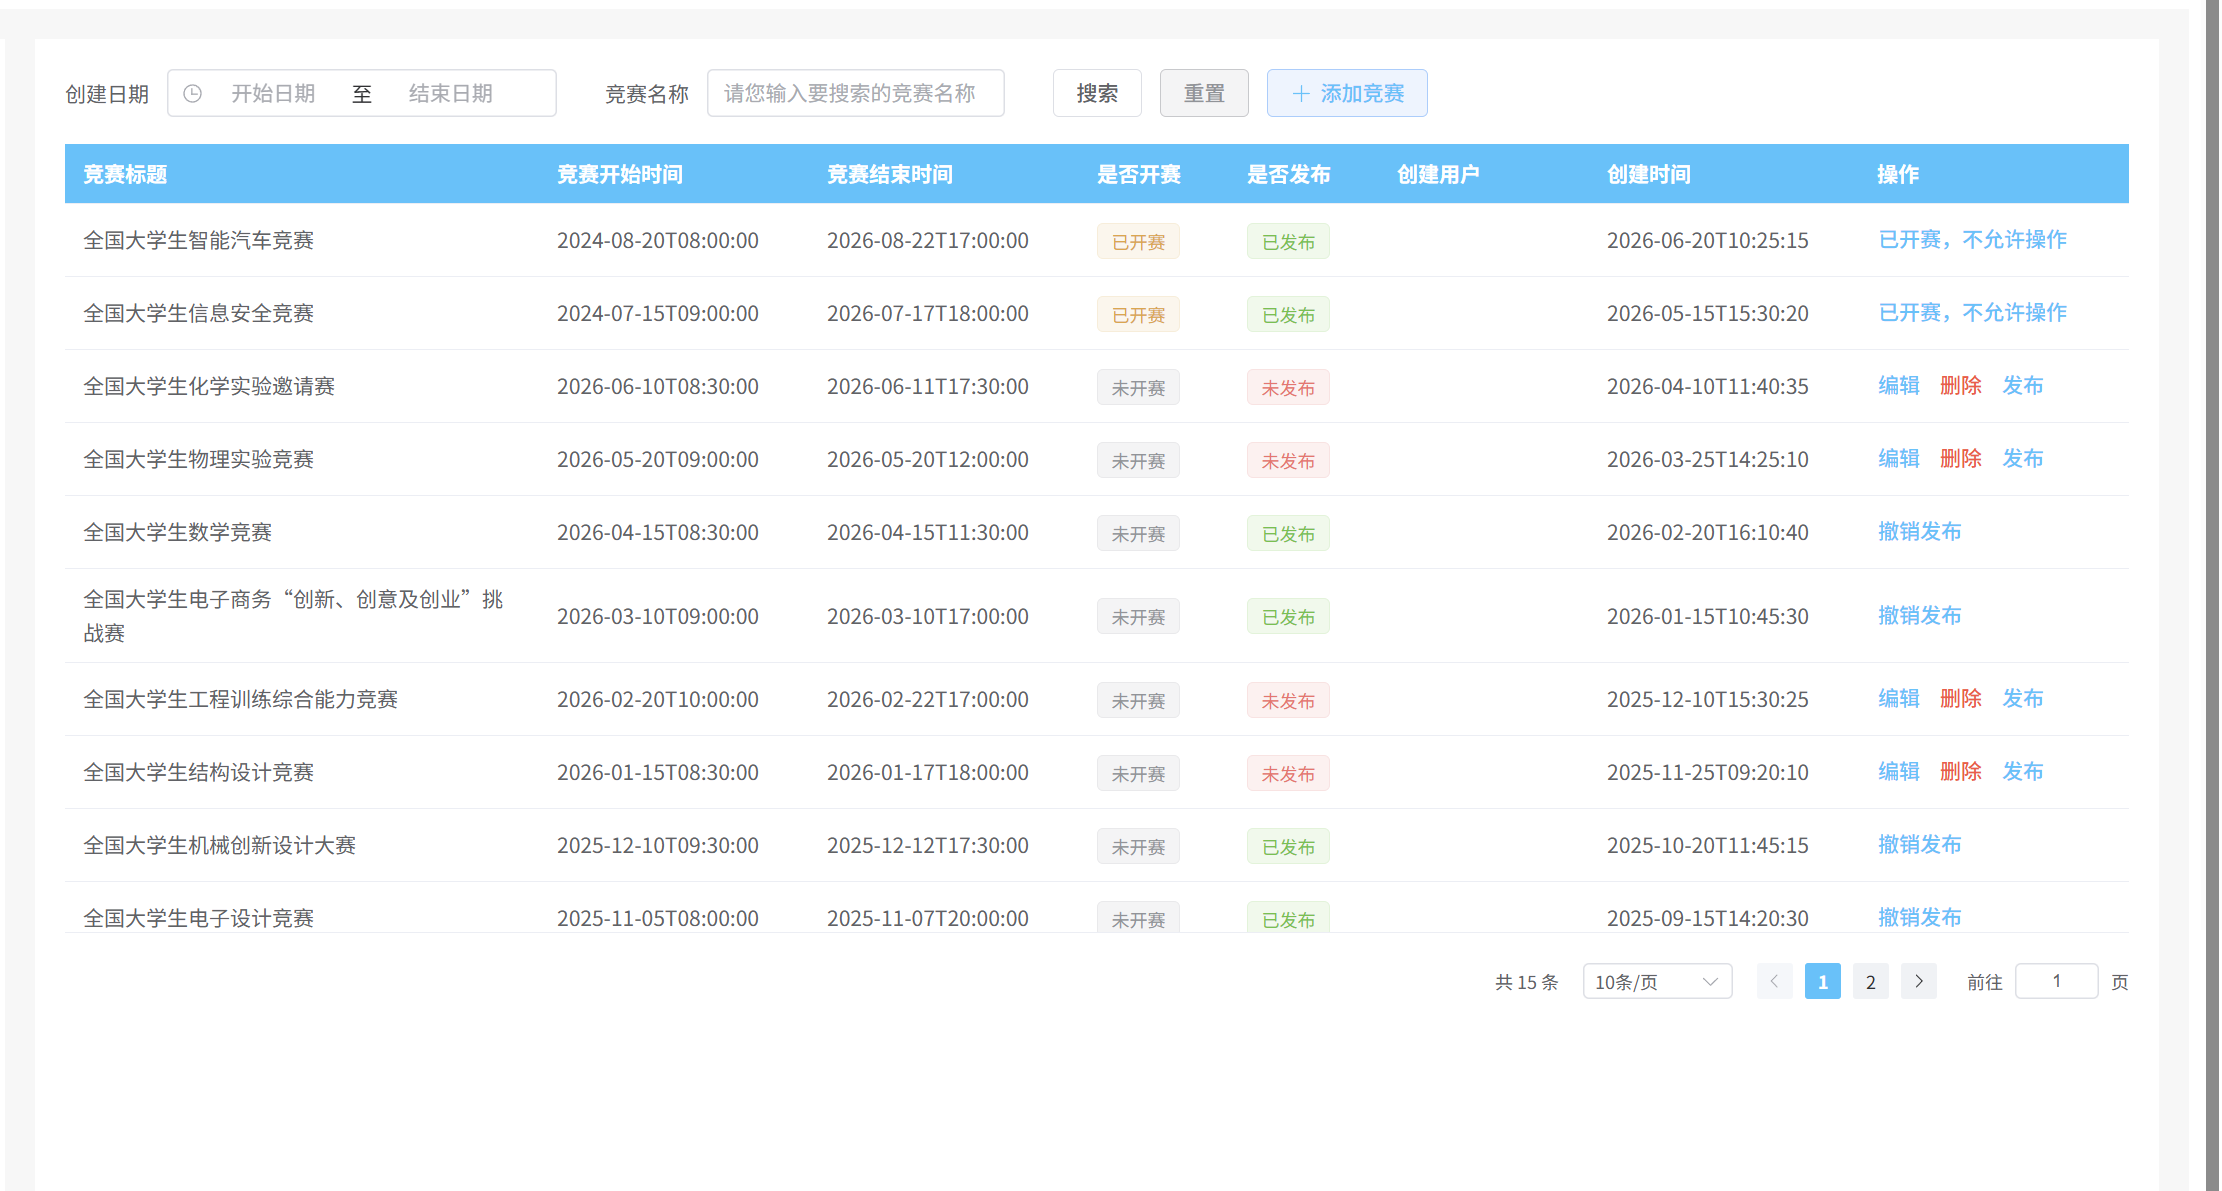
<template><el-form inline="true"><el-form-item label="创建日期"><el-date-picker v-model="datetimeRange" style="width: 240px" type="datetimerange" range-separator="至"start-placeholder="开始日期" end-placeholder="结束日期"></el-date-picker></el-form-item><el-form-item label="竞赛名称"><el-input v-model="params.title" placeholder="请您输入要搜索的竞赛名称" /></el-form-item><el-form-item><el-button @click="onSearch" plain>搜索</el-button><el-button @click="onReset" plain type="info">重置</el-button><el-button type="primary" :icon="Plus" plain @click="onAddExam">添加竞赛</el-button></el-form-item></el-form><!-- 表格 --><el-table height="526px" :data="examList"><el-table-column prop="title" label="竞赛标题" /><el-table-column prop="startTime" width="180px" label="竞赛开始时间" /><el-table-column prop="endTime" width="180px" label="竞赛结束时间" /><el-table-column label="是否开赛" width="100px"><template #default="{ row }"><div v-if="!isNotStartExam(row)"><el-tag type="warning">已开赛</el-tag></div><div v-else><el-tag type="info">未开赛</el-tag></div></template></el-table-column><el-table-column prop="status" width="100px" label="是否发布"><template #default="{ row }"><div v-if="row.status == 0"><el-tag type="danger">未发布</el-tag></div><div v-if="row.status == 1"><el-tag type="success">已发布</el-tag></div></template></el-table-column><el-table-column prop="createName" width="140px" label="创建用户" /><el-table-column prop="createTime" width="180px" label="创建时间" /><el-table-column label="操作" width="180px"><template #default="{ row }"><el-button v-if="isNotStartExam(row) && row.status == 0" type="text" @click="onEdit(row.examId)">编辑</el-button><el-button v-if="isNotStartExam(row) && row.status == 0" type="text" @click="onDelete(row.examId)"class="red">删除</el-button><el-button v-if="row.status == 1 && isNotStartExam(row)" type="text"@click="cancelPublishExam(row.examId)">撤销发布</el-button><el-button v-if="row.status == 0 && isNotStartExam(row)" type="text"@click="publishExam(row.examId)">发布</el-button><el-button type="text" v-if="!isNotStartExam(row)">已开赛,不允许操作</el-button></template></el-table-column></el-table><!-- 分页区域 --><el-pagination background size="small" layout="total, sizes, prev, pager, next, jumper" :total="total"v-model:current-page="params.pageNum" v-model:page-size="params.pageSize" :page-sizes="[5, 10, 15, 20]"@size-change="handleSizeChange" @current-change="handleCurrentChange" />
</template><script setup>
import { Plus } from '@element-plus/icons-vue'
import { getExamListService, delExamService, publishExamService, cancelPublishExamService } from '@/apis/exam'
import { reactive, ref } from 'vue'
import router from '@/router'function isNotStartExam(exam) {const now = new Date(); //当前时间return new Date(exam.startTime) > now
}const params = reactive({pageNum: 1,pageSize: 10,startTime: '',endTime: '',title: ''
})const examList = ref([])
const total = ref(0)
const datetimeRange = ref([])</script>
            <el-date-picker v-model="datetimeRange" style="width: 240px" type="datetimerange" range-separator="至"start-placeholder="开始日期" end-placeholder="结束日期"></el-date-picker>
const datetimeRange = ref([])
这个是时间选择框,其中v-model绑定的是一个数组,数组里面存储的是开始和结束时间数据
然后就是开发js代码了
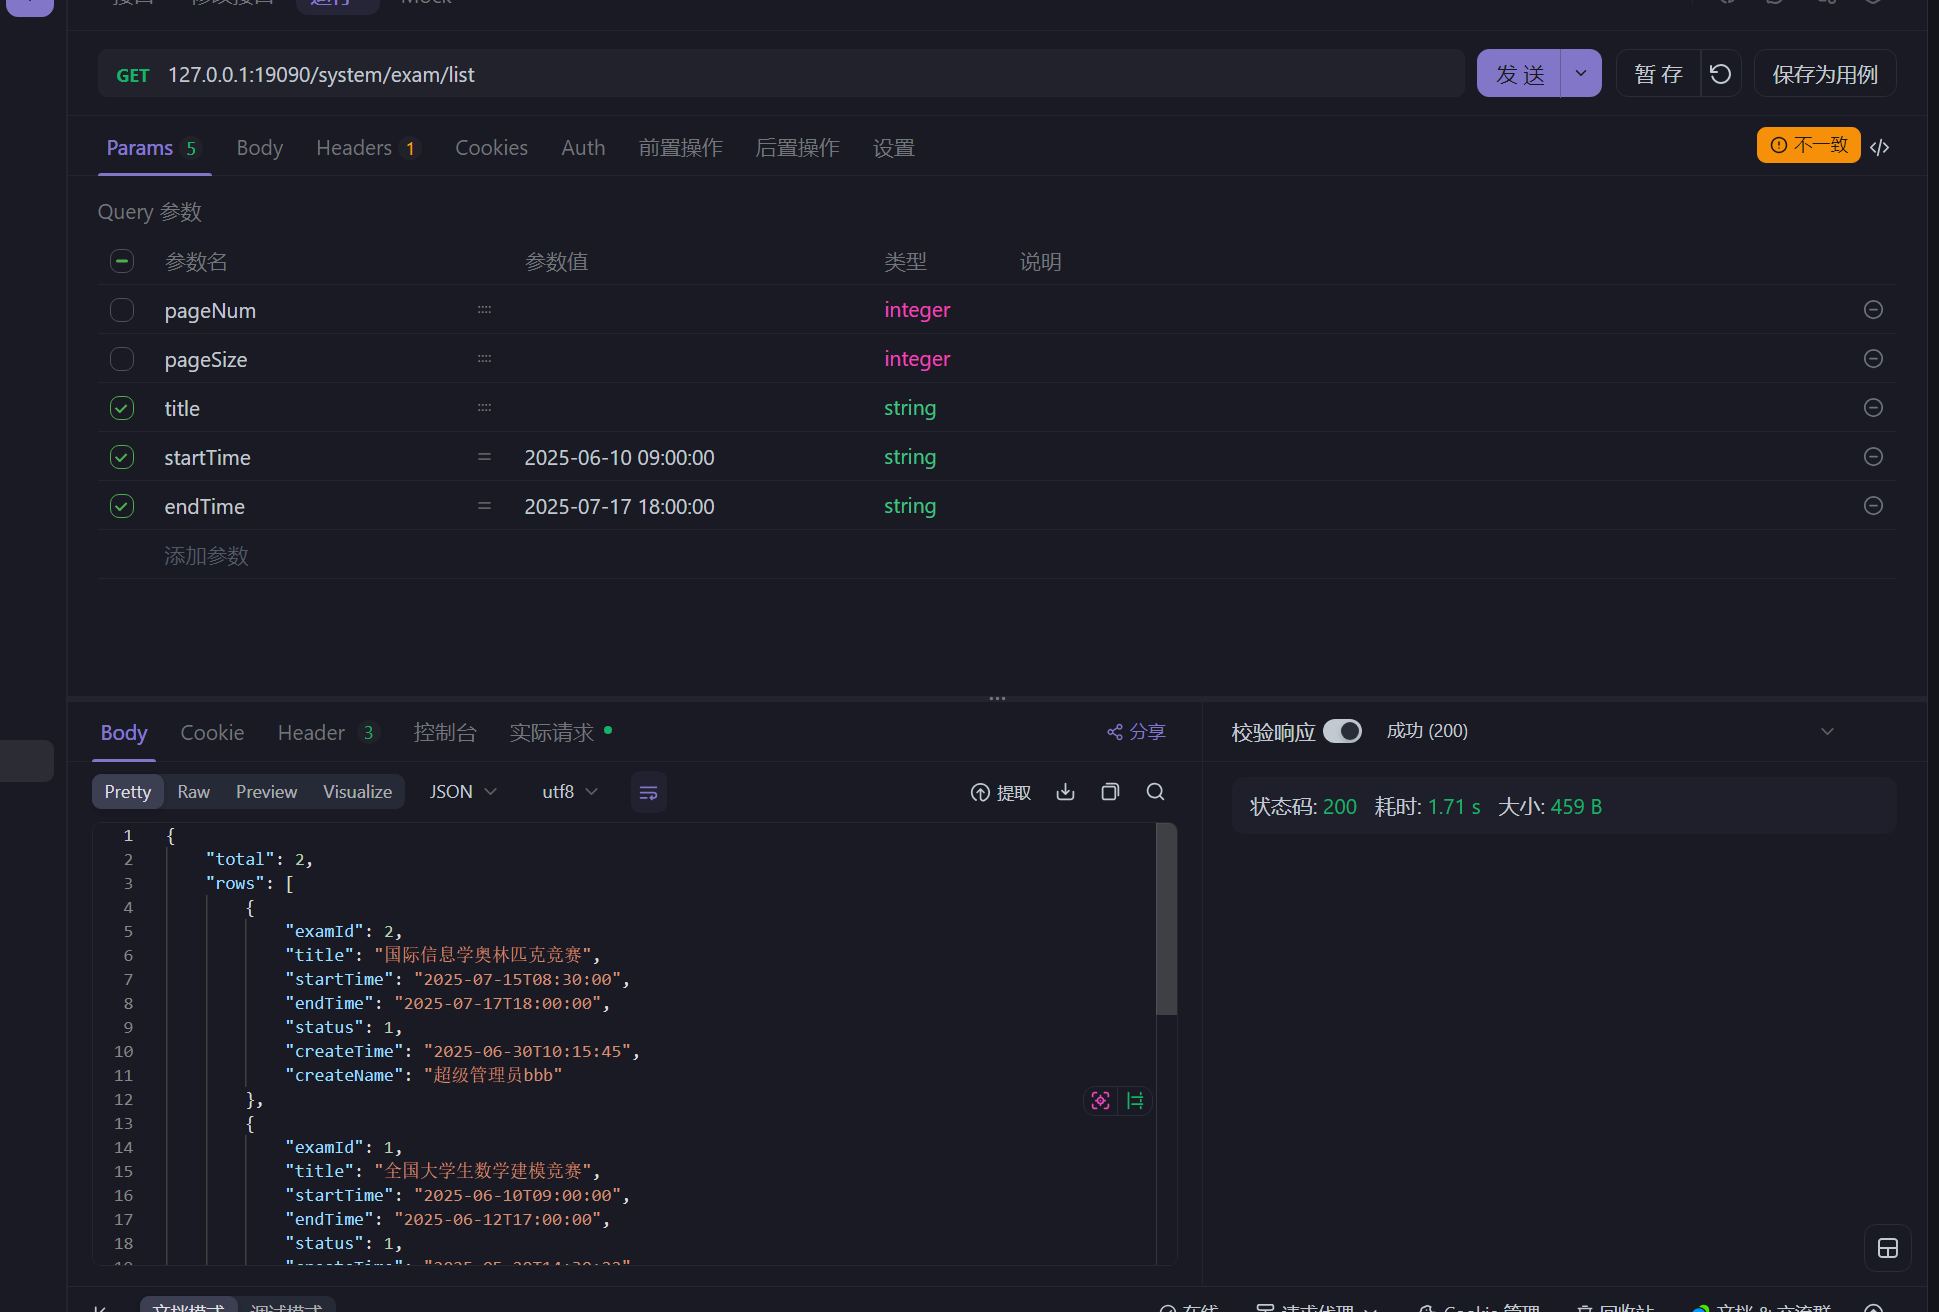
import service from "@/utils/request";export function getExamListService(params) {return service({url: "/exam/list",method: "get",params,});
}
async function getExamList() {const res = await getExamListService(params);console.log("获取题目管理表单数据:", res);examList.value = res.rows;total.value = res.total;
}getExamList();
@Data
public class ExamVO {private Long examId;private String title;@JsonFormat(pattern = "yyyy-MM-dd HH:mm:ss")private LocalDateTime startTime;@JsonFormat(pattern = "yyyy-MM-dd HH:mm:ss")private LocalDateTime endTime;private Integer status;@JsonFormat(pattern = "yyyy-MM-dd HH:mm:ss")private LocalDateTime createTime;private String createName;}
然后是修改分页请求
function handleSizeChange(newSize) {params.pageNum = 1;getExamList();
}
function handleCurrentChange(newPage) {getExamList();
}
然后是搜索和重置
然后就是datetimeRange 里面的元素数据类型是时间类型Date的,那要怎么办呢,我们可以转化为Json类型,为什么VO里面不用时间类型呢,因为apifox没有时间类型来测试
function onSearch(){params.pageNum = 1;getExamList();
}function onReset(){params.startTime = ''params.endTime = ''params.title = ''params.pageNum = 1params.pageSize = 10datetimeRange.value.length = 0getExamList();
}
async function getExamList() {if(datetimeRange.value[0] instanceof Date){params.startTime = datetimeRange.value[0].toISOString()}if(datetimeRange.value[1] instanceof Date){params.endTime = datetimeRange.value[1].toISOString()}console.log("Exam,params:",params)const res = await getExamListService(params);console.log("获取题目管理表单数据:", res);examList.value = res.rows;total.value = res.total;
}
这样就可以了
instanceof 是判断类型,如果不为空,而且为Date类型的话,那么就转为json