VScode 支持 QNX 源码跳转
编译构建
# 环境初始化
source /home/gaoyang3513/Workspaces/qnx800/qnxsdp-env.sh# 编译
make
环境配置
要在VS Code中实现对QNX工程源码的正确跳转(Go to Definition/Declaration)、自动补全(IntelliSense)和错误检查,需要安装并配置 C/C++ 插件或Clangd插件。虽然两个插件都可以实现最终的代码跳转但过程有些差异,总结起来C/C++插件更友好和快捷,所以比较推荐。
QNX 插件
QNX官方开发的插件,集合了很多功能,比较下来比较好用的功能有: SDP环境配置、交互终端(QNX初始化)、工程管理、设备在线调整、系统监控等。
C/C++ 插件
配置C/C++插件使其获知QNX编译环境的头文件路径、宏定义以及编译器路径,主要通过编辑项目根目录下.vscode/c_cpp_properties.json 文件来完成。以下是配置步骤和示例:
前提条件
- 安装VS Code: 确保已经安装Visual Studio Code;
- 安装Remote SSH扩展:在VS Code中安装Microsoft的"Remote SSH"扩展(
ms-vscode-remote.remote-ssh)。 - 安装C/C++扩展: 在VS Code中安装Microsoft的"C/C++"扩展(
ms-vscode.cpptools)。 - 安装QNX Momentics SDK:确保已经安装了QNX Momentics SDK,获知了安装路径(例如,示例路径
~/Workspaces/qnx800)。
配置步骤
-
打开或创建QNX工程:在VS Code中打开你的QNX工程文件夹。
-
生成
c_cpp_properties.json- 按下
Ctrl+Shift+P(或Cmd+Shift+Pon macOS) 打开命令面板。 - 输入
C/C++: Edit Configurations (UI)或C/C++: Edit Configurations (JSON)。 - 选择
(JSON)选项,VS Code 会在你的项目根目录下创建一个.vscode文件夹,并在其中生成c_cpp_properties.json文件。
- 按下
-
编辑
c_cpp_properties.json
打开生成的c_cpp_properties.json文件,并根据你的QNX SDK版本和目标架构进行修改。{"configurations": [{"name": "QNX 8.0 x86_64", // 配置名称,可自定义"compilerPath": "/home/gaoyang3513/Workspaces/qnx800/host/linux/x86_64/usr/bin/qcc", // QCC 编译器的路径"includePath": ["${workspaceFolder}/**", // 包含当前工作区的所有头文件"/home/gaoyang3513/Workspaces/qnx800/target/qnx" // QNX 系统头文件路径],"defines": ["__QNX__", // QNX 平台的宏定义"_NTO_VERSION=800", // QNX Neutrino 版本宏,根据实际版本修改"__AARCH64__", // AArch64 架构宏"__ARM_ARCH_8A__" // ARMv8-A 架构宏],"intelliSenseMode": "gcc-x64", // IntelliSense 模式,因为QCC基于GCC,所以选择gcc-x64"browse": {"path": ["${workspaceFolder}","/home/gaoyang3513/Workspaces/qnx800/target/qnx/usr/include"],"limitSymbolsToIncludedHeaders": true},"cStandard": "c11", // C语言标准"cppStandard": "c++11" // C++语言标准}],"version": 4 }
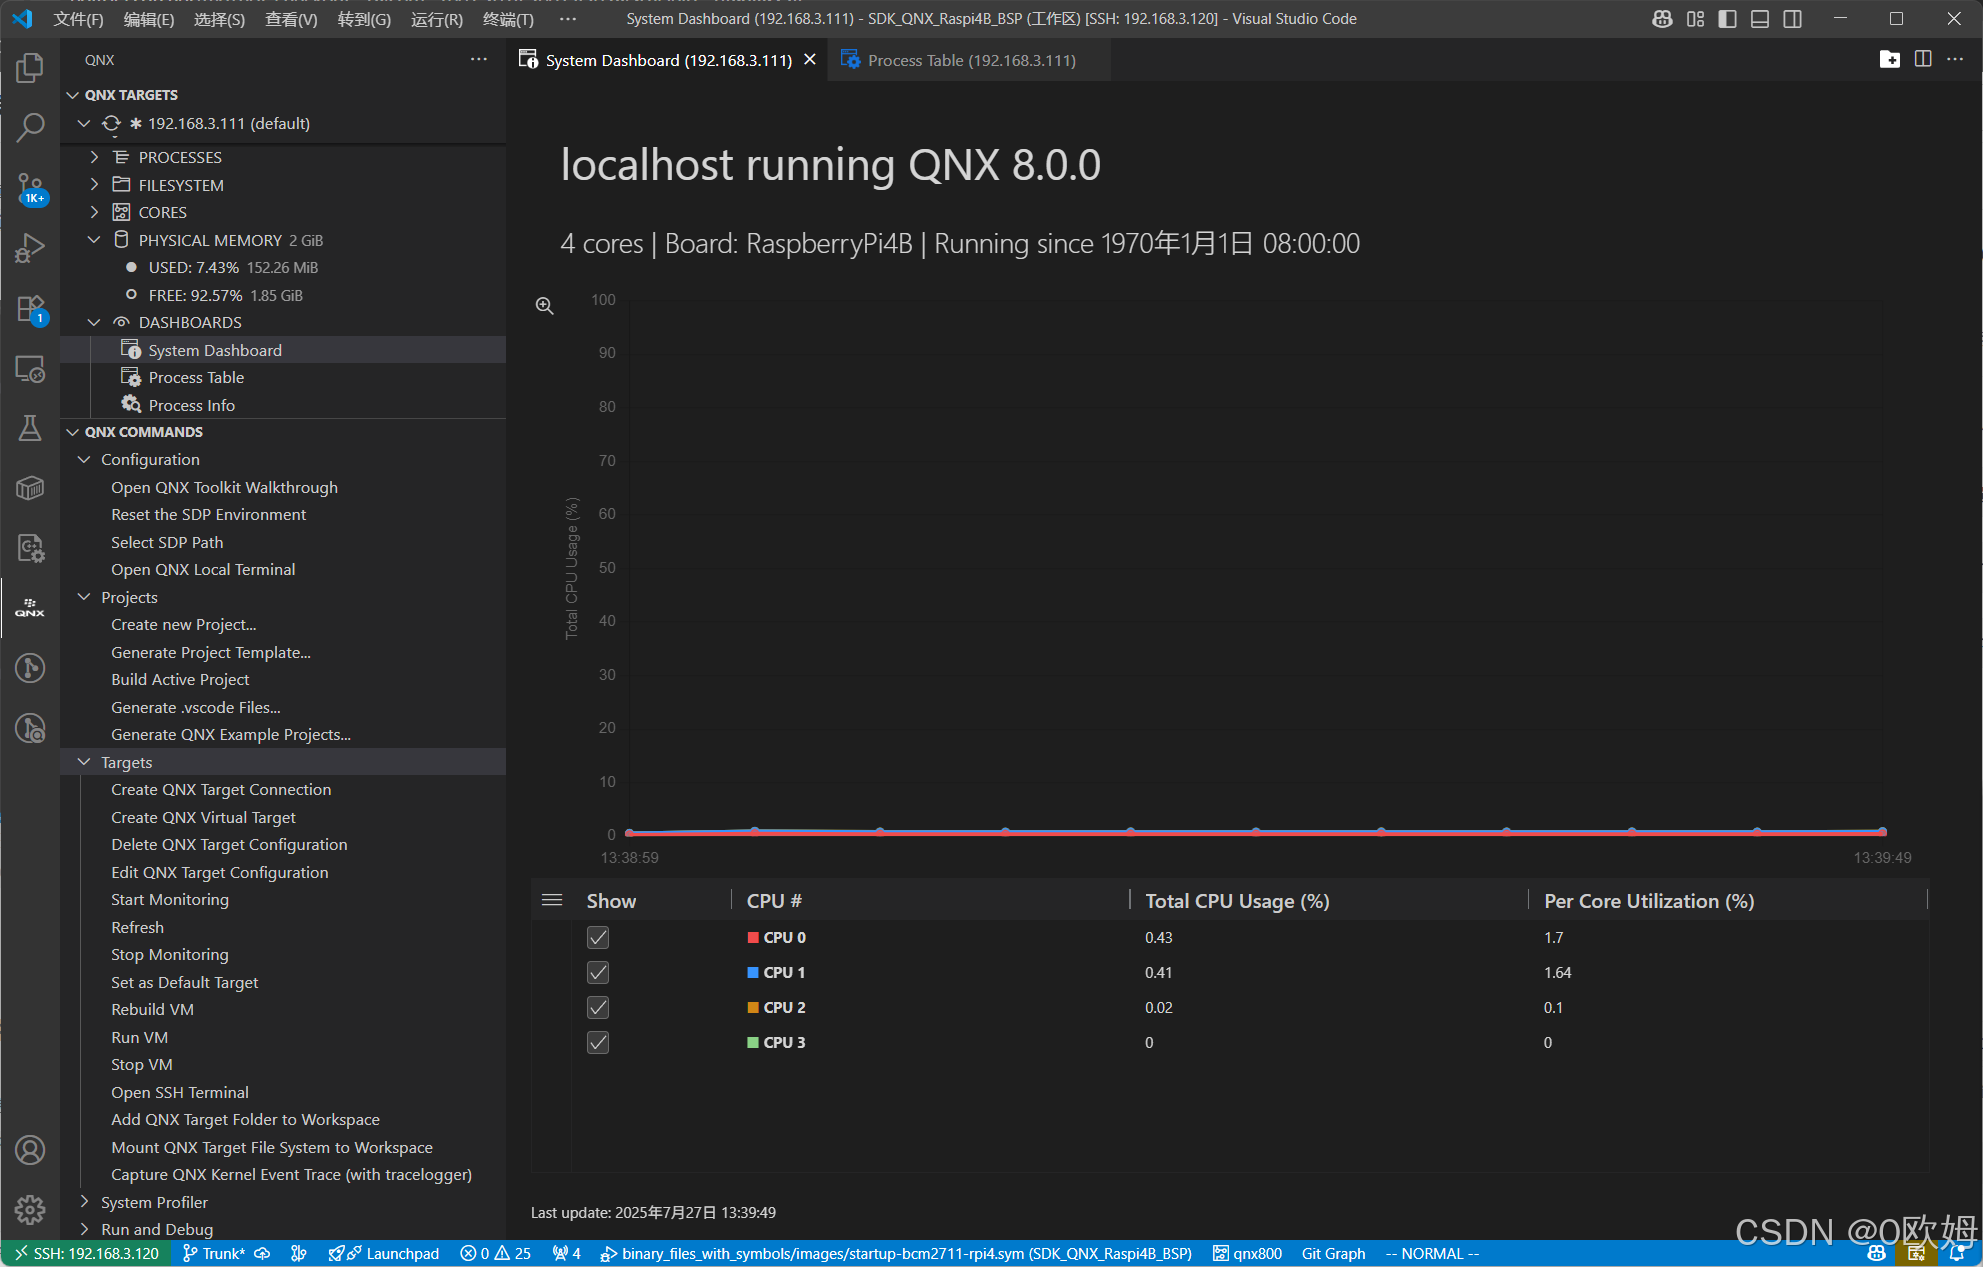
效果演示

Clangd 插件(可选)
配置Clangd插件使其支持QNX源码的跳转需要依赖工程顶层目录下的compile_command.json 文件来完成。以下是配置步骤和示例:
前提条件
- 安装VS Code: 确保已经安装Visual Studio Code;
- 安装Remote SSH扩展: 在VS Code中安装Microsoft的"Remote SSH"扩展(
ms-vscode-remote.remote-ssh)。 - 安装Clangd扩展:在VS Code中安装Microsoft的"Clangd"扩展(
llvm-vs-code-extensions.vscode-clangd)。 - 安装QNX Momentics SDK:确保已经安装了QNX Momentics SDK,获知了安装路径(例如,示例路径
~/Workspaces/qnx800)。
配置步骤
-
打开或创建QNX工程:在VS Code中打开你的QNX工程文件夹。
-
生成 `c_cpp_properties.json
-
安装compiledb工具(pyton3)
pip3 install --user compiledb -
编译并生成compile_commands.json
compiledb make
-
-
编辑
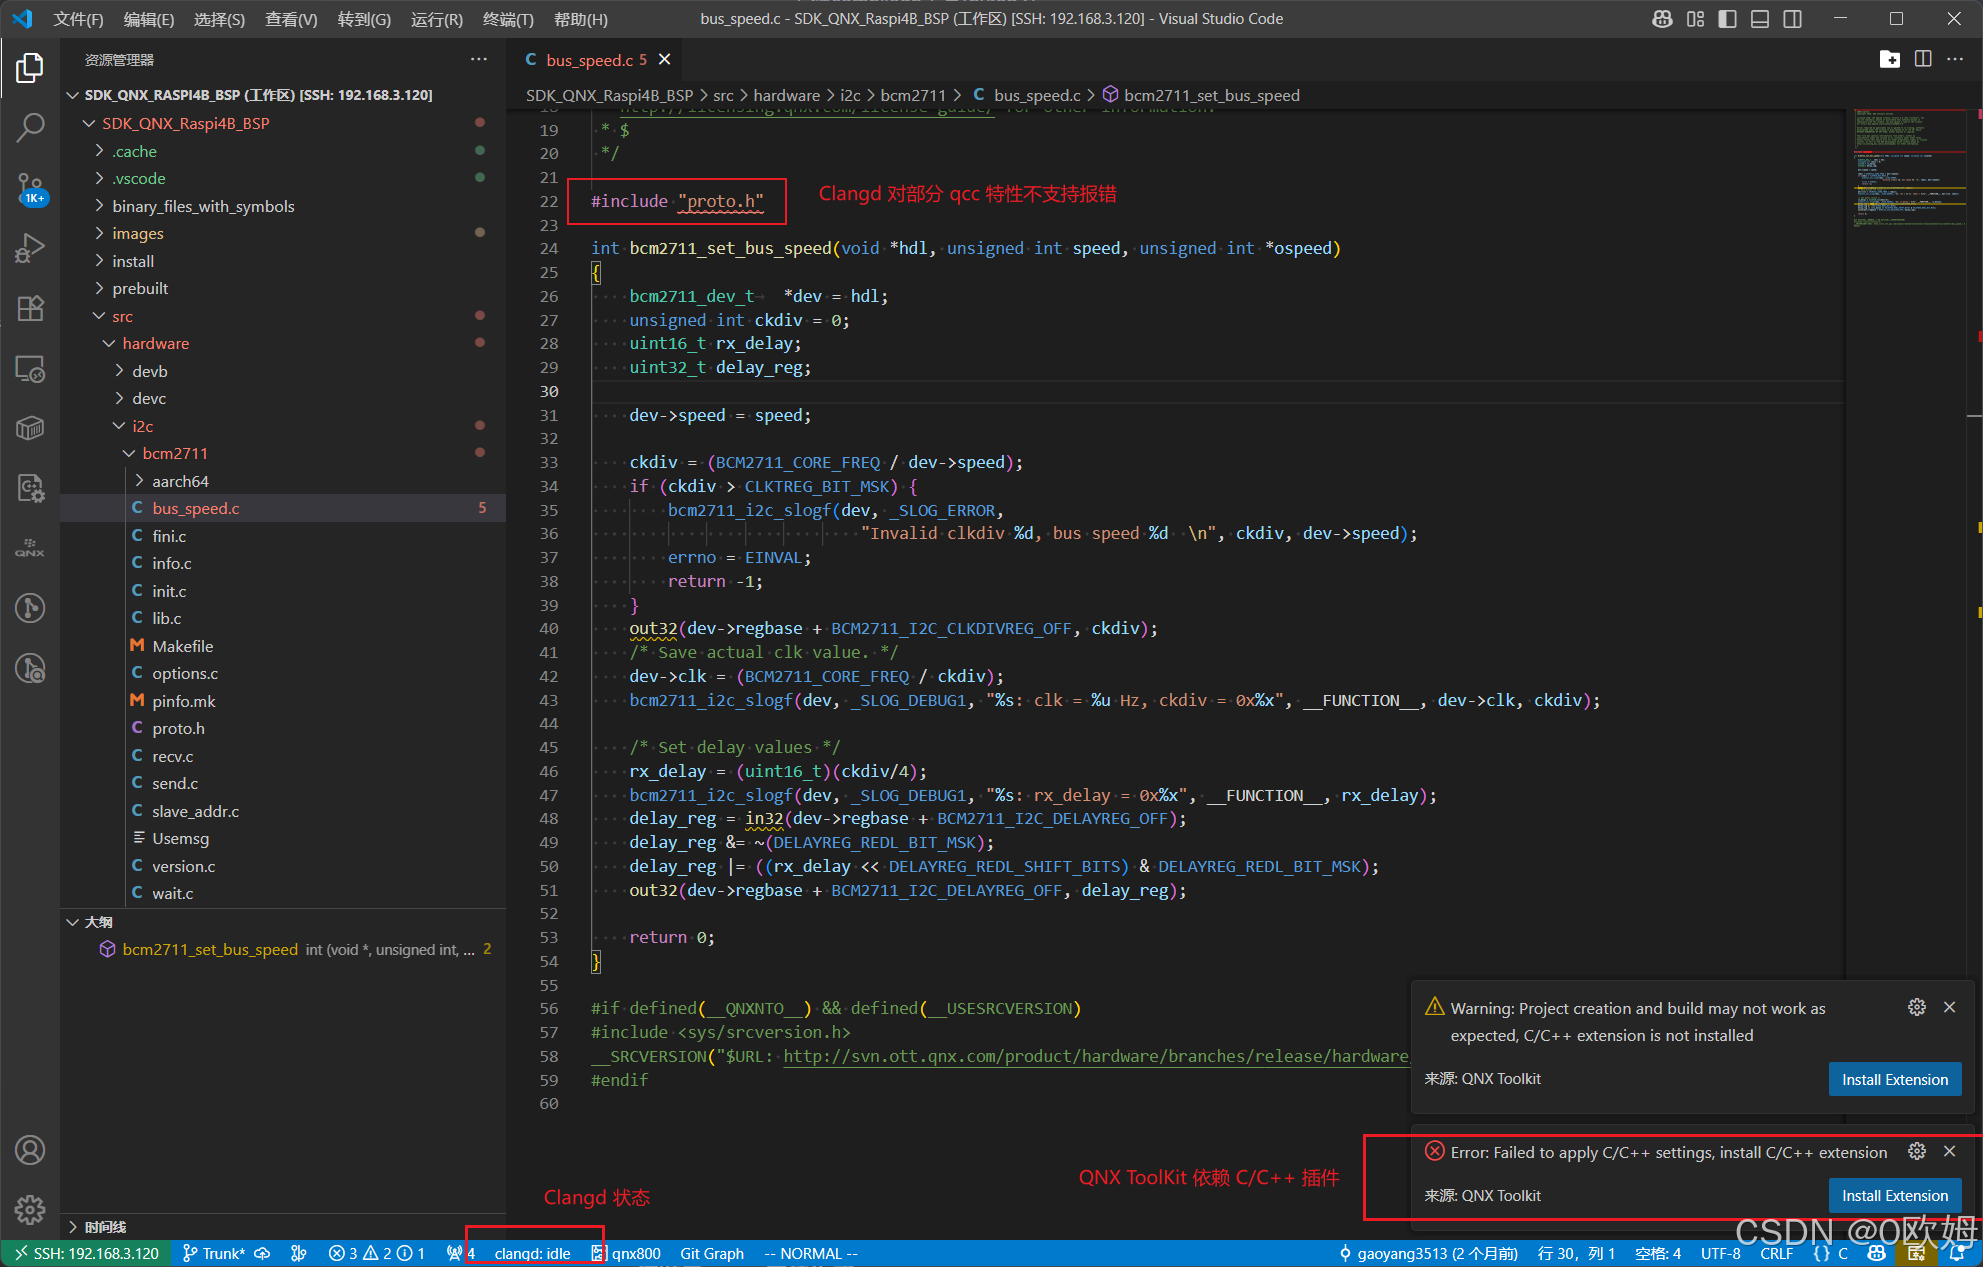
c_cpp_properties.json:Clang 无能支持QCC私有的一些特性,所以需要针对性修改,包括且不限于下面的修改:
# 替换
sed -i 's/-Vgcc_ntoaarch64/-D__QNX__/'       compile_commands.json
# 后追加一行
sed -i '/"-D__QNX__",/a\   "-D__QNXNTO__",'  compile_commands.json
sed -i '/"-D__QNX__",/a\   "-D__aarch64__",' compile_commands.json
sed -i '/"-EL",/a\   "-D__LITTLEENDIAN__",'  compile_commands.json
# 前追加一行
#sed -i '/"-D__QNX__",/i\   "-D__aarch64__",'     compile_commands.json
效果演示
问题解决
问题一、C/C++ 无法工作且打不开配置
排查出原因为安装了 Clangd 扩展后把会警告和 C/C++ 扩展存在冲突,当前点击"Disable IntelliSense"后C/C++插件的配置将会消失。

进到设置,搜索关键字"intelliSenseEngineFallback",由 “disabled” 修改为 "default"即可。规避干扰,可对当前工作区禁用 Clangd 插件。
问题二、bear无法生成compile_commands.json
使用bear工具虽然可以正常编译但最终生成的compile_command.json文件为空。
$ bear -- make
...
所以需要使用替换方案 compiledb 或自行编写python脚本收集编译日志生成 compile_command.json 文件,庆幸的是QNX的编译框架恰好会将所有 qcc 编译命令显式打印出来。所以使用AI工具生成的对编译日志收集并分析出compile_command.json文件的python脚本如下:
import sys
import re
import json
import os
import shlex
from collections import defaultdictdef detect_qnx_sysroot():"""检测QNX系统根目录"""# 1. 尝试从环境变量获取if 'QNX_TARGET' in os.environ:qnx_target = os.environ['QNX_TARGET']if os.path.exists(qnx_target):return qnx_target# 2. 尝试从标准位置查找common_paths = [# QNX SDKP 8.0 默认安装路径os.path.expanduser("~/qnx710/target/qnx7"),os.path.expanduser("~/qnx800/target/qnx"),"/opt/qnx700/target/qnx7","/opt/qnx800/target/qnx",# 历史版本路径os.path.expanduser("~/qnx660/target/qnx6"),"/opt/qnx660/target/qnx6"]for path in common_paths:if os.path.exists(os.path.join(path, "usr/include")):return path# 3. 尝试从编译命令中推断return Nonedef convert_qcc_to_clang(command, sysroot=None):"""将qcc编译选项转换为clang兼容格式"""tokens = shlex.split(command)new_tokens = ['clang']  # 替换qcc为clangskip_next = Falseinclude_paths = []# 需要保留的选项类型keep_options = {'-D', '-U', '-include', '-c', '-o', '-x', '-std'}# 需要特殊处理的QNX特有选项arch_map = {'gcc_ntoaarch64': 'aarch64-unknown-nto-qnx','gcc_ntox86_64': 'x86_64-unknown-nto-qnx','gcc_ntoarmv7': 'armv7-unknown-nto-qnx'}# 需要移除的QNX特有选项remove_options = {'-V', '-Wc', '-fpic', '-EL', '-EB'}for i, token in enumerate(tokens):if skip_next:skip_next = Falsecontinue# 跳过qcc路径if token.endswith('qcc'):continue# 处理-V选项指定架构if token == '-V':if i+1 < len(tokens) and tokens[i+1] in arch_map:new_tokens.extend(['--target', arch_map[tokens[i+1]]])skip_next = Truecontinue# 处理-Wc,选项if token.startswith('-Wc,'):# 直接提取逗号后的选项option = token[4:]# 特殊处理选项转换if option == '-fpic':option = '-fPIC'elif option == '-mstrict-align':option = ''  # clang不支持此选项if option:new_tokens.append(option)continue# 处理包含路径if token.startswith('-I'):path = token[2:] or tokens[i+1]if not path.startswith('-'):# 收集所有包含路径include_paths.append(path)new_tokens.append(token)if not token[2:]:  # -I 和路径分开的情况skip_next = Truecontinue# 保留标准选项if token in keep_options:new_tokens.append(token)if i+1 < len(tokens) and not tokens[i+1].startswith('-'):new_tokens.append(tokens[i+1])skip_next = Truecontinue# 保留定义和包含路径if token.startswith(('-D', '-U')):new_tokens.append(token)if len(token) == 2:  # 选项和值分开的情况new_tokens.append(tokens[i+1])skip_next = Truecontinue# 保留源文件if token.endswith('.c'):new_tokens.append(token)continue# 保留警告选项if token.startswith('-W'):# 转换QNX特有的警告选项if token == '-Wc,-Wall':new_tokens.append('-Wall')else:new_tokens.append(token)continue# 保留优化级别if token.startswith('-O'):new_tokens.append(token)continue# 保留语言标准if token.startswith('-std='):new_tokens.append(token)continue# 保留调试信息if token == '-g':new_tokens.append(token)continue# 移除QNX特有选项if token in remove_options:continue# 默认保留其他选项new_tokens.append(token)# 添加系统根目录if sysroot:new_tokens.append(f'--sysroot={sysroot}')return ' '.join(new_tokens)def parse_make_output(input_lines):compile_commands = []dir_stack = []current_dir = Noneseen_commands = defaultdict(set)# 检测QNX系统根目录sysroot = detect_qnx_sysroot()if not sysroot:print("警告: 未检测到QNX系统根目录,代码补全可能不完整", file=sys.stderr)print("请先运行: source $QNX_BASE/qnxsdp-env.sh", file=sys.stderr)# 正则表达式匹配entering_re = re.compile(r"make\[(\d+)\]: Entering directory ['\"](.*?)['\"]")leaving_re = re.compile(r"make\[(\d+)\]: Leaving directory")qcc_command_re = re.compile(r"^(/.*?/qcc .*? -c .*?\.c)")for line in input_lines:line = line.strip()# 处理进入目录entering_match = entering_re.match(line)if entering_match:if current_dir is not None:dir_stack.append(current_dir)current_dir = entering_match.group(2)continue# 处理离开目录leaving_match = leaving_re.match(line)if leaving_match and dir_stack:current_dir = dir_stack.pop()continue# 提取qcc编译命令qcc_match = qcc_command_re.search(line)if qcc_match and current_dir:full_command = qcc_match.group(1)# 提取源文件source_file = Nonefor part in full_command.split():if part.endswith('.c'):source_file = partbreakif not source_file:continue# 转换为绝对路径if not os.path.isabs(source_file):source_file = os.path.join(current_dir, source_file)else:source_file = os.path.normpath(source_file)# 避免重复命令command_key = (current_dir, source_file)if full_command in seen_commands[command_key]:continueseen_commands[command_key].add(full_command)# 转换命令为clang兼容格式clang_command = convert_qcc_to_clang(full_command, sysroot)compile_commands.append({"directory": current_dir,"file": source_file,"command": clang_command})return compile_commandsdef main():# 检查是否在管道中使用if sys.stdin.isatty():print("错误: 请通过管道传递make输出", file=sys.stderr)print("用法: make | python gen_cc.py", file=sys.stderr)sys.exit(1)input_lines = sys.stdin.readlines()commands = parse_make_output(input_lines)with open('compile_commands.json', 'w') as f:json.dump(commands, f, indent=2)print(f"生成 compile_commands.json 包含 {len(commands)} 条记录")print("提示: 在VSCode中安装clangd扩展,并将此文件放在项目根目录")print("配置建议: 在.vscode/settings.json中添加:")print('''{"clangd.arguments": ["--query-driver=~/qnx*/host/linux/x86_64/usr/bin/qcc","--compile-commands-dir=${workspaceFolder}"]
}''')if __name__ == "__main__":main()