我的网页聊天室设计
一、需求分析
1.用户管理模块
注册功能
实现一个注册页面。注册页面上包含了一个输入框,输入用户名和密码.
注册成功后可以跳转到登录页面.
登录功能
实现一个登录页面。登录页面上包含一个输入框。输入用户名和密码.
登录成功后可以跳转到主页面.
2.主界面
用户信息
左上角显示用户的昵称.
会话列表
显示当前用户的会话列表.
选择某个表项,就会在右侧消息区显示出历史消息.
好友列表
显示当前用户的好友列表.
点击好友列表中的表项,就会跳转到会话列表,同时给会话列表新增一个表项.
并且提供了一个 "新增好友" 的按钮,点击后跳转到新增好友页面.
消息区域
在右侧显示消息区域.
最上方显示会话的名称.
中间显示消息内容.
下方显示一个输入框和发送按钮.
当用户点击发送按钮,则会把输入框中的消息通过网络发送出去.
消息传输功能
选中好友,则会在会话列表中生成一个会话.
点击选中会话,会在右侧区域加载出历史消息列表.
接下来在输入框中输入消息,点击发送按钮即可发送消息.
如果对方在线,就会即刻提示实时消息.
如果对方不在线,后续上线后就会看到历史消息.
二、数据库设计
我建立了5张表
user表
用来登录操作,身份识别。
1.userId
2.username
3.password
CREATE TABLE `user` (`userId` int(11) NOT NULL AUTO_INCREMENT,`username` varchar(20) DEFAULT NULL,`password` varchar(20) DEFAULT NULL,PRIMARY KEY (`userId`),UNIQUE KEY `username` (`username`)
) ENGINE=InnoDB AUTO_INCREMENT=5 DEFAULT CHARSET=utf8;
friend表
用来关联用户的好友
1.userId
2.friendId
可以通过userId,查friendId。得到他的好友都是谁
CREATE TABLE `friend` (`userId` int(11) DEFAULT NULL,`friendId` int(11) DEFAULT NULL
) ENGINE=InnoDB DEFAULT CHARSET=utf8;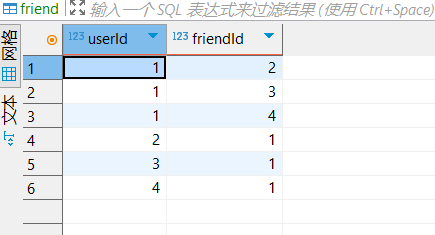
message表
用来记录消息,
1.消息id
2.消息从哪个用户id来
3.消息属于哪个会话id
4.消息内容是什么
5.消息发送的时间
CREATE TABLE `message` (`messageId` int(11) NOT NULL AUTO_INCREMENT,`fromId` int(11) DEFAULT NULL,`sessionId` int(11) DEFAULT NULL,`content` varchar(2048) DEFAULT NULL,`postTime` datetime DEFAULT NULL,PRIMARY KEY (`messageId`)
) ENGINE=InnoDB AUTO_INCREMENT=53 DEFAULT CHARSET=utf8;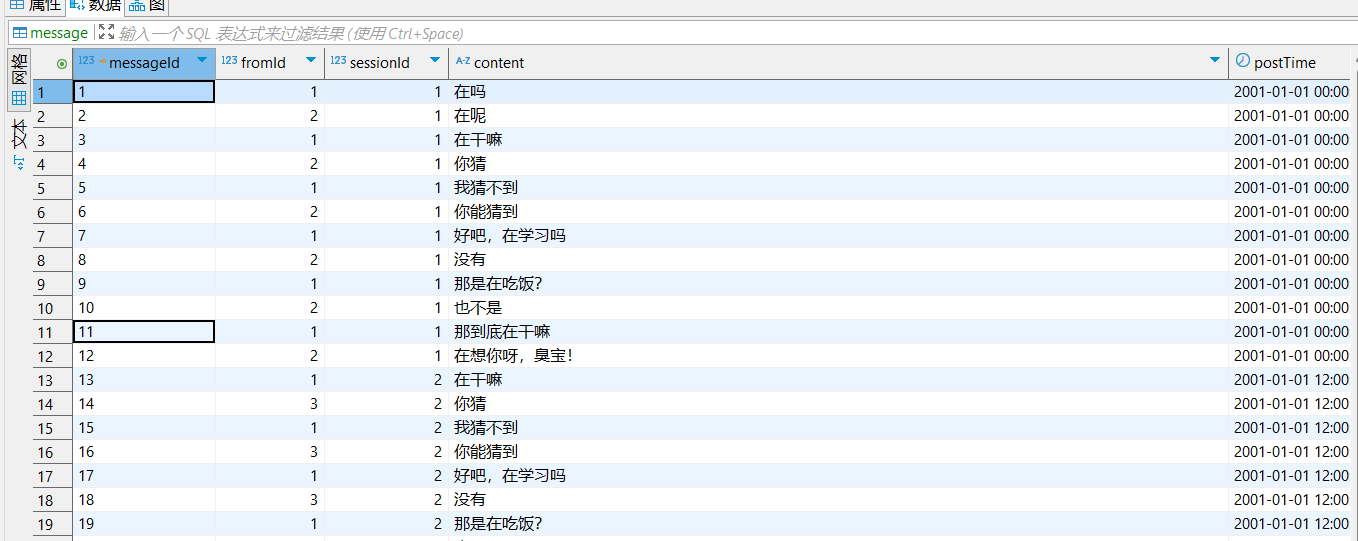
message_session表
这里记录了所创建的所有会话
1.会话id
2.会话创建时间
CREATE TABLE `message_session` (`sessionId` int(11) NOT NULL AUTO_INCREMENT,`lastTime` datetime DEFAULT NULL,PRIMARY KEY (`sessionId`)
) ENGINE=InnoDB AUTO_INCREMENT=4 DEFAULT CHARSET=utf8;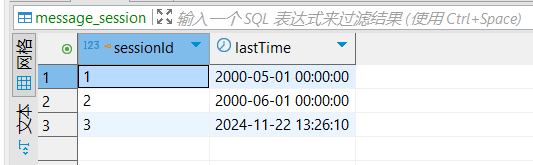
message_session_user表
这里记录会话中都有哪些userId,也就是说这个会话都有谁在聊天
sessionId
userId
CREATE TABLE `message_session_user` (`sessionId` int(11) DEFAULT NULL,`userId` int(11) DEFAULT NULL
) ENGINE=InnoDB DEFAULT CHARSET=utf8;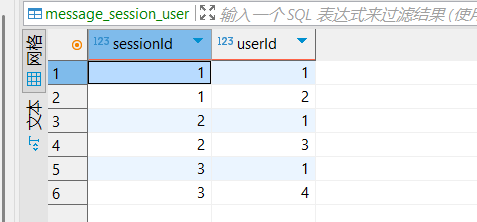
三、注册功能的实现
1.写mapper层
接口
Integer insert(User user);xml
useGeneratedKeys="true"
keyProperty="userId"
useGeneratedKeys是MyBatis提供的一个特性,
当插入数据时,数据库会返回一个id值, 这个特性是可选的,但是建议使用,因为使用这个特性,可以获得插入数据的id值。
keyProperty="userId"是MyBatis提供的一个属性,用来指定id值的属性名。 useGeneratedKeys="true"和keyProperty="userId"一起使用, 可以获得插入数据的id值。
虽然数据库已经是自增 userId 了
但是并没有给实体类中的 userId 赋值,如果不这样操作,
那么实体类中的 userId的值就为null
<!--    useGeneratedKeys="true" keyProperty="userId"
用来获得id的值,并放入userId这个属性用--><insert id="insert" useGeneratedKeys="true" keyProperty="userId">insert into user values (null,#{username},#{password})</insert>
2.写Controller层
@RequestMapping("/register")public Object register(String username, String password){User user = null;try {user = new User();user.setUsername(username);user.setPassword(password);int ret = userMapper.insert(user);System.out.println("注册" + ret);user.setPassword("");}catch (DuplicateKeyException e){System.out.println("注册失败!username=" + username);user = new User();}return user;}try/catch主要解决由于数据库中
username 添加了唯一约束的约束。确保username是唯一的。
如果这里添加了重复了username,那么就会出现异常。会报服务器错误,比如
接口会返回 500 Internal Server Error(HTTP 状态码)。
前端收到的响应是一个包含堆栈跟踪的错误页面(Spring 默认错误页)或 JSON 错误信息。
用户看到的提示可能是 “服务器内部错误”,而非友好的 “用户名已存在”。 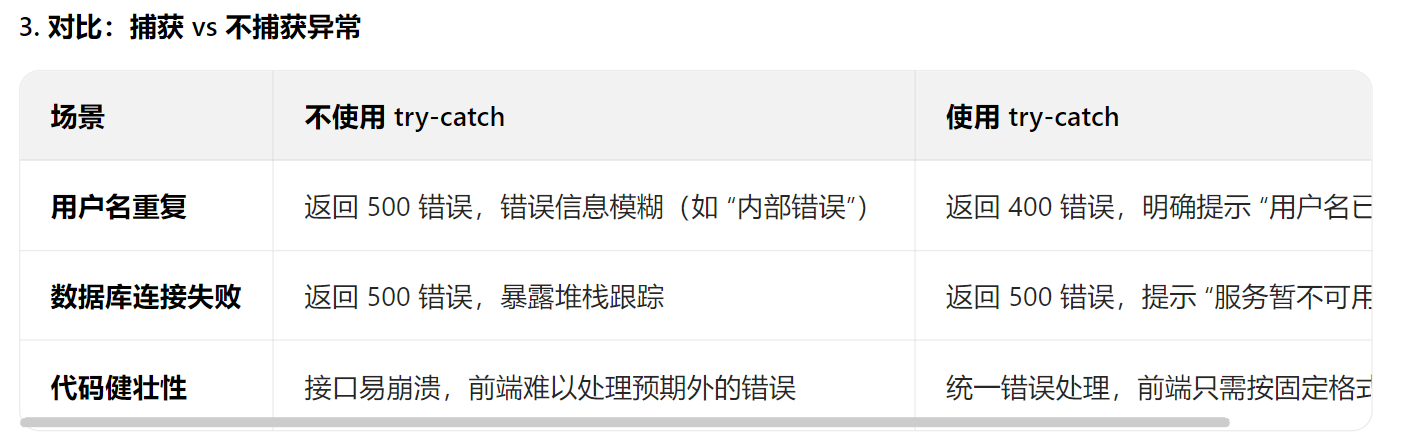
四、登录功能的实现
1.写mapper层
接口
//登录,根据用户名查询用户信息User selectByName(String username);xml
<select id="selectByName" resultType="com.qyy.www_chatroom.model.User">select * from user where username = #{username}</select>resultType="com.qyy.www_chatroom.model.User
告诉 MyBatis 将查询结果映射到
User类的对象中。MyBatis 会自动将列名(如username)映射到User类的属性(如getUsername()方法对应的属性)。
2.写Controller层
HttpSession session = request.getSession(true); // 创建或获取现有会话
如果是false,仅返回现有会话,若无则返回 null。
@RequestMapping("/login")public Object login(String username, String password, HttpServletRequest request){//1.先去数据库查username能不能找到对象。//如果能找到,看密码是否匹配,如果匹配登录成功,创建会话User user = userMapper.selectByName(username);if(user == null || !user.getPassword().equals(password)){System.out.println("登录失败!,用户名或者密码错误"+user);return new User();}//2.如果匹配成功,则登录成功,创建会话,我们需要HttpServletRequest来创建会话HttpSession session = request.getSession(true);session.setAttribute("user",user);//避免返回密码user.setPassword("");return user;}五、显示用户信息
由于当前用户已经登录,用户信息存储在session中,因此只需要调用HttpServletRequest
HttpServletRequest request
通过HttpSession session = request.getSession(false);得到当前现有的会话。
这里存储的东西有点像
1.写Controller层
@RequestMapping("userInfo")public Object getUserInfo(HttpServletRequest request){//1.先从请求中获取会话HttpSession session = request.getSession(false);if(session == null){//用户没登录,返回空对象System.out.println("获取不到session对象!");return new User();}//2.从会话中获取到之前保存的用户对象User user = (User)session.getAttribute("user");if(user == null){System.out.println("获取不到 User 对象!");return new User();}user.setPassword("");return user;}PS:HttpSession 的本质
- 接口定义:
HttpSession是 Servlet 规范中的接口(javax.servlet.http.HttpSession),定义了会话管理的方法(如setAttribute()、getAttribute())。 - 底层实现:由 Servlet 容器(如 Tomcat)提供具体实现,通常使用 Map 结构 存储属性。例如:
// 伪代码示例(实际实现因容器而异)
public class StandardSession implements HttpSession {private final Map<String, Object> attributes = new ConcurrentHashMap<>();@Overridepublic void setAttribute(String name, Object value) {attributes.put(name, value);}@Overridepublic Object getAttribute(String name) {return attributes.get(name);}
}
1. 为什么使用 Map 结构?
- 键值对存储:
setAttribute(key, value)和getAttribute(key)的设计天然适合 Map。 - 线程安全:生产环境中,容器通常使用线程安全的 Map(如
ConcurrentHashMap),以处理多线程并发访问。 - 灵活性:Map 允许存储任意类型的对象(
Object),符合HttpSession的设计。
2. 不同容器的实现差异
| Servlet 容器 | 存储方式 |
|---|---|
| Tomcat | 使用 ConcurrentHashMap 存储在内存中,支持持久化到文件或数据库。 |
| Jetty | 类似 Tomcat,支持分布式会话(如 Redis 集群)。 |
| 分布式环境 | 会话数据可能存储在 Redis、Memcached 等外部缓存中,通过序列化后传输。 |
3. 代码验证示例
通过反射查看 Tomcat 的 Session 实现(仅作原理演示,不建议在生产环境使用):
import javax.servlet.http.HttpSession;
import java.lang.reflect.Field;
import java.util.Map;public class SessionReflectionDemo {public static void main(String[] args) {// 假设这是从 request 中获取的 SessionHttpSession session = getSessionFromSomewhere();try {// 获取 StandardSession 类的私有属性Field attributesField = session.getClass().getDeclaredField("attributes");attributesField.setAccessible(true);// 获取内部的 MapMap<String, Object> attributesMap = (Map<String, Object>) attributesField.get(session);System.out.println("底层存储类型: " + attributesMap.getClass().getName());} catch (Exception e) {e.printStackTrace();}}
}
- 输出结果(在 Tomcat 中):
底层存储类型: java.util.concurrent.ConcurrentHashMap
4. 分布式会话的特殊性
在分布式系统中,HttpSession 的底层可能不是直接的 Map:
- 场景:多台服务器共享会话数据(如微服务架构)。
- 实现:
- 粘性会话:请求始终路由到同一服务器,底层仍是本地 Map。
- 会话复制:服务器间同步会话数据(性能开销大)。
- 外部存储:会话数据存储在 Redis/Memcached 中,通过序列化 / 反序列化传输,逻辑上类似 Map,但物理上是分布式缓存。
总结
- 核心结论:
HttpSession的底层实现在 单体应用 中通常是 Map 结构(如ConcurrentHashMap),而在 分布式环境 中可能是外部缓存(如 Redis),但对外提供的 API(setAttribute/getAttribute)仍保持 Map 的语义。 - 开发者视角:无需关心具体实现,只需使用
HttpSession接口提供的方法即可。
六、会话列表显示及新增会话
1.写mapper层
查该用户存在于哪些会话
//根据userId获取到该用户都在哪些会话存在。返回结果是一组sessionIdList<Integer> getSessionIdByUserId(int userId);
    <select id="getSessionIdByUserId" resultType="java.lang.Integer">
-- 子查询select sessionId from message_sessionwhere sessionId in(select sessionId from message_session_user where userId = #{userId})order by lastTime desc</select>
<select id="getFriendsBySessionId" resultType="com.qyy.www_chatroom.model.Friend">select userId as friendId,username as friendName from userwhere userId in(select userId from message_session_user where sessionId = #{sessionId} and userId != #{selfUserId})</select>查询最后一条消息
//获取指定对话的最后一条消息@Select("select content from message where sessionId = #{sessionId} order by postTime desc limit 1")String getLastMessageBySessionId(int sessionId);
根据sessionId 来查询这个会话都包含哪些用户(除去自己)
List<Friend> getFriendsBySessionId(@Param("sessionId") int sessionId,@Param("selfUserId") int selfUserId);
<select id="getFriendsBySessionId" resultType="com.qyy.www_chatroom.model.Friend">select userId as friendId,username as friendName from userwhere userId in(select userId from message_session_user where sessionId = #{sessionId} and userId != #{selfUserId})</select>
新增一个会话记录,返回会话的id
//3.新增一个会话记录。返回会话的id@Options(useGeneratedKeys = true,keyProperty = "sessionId")@Insert("insert into message_session(sessionId, lastTime) values (null,now())")int addMessageSession(MessageSession messageSession);在消息会话用户表中插入用户,用来关联会话与用户的关系
@Insert("insert into message_session_user(sessionId, userId) values (#{sessionId},#{userId})")int addMessageSessionUser(MessageSessionUser messageSessionuser);
2.写Controller层
会话列表展示
@RequestMapping("/sessionList")public Object getMessageList(HttpServletRequest request){List<MessageSession> messageSessionList = new ArrayList<>();//1.获取当前用户userId,从Spring的Session中获取HttpSession session = request.getSession(false);if(session == null){System.out.println("getMessageList Session为空!");return messageSessionList;}User user = (User)session.getAttribute("user");if(user == null){System.out.println("getMessageList : user 为空");}//2.根据userId查询数据库,查出来会话有哪些。List<Integer> sessionIdList = messageSessionMapper.getSessionIdByUserId(user.getUserId());System.out.println("获取到的sessionIdList:"+sessionIdList);for(int sessionId : sessionIdList){MessageSession messageSession = new MessageSession();messageSession.setSessionId(sessionId);//3.遍历会话Id,查询出每个会话里涉及到的好友有谁List<Friend> friends = messageSessionMapper.getFriendsBySessionId(sessionId, user.getUserId());messageSession.setFriends(friends);//4.遍历会话 iD,查询每个会话最后一条消息String lastMessage = messageMapper.getLastMessageBySessionId(sessionId);if(lastMessage == null){messageSession.setLastMessage("");}else {messageSession.setLastMessage(lastMessage);}messageSessionList.add(messageSession);}//最终目标构造出一个MessageSession对象数组。return messageSessionList;}新增会话,并关联两个用户
@Transactional
注解的作用是确保三个数据库操作(插入会话、插入两个用户关联记录)作为一个不可分割的原子操作
@Transactional
@Transactional@RequestMapping("/session")public Object addMessageSession(int toUserId, @SessionAttribute("user")User user){HashMap<String,Integer> resp = new HashMap<>();//进行数据库插入操作//1.先给message—_Session表里插入记录,使用这个参数的目的主要是为了获取到会话的主键SessionId//里面的friends和lastMessage属性这里用不上MessageSession messageSession = new MessageSession();messageSessionMapper.addMessageSession(messageSession);//2.给message_session_user表里插入记录MessageSessionUser messageSessionUser = new MessageSessionUser();messageSessionUser.setSessionId((messageSession.getSessionId()));messageSessionUser.setUserId(user.getUserId());messageSessionMapper.addMessageSessionUser(messageSessionUser);//3.给message_session_user表中插入记录MessageSessionUser messageSessionUser2 = new MessageSessionUser();messageSessionUser2.setSessionId(messageSession.getSessionId());messageSessionUser2.setUserId(toUserId);messageSessionMapper.addMessageSessionUser(messageSessionUser2);System.out.println("[addMessageSession] 新增会话成功!sessionId =" + messageSession.getSessionId()+"userId" +user.getUserId()+"userId2" + toUserId);resp.put("sessionId", messageSession.getSessionId());return resp;}
七、好友列表显示
1.写mapper层
@Mapper
public interface FriendMapper {//要查看是哪个用户的好友List<Friend> selectFriendList(int userId);
}
xml
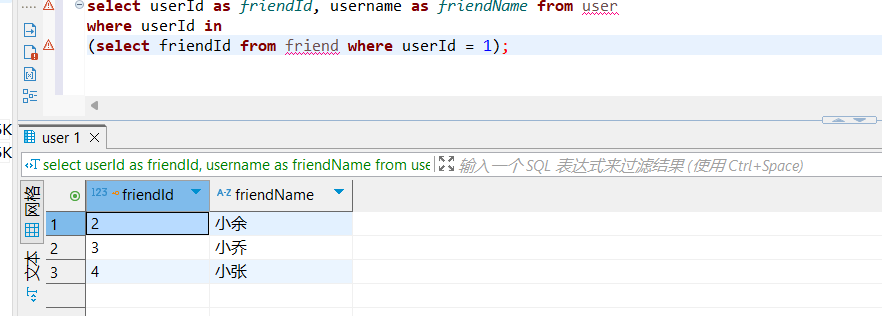
<select id="selectFriendList" resultType="com.qyy.www_chatroom.model.Friend">select userId as friendId, username as friendName from userwhere userId in(select friendId from friend where userId = #{userId})</select>sql
select userId as friendId, username as friendName from user
where userId in
(select friendId from friend where userId = #{userId})
例如小祁的好友列表如下
2.写Controller层
@RequestMapping("friendList")public Object getFriendList(HttpServletRequest request){HttpSession session = request.getSession();if(session == null){System.out.println("getFriendList,session不存在");return new ArrayList<Friend>();}User user = (User)session.getAttribute("user");if(user == null){System.out.println("getFriendList,user不存在");return new ArrayList<Friend>();}List<Friend> friendList = friendMapper.selectFriendList(user.getUserId());return friendList;}由于这里用户已经登录
这里还是根据从 HttpServletRequest
中获取Session,再从Session得到当前用户 id。
再根据当前用户id 来查好友列表
八、消息区域文本显示
1.写mapper层
获取历史消息
//获取历史消息//有的会话,历史消息特别多。//此处做一个限制,默认只取最近100条消息//进行笛卡尔积。username = fromId。根据sessionId匹配//直接按发送时间升序,让会话中最新消息在最下面,并显示100条数据@Select("select messageId,fromId,username as fromName,sessionId,content" +" from user,message " +"where userId = fromId and sessionId = #{sessionId} " +"order by postTime asc limit 100")List<Message> getMessageBySessionId(int sessionId);2.写Controller层
历史消息查询
@RequestMapping("/message")public Object getMessage(int sessionId){List<Message> messages = messageMapper.getMessageBySessionId(sessionId);System.out.println("+++++++++++++++++++++++++++++++++++++++++++++++"+messages);return messages;}九、消息传输功能的实现
WebSocket实现消息传输功能的核心流程
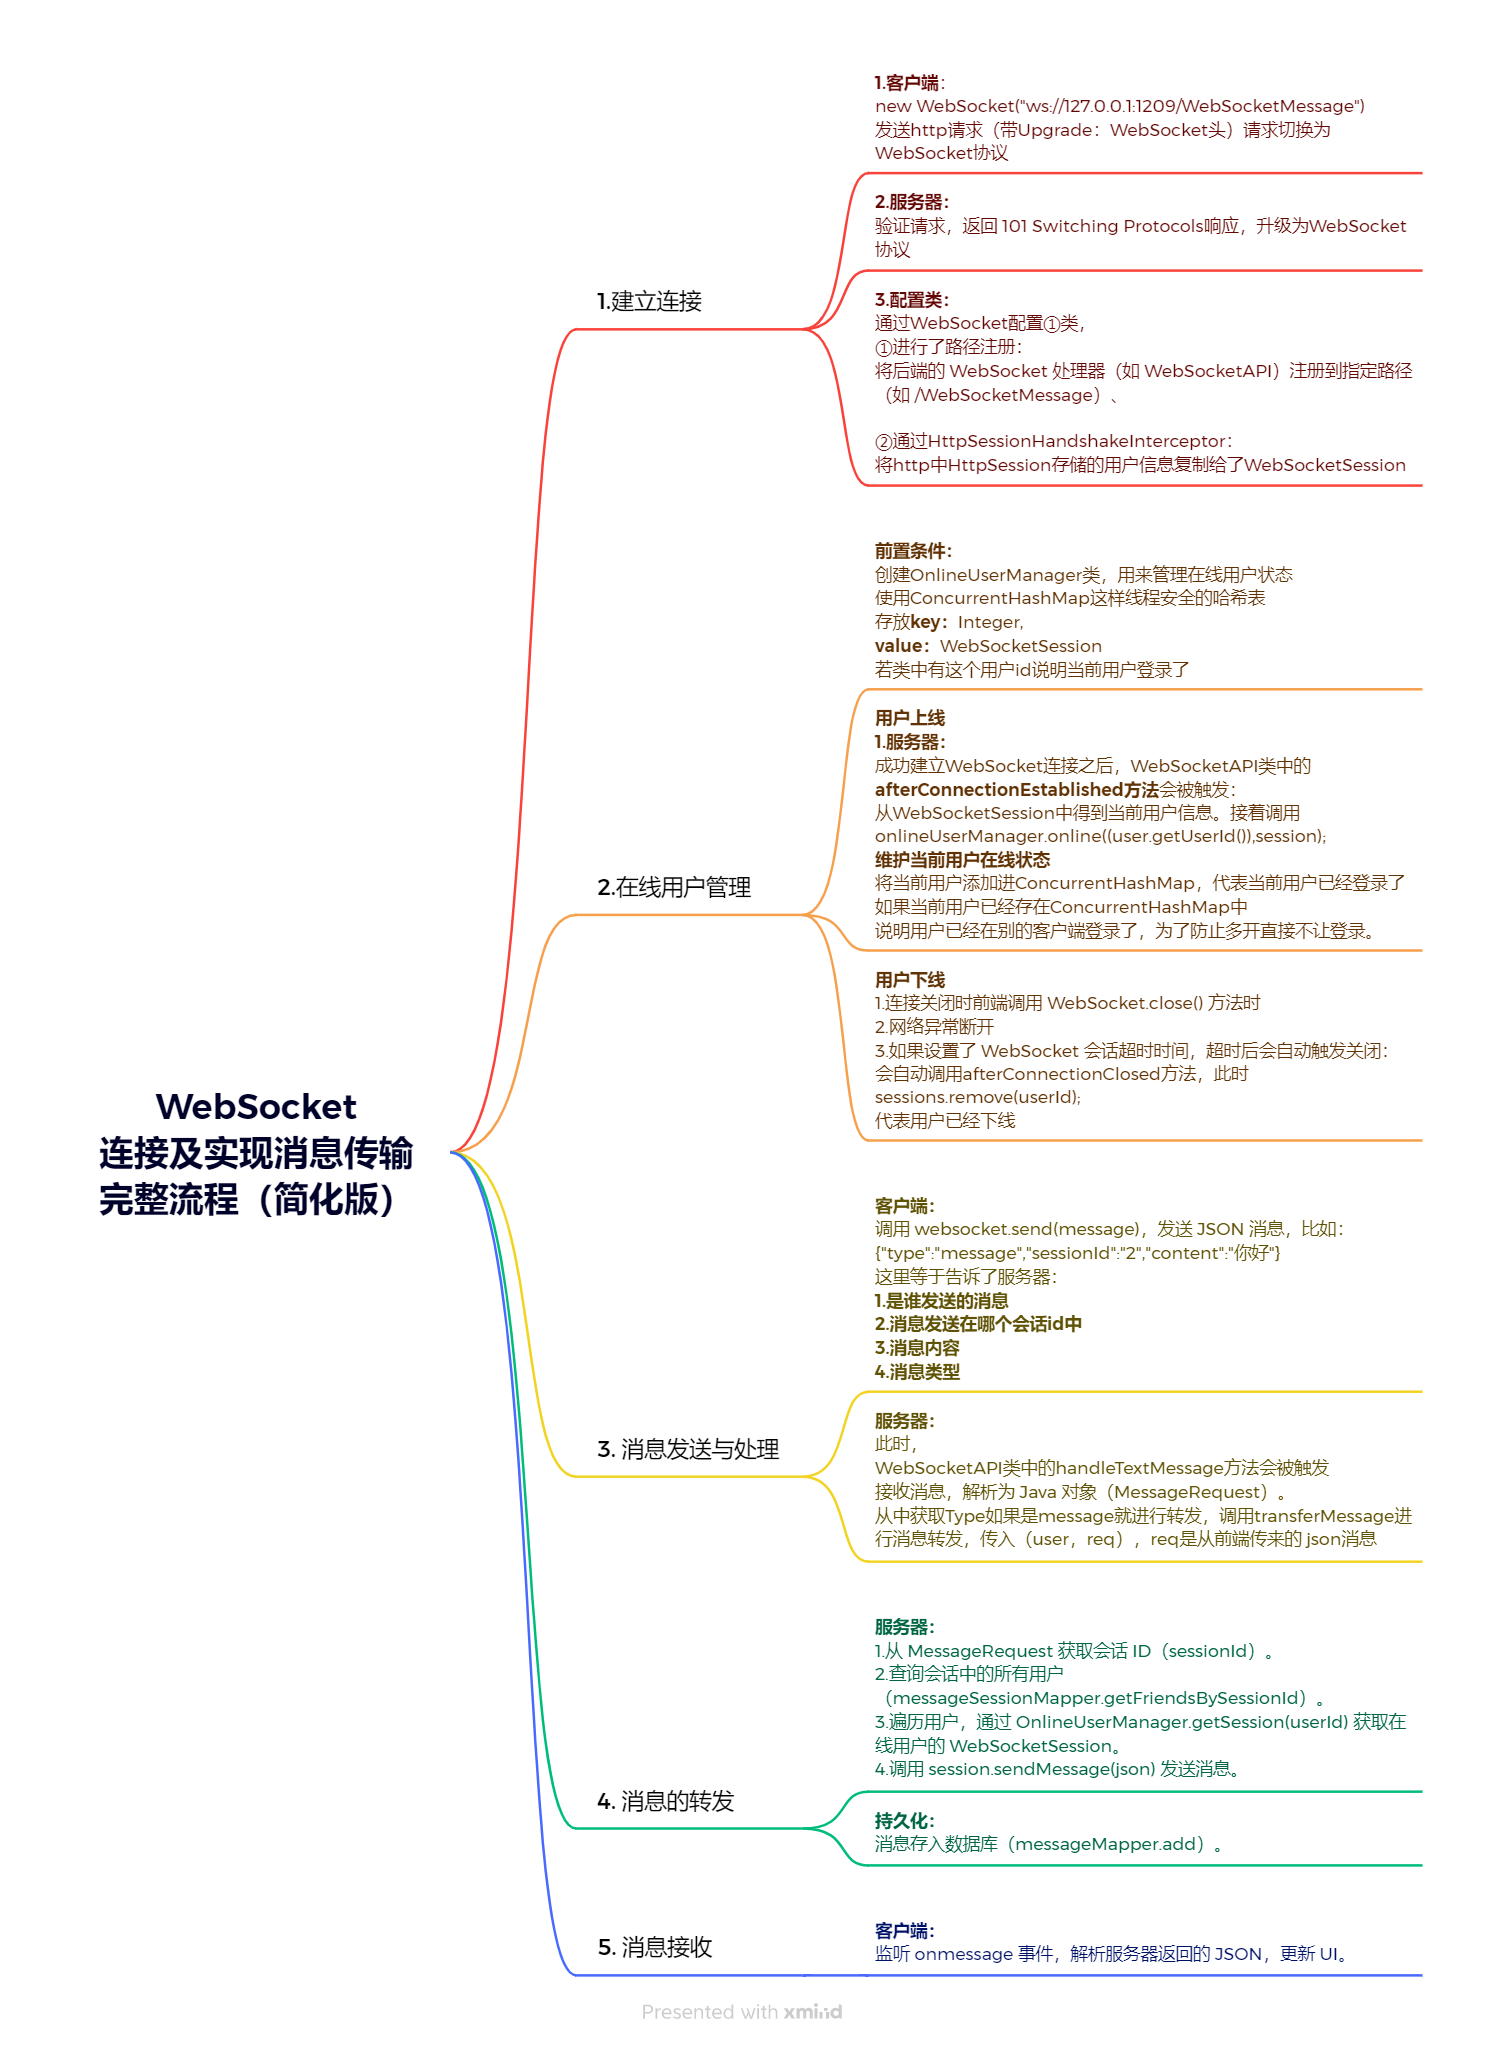
整个过程是实时、双向的,无需客户端频繁发送请求,服务器可以主动推送消息给客户端。
1.WebSocket配置类WebSocketConfig类实现WebSocketConfigurer 类(注册路径,复制用户信息)
@Configuration
@EnableWebSocket //启动websocket
public class WebSocketConfig implements WebSocketConfigurer {@Autowiredprivate WebSocketAPI webSocketAPI;@Overridepublic void registerWebSocketHandlers(WebSocketHandlerRegistry registry) {//通过这个方法。把刚才创建好的Handler类注册到具体的路径上registry.addHandler(webSocketAPI,"/WebSocketMessage")//通过这个拦截器就可以把用户给HttpSession中添加的Attribute在WebSocketSession也被加入一份.addInterceptors(new HttpSessionHandshakeInterceptor());}
}
2.管理用户在线状态OnlineUserManager类
package com.qyy.www_chatroom.component;import org.springframework.stereotype.Component;
import org.springframework.web.socket.WebSocketSession;import java.util.HashMap;
import java.util.concurrent.ConcurrentHashMap;//通过这个类来记录当前用户在线状态,维护了()
//此处的哈希表要考虑线程安全问题,因此使用ConcurrentHashMap是很有必要的。
//此处是我们自己写了一个哈希表进行手动管理。我们也可以借助redis中间件什么的进行处理。方便起见。我们这样处理
@Component
public class OnlineUserManager {private ConcurrentHashMap<Integer, WebSocketSession> sessions = new ConcurrentHashMap<>();//1.用户上线,给哈希表插入键值对//若两个不同客户端,使用同一个账号登录,也就是多开。//我们这里设置如果前一个客户端登录,就不允许后面客户端再登录了(代码简单)//要避免多开,因为多开需要写更复杂的逻辑来处理。如果多个客户端登录,如果有人给你发消息。//我们需要给多个客户端同时发到消息。因此逻辑上会变得更复杂。public void online(int userId,WebSocketSession session){if(sessions.get(userId) != null){//说明此时用户已经在线了,那么我们就登录失败,不记录映射关系.后续就收不到任何消息//因为我们通过映射关系实现消息转发System.out.println("["+ userId + "] 已经被登陆了!");return;//这个客户端断开链接的时候,会触发offline操作。进行offline的时候//不能就把userId:1 WebSocketSession:session1这个信息给删了//删除的时候,要看一下是否是删除自己的会话。}sessions.put(userId,session);System.out.println("["+ userId + "] 上线!");}//2.用户下线,针对这个哈希表进行删除元素public void offline(int userId,WebSocketSession session){WebSocketSession exitSession = sessions.get(userId);//为了防止多开,删除键值对的时候,要看一下是否是删除自己的会话session。//不能把别人的删了// 比如:多开后手机 B 因为网络问题,突然触发了一个错误的 offline(user1, sessionB) 方法(注意:sessionB 是手机 B 的会话,并未被服务器记录)//如果没有判断 exitSession == session,直接执行 sessions.remove(user1)//结果:手机 A 的 sessionA 被错误删除,user1 变成离线,但手机 A 其实还在线 ❌if(exitSession == session){//如果这俩Session是同一个,才真正进行下线操作,否则就啥也不干sessions.remove(userId);System.out.println("["+ userId + "] 下线!");}}//3.根据userId获取到WebSocketSessionpublic WebSocketSession getSession(int userId){return sessions.get(userId);}}
3.建立连接后调用afterConnectionEstablished类(来更新用户在线状态)
@Overridepublic void afterConnectionEstablished(WebSocketSession session) throws Exception {//这个方法会在websocket连接建立后被自动调用System.out.println("【WebSocket】 连接成功");//正因为前面加上了拦截器,就可以让每一个往HttpSession中加入的Attribute//在WebSocketSession中也被加入一份User user = (User) session.getAttributes().get("user");if(user == null){return;}System.out.println("获取到的userId-----------------" +user.getUserId());//获取到userId之后,就把键值对存起来onlineUserManager.online((user.getUserId()),session);}4.处理前端发来的消息handleTextMessage类
@Overrideprotected void handleTextMessage(WebSocketSession session, TextMessage message) throws Exception {//这个方法是在websocket收到消息后,被自动调用System.out.println("【WebSocket】 收到消息!"+message.toString());//session会话里面记录了通信双方是谁。Session中就持有了websocket的通信连接User user = (User) session.getAttributes().get("user");if(user == null){System.out.println("[WebsocketAPI] user == null 未登录用户,无法进行消息转发");return;}//2.针对请求进行解析,把json格式的字符串,转成一个java中的对象//message.getPayload()得到荷载信息这是json格式,我们把他转成java对象MessageRequest req = objectMapper.readValue(message.getPayload(), MessageRequest.class);if(req.getType().equals("message")){//就进行转发transferMessage(user,req);}else {System.out.println("[WebsocketAPI] req.type 有误" + message.getPayload());}//后续主要实现这个方法//处理消息接收,转发,以及保存消息记录}5.转发消息类transferMessage类
//通过这个方法来完成实际的消息转发操作。//1.先构造一个待转发的响应对象,MessageResponse//2.根据请求的SessionId,获取这个MessageSession的里面都有哪些用户//通过查询数据库就知道了//3.循环遍历上述这个列表,给列表中的每一个用户都发一份响应消息//知道了每个用户的userId,进一步查询刚才准备好的OnlineManager,就知道了对应的WebSocketSession//注:除了给好友发,我们还要给自己发。//一个会话可能有很多人,群聊前端写起来比较麻烦,不过我们后端API都支持群聊//4.转发的消息要记录到数据库中,这样后续用户如果下线之后,重新上线,还能通过历史消息拿到之前的消息private void transferMessage(User fromUser, MessageRequest req) throws IOException {//考虑一下,如果发消息时候,对方不在线,该怎么处理。给李四发消息,如果不在线。第二步能获取到李四,但是第三步WebSocketSession//找不到。不过我们存到数据库中,如果哪天上线了,就能通过历史消息看到张三发来的消息// 如果在线,就要立即收到消息。//1.先构造一个待转发的响应对象,MessageResponseMessageResponse response = new MessageResponse();response.setType("message");//不设置也行,因为已经就地初始化了response.setFromId(fromUser.getUserId());response.setFromName(fromUser.getUsername());response.setSessionId(req.getSessionId());response.setContent(req.getContent());//还需要把java对象转jsonString responseJson = objectMapper.writeValueAsString(response);System.out.println("transferMessage respJson:" +responseJson);//2.根据请求的SessionId,获取这个MessageSession的里面都有哪些用户//通过查询数据库就知道了List<Friend> friends = messageSessionMapper.getFriendsBySessionId(req.getSessionId(), fromUser.getUserId());//注:数据库操作会把自身用户排除掉。而发消息要给自己这边也发一次,因此把当前用户也要添加进去Friend myself = new Friend();myself.setFriendId(fromUser.getUserId());myself.setFriendName(fromUser.getUsername());friends.add(myself);//3.循环遍历上述这个列表,给列表中的每一个用户都发一份响应消息//知道了每个用户的userId,进一步查询刚才准备好的OnlineManager,就知道了对应的WebSocketSession//注:除了给好友发,我们还要给自己发。for(Friend friend : friends){WebSocketSession webSocketsession = onlineUserManager.getSession(friend.getFriendId());if(webSocketsession == null){//如果用户不在线,就不发送continue;}webSocketsession.sendMessage(new TextMessage(responseJson));}//4.转发的消息,还需要放到数据库中,后续用户如果下线,重新上线还可以通过历史消息方式拿到之前的消息//需要往message表中写入记录Message message = new Message();message.setFromId(fromUser.getUserId());message.setSessionId(req.getSessionId());message.setContent(req.getContent());//自增主键和时间属性都可以让SQL、在数据库中生成messageMapper.add(message);}