用PyTorch手写透视变换
Torch,起码是较老版本,没有原生支持可微分的透视变换。为了解决,可以尝试用Torch3D,或者其他3D Torch的库。这里给一个简单的实现。需要注意,非常老的torch不支持。
- 构建目标图像中的像素网格坐标;
- 使用 ( H^{-1} ) 反向映射目标图像像素至原图坐标;
- 用
grid_sample()在原图中采样这些位置的值(双线性插值); - 利用 PyTorch 的 autograd 系统自动传递梯度。
📥 输入参数
| 参数 | 类型 | 说明 |
|---|---|---|
image | Tensor(C,H,W) | 输入图像,float32 张量,通道优先格式(如 RGB 图为 3×H×W) |
matrix | Tensor(3,3) | 透视变换矩阵(Homography) |
out_h | int | 输出图像高度 |
out_w | int | 输出图像宽度 |
📤 输出结果
| 返回值 | 类型 | 说明 |
|---|---|---|
output | Tensor(C, out_h, out_w) | 输出透视变换后的图像张量 |
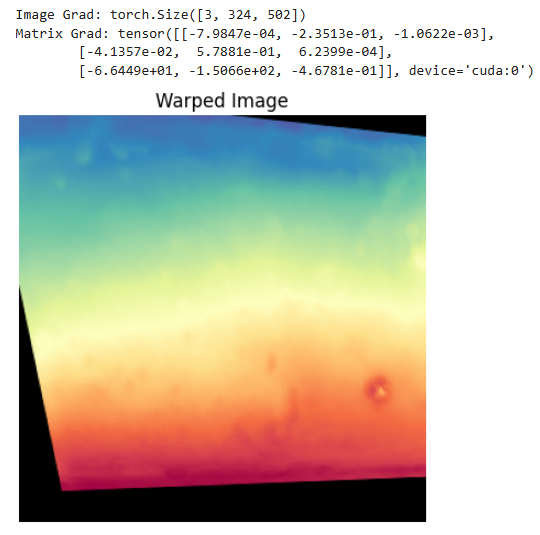
先来效果图
透视变换
透视变换(Homography),将图像按指定的 3×3 矩阵进行几何变换,也就是矩阵乘法。 输出图像大小是固定的,需要我们 将输出图像每个位置“反推”回输入图像中应该采样的位置,这叫做反向采样(inverse mapping)。
获取变换位置映射
在针对图像做各种变换时候,首先都要有一个meshgrid,用于构建像素坐标网格。对于单应性变换、旋转等都是如此。 具体实现用 arange,生成一个从 0 开始到 out_h-1 的连续整数张量。
yy, xx = torch.meshgrid(torch.arange(out_h),torch.arange(out_w),indexing='ij'
)
得到目标图像中每个像素的位置 (x, y),再构建齐次坐标:
grid = torch.stack([xx, yy, ones], dim=0).view(3, -1) # shape: (3, H*W)
我们要找到“目标图像第 (x,y) 个像素,在源图像的哪个位置采样”,所以要用 反变换H−1H^{-1}H−1 把目标图像的位置映射到源图像坐标。
H_inv = torch.inverse(matrix)
sample_coords = H_inv @ grid  # shape: (3, N)
接着,做除以第三行的归一化:
sample_coords = sample_coords[:2] / sample_coords[2:] # shape: (2, N)
就能得到输出图像中每个点,在输入图像中的实际采样位置(浮点数)是多少。这里还得做个归一化,为了应对 grid_sample 的输入要求
x_norm = (x / (W - 1)) * 2 - 1
y_norm = (y / (H - 1)) * 2 - 1
接下来到了关键步骤,怎么用映射矩阵来执行变换?
grid_sample 函数
grid_sample 是 PyTorch 中的一个重要函数,常用于图像变换、空间变换网络(STN)、透视变换等场景。它通过提供一组采样坐标点,在输入图像上进行双线性插值或最近邻插值。
📥 输入参数说明
| 参数名 | 类型 | 说明 |
|---|---|---|
input | Tensor (B, C, H_in, W_in) | 输入图像或特征图,batch 格式 |
grid | Tensor (B, H_out, W_out, 2) | 每个输出像素在输入图像上的采样坐标,最后一维是 (x, y) |
mode | str,可选(默认 'bilinear') | 插值模式:'bilinear' 或 'nearest' |
padding_mode | str,可选(默认 'zeros') | 超出边界时的填充方式:'zeros', 'border', 'reflection' |
align_corners | bool(默认 True) | 是否将输入图像角像素映射到 [-1, 1] 的边界点 |
📌 坐标说明(关键)
grid中的坐标是归一化的,范围是 [-1, 1]:(-1, -1)表示左上角(1, 1)表示右下角
- 这适用于所有尺寸的输入图像,PyTorch 会自动映射到实际的像素位置
所以这里要进行:
warped = F.grid_sample(image.unsqueeze(0),        # (1, C, H, W)sample_grid.unsqueeze(0),  # (1, out_h, out_w, 2)mode='bilinear',padding_mode='zeros',align_corners=True
)
结果是你想要的透视变换图像。
汇总
import torch
import torch.nn.functional as Fdef warp_perspective(image, matrix, out_h, out_w):"""image: Tensor (C, H, W)matrix: Tensor (3, 3)return: warped image (C, out_h, out_w)"""device = image.devicedtype = image.dtypeC, H, W = image.shape# 1. 构建目标图像像素网格yy, xx = torch.meshgrid(torch.arange(out_h, device=device, dtype=dtype),torch.arange(out_w, device=device, dtype=dtype),indexing='ij')ones = torch.ones_like(xx)grid = torch.stack([xx, yy, ones], dim=0).view(3, -1)  # (3, H*W)# 2. 将目标像素通过 H^-1 映射回源图像坐标H_inv = torch.inverse(matrix)sample_coords = H_inv @ grid  # (3, N)sample_coords = sample_coords[:2] / sample_coords[2:]  # (2, N)# 3. 归一化坐标到 [-1, 1]x_norm = (sample_coords[0] / (W - 1)) * 2 - 1y_norm = (sample_coords[1] / (H - 1)) * 2 - 1sample_grid = torch.stack([x_norm, y_norm], dim=-1)  # (N, 2)sample_grid = sample_grid.view(out_h, out_w, 2)sample_grid = sample_grid.unsqueeze(0)  # (1, out_h, out_w, 2)# 4. image -> (1, C, H, W)image = image.unsqueeze(0)warped = F.grid_sample(image,sample_grid,mode='bilinear',padding_mode='zeros',align_corners=True)return warped.squeeze(0)  # (C, out_h, out_w)from PIL import Image
from torchvision.transforms.functional import to_tensor
import matplotlib.pyplot as plt# 加载图片
img = Image.open("img").convert("RGB")
img_tensor = to_tensor(img).float().cuda()  # (C, H, W)# 定义 Homography(可以设置为 requires_grad=True)
H = torch.tensor([[1.0, 0.2, -30.0],[0.1, 1.0, -20.0],[0.0005, 0.0003, 1.0]
], dtype=torch.float32, device='cuda')img_tensor.requires_grad_()  # ✅ 启用梯度
H.requires_grad_()           # ✅ 如果你也想对H求导# 调用纯 Python 实现的 warp 函数
out = warp_perspective(img_tensor, H, 300, 300)# 计算 loss 并反向
loss = out.mean()
loss.backward()# 打印梯度信息
print("Image Grad:", img_tensor.grad.shape)
print("Matrix Grad:", H.grad)# 可视化结果
plt.imshow(out.permute(1, 2, 0).detach().cpu().numpy())
plt.axis('off')
plt.title('Warped Image')
plt.show()