【Actix Web】Rust Web开发实战:Actix Web框架全面指南

✨✨ 欢迎大家来到景天科技苑✨✨
🎈🎈 养成好习惯,先赞后看哦~🎈🎈
🏆 作者简介:景天科技苑
🏆《头衔》:大厂架构师,华为云开发者社区专家博主,阿里云开发者社区专家博主,CSDN全栈领域优质创作者,掘金优秀博主,51CTO博客专家等。
🏆《博客》:Rust开发,Python全栈,Golang开发,云原生开发,PyQt5和Tkinter桌面开发,小程序开发,人工智能,js逆向,App逆向,网络系统安全,数据分析,Django,fastapi,flask等框架,云原生K8S,linux,shell脚本等实操经验,网站搭建,数据库等分享。所属的专栏:Rust语言通关之路
景天的主页:景天科技苑

文章目录
- Rust Web开发
- 一、Actix Web框架概述
- 1.1 Actix Web的特点
- 1.2 Actix Web与其他Rust框架比较
- 二、环境准备与项目创建
- 2.1 添加Actix Web依赖
- 三、基本Web服务器
- 3.1 最简单的HTTP服务器
- 四、路由系统详解
- 4.1 基本路由
- 4.2 支持多种HTTP方法
- 4.3 路径参数
- 4.4 查询参数
- 4.5 通配符和前缀
- 五、请求体与响应处理
- 5.1 处理JSON数据
- 5.2 表单处理
- 5.2.1普通处理表单提交
- 5.2.2 Actix Web文件上传
- 5.2.3 大文件上传内存问题
- 5.2.4 文件上传超时
- 5.3 大文件下载
- 六、跨域静态资源
- 🧠 1. 什么是 CORS?
- 📦 2. 添加依赖
- 🚀 3. 基本用法
- ⚙️ 4. 自定义跨域策略(推荐)
- 🧪 5. 常见配置参数详解
- 🛡️ 6. 生产环境注意事项
Rust Web开发
一、Actix Web框架概述
Actix Web是Rust生态中最受欢迎的高性能Web框架之一,它构建在强大的Actix actor框架之上,提供了构建现代Web应用所需的完整工具集。
Actix Web以其卓越的性能、安全性和易用性在Rust社区中广受好评。
1.1 Actix Web的特点
高性能:Actix Web在TechEmpower基准测试中 consistently排名靠前
类型安全:充分利用Rust的类型系统在编译期捕获错误
异步支持:基于async/await语法构建,支持高并发
灵活的路由系统:直观的路由定义和强大的请求处理
中间件支持:可组合的中间件系统用于横切关注点
WebSocket支持:内置WebSocket支持用于实时应用
1.2 Actix Web与其他Rust框架比较
与其他Rust Web框架如Rocket、Warp等相比,Actix Web在性能与功能丰富性之间取得了良好的平衡。它比Rocket更灵活,比Warp更易上手,同时保持了极高的性能标准。
二、环境准备与项目创建
2.1 添加Actix Web依赖
在Cargo.toml中添加以下依赖:
[dependencies]
actix-rt = "2.10.0"  # Actix运行时
actix-web = "4.11.0"
serde = { version = "1.0.219", features = ["derive"] }  # 用于序列化
三、基本Web服务器
3.1 最简单的HTTP服务器
让我们从最基本的例子开始,创建一个返回"Hello World!"的服务器:
use actix_web::{ get, App, HttpResponse, HttpServer, Responder };//异步函数,上面加请求方法和路径
//方法返回值是Responder trait对象
#[get("/")]
async fn hello() -> impl Responder {//响应体内容HttpResponse::Ok().body("Hello World!")
}//main函数也要设置成异步
//actix_web::main宏会自动设置main函数为异步
#[actix_web::main]
async fn main() -> std::io::Result<()> {//通过HttpServer::new创建一个HTTP服务器,闭包返回一个App实例//App::new().service(hello)注册hello函数为服务//bind绑定地址和端口//run启动服务器//await等待服务器运行结束println!("Server running at http://127.0.0.1:8080");HttpServer::new(|| { App::new().service(hello) }).bind("127.0.0.1:8080")?.run().await
}
这段代码做了以下几件事:
定义了一个异步处理函数hello
使用#[get(“/”)]宏将其注册为根路径的GET方法处理器
创建了一个HttpServer实例
在本地8080端口启动服务器

浏览器访问

四、路由系统详解
Actix Web提供了强大而灵活的路由系统,支持各种HTTP方法和路径模式。
4.1 基本路由
除了使用属性宏,你还可以手动注册路由:
使用 .route():
use actix_web::{ web, App, HttpResponse, HttpServer }; //使用web来注册路由async fn manual_hello() -> HttpResponse {HttpResponse::Ok().body("Hey there!")
}#[actix_web::main]
async fn main() -> std::io::Result<()> {//使用.route("/hey", web::get().to(manual_hello))注册路由//web::get()表示GET请求//to(manual_hello)表示调用manual_hello函数HttpServer::new(|| { App::new().route("/hey", web::get().to(manual_hello)) }).bind("127.0.0.1:8080")?.run().await
}
访问

4.2 支持多种HTTP方法
Actix Web支持所有标准HTTP方法:
.route("/resource", web::get().to(get_handler))
.route("/resource", web::post().to(post_handler))
.route("/resource", web::put().to(put_handler))
.route("/resource", web::delete().to(delete_handler))
4.3 路径参数
方法一:使用元组提取多个参数
你可以从URL路径中提取参数:
在异步方法宏的路径里面设置路径参数
并通过path.into_inner()方法获取
use actix_web::{ get, App, HttpServer, Responder, web };//异步函数,上面加请求方法和路径
//方法返回值是Responder trait对象
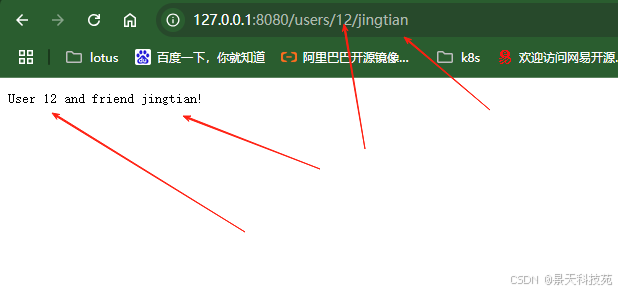
//提取路径参数#[get("/users/{user_id}/{friend}")]
async fn user_info(path: web::Path<(u32, String)>) -> impl Responder {//获取路径参数let (user_id, friend) = path.into_inner();//也可以用format!宏返回字符串响应体,与HttpResponse::Ok().body()效果相同format!("User {} and friend {}!", user_id, friend)// HttpResponse::Ok().body(format!("User {} and friend {}!", user_id, friend))
}//main函数也要设置成异步
//actix_web::main宏会自动设置main函数为异步
#[actix_web::main]
async fn main() -> std::io::Result<()> {//通过HttpServer::new创建一个HTTP服务器,闭包返回一个App实例//App::new().service(hello)注册hello函数为服务//bind绑定地址和端口//run启动服务器//await等待服务器运行结束println!("Server running at http://127.0.0.1:8080");HttpServer::new(|| { App::new().service(user_info) }).bind("127.0.0.1:8080")?.run().await
}
方法二:使用结构体提取
use actix_web::{ get, App, HttpServer, Responder, web };//使用结构体来提取路径参数
#[derive(serde::Deserialize)]
struct UserInfo {user_id: u32,friend: String,
}#[get("/users/{user_id}/{friend}")]
async fn user_info_struct(path: web::Path<UserInfo>) -> impl Responder {//通过结构体来提取路径参数format!("User {} and friend {}!", path.user_id, path.friend)
}//main函数也要设置成异步
//actix_web::main宏会自动设置main函数为异步
#[actix_web::main]
async fn main() -> std::io::Result<()> {//通过HttpServer::new创建一个HTTP服务器,闭包返回一个App实例//App::new().service(hello)注册hello函数为服务//bind绑定地址和端口//run启动服务器//await等待服务器运行结束println!("Server running at http://127.0.0.1:8080");HttpServer::new(|| { App::new().service(user_info_struct) }).bind("127.0.0.1:8080")?.run().await
}

方法三:手动从 HttpRequest 中解析
使用.route获取路径参数
use actix_web::{ App, HttpServer, HttpResponse, HttpRequest, Responder, web };async fn greet(req: HttpRequest) -> impl Responder {//通过req.match_info().get("name")获取路径参数//get("name")中的name要与路径参数{name}中的name保持一致//unwrap_or("World")表示如果路径参数不存在,就使用默认值Worldlet name = req.match_info().get("name").unwrap_or("World");HttpResponse::Ok().body(format!("Hello, {}!", name))
}//使用.route获取路径参数
#[actix_web::main]
async fn main() -> std::io::Result<()> {//使用.route("/hey/{name}", web::get().to(greet))注册动态路径参数//web::get()表示GET请求//to(greet)表示调用greet函数HttpServer::new(|| { App::new().route("/hey/{name}", web::get().to(greet)) }).bind("127.0.0.1:8080")?.run().await
}

小结:

4.4 查询参数
在 Actix Web 中获取查询参数(Query Parameters)的方法非常直观,主要有两种方式:
✅ 方法一:使用 web::Query 自动反序列化
这是最常用和推荐的方式,借助 serde 自动将 URL 查询参数解析成结构体。
//查询参数获取
use actix_web::{ web, App, HttpResponse, HttpServer, Responder };
use serde::Deserialize;#[derive(Deserialize)]
struct Info {name: String,age: Option<u8>, // 可以是可选的
}async fn query_handler(query: web::Query<Info>) -> impl Responder {//这里采用引用的方式,避免数据的移动。因为String类型没有实现Copy traitlet name = &query.name;//age是可选的,所以需要unwrap_or来处理,如果没有传递age参数,则默认为0let age = query.age.unwrap_or(0);HttpResponse::Ok().body(format!("Name: {}, Age: {}", name, age))
}#[actix_web::main]
async fn main() -> std::io::Result<()> {HttpServer::new(|| { App::new().route("/search", web::get().to(query_handler)) }).bind(("127.0.0.1", 8080))?.run().await
}

如果查询参数没有age,就取默认值

通过宏配置路由也行
//查询参数获取
use actix_web::{ web, App, HttpResponse, HttpServer, Responder, get };
use serde::Deserialize;#[derive(Deserialize)]
struct Info {name: String,age: Option<u8>, // 可以是可选的
}#[get("/search")]
async fn query_handler(query: web::Query<Info>) -> impl Responder {//这里采用引用的方式,避免数据的移动。因为String类型没有实现Copy traitlet name = &query.name;//age是可选的,所以需要unwrap_or来处理,如果没有传递age参数,则默认为0let age = query.age.unwrap_or(0);HttpResponse::Ok().body(format!("Name: {}, Age: {}", name, age))
}#[actix_web::main]
async fn main() -> std::io::Result<()> {HttpServer::new(|| { App::new().service(query_handler) }).bind(("127.0.0.1", 8080))?.run().await
}
✅ 方法二:手动从 HttpRequest 获取字符串形式
这种方式适用于只想取部分参数、不确定字段名、或不使用结构体的情况。
//查询参数获取
use actix_web::{ App, HttpResponse, HttpServer, Responder, get, HttpRequest };//手动获取查询参数
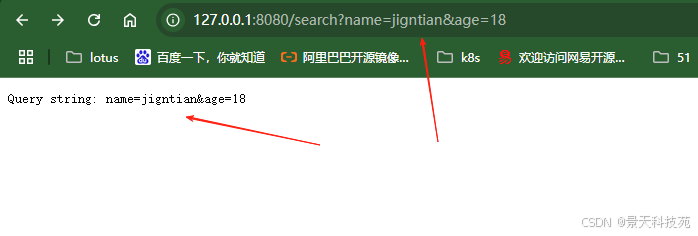
#[get("/search")]
async fn query_manual(req: HttpRequest) -> impl Responder {//通过HttpRequest.query_string()获取查询字符串let query = req.query_string(); // 返回原始字符串,例如 "name=tom&age=20"HttpResponse::Ok().body(format!("Query string: {}", query))
}#[actix_web::main]
async fn main() -> std::io::Result<()> {HttpServer::new(|| { App::new().service(query_manual) }).bind(("127.0.0.1", 8080))?.run().await
}
你也可以手动解析成键值对:
通过serde_urlencoded解析
依赖:
[dependencies]
actix-rt = "2.10.0"
actix-web = "4.11.0"
serde = { version = "1.0.219", features = ["derive"] }
serde_urlencoded = "0.7.1"
//查询参数获取,并解析
use actix_web::{ App, HttpResponse, HttpServer, Responder, get, HttpRequest };
use std::collections::HashMap;
#[get("/search")]
async fn query_map(req: HttpRequest) -> impl Responder {//通过serde_urlencoded::from_str()将查询字符串转换为HashMaplet params: HashMap<String, String> = serde_urlencoded::from_str(req.query_string()).unwrap_or_default();//从HashMap中获取参数值,如果参数不存在,则使用默认值let name = params.get("name").cloned().unwrap_or("Unknown".into());let age = params.get("age").cloned().unwrap_or("0".into());HttpResponse::Ok().body(format!("Name: {}, Age: {}", name, age))
}#[actix_web::main]
async fn main() -> std::io::Result<()> {HttpServer::new(|| { App::new().service(query_map) }).bind(("127.0.0.1", 8080))?.run().await
}

🔁 小结对比

4.5 通配符和前缀
Actix Web支持复杂的路径模式:
// 匹配所有以"/path/"开头的URL
.route("/path/{tail:.*}", web::get().to(handler))// 匹配数字ID
.route("/user/{id:[0-9]+}", web::get().to(handler))
use actix_web::{ App, HttpServer, HttpResponse, HttpRequest, Responder, get };//匹配以hey开头的任意路径
#[get("/hey/{name:.*}")]
async fn greet(req: HttpRequest) -> impl Responder {//通过req.match_info().get("name")获取路径参数//unwrap_or("World")表示如果路径参数不存在,就使用默认值Worldlet name = req.match_info().get("name").unwrap_or("World");HttpResponse::Ok().body(format!("Hello, {}!", name))
}//使用.route获取路径参数
#[actix_web::main]
async fn main() -> std::io::Result<()> {//使用.route("/hey/{name}", web::get().to(greet))注册动态路径参数//web::get()表示GET请求//to(greet)表示调用greet函数HttpServer::new(|| { App::new().service(greet) }).bind("127.0.0.1:8080")?.run().await
}

五、请求体与响应处理
5.1 处理JSON数据
Actix Web内置了对JSON的支持:
//处理json请求
use actix_web::{ web, App, HttpServer, Responder, get, post };
use serde::{ Deserialize, Serialize };#[derive(Serialize, Deserialize, Debug)]
struct MyObj {name: String,number: i32,
}// get请求返回JSON响应
#[get("/get-json")]
async fn get_json() -> web::Json<MyObj> {println!("get_json");//通过web::Json()将MyObj转换为JSON响应web::Json(MyObj {name: "Test".to_string(),number: 42,})
}// post请求接收JSON请求体
#[post("/receive-json")]
async fn receive_json(obj: web::Json<MyObj>) -> impl Responder {println!("Received: {:?}", obj);format!("Received {} with number {}", obj.name, obj.number)
}#[actix_web::main]
async fn main() -> std::io::Result<()> {HttpServer::new(|| { App::new().service(get_json).service(receive_json) }).bind(("127.0.0.1", 8080))?.run().await
}
get请求

post请求

5.2 表单处理
5.2.1普通处理表单提交
💡 注意事项
表单请求的 Content-Type 必须为 application/x-www-form-urlencoded。
不支持 multipart/form-data(文件上传)时需使用 actix-multipart,那是另一类处理。
//处理表单请求
use actix_web::{ web, App, HttpServer, Responder, post };
use serde::Deserialize;
#[derive(Deserialize, Debug)]
struct FormData {username: String,password: String,
}#[post("/login")]
async fn login(form: web::Form<FormData>) -> impl Responder {println!("Received: {:?}", form);format!("Welcome {}, your password is {}!", form.username, form.password)
}#[actix_web::main]
async fn main() -> std::io::Result<()> {HttpServer::new(|| { App::new().service(login) }).bind(("127.0.0.1", 8080))?.run().await
}

5.2.2 Actix Web文件上传
📦 Actix Web 中的文件上传(multipart/form-data)
✅ 使用 actix-multipart 处理 multipart/form-data
表单中如果使用 <input type="file">,表单必须设置 enctype=“multipart/form-data”,对应 HTTP 请求的 Content-Type 是 multipart/form-data,这时 Actix Web 需要借助:
actix-multipart:解析 multipart 表单。
futures-util:异步流支持。
tokio::fs:异步保存文件。
actix_files::Files
可以开启静态文件服务
基本配置选项
Files::new("/static", "./static").index_file("index.html") // 默认索引文件.prefer_utf8(true) // 优先使用UTF-8编码.use_last_modified(true) // 启用Last-Modified头.use_etag(true) // 启用ETag缓存.disable_content_disposition() // 禁用自动添加Content-Disposition头
Cargo.toml依赖:
[dependencies]
actix-files = "0.6.6"
actix-multipart = "0.7.2"
actix-rt = "2.10.0"
actix-web = "4.11.0"
futures-util = "0.3.31"
sanitize-filename = "0.6.0"
serde = { version = "1.0.219", features = ["derive"] }
tokio = { version = "1.45.1", features = ["full"] }
完整代码
//文件上传
use actix_multipart::Multipart;
use actix_web::{ App, HttpResponse, HttpServer, Result, web };
use futures_util::StreamExt;
use sanitize_filename::sanitize;
use tokio::fs::File;
use tokio::io::AsyncWriteExt;  // 大文件异步写入文件
use actix_files::Files;
use serde::Serialize;//创建个结构体来保存用户名和文件路径
#[derive(Serialize, Debug)]
struct UploadResponse {username: String,uploaded_files: Vec<String>,
}async fn upload(mut payload: Multipart) -> Result<HttpResponse> {// 保存用户名和文件路径let mut username = String::new();//保存文件路径let mut uploaded_files = Vec::new();// 遍历表单所有字段while let Some(field) = payload.next().await {// 获取字段let mut field = field?;// 获取表单字段名if let Some(content_disposition) = field.content_disposition() {if let Some(name) = content_disposition.get_name() {// 根据字段名处理不同的字段,这里的字段就是前端上传文件时,form-data里面的字段match name {// 处理用户名字段"username" => {while let Some(chunk) = field.next().await {let data = chunk?;username.push_str(&String::from_utf8_lossy(&data));println!("Received username: {}", username);}}// 处理文件字段"avatar" => {if let Some(filename) = content_disposition.get_filename() {// 保存文件//sanitize 将用户提供的原始文件名转换成安全、合法的文件名。它的核心作用是防止文件名注入攻击和确保文件系统兼容性。let filename = sanitize(filename);let filepath = format!("./uploads/{}", filename);// 创建文件let mut f = File::create(&filepath).await?;// 读取文件数据并写入到文件中while let Some(chunk) = field.next().await {let data = chunk?;f.write_all(&data).await?;}uploaded_files.push(filepath);// 打印保存的文件路径//每次保存一个文件后,都会把文件路径 filepath 添加到这个向量的末尾://使用 last() 可以确保你打印的是刚刚保存的那个文件的路径,而不是之前保存的文件路径。println!("Received file: {}", uploaded_files.last().unwrap());}}// 处理未知字段_ => {username.push_str(&format!("Unknown field: {}\n", name));uploaded_files = vec!["Unknown field".to_string()];}}}}}// 返回json响应Ok(HttpResponse::Ok().json(UploadResponse { username, uploaded_files }))
}#[actix_web::main]
async fn main() -> std::io::Result<()> {// 创建uploads目录,类似mkdir -p。乐意递归创建目录std::fs::create_dir_all("./uploads")?;HttpServer::new(|| {App::new().route("/upload", web::post().to(upload)).service(Files::new("/login", "./public").index_file("upload.html")) // 访问根/路径,展示html页面.service(Files::new("/uploads", "./uploads").show_files_listing()) // 静态文件服务,可以访问/uploads目录下的文件}).bind(("127.0.0.1", 8080))?.run().await
}
可以上传单文件,也可以上传多文件

开启静态服务注意事项

5.2.3 大文件上传内存问题
问题:上传大文件时内存占用过高。
解决方案:
使用流式处理,不要一次性加载整个文件到内存
设置合理的缓冲区大小
使用tokio::fs::File进行异步文件IO
use tokio::io::AsyncWriteExt;while let Some(chunk) = field.next().await {let data = chunk?;file.write_all(&data).await?;
}
5.2.4 文件上传超时
问题:慢速连接导致上传超时。
解决方案:
设置合理的超时时间
提供进度反馈
use actix_web::web::PayloadConfig;// 设置30分钟超时
App::new().app_data(PayloadConfig::new(10_000_000) // 10MB.timeout(std::time::Duration::from_secs(1800)))
5.3 大文件下载
在 Actix Web 中实现 大文件下载(如视频、安装包等),你需要使用 分块流式传输(chunked streaming) 的方式发送文件,以避免一次性将整个文件加载进内存。
🧠 1)目标
✅ 支持 大文件下载(>1GB 也没问题)
✅ 使用低内存占用方式读取(流式读取)
✅ 支持设置响应头(如 Content-Disposition)触发浏览器下载
📦 2)添加依赖
[dependencies]
actix-web = "4.11.0"
tokio = { version = "1.45.1", features = ["full"] }
tokio-util = "0.7.15"
🚀 3. 完整代码:流式下载大文件
use actix_web::{ web, HttpResponse, Result, get, App, HttpServer };
use tokio::fs::File;
use tokio_util::io::ReaderStream;
use actix_web::http::{ header, StatusCode };#[get("/download/{filename}")]
async fn download_file(path: web::Path<String>) -> Result<HttpResponse> {let filename = path.into_inner();let file_path = format!("./downloads/{}", filename);// 尝试打开文件let file = match File::open(&file_path).await {Ok(f) => f,Err(_) => {return Ok(HttpResponse::NotFound().body("File not found"));}};// 创建 tokio 异步流let stream = ReaderStream::new(file);// 设置响应头let content_disposition = format!("attachment; filename=\"{}\"", filename);Ok(HttpResponse::build(StatusCode::OK).append_header((header::CONTENT_TYPE, "application/octet-stream")).append_header((header::CONTENT_DISPOSITION, content_disposition)).streaming(stream))
}#[actix_web::main]
async fn main() -> std::io::Result<()> {HttpServer::new(|| { App::new().service(download_file) }).bind(("127.0.0.1", 8080))?.run().await
}
🌐 4. 浏览器访问下载

六、跨域静态资源
在使用 Actix Web 构建前后端分离的 Web 应用时,经常会遇到 跨域请求(CORS) 的问题。为了解决这个问题,Actix 提供了专用中间件:actix-cors。
🧠 1. 什么是 CORS?
CORS(Cross-Origin Resource Sharing) 是一种机制,用于允许浏览器从一个域名的网页请求另一个域名的资源。
例如:
前端运行在 http://localhost:3000
后端(Actix Web)运行在 http://127.0.0.1:8080
默认情况下,浏览器不允许跨域请求,除非服务器明确设置允许。
📦 2. 添加依赖
在你的 Cargo.toml 中添加:
[dependencies]
actix-cors = "0.7.1"
actix-web = "4.11.0"
🚀 3. 基本用法
✅ 最简单的 CORS 配置(开发用)
use actix_cors::Cors;
use actix_web::{App, HttpServer, web, HttpResponse};#[actix_web::main]
async fn main() -> std::io::Result<()> {HttpServer::new(|| {App::new().wrap(Cors::permissive() // 允许所有跨域请求(不推荐用于生产)).route("/api/data", web::get().to(|| async {HttpResponse::Ok().body("hello from actix")}))}).bind(("127.0.0.1", 8080))?.run().await
}
⚙️ 4. 自定义跨域策略(推荐)
use actix_cors::Cors;
use actix_web::{http, App, HttpServer, HttpResponse, web};#[actix_web::main]
async fn main() -> std::io::Result<()> {HttpServer::new(|| {let cors = Cors::default().allowed_origin("http://localhost:3000") // 指定允许的前端地址.allowed_methods(vec!["GET", "POST", "PUT", "DELETE"]) // 允许的方法.allowed_headers(vec![http::header::CONTENT_TYPE, http::header::AUTHORIZATION]).allow_credentials(true) // 允许携带 cookie.max_age(3600); // 预检请求缓存时间(秒)App::new().wrap(cors).route("/api/hello", web::get().to(|| async {HttpResponse::Ok().body("Hello from CORS!")}))}).bind(("127.0.0.1", 8080))?.run().await
}#[actix_web::main]
async fn main() -> std::io::Result<()> {// 创建uploads目录,类似mkdir -p。乐意递归创建目录std::fs::create_dir_all("./uploads")?;HttpServer::new(|| {App::new()//设置跨域.wrap(Cors::default().allow_any_origin().allow_any_method().allow_any_header()) //允许所有源,所有方法,所有请求头.route("/upload", web::post().to(upload)).service(Files::new("/login", "./public").index_file("upload.html")) // 访问根/路径,展示html页面.service(Files::new("/uploads", "./uploads").show_files_listing()) // 静态文件服务,可以访问/uploads目录下的文件}).bind(("172.20.10.188", 8080))?.run().await
}
🧪 5. 常见配置参数详解

🛡️ 6. 生产环境注意事项
绝对不要使用 .permissive() 或 .allowed_origin(“*”) 配置在生产环境。
对 allowed_origin 进行精确控制或白名单判断。
CORS 错误一般在浏览器控制台会有提示,不会在 Rust 后端看到错误日志。