【Docker安装PostgreSQL】psql:致命错误: 用户 Password 认证失败
目录
【主要问题】致命错误: 用户 "ship" Password 认证失败问题
【问题描述】
【执行错误示例】
【解决方法】
1、更改docker-compose.yml 配置文件
2、更改项目的配置文件【config.py】
【常见问题排查】
一、docker命令【排查问题命令】
启动数据库
重启容器
进入容器
进入数据库
连接数据库
退出容器
清除所有数据卷
强制删除指定数据卷
查看当前用户
查看所有容器
查看 PostgreSQL 配置文件中的认证方法
查看pg_hba.conf 内容
查看 PostgreSQL 当前监听的地址
查看 PostgreSQL 实际使用的配置文件路径
查看监听的端口(如果支持)
查看容器运行状态
查看日志
查看pg_hba.conf
查看容器内端口占用
手动修改 pg_hba.conf 的完整步骤(在 Docker 容器中)
手动修改 postgresql.conf 启用远程连接
重置容器密码
验证监听端口是否成功(容器内部)
验证 PostgreSQL 部署
安装常用工具(含 ps, top, netstat 等)
二、使用Docker搭建Postgresql数据库,及设置远程访问
1、拉取Postgresq镜像
2、构建镜像容器
3、进入postgres容器
4、切换当前用户,再登录数据库
5、设置远程访问许可(很重要)
5.1 修改postgres配置文件
5.2 设置防火墙
三、排查步骤示例
1. 检查网络配置
2、查看网络中的容器
3、确认 listen_addresses 配置
4、确保Docker 映射5432 端口
5、容器内确认密码
6、Windows 本地是否安装了正确版本的 psql 工具
7、防火墙 / 安全软件是否阻止了本地 127.0.0.1:5432 端口
8、确保 pg_hba.conf 中最后一条确实生效
TCP端口监听失败问题

【主要问题】致命错误: 用户 "ship" Password 认证失败问题
【问题描述】
容器内可正常连接数据库,容器外则无法正常连接,返回认证失败的错误。
详细描述
1、在包含Docker-compose.yml的项目文件夹下【docker-compose up -d】命令安装PostgreSQL;
2、安装好后执行【psql -h 127.0.0.1 -p 5432 -U ship -d shipdb】,并输入配置密码,返回认证失败;
3、【docker exec -it postgres_db bash】进入容器后,执行【psql -h 127.0.0.1 -p 5432 -U ship -d shipdb】并输入密码,则可以连接成功,如下图:

【执行错误示例】
psql -h 127.0.0.1 -p 5432 -U ship -d shipdb
【显示】
D:\computer_soft\Microsoft VS Code\python_project\RAG\项目2_基于LangGraph实现智能分诊系统\L1-Project-2>psql -h 127.0.0.1 -p 5432 -U ship -d shipdb
用户 ship 的口令:
psql: 错误: 连接到"127.0.0.1"上的服务器,端口5432失败:致命错误: 用户 "ship" Password 认证失败
【解决方法】
1、更改docker-compose.yml 配置文件
主要是外部端口的问题:posts原来我写的是【"5432:5432"】,后面改成【"15432:5432"】可成功连接Postgre。这里就是将外部端口换了一下,可能是端口占用的问题。
试了挺多方法的,最后竟然改个端口就解决了,也是挺无语的。
version: '3.8'services:postgres:image: postgres:15 # 指定具体版本container_name: postgres_dbenvironment:POSTGRES_USER: AIdoctor #数据库用户名POSTGRES_PASSWORD: 123456 #数据库密码POSTGRES_DB: postgres #数据库名PGDATA: /var/lib/postgresql/data/pgdataTZ: Asia/Shanghai # 设置时区ports:- "15432:5432" #端口号:15432:宿主机(你本机)映射的端口(外部端口),5432:容器内 PostgreSQL 服务监听的端口(内部端口)volumes:- ./data:/var/lib/postgresql/datarestart: unless-stoppedhealthcheck: # 健康检查test: ["CMD", "pg_isready", "-U", "nange"]interval: 10stimeout: 5sretries: 5command: ["postgres", "-c", "max_connections=200"] # 自定义配置volumes:pgdata:2、更改项目的配置文件【config.py】
根据自己项目中对应的数据库配置文件进行更改即可
# 数据库 URI,默认值
DB_URI = os.getenv("DB_URI", "postgresql://AIdoctor:123456@localhost:15432/postgres?sslmode=disable")【更改部分】
AIdoctor:123456@localhost:15432/postgres
【AIdoctor】数据库用户名
【123456】数据库密码
【15432】数据库外部端口
【postgres】数据库名
【常见问题排查】
容器内:允许外部连接
# cat /var/lib/postgresql/data/postgresql.conf | grep listen_addresses
【显示】listen_addresses = '*'✅表明允许外部连接
容器外:查看是否正确映射
docker ps
【显示】
CONTAINER ID   IMAGE         COMMAND                   CREATED         STATUS                   PORTS                    NAMES
8a6d71030a5c   postgres:15   "docker-entrypoint.s…"   6 minutes ago   Up 6 minutes (healthy)   0.0.0.0:5432->5432/tcp   postgres_db
✅ 表明你的 PostgreSQL 容器的 5432 端口已经正确映射到主机的 5432 端口。
容器执行:pg_hba.conf内容显示最后一行:# cat /var/lib/postgresql/data/pg_hba.conf | grep host
host all all all scram-sha-256这行配置理论上允许所有 IP、所有用户、所有数据库用
scram-sha-256认证方式连接。
如何解决Docker容器与外部数据库连接失败的问题:如何解决Docker容器与外部数据库连接失败的问题? - 树叶云
一、docker命令【排查问题命令】
启动数据库
docker-compose up -d重启容器
docker restart postgres_db【postgres_db】表示容器名称
进入容器
docker exec -it postgres_db bash【postgres_db】表示容器名称
停止容器
docker stop postgres_db或 或者用容器 ID:
docker stop 1e14226a6a96
进入数据库
docker exec -it postgres_db psql -U ship -d shipdb
【postgres_db】表示容器名称
【ship】数据库用户名
【shipdb】数据库名
连接数据库
psql -h 127.0.0.1 -p 5432 -U ship -d shipdb
【postgres_db】表示容器名称
【ship】数据库用户名
【shipdb】数据库名
需要在Windows中(容器外)连接成功,如输入密码:123456(你设置的数据库密码),并且成功进入容器,则连接成功。注意输入密码时不会显示。
退出容器
exit
清除所有数据卷
docker-compose down --volumes
注意:有重要文件时需要提前备份 ,以免误删重要数据。
删除指定容器
docker rm postgres_db
或者:
docker rm 1e14226a6a96
【postgres_db】 容器名称
【1e14226a6a96】容器ID
强制删除指定数据卷
docker volume rm l1-project-2_pgdata
删除成功则输出: l1-project-2_pgdata
【说明】 l1-project-2_pgdata为数据库名
查看当前用户
执行位置:数据库
shipdb=# \du

查看所有容器
docker ps -a

查看 PostgreSQL 配置文件中的认证方法
docker exec -it postgres_db psql -U ship -d shipdb -c "SHOW password_encryption;"
【postgres_db】表示容器名称
【ship】数据库用户名
【shipdb】数据库名
查看pg_hba.conf 内容
docker exec -it postgres_db cat /var/lib/postgresql/data/pg_hba.conf
容器名称:postgres_db
查看 PostgreSQL 当前监听的地址
docker exec -it postgres_db psql -U doc -d doc_db -c "SHOW listen_addresses;"
-
返回
*:表示 PostgreSQL 监听所有 IP,✅ 没问题。 -
返回
localhost或127.0.0.1:🔁 需要改配置。
查看 PostgreSQL 实际使用的配置文件路径
docker exec -it postgres_db psql -U doc -d doc_db -c "SHOW config_file;"
通常返回 /var/lib/postgresql/data/postgresql.conf。
查看监听的端口(如果支持)
docker exec -it postgres_db psql -U doc -d doc_db -c "SELECT inet_server_port();"
可能返回 5432,也可能为空(某些版本不支持)。
查看容器运行状态
docker ps
说明:这里用来查看确认容器端口是否映射成功。确保输出中有【0.0.0.0:5432->5432/tcp】 ;如果没有,说明docker-compose.yml中未正确映射。

查看日志
docker logs postgres_db
creating user "ship"
creating database "shipdb"
如果看到这两条,说明这次 PostgreSQL 初始化成功执行。
查看pg_hba.conf
#进入容器
docker exec -it postgres_db bash
#进入配置目录
cat /var/lib/postgresql/data/pg_hba.conf
#确保
postgresql.conf中监听地址为*
cat /var/lib/postgresql/data/postgresql.conf | grep listen_addresses
说明:确认是否包含如下内容(重点是这两行)
#进入配置目录
cat /var/lib/postgresql/data/pg_hba.conf
【输出】
# TYPE DATABASE USER ADDRESS METHOD
host all all 0.0.0.0/0 md5
如果不是 *,也要手动修改为:
#确保
postgresql.conf中监听地址为*
cat /var/lib/postgresql/data/postgresql.conf | grep listen_addresses【输出】
listen_addresses = '*'
查看容器内端口占用
#进入容器内
docker exec -it postgres_db bash
#安装网络工具包(用于支持netstat命令)
root@bc08810fe3f2:/# apt update && apt install -y net-tools
#查看容器内5432端口占用情况
root@7790c528d899:/# netstat -app | grep 5432
【说明】
#查看容器内5432端口占用情况
root@7790c528d899:/# netstat -app | grep 5432
✅ 正确结果应包含:
tcp 0 0 0.0.0.0:5432 0.0.0.0:* LISTEN
或tcp 0 0 :::5432 :::* LISTEN
下图运行结果没有包含:
这表示 PostgreSQL 目前只监听了 Unix socket,而没有监听 TCP 端口 5432,也就是说:
❌ 容器内部 PostgreSQL 没有监听 0.0.0.0:5432,外部当然连接不上!

D:\computer_soft\Microsoft VS Code\python_project\RAG\项目2_基于LangGraph实现智能分诊系统\L1-Project-2>docker exec -it postgres_db bash
root@a17dd6c55a0d:/# netstat -app | grep 5432
unix 2 [ ACC ] STREAM LISTENING 315734 - /var/run/postgresql/.s.PGSQL.5432
手动修改 pg_hba.conf 的完整步骤(在 Docker 容器中)
🔹 第一步:进入容器
打开你的 cmd,执行:
docker exec -it postgres_db bash
如果容器名不是 postgres_db,先执行 docker ps 查看实际容器名。
🔹 第二步:找到 pg_hba.conf 文件路径
执行:
find / -name pg_hba.conf
常见路径(不同镜像可能稍有差异):
-
/var/lib/postgresql/data/pg_hba.conf -
或
/var/lib/postgresql/data/pgdata/pg_hba.conf
🔹 第三步:安装编辑器(可选)
有些镜像没有 vi,你可以用 apt 安装(如果没法联网就跳过):
apt update && apt install nano -y
apt install vim -y
🔹 第四步:编辑 pg_hba.conf 文件
用你找到的路径打开文件,例如:
vi /var/lib/postgresql/data/pg_hba.conf
按【i】插入
或者:
nano /var/lib/postgresql/data/pg_hba.conf
【插入演示截图】

🔹 第五步:确保添加以下内容(追加或替换)
# 允许任何主机通过密码连接
# TYPE  DATABASE        USER            ADDRESS                 METHOD
# 添加此条以支持 IPv4
host    all             all             0.0.0.0/0               md5# 添加此条以支持 IPv6
host    all             all             ::/0                    md5
建议你把原有的 host 相关行都注释掉,只保留上面这一条用于远程密码连接。
🔹 第六步:保存退出
-
如果是
vi:按下Esc,然后输入 【:wq】回车。 -
如果是
nano:按下Ctrl + O保存,Ctrl + X退出。
🔹 第七步:重启容器使配置生效
exit  # 退出容器
docker restart postgres_db
可以尝试连接
psql -h 127.0.0.1 -U ship -d shipdb
手动修改 postgresql.conf 启用远程连接
🔹 第一步:进入容器
docker exec -it postgres_db bash
🔹 第二步:查找 postgresql.conf 文件路径
find / -name postgresql.conf
你可能会看到类似的路径:
/var/lib/postgresql/data/postgresql.conf
或:
/var/lib/postgresql/data/pgdata/postgresql.conf
🔹 第三步:编辑 postgresql.conf
用 vi 编辑你刚找到的路径,例如:
vi /var/lib/postgresql/data/postgresql.conf
🔹 第四步:修改 listen_addresses
在文件中找到这一行(通常在 60~90 行之间):
#listen_addresses = 'localhost'
将其修改为:
listen_addresses = '*'
如果是被注释掉的(前面有 #),请去掉 #。
🟦 保存并退出:
-
按
Esc -
输入:
:wq
🔄 第五步:重启容器以使配置生效
exit
docker restart postgres_db
测试连接
psql -h localhost -U ship -d shipdb
或用 pgAdmin / DBeaver 测试远程连接。
重置容器密码
进入容器——>进入数据库
docker exec -it postgres_db psql -U ship -d shipdb
输入下面命令改密码:
ALTER ROLE ship WITH PASSWORD '123456';
确保用的密码就是你本地输入的。
验证监听端口是否成功(容器内部)
#进入容器
docker exec -it postgres_db#查看监听端口
netstat -tuln | grep 5432
如果成功,你会看到:
tcp 0 0 0.0.0.0:5432 0.0.0.0:* LISTEN
或:
tcp6 0 0 :::5432 :::* LISTEN
验证 PostgreSQL 部署
docker-compose ps

安装常用工具(含 ps, top, netstat 等)
进入容器
docker exec -it postgres_db安装工具
apt update && apt install -y procps net-tools
二、使用Docker搭建Postgresql数据库,及设置远程访问
1、拉取Postgresq镜像
docker pull postgres
2、构建镜像容器
docker run -it --name postgres --restart always -e POSTGRES_PASSWORD='abc123' -e ALLOW_IP_RANGE=0.0.0.0/0 -v /home/postgres/data:/var/lib/postgresql -p 55433:5432 -d postgres
–name : 自定义容器名称
POSTGRES_PASSWORD:数据库密码
-e ALLOW_IP_RANGE=0.0.0.0/0,这个表示允许所有ip访问,如果不加,则非本机 ip 访问不了
-v :进行映射,本地目录:容器内路径
-p:映射端口,宿主机端口:容器端口
最后是 镜像名称:端口号
3、进入postgres容器
docker exec -it postgres bash
4、切换当前用户,再登录数据库
将当前root切换成postgres
su postgres
输入用户名,密码再命令执行完后,再根据提示输入
psql -U postgres -W
输入密码,登录成功

5、设置远程访问许可(很重要)
共需要修改两个配置文件:pg_hba.conf、postgresql.conf,步骤分别如下:
5.1 修改postgres配置文件
首先,确认已进入容器,再按下列步骤操作:
1)、修改pg_hba.conf文件
A、用命令将postgres中的pg_hba.conf文件,复制到目录/home中
docker cp postgres:/var/lib/postgresql/data/pg_hba.conf /home
为什么你要拷它出来?
你的认证失败(
password authentication failed for user),可能就是:
pg_hba.conf配置不允许你当前用户/主机访问。它可能设置为只允许本地,或者用
peer方式(不需要密码但要求系统账户)。作用 :用
docker cp把容器里的pg_hba.conf拷到宿主机。
home表示存储路径,如 用 docker cp 把容器里的 pg_hba.conf 拷到宿主机。下面是是我的实际步骤,改成了我自己的路径:
docker cp postgres:/var/lib/postgresql/data/pg_hba.conf "D:\computer_soft\Microsoft VS Code\python_project\RAG\项目2_基于LangGraph实现智能分诊系统\L1-Project-2\data"


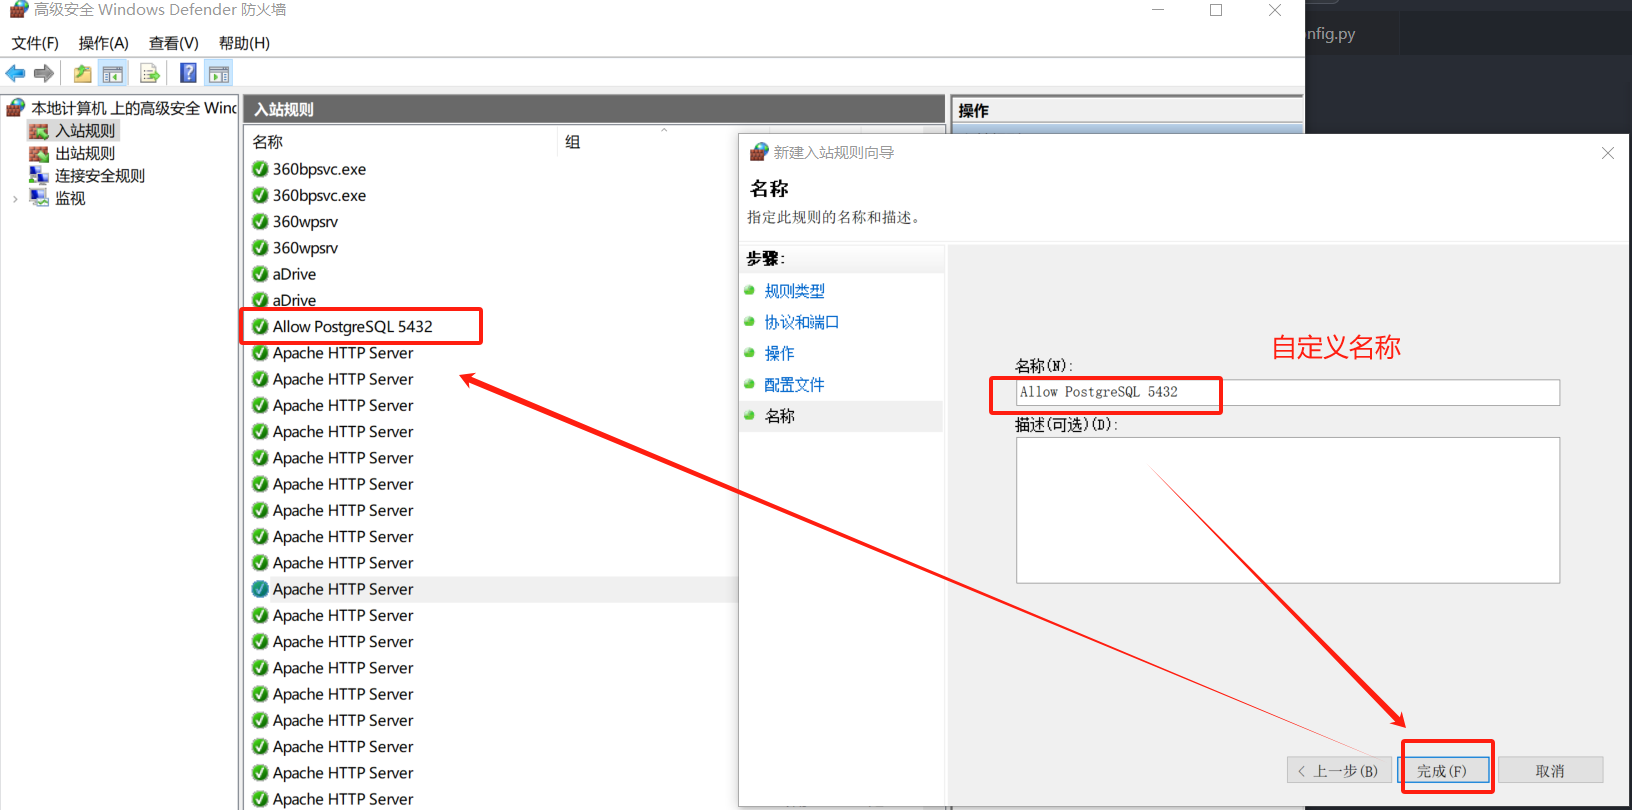
5.2 设置防火墙
首先,执行exit命令,退出postgres用户,再执行一次exit,退出容器。然后才可以进行防火墙设置。主要就是把5432端口设置为入站规则所允许。
进入控制面板


三、排查步骤示例
1. 检查网络配置
首先,确保Docker容器能够访问外部网络。可以通过以下命令检查容器的网络设置:
docker network lsNETWORK ID NAME DRIVER SCOPE
864296fa20e9 bridge bridge local
baa40dad1039 host host local
576d9dc07300 l1-project-2_default bridge local
f1f25ff900b7 my_app_default bridge local
97e6015d9775 none null local
2、查看网络中的容器
docker network inspect l1-project-2_default[
{
"Name": "l1-project-2_default",
"Id": "576d9dc073006cbb1940926187074d2c1d270976ab77186f2fc39b501f9a8fed",
"Created": "2025-06-11T15:12:05.788029675Z",
"Scope": "local",
"Driver": "bridge",
"EnableIPv4": true,
"EnableIPv6": false,
"IPAM": {
"Driver": "default",
"Options": null,
"Config": [
{
"Subnet": "172.19.0.0/16",
"Gateway": "172.19.0.1"
}
]
},
"Internal": false,
"Attachable": false,
"Ingress": false,
"ConfigFrom": {
"Network": ""
},
"ConfigOnly": false,
"Containers": {
"bc08810fe3f2703878020371ebc672f32f9785cb529d5107dd89c7fda3aa7b0b": {
"Name": "postgres_db",
"EndpointID": "f235e2183819716f1c05c03f6dd3f1b291b4ebb9230aac769668ded452d8bb33",
"MacAddress": "ee:f0:59:a1:f9:98",
"IPv4Address": "172.19.0.2/16",
"IPv6Address": ""
}
},
"Options": {},
"Labels": {
"com.docker.compose.config-hash": "4bd542ef2441d7fe54435bdb0fc94ac897d9f9e365754e7b80016edc4a45ac6f",
"com.docker.compose.network": "default",
"com.docker.compose.project": "l1-project-2",
"com.docker.compose.version": "2.34.0"
}
}
]
【验证】
docker中的container ID:bc08810fe3f2703878020371ebc672f32f9785cb529d5107dd89c7fda3aa7b0b

如果需要,可以使用以下命令创建一个新的网络并将容器连接到该网络:
docker network create my_network3、确认 listen_addresses 配置
root@bc08810fe3f2:/#
psql -U ship -d shipdb -c "SHOW listen_addresses"【显示】
listen_addresses
------------------
*
(1 row)
配置 listen_addresses = '*': 表示设置监听全部地址
4、确保Docker 映射5432 端口
docker exec -it postgres_db bash
psql -U ship -d shipdb -c "SHOW hba_file;"
cat /var/lib/postgresql/data/pg_hba.conf
【显示】
root@bc08810fe3f2:/# cat /var/lib/postgresql/data/pg_hba.conf
# PostgreSQL Client Authentication Configuration File
# ===================================================
#
# Refer to the "Client Authentication" section in the PostgreSQL
# documentation for a complete description of this file. A short
# synopsis follows.
#
# This file controls: which hosts are allowed to connect, how clients
# are authenticated, which PostgreSQL user names they can use, which
# databases they can access. Records take one of these forms:
#
# local DATABASE USER METHOD [OPTIONS]
# host DATABASE USER ADDRESS METHOD [OPTIONS]
# hostssl DATABASE USER ADDRESS METHOD [OPTIONS]
# hostnossl DATABASE USER ADDRESS METHOD [OPTIONS]
# hostgssenc DATABASE USER ADDRESS METHOD [OPTIONS]
# hostnogssenc DATABASE USER ADDRESS METHOD [OPTIONS]
#
# (The uppercase items must be replaced by actual values.)
#
# The first field is the connection type:
# - "local" is a Unix-domain socket
# - "host" is a TCP/IP socket (encrypted or not)
# - "hostssl" is a TCP/IP socket that is SSL-encrypted
# - "hostnossl" is a TCP/IP socket that is not SSL-encrypted
# - "hostgssenc" is a TCP/IP socket that is GSSAPI-encrypted
# - "hostnogssenc" is a TCP/IP socket that is not GSSAPI-encrypted
#
# DATABASE can be "all", "sameuser", "samerole", "replication", a
# database name, or a comma-separated list thereof. The "all"
# keyword does not match "replication". Access to replication
# must be enabled in a separate record (see example below).
#
# USER can be "all", a user name, a group name prefixed with "+", or a
# comma-separated list thereof. In both the DATABASE and USER fields
# you can also write a file name prefixed with "@" to include names
# from a separate file.
#
# ADDRESS specifies the set of hosts the record matches. It can be a
# host name, or it is made up of an IP address and a CIDR mask that is
# an integer (between 0 and 32 (IPv4) or 128 (IPv6) inclusive) that
# specifies the number of significant bits in the mask. A host name
# that starts with a dot (.) matches a suffix of the actual host name.
# Alternatively, you can write an IP address and netmask in separate
# columns to specify the set of hosts. Instead of a CIDR-address, you
# can write "samehost" to match any of the server's own IP addresses,
# or "samenet" to match any address in any subnet that the server is
# directly connected to.
#
# METHOD can be "trust", "reject", "md5", "password", "scram-sha-256",
# "gss", "sspi", "ident", "peer", "pam", "ldap", "radius" or "cert".
# Note that "password" sends passwords in clear text; "md5" or
# "scram-sha-256" are preferred since they send encrypted passwords.
#
# OPTIONS are a set of options for the authentication in the format
# NAME=VALUE. The available options depend on the different
# authentication methods -- refer to the "Client Authentication"
# section in the documentation for a list of which options are
# available for which authentication methods.
#
# Database and user names containing spaces, commas, quotes and other
# special characters must be quoted. Quoting one of the keywords
# "all", "sameuser", "samerole" or "replication" makes the name lose
# its special character, and just match a database or username with
# that name.
#
# This file is read on server startup and when the server receives a
# SIGHUP signal. If you edit the file on a running system, you have to
# SIGHUP the server for the changes to take effect, run "pg_ctl reload",
# or execute "SELECT pg_reload_conf()".
#
# Put your actual configuration here
# ----------------------------------
#
# If you want to allow non-local connections, you need to add more
# "host" records. In that case you will also need to make PostgreSQL
# listen on a non-local interface via the listen_addresses
# configuration parameter, or via the -i or -h command line switches.# CAUTION: Configuring the system for local "trust" authentication
# allows any local user to connect as any PostgreSQL user, including
# the database superuser. If you do not trust all your local users,
# use another authentication method.
# TYPE DATABASE USER ADDRESS METHOD# "local" is for Unix domain socket connections only
local all all trust
# IPv4 local connections:
host all all 127.0.0.1/32 trust
# IPv6 local connections:
host all all ::1/128 trust
# Allow replication connections from localhost, by a user with the
# replication privilege.
local replication all trust
host replication all 127.0.0.1/32 trust
host replication all ::1/128 trust#host all all all scram-sha-256
host all all 0.0.0.0/0 md5
5、容器内确认密码
你可以用超级用户(例如 postgres)在容器内重置密码确保一致性:
# 进入容器
docker exec -it postgres_db bash# 进入数据库
psql -U ship -d shipdb# 查看用户是否存在
\du# 重设密码
ALTER USER ship WITH PASSWORD '123456';# 退出
\q
【显示】
root@bc08810fe3f2:/# psql -U ship -d shipdb
psql (15.13 (Debian 15.13-1.pgdg120+1))
Type "help" for help.shipdb=# \du
List of roles
Role name | Attributes | Member of
-----------+------------------------------------------------------------+-----------
ship | Superuser, Create role, Create DB, Replication, Bypass RLS | {}shipdb=# ALTER USER ship WITH PASSWORD '123456'
shipdb-# \q
root@bc08810fe3f2:/#exit
6、Windows 本地是否安装了正确版本的 psql 工具
打开 PowerShell 或 CMD 输入:
psql --version
【显示】
D:\computer_soft\Microsoft VS Code\python_project\RAG\项目2_基于LangGraph实现智能分诊系统\L1-Project-2>psql --version
psql (PostgreSQL) 15.13
7、防火墙 / 安全软件是否阻止了本地 127.0.0.1:5432 端口
可以运行以下命令确认本地端口监听状态:
netstat -ano | findstr :5432
【显示】
D:\computer_soft\Microsoft VS Code\python_project\RAG\项目2_基于LangGraph实现智能分诊系统\L1-Project-2>netstat -ano | findstr :5432
TCP 0.0.0.0:5432 0.0.0.0:0 LISTENING 8624
TCP 0.0.0.0:5432 0.0.0.0:0 LISTENING 6588
TCP [::]:5432 [::]:0 LISTENING 8624
TCP [::]:5432 [::]:0 LISTENING 6588
从你的输出结果来看:
TCP 0.0.0.0:5432 0.0.0.0:0 LISTENING 8624
TCP 0.0.0.0:5432 0.0.0.0:0 LISTENING 6588
这意味着:
✅ 端口 5432 已经监听成功,并且是绑定在 0.0.0.0 上的,表示任何地址(包括 127.0.0.1)都能访问。说明 Docker 映射生效,网络没有问题。
8、确保 pg_hba.conf 中最后一条确实生效
你当前的配置末尾是:
host all all 0.0.0.0/0 md5
临时将 pg_hba.conf 设置为 trust 模式排查密码问题,并恢复为 md5 模式。
第一步:进入容器
在主机(Windows)终端中执行:
docker exec -it postgres_db bash第二步:切换认证方式为 trust(跳过密码)
🔧 修改 pg_hba.conf 文件(替换 md5 为 trust):
sed -i 's/^host all all 0.0.0.0\/0 md5/host all all 0.0.0.0\/0 trust/' /var/lib/postgresql/data/pg_hba.conf
🔁 重新加载 PostgreSQL 配置文件:
psql -U ship -d shipdb -c "SELECT pg_reload_conf();"
第三步:Windows 主机测试连接(此时不需要密码)
psql -h 127.0.0.1 -p 5432 -U ship -d shipdb
如果这一步可以成功连接 → 说明之前密码验证确实有问题。
第四步:修正密码并恢复为 md5 模式
#① 在容器里进入 PostgreSQL:
psql -U ship -d shipdb#② 修改密码:
ALTER USER ship WITH PASSWORD '123456';
\q#③ 恢复 pg_hba.conf(把 trust 改回 md5):
sed -i 's/^host all all 0.0.0.0\/0 trust/host all all 0.0.0.0\/0 md5/' /var/lib/postgresql/data/pg_hba.conf#④ 重新加载配置:
psql -U ship -d shipdb -c "SELECT pg_reload_conf();"#最后再次在 Windows 上测试密码连接:
psql -h 127.0.0.1 -p 5432 -U ship -d shipdb#当提示输入密码时,输入:
123456
【显示】
root@bc08810fe3f2:/# sed -i 's/^host all all 0.0.0.0\/0 md5/host all all 0.0.0.0\/0 trust/' /var/lib/postgresql/data/pg_hba.conf
root@bc08810fe3f2:/# psql -U ship -d shipdb -c "SELECT pg_reload_conf();"
pg_reload_conf
----------------
t
(1 row)
TCP端口监听失败问题
root@bc08810fe3f2:/# apt update && apt install -y net-tools
root@7790c528d899:/# netstat -ano | findstr :5432
root@bc08810fe3f2:/# netstat -app | grep 5432
unix 2 [ ACC ] STREAM LISTENING 306586 - /var/run/postgresql/.s.PGSQL.5432
root@bc08810fe3f2:/# exit
表示 PostgreSQL 当前 只监听 Unix Socket:
-
路径为
/var/run/postgresql/.s.PGSQL.5432; -
没有
tcp 0.0.0.0:5432或tcp 127.0.0.1:5432的监听端口; -
所以从容器外(如宿主机)无法通过 IP 和端口连接数据库。
✅ 正确结果应包含:
tcp 0 0 0.0.0.0:5432 0.0.0.0:* LISTEN
或tcp 0 0 :::5432 :::* LISTEN