SpringBoot(Ⅱ-2)——,SpringBoot版本控制,自动装配原理补充(源码),自动导包原理补充(源码),run方法
SpringBoot的版本控制是怎么做的
starter版本控制
SpringBoot的核心父依赖,下面导入的所有starter依赖都不需要指定版本,版本默认和spring-boot-starter-parent的parent版本一致;
xxxstarter内部jar包依赖的版本管理,starter自动做好了,不会出现冲突,也不需要我们操心
<parent><groupId>org.springframework.boot</groupId><artifactId>spring-boot-starter-parent</artifactId><version>2.6.7</version><relativePath/> <!-- lookup parent from repository -->
</parent>
所有jar包的依赖的版本,追根溯源是spring-boot-dependencies
我们点进去spring-boot-starter-parent,会发现这个项目还有自己的父依赖
<parent><groupId>org.springframework.boot</groupId><artifactId>spring-boot-dependencies</artifactId><version>2.6.7</version>
</parent>
<artifactId>spring-boot-starter-parent</artifactId>
<packaging>pom</packaging>
<name>spring-boot-starter-parent</name>
我们继续点进去spring-boot-dependencies,会发现这个spring-boot-starter-parent所依赖的所有jar包的版本

spring-boot-dependencies就是SpringBoot的版本仲裁中心
没有被包括在这个文件当中的依赖,还是需要写version
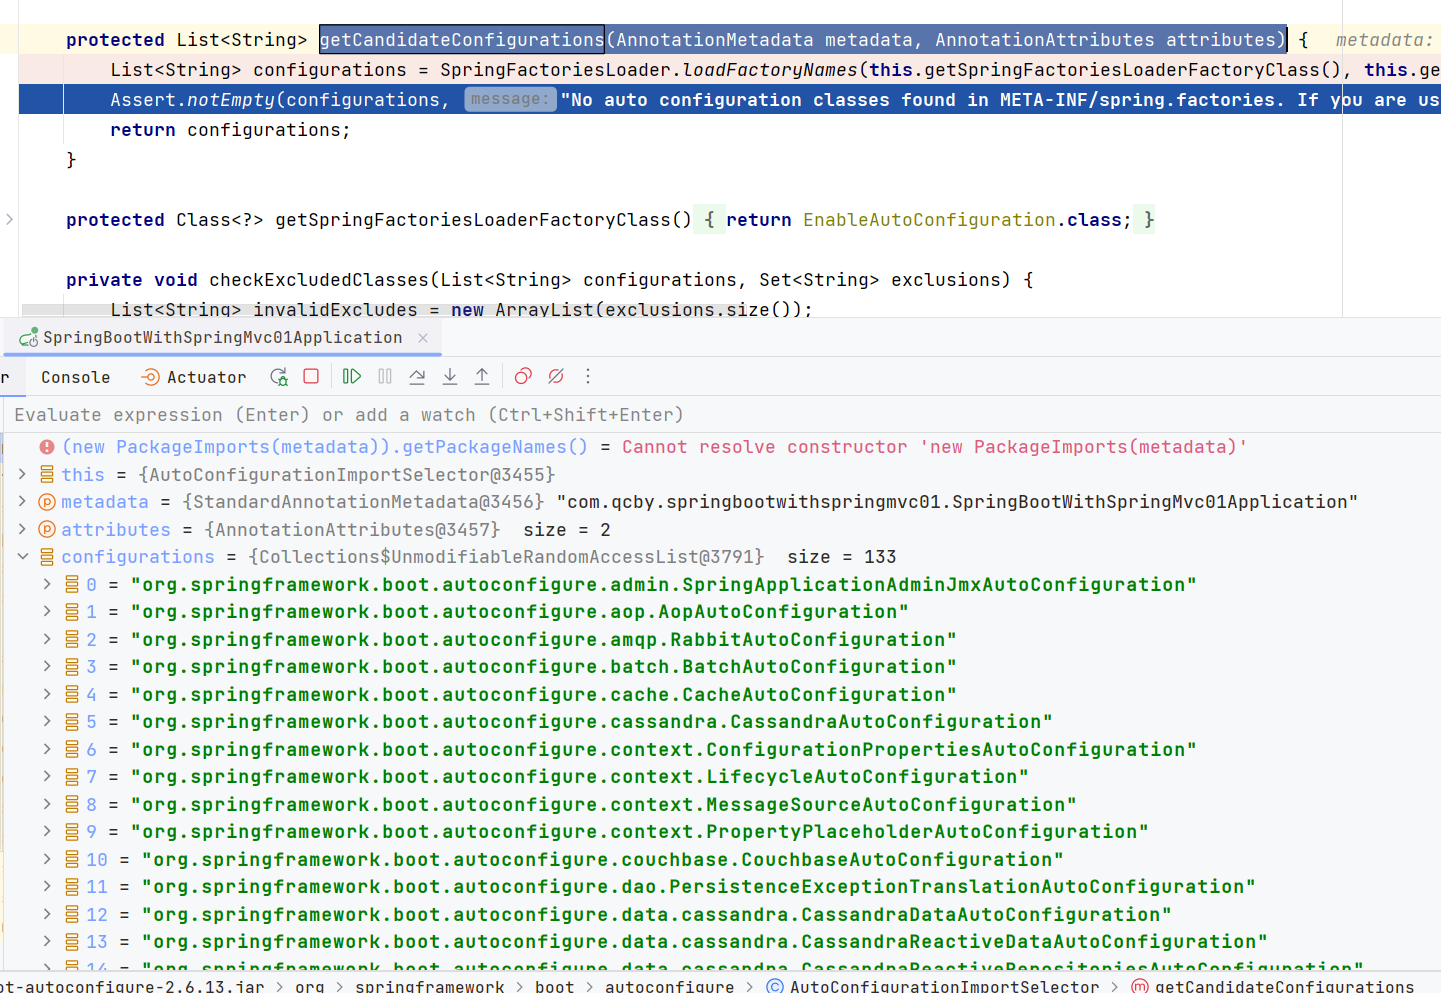
自动获取需要扫的包路径(获取主启动类的所在包及其子包,作为包扫描的参数)
@SpringBootApplication → @EnableAutoConfiguration → @AutoConfigurationPackage → @Import({AutoConfigurationPackages.Registrar.class}) → 方法public void registerBeanDefinitions(AnnotationMetadata metadata, BeanDefinitionRegistry registry) → 选中new PackageImports(metadata)).getPackageNames(),右键Evaluate expression
得到如图结果

自动装配bean(约定大于配置)
自动将默认的包名导入一个list中,然后根据@ConditionalOnxxx注解剔除不需要加载的包,最后将需要加载的包的所有bean导入IOC容器
@SpringBootApplication → @EnableAutoConfiguration → @Import({AutoConfigurationImportSelector.class}) → AutoConfigurationImportSelector.class →
getCandidateConfigurations(AnnotationMetadata metadata, AnnotationAttributes attributes)方法获取候选配置类全限定类名 → 根据starter和配置文件(@ConditionalOnxxx注解选择哪些bean被真正装配,而哪些被过滤)
重点:
1. xxxxAutoConfiguration.class帮助我们给容器中自动装配组件(一般都带有@ConditionalOnxxx注解)
2. xxxxProperties配置类与配置文件互相映射,同时其中的字段值有默认属性值。所以当配置文件没有值的时候,就走默认值;反之,则走配置文件的值
这就是约定大于配置,或者叫约定优于配置
全限定类名被拼接在一个List<String> configurations当中
protected List<String> getCandidateConfigurations(AnnotationMetadata metadata, AnnotationAttributes attributes) {List<String> configurations = SpringFactoriesLoader.loadFactoryNames(this.getSpringFactoriesLoaderFactoryClass(), this.getBeanClassLoader());Assert.notEmpty(configurations, "No auto configuration classes found in META-INF/spring.factories. If you are using a custom packaging, make sure that file is correct.");return configurations;
}
protected AutoConfigurationEntry getAutoConfigurationEntry(AnnotationMetadata annotationMetadata) {if (!this.isEnabled(annotationMetadata)) {return EMPTY_ENTRY;} else {AnnotationAttributes attributes = this.getAttributes(annotationMetadata);List<String> configurations = this.getCandidateConfigurations(annotationMetadata, attributes);// 所有候选配置configurations = this.removeDuplicates(configurations);// 去重Set<String> exclusions = this.getExclusions(annotationMetadata, attributes);// 根据注解元数据获取需要被排除的this.checkExcludedClasses(configurations, exclusions);// 校验是否真的需要被排除configurations.removeAll(exclusions);configurations = this.getConfigurationClassFilter().filter(configurations);// 其他过滤this.fireAutoConfigurationImportEvents(configurations, exclusions);return new AutoConfigurationEntry(configurations, exclusions);// 最终返回}
}
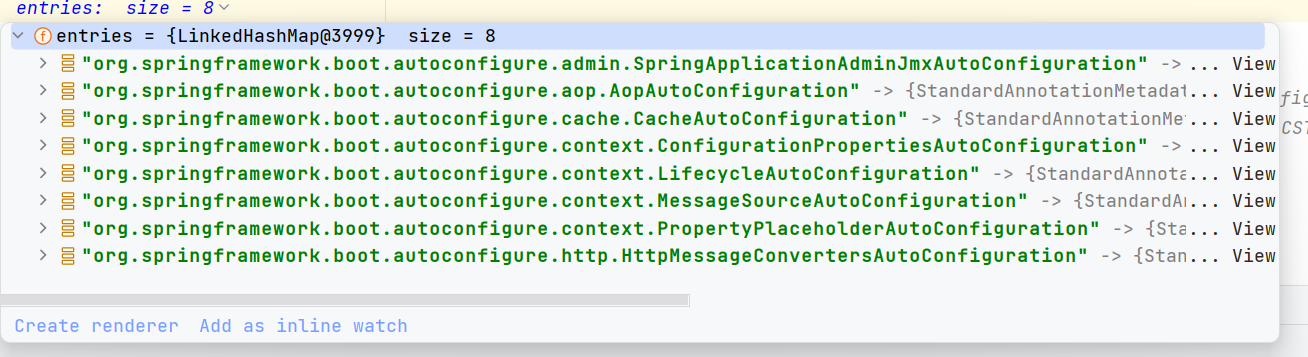
过滤完成只剩下25个了

最终拼接到一个map当中
private final Map<String, AnnotationMetadata> entries = new LinkedHashMap();
SpringBoot启动类run方法的作用
@SpringBootApplication注解只是标记作用,告诉Spring自动配置和自动导包的内容
实际读取和加载这些事情,是run方法做的
run方法代码分析
public static void main(String[] args) {SpringApplication.run(SpringBootWithSpringMvc01Application.class, args);
}
点进去之后是另一个run方法
public static ConfigurableApplicationContext run(Class<?> primarySource, String... args) {return run(new Class[]{primarySource}, args);
}
再点进去是第三个run方法
public static ConfigurableApplicationContext run(Class<?>[] primarySources, String[] args) {return (new SpringApplication(primarySources)).run(args);
}
最终的run方法内容
public ConfigurableApplicationContext run(String... args) {long startTime = System.nanoTime();DefaultBootstrapContext bootstrapContext = this.createBootstrapContext();ConfigurableApplicationContext context = null;this.configureHeadlessProperty();SpringApplicationRunListeners listeners = this.getRunListeners(args);listeners.starting(bootstrapContext, this.mainApplicationClass);try {ApplicationArguments applicationArguments = new DefaultApplicationArguments(args);ConfigurableEnvironment environment = this.prepareEnvironment(listeners, bootstrapContext, applicationArguments);this.configureIgnoreBeanInfo(environment);Banner printedBanner = this.printBanner(environment);context = this.createApplicationContext();context.setApplicationStartup(this.applicationStartup);this.prepareContext(bootstrapContext, context, environment, listeners, applicationArguments, printedBanner);this.refreshContext(context);this.afterRefresh(context, applicationArguments);Duration timeTakenToStartup = Duration.ofNanos(System.nanoTime() - startTime);if (this.logStartupInfo) {(new StartupInfoLogger(this.mainApplicationClass)).logStarted(this.getApplicationLog(), timeTakenToStartup);}listeners.started(context, timeTakenToStartup);this.callRunners(context, applicationArguments);} catch (Throwable var12) {this.handleRunFailure(context, var12, listeners);throw new IllegalStateException(var12);}try {Duration timeTakenToReady = Duration.ofNanos(System.nanoTime() - startTime);listeners.ready(context, timeTakenToReady);return context;} catch (Throwable var11) {this.handleRunFailure(context, var11, (SpringApplicationRunListeners)null);throw new IllegalStateException(var11);}
}
核心
this.setInitializers(this.getSpringFactoriesInstances(ApplicationContextInitializer.class));是核心
第三个run方法中,SpringApplication的构造方法,实际上是创建Spring的配置对象
public SpringApplication(Class<?>... primarySources) {this((ResourceLoader)null, primarySources);
}// 完成了自动装配
public SpringApplication(ResourceLoader resourceLoader, Class<?>... primarySources) {this.sources = new LinkedHashSet();this.bannerMode = Mode.CONSOLE;this.logStartupInfo = true;this.addCommandLineProperties = true;this.addConversionService = true;this.headless = true;this.registerShutdownHook = true;this.additionalProfiles = Collections.emptySet();this.isCustomEnvironment = false;this.lazyInitialization = false;this.applicationContextFactory = ApplicationContextFactory.DEFAULT;this.applicationStartup = ApplicationStartup.DEFAULT;this.resourceLoader = resourceLoader;Assert.notNull(primarySources, "PrimarySources must not be null");this.primarySources = new LinkedHashSet(Arrays.asList(primarySources));this.webApplicationType = WebApplicationType.deduceFromClasspath();this.bootstrapRegistryInitializers = new ArrayList(this.getSpringFactoriesInstances(BootstrapRegistryInitializer.class));// 完成读取所有配置初始化的工作this.setInitializers(this.getSpringFactoriesInstances(ApplicationContextInitializer.class));this.setListeners(this.getSpringFactoriesInstances(ApplicationListener.class));this.mainApplicationClass = this.deduceMainApplicationClass();
}