【玩转MacBook】Git安装
Git 官网也提到了MacBook 可以使用 Homebrew 安装 Git,所以在此使用 Homebrew 安装。
1、安装 Homebrew
执行安装脚本
在 Terminal 中执行如下命令:
/bin/bash -c "$(curl -fsSL https://gitee.com/ineo6/homebrew-install/raw/master/install.sh)"
其实就是**执行作者写的一个脚本文件 install.sh。**这个脚本很方便,已经配置好了镜像源,如果上述命令执行成功就无需再配置镜像源。
安装的完整过程如下:
larryla@larryladeMacBook-Air ~ % /bin/bash -c "$(curl -fsSL https://gitee.com/ineo6/homebrew-install/raw/master/install.sh)"
==> Checking for `sudo` access (which may request your password)...
Password:
==> You are using macOS 15.1.
==> We do not provide support for this pre-release version.
因为系统版本,可能会遇到一些未知问题==> The following new directories will be created:
/opt/homebrew/bin
/opt/homebrew/etc
/opt/homebrew/include
/opt/homebrew/lib
/opt/homebrew/sbin
/opt/homebrew/share
/opt/homebrew/var
/opt/homebrew/opt
/opt/homebrew/share/zsh
/opt/homebrew/share/zsh/site-functions
/opt/homebrew/var/homebrew
/opt/homebrew/var/homebrew/linked
/opt/homebrew/Cellar
/opt/homebrew/Caskroom
/opt/homebrew/Frameworks
==> The Xcode Command Line Tools will be installed.
==> 安装提示Mac下镜像飞速安装Homebrew教程(请收藏):https://brew.idayer.com/打个小广告
欢迎使用[快系列]教程,必出精品,安装有保障!- [快系列]stable-diffusion-webui: https://brew.idayer.com/install/stable-diffusion-webui
- [快系列]nvm快速安装教程: https://brew.idayer.com/install/nvm-for-nodejs安装遇到问题,请添加讨论群寻求Homebre的安装帮助。当然也非常欢迎大家加群聊天摸鱼,讨论mac、软件、摄影,扫码关注公众号:湖中剑,回复'brew'加群。█████████████████████████████████████
█████████████████████████████████████
████ ▄▄▄▄▄ █▀█ █▄▀▄ ▄ ▄▄██ ▄▄▄▄▄ ████
████ █   █ █▀▀▀█ ▀█▀▀▀▀▄▀█ █   █ ████
████ █▄▄▄█ █▀ █▀▀█▄▀ █▀▄ █ █▄▄▄█ ████
████▄▄▄▄▄▄▄█▄▀ ▀▄█▄▀ █▄▀ █▄▄▄▄▄▄▄████
████     ▀▄▄▄▄▀▄▀▄▄█▀▀█ █ ▀ ▀▄█▄▀████
████ ▀█▄▀▀▄  █▄█▀█ ▄██ █ ▀ ▄▄██▀█████
████ █   █▄ ▄ ▄█▄ ▀  ██ ▀ ▀▀▀▄ █▀████
████ ██▄██▄▀ █  ▄█▀ ▄▄▀▀ ▀ █▄█▄▀█████
████ ▄ ▀▄▄▄▀█▄ ▄▀     ▀ ▀█▀ ▀▀ █▀████
████ █ ▀▀▀▄█▄█▄█▀█▀▄ █▀▀▄▄█▄▄▄▄▀█████
████▄██▄▄█▄█▀▀▀█▄█▄ ▀▄▀█ ▄▄▄ ▀   ████
████ ▄▄▄▄▄ █▄▀  ▄█▄  ▄▀  █▄█  ▄▀█████
████ █   █ █ ▀▄▄ ▀▄ ▀███ ▄▄▄▄ ▄▀ ████
████ █▄▄▄█ █ ▄▄▀ ██▄▀▄▀▄ ▀▄   ▄ █████
████▄▄▄▄▄▄▄█▄▄█▄▄████▄█████▄▄█▄██████
█████████████████████████████████████
█████████████████████████████████████请按回车键(RETURN)继续安装,按其他任意按键取消安装
==> /usr/bin/sudo /usr/bin/install -d -o root -g wheel -m 0755 /opt/homebrew
==> /usr/bin/sudo /bin/mkdir -p /opt/homebrew/bin /opt/homebrew/etc /opt/homebrew/include /opt/homebrew/lib /opt/homebrew/sbin /opt/homebrew/share /opt/homebrew/var /opt/homebrew/opt /opt/homebrew/share/zsh /opt/homebrew/share/zsh/site-functions /opt/homebrew/var/homebrew /opt/homebrew/var/homebrew/linked /opt/homebrew/Cellar /opt/homebrew/Caskroom /opt/homebrew/Frameworks
==> /usr/bin/sudo /bin/chmod ug=rwx /opt/homebrew/bin /opt/homebrew/etc /opt/homebrew/include /opt/homebrew/lib /opt/homebrew/sbin /opt/homebrew/share /opt/homebrew/var /opt/homebrew/opt /opt/homebrew/share/zsh /opt/homebrew/share/zsh/site-functions /opt/homebrew/var/homebrew /opt/homebrew/var/homebrew/linked /opt/homebrew/Cellar /opt/homebrew/Caskroom /opt/homebrew/Frameworks
==> /usr/bin/sudo /bin/chmod go-w /opt/homebrew/share/zsh /opt/homebrew/share/zsh/site-functions
==> /usr/bin/sudo /usr/sbin/chown larryla /opt/homebrew/bin /opt/homebrew/etc /opt/homebrew/include /opt/homebrew/lib /opt/homebrew/sbin /opt/homebrew/share /opt/homebrew/var /opt/homebrew/opt /opt/homebrew/share/zsh /opt/homebrew/share/zsh/site-functions /opt/homebrew/var/homebrew /opt/homebrew/var/homebrew/linked /opt/homebrew/Cellar /opt/homebrew/Caskroom /opt/homebrew/Frameworks
==> /usr/bin/sudo /usr/bin/chgrp admin /opt/homebrew/bin /opt/homebrew/etc /opt/homebrew/include /opt/homebrew/lib /opt/homebrew/sbin /opt/homebrew/share /opt/homebrew/var /opt/homebrew/opt /opt/homebrew/share/zsh /opt/homebrew/share/zsh/site-functions /opt/homebrew/var/homebrew /opt/homebrew/var/homebrew/linked /opt/homebrew/Cellar /opt/homebrew/Caskroom /opt/homebrew/Frameworks
==> /usr/bin/sudo /usr/sbin/chown -R larryla:admin /opt/homebrew
==> /usr/bin/sudo /bin/mkdir -p /Users/larryla/Library/Caches/Homebrew
==> /usr/bin/sudo /bin/chmod g+rwx /Users/larryla/Library/Caches/Homebrew
==> /usr/bin/sudo /usr/sbin/chown -R larryla /Users/larryla/Library/Caches/Homebrew
==> Searching online for the Command Line Tools
==> /usr/bin/sudo /usr/bin/touch /tmp/.com.apple.dt.CommandLineTools.installondemand.in-progress
==> Installing Command Line Tools for Xcode-16.2
==> /usr/bin/sudo /usr/sbin/softwareupdate -i Command\ Line\ Tools\ for\ Xcode-16.2
Software Update ToolFinding available softwareDownloading Command Line Tools for Xcode
Downloaded Command Line Tools for Xcode
Installing Command Line Tools for Xcode
Done with Command Line Tools for Xcode
Done.
==> /usr/bin/sudo /usr/bin/xcode-select --switch /Library/Developer/CommandLineTools
Password:
Sorry, try again.
Password:
==> /usr/bin/sudo /bin/rm -f /tmp/.com.apple.dt.CommandLineTools.installondemand.in-progress==> Downloading and installing Homebrew...
remote: Enumerating objects: 288347, done.
remote: Counting objects: 100% (44/44), done.
remote: Compressing objects: 100% (44/44), done.
remote: Total 288347 (delta 0), reused 44 (delta 0), pack-reused 288303
Receiving objects: 100% (288347/288347), 90.04 MiB | 6.20 MiB/s, done.
Resolving deltas: 100% (206656/206656), done.
From https://mirrors.ustc.edu.cn/brew* [new branch]            SMillerDev-patch-1                                 -> origin/SMillerDev-patch-1* [new branch]            cleaner-factory                                    -> origin/cleaner-factory* [new branch]            dependabot/bundler/Library/Homebrew/rubocop-1.65.1 -> origin/dependabot/bundler/Library/Homebrew/rubocop-1.65.1* [new branch]            depends-on-order-cop-blank-lines                   -> origin/depends-on-order-cop-blank-lines* [new branch]            deprecate-old-style-cmds                           -> origin/deprecate-old-style-cmds* [new branch]            info-analytics-timeout                             -> origin/info-analytics-timeout* [new branch]            load-installed-casks                               -> origin/load-installed-casks* [new branch]            load-internal-cask-json-v3                         -> origin/load-internal-cask-json-v3* [new branch]            make-brew-typecheck-work-with-taps                 -> origin/make-brew-typecheck-work-with-taps* [new branch]            master                                             -> origin/master* [new branch]            tmpdir-sandbox                                     -> origin/tmpdir-sandbox* [new branch]            use-cask-tab-to-better-identify-installed-casks    -> origin/use-cask-tab-to-better-identify-installed-casks* [new tag]               0.1                                                -> 0.1* [new tag]               0.2                                                -> 0.2* [new tag]               0.3                                                -> 0.3* [new tag]               0.4                                                -> 0.4* [new tag]               0.5                                                -> 0.5* [new tag]               0.6                                                -> 0.6* [new tag]               0.7                                                -> 0.7* [new tag]               0.7.1                                              -> 0.7.1......* [new tag]               4.4.11                                             -> 4.4.11* [new tag]               4.4.12                                             -> 4.4.12* [new tag]               4.4.13                                             -> 4.4.13* [new tag]               4.4.2                                              -> 4.4.2* [new tag]               4.4.3                                              -> 4.4.3* [new tag]               4.4.4                                              -> 4.4.4* [new tag]               4.4.5                                              -> 4.4.5* [new tag]               4.4.6                                              -> 4.4.6* [new tag]               4.4.7                                              -> 4.4.7* [new tag]               4.4.8                                              -> 4.4.8* [new tag]               4.4.9                                              -> 4.4.9
remote: Enumerating objects: 55, done.
remote: Counting objects: 100% (33/33), done.
remote: Total 55 (delta 33), reused 33 (delta 33), pack-reused 22
Unpacking objects: 100% (55/55), 9.08 KiB | 216.00 KiB/s, done.
From https://mirrors.ustc.edu.cn/brew* [new tag]               4.0.29     -> 4.0.29* [new tag]               4.1.9      -> 4.1.9* [new tag]               4.2.14     -> 4.2.14* [new tag]               4.3.10     -> 4.3.10
HEAD is now at e330f371f8 Merge pull request #19002 from Homebrew/dependabot/bundler/Library/Homebrew/regexp_parser-2.10.0
==> Tapping homebrew/services
remote: Enumerating objects: 3796, done.
remote: Total 3796 (delta 0), reused 0 (delta 0), pack-reused 3796
Receiving objects: 100% (3796/3796), 1.11 MiB | 1.49 MiB/s, done.
Resolving deltas: 100% (1858/1858), done.
From https://mirrors.ustc.edu.cn/homebrew-services* [new branch]      master     -> origin/master
HEAD is now at 6df0008 Merge pull request #854 from Homebrew/dependabot/bundler/bigdecimal-3.1.9
HOMEBREW_BREW_GIT_REMOTE set: using https://mirrors.ustc.edu.cn/brew.git as the Homebrew/brew Git remote.
==> Updating Homebrew...
==> Downloading https://mirrors.ustc.edu.cn/homebrew-bottles/bottles/bottles-portable-ruby/portable-ruby-3.3.6.arm64_big_sur.bottle.tar.gz
################################################################################################################################################################### 100.0%
==> Pouring portable-ruby-3.3.6.arm64_big_sur.bottle.tar.gz
==> Next steps:
自动配置环境变量
执行成功重要信息!!!重要信息!!!重要信息!!!
如果遇到 command not found brew,请执行下面脚本完成安装或者直接重新打开终端:
eval "$(/opt/homebrew/bin/brew shellenv)"==> 🎉 恭喜,安装成功!
- 验证命令: brew help
- 请收藏,谨防失联: https://brew.idayer.com==> 如果有幸帮助到你,可以考虑请我喝杯咖啡~☕ 喝咖啡:https://brew.idayer.com/reward/
如上所示,提示安装成功。
配置环境变量
依次执行如下命令:
echo 'eval "$(/opt/homebrew/bin/brew shellenv)"' >> ~/.zprofileeval "$(/opt/homebrew/bin/brew shellenv)"
Homebrew 环境变量会被配置到文件 .zprofile 中:

检查 Homebrew 是否安装成功:
执行命令:
larryla@larryladeMacBook-Air ~ % brew help
Example usage:brew search TEXT|/REGEX/brew info [FORMULA|CASK...]brew install FORMULA|CASK...brew updatebrew upgrade [FORMULA|CASK...]brew uninstall FORMULA|CASK...brew list [FORMULA|CASK...]Troubleshooting:brew configbrew doctorbrew install --verbose --debug FORMULA|CASKContributing:brew create URL [--no-fetch]brew edit [FORMULA|CASK...]Further help:brew commandsbrew help [COMMAND]man brewhttps://docs.brew.sh
如上所示,显示帮助信息,说明 Homebrew 安装成功。
2、安装 Git
我原本是想使用 Homebrew 安装 Git 的,结果在安装 Homebrew 的过程中,弹出来一个对话框,提示我安装“Command Line Developer Tools”。
Command Line Developer Tools 是 macOS 提供的一组工具,用于命令行开发,包含了编译器(clang)、版本控制工具(git)、构建工具(make)和调试工具等。它们是开发者进行软件开发的基础工具,可以独立于完整的 Xcode 安装,只需占用较少的存储空间。
看到有 Git,我就直接同意安装了:

安装完成后,检查 Git 是否成功安装:
larryla@larryladeMacBook-Air ~ % git -v
git version 2.39.5 (Apple Git-154)
安装成功。
查看 git 位置:
larryla@larryladeMacBook-Air ~ % which git
/usr/bin/git
/usr/bin/:这是一个常见的系统目录,存放系统级的可执行文件(即命令和程序)。这个目录包含了 macOS 系统和很多系统级工具的可执行文件,比如 git、ls、curl 等。
使用Homebrew安装Git
为什么还要使用 Homebrew 安装一遍 Git,后文有解释。
安装
执行命令:brew install git
完整过程如下:
larryla@larryladeMacBook-Air ~ % brew install git
==> Downloading https://mirrors.ustc.edu.cn/homebrew-bottles/api/formula.jws.jso
######################################################################### 100.0%
==> Downloading https://mirrors.ustc.edu.cn/homebrew-bottles/api/cask.jws.json
######################################################################### 100.0%
==> Fetching dependencies for git: libunistring, gettext and pcre2
==> Fetching libunistring
==> Downloading https://mirrors.ustc.edu.cn/homebrew-bottles/bottles/libunistrin
######################################################################### 100.0%
==> Fetching gettext
==> Downloading https://mirrors.ustc.edu.cn/homebrew-bottles/bottles/gettext-0.2
######################################################################### 100.0%
==> Fetching pcre2
==> Downloading https://mirrors.ustc.edu.cn/homebrew-bottles/bottles/pcre2-10.44
######################################################################### 100.0%
==> Fetching git
==> Downloading https://mirrors.ustc.edu.cn/homebrew-bottles/bottles/git-2.47.1.
######################################################################### 100.0%
==> Installing dependencies for git: libunistring, gettext and pcre2
==> Installing git dependency: libunistring
==> Pouring libunistring-1.3.arm64_sequoia.bottle.tar.gz
🍺  /opt/homebrew/Cellar/libunistring/1.3: 59 files, 5.4MB
==> Installing git dependency: gettext
==> Pouring gettext-0.23.arm64_sequoia.bottle.tar.gz
🍺  /opt/homebrew/Cellar/gettext/0.23: 2,052 files, 22.4MB
==> Installing git dependency: pcre2
==> Pouring pcre2-10.44.arm64_sequoia.bottle.tar.gz
🍺  /opt/homebrew/Cellar/pcre2/10.44: 237 files, 6.3MB
==> Installing git
==> Pouring git-2.47.1.arm64_sequoia.bottle.tar.gz
==> Caveats
The Tcl/Tk GUIs (e.g. gitk, git-gui) are now in the `git-gui` formula.
Subversion interoperability (git-svn) is now in the `git-svn` formula.zsh completions and functions have been installed to:/opt/homebrew/share/zsh/site-functions
==> Summary
🍺  /opt/homebrew/Cellar/git/2.47.1: 1,685 files, 54.4MB
==> Running `brew cleanup git`...
Disable this behaviour by setting HOMEBREW_NO_INSTALL_CLEANUP.
Hide these hints with HOMEBREW_NO_ENV_HINTS (see `man brew`).
==> Caveats
==> git
The Tcl/Tk GUIs (e.g. gitk, git-gui) are now in the `git-gui` formula.
Subversion interoperability (git-svn) is now in the `git-svn` formula.zsh completions and functions have been installed to:/opt/homebrew/share/zsh/site-functions
如下图所示,安装成功,版本是 2.47.1,安装在了 /opt/homebrew/Cellar/git/2.47.1 目录下:

配置环境变量
查看 Git 版本,发现依旧是之前在安装 Command Line Developer Tools 时安装的版本:
larryla@larryladeMacBook-Air ~ % git -v
git version 2.39.5 (Apple Git-154)
这是因为没有为 Homebrew 安装版本 2.47.1 配置环境变量。
笔者的 MacBook Air 用的是 zsh shell,所以需要配置 .zshrc 文件,文件中包括了之前已经配置的 Maven 和 JDK:
# JDK 和 Maven 配置
JAVA_HOME=/Library/Java/JavaVirtualMachines/jdk-1.8.jdk/Contents/Home
M2_HOME=/Users/larryla/softwares/developer/apache-maven-3.9.9
PATH=$JAVA_HOME/bin:$M2_HOME/bin:$PATH
CLASSPATH=$JAVA_HOME/lib/tools.jar:$JAVA_HOME/lib/dt.jar# Git 配置
GIT_HOME=/opt/homebrew/Cellar/git/2.47.1
PATH=$GIT_HOME/bin:$PATH# 导出环境变量
export JAVA_HOME
export PATH
export CLASSPATH
export M2_HOME
export GIT_HOME
再次检查 Git 版本,这次就是使用 Homebrew 安装的 Git 了:
larryla@larryladeMacBook-Air ~ % git -v
git version 2.47.1
查看 Git 位置:
larryla@larryladeMacBook-Air ~ % which git
/opt/homebrew/Cellar/git/2.47.1/bin/git
Homebrew 安装 Git 的路径:
- 苹果 M 系列芯片:/opt/homebrew/Cellar/git/版本号
- Intel 芯片:/usr/local/bin/git
3、为MacBook配置GitHub的SSH
1、验证笔记本是否已有 ssh keys:
larryla@larryladeMacBook-Air ~ % ls -al ~/.ssh
ls: /Users/larryla/.ssh: No such file or directory
可以看到,本机器还没有。
2、生成 ssh keys:
在 Terminal 执行如下命令:
ssh-keygen -t rsa -b 4096 -C "1649063532@qq.com"
引号内为 GitHub 账号关联的邮箱,可以在 GitHub 上的 Settings -> Emails 处查看:

生成过程如下,中间会提示你设置密码,为了便利,不用设置密码,一路回车:
larryla@larryladeMacBook-Air ~ % ssh-keygen -t rsa -b 4096 -C "1649063532@qq.com"
Generating public/private rsa key pair.
Enter file in which to save the key (/Users/larryla/.ssh/id_rsa):
Created directory '/Users/larryla/.ssh'.
Enter passphrase (empty for no passphrase):
Enter same passphrase again:
Your identification has been saved in /Users/larryla/.ssh/id_rsa
Your public key has been saved in /Users/larryla/.ssh/id_rsa.pub
The key fingerprint is:
SHA256:h4hMW90V9Nv5..........7kG75JQKpmJ0 16......2@qq.com
The key's randomart image is:
+---[RSA 4096]----+
|           .+.o=*|
|       . . .oo=+=|
|    . . . .o =o=*|
|   o + . .o = *=+|
|    + .+So.o *.+o|
|      o E.  * o.o|
|           . + o.|
|              .  |
|                 |
+----[SHA256]-----+
3、将 SSH Key 添加到 ssh-agent:eval $(ssh-agent -s)
larryla@larryladeMacBook-Air ~ % eval $(ssh-agent -s)
Agent pid 93133
larryla@larryladeMacBook-Air ~ % ssh-add ~/.ssh/id_rsa
Identity added: /Users/larryla/.ssh/id_rsa (1649063532@qq.com)
4、打开i d_rsa.pub 文件,复制文件内容到 GitHub
ls -al ~/.sshcat ~/.ssh/id_rsa.pub
将从"ssh-rsa"开头一直到邮箱结束的字符串都复制上。
打开 GitHub,找到 SSH and GPG keys:

选择 New SSH key:
- 取名
- 粘贴

5、验证SSH连接是否建立成功。输出过程中,可能会要求输入 yes 或 no,输入 yes 后回车即可:
larryla@larryladeMacBook-Air ~ % ssh -T git@github.com
The authenticity of host 'github.com (20.2xx.xxx.xx6)' can't be established.
ED25519 key fingerprint is SHA256:+DiY3wvv...........zPMSvHdkr4UvCOqU.
This key is not known by any other names.
Are you sure you want to continue connecting (yes/no/[fingerprint])? yes
Warning: Permanently added 'github.com' (ED25519) to the list of known hosts.
Hi Acura-bit! You've successfully authenticated, but GitHub does not provide shell access.
4、IntelliJ IDEA配置全局Git
背景:每次新建项目或打开项目,都会使用默认的配置 .m2 的那个,能不能一次性配置好?答案是可以的。
如下图所示,关闭所有项目 File -> Close Project 后,进入下面的界面,找到左下角的设置按钮。

设置 Maven 的安装路径、settings.xml 文件路径、本地仓库路径:

接下来,把跟 Maven 相关的也设置好:


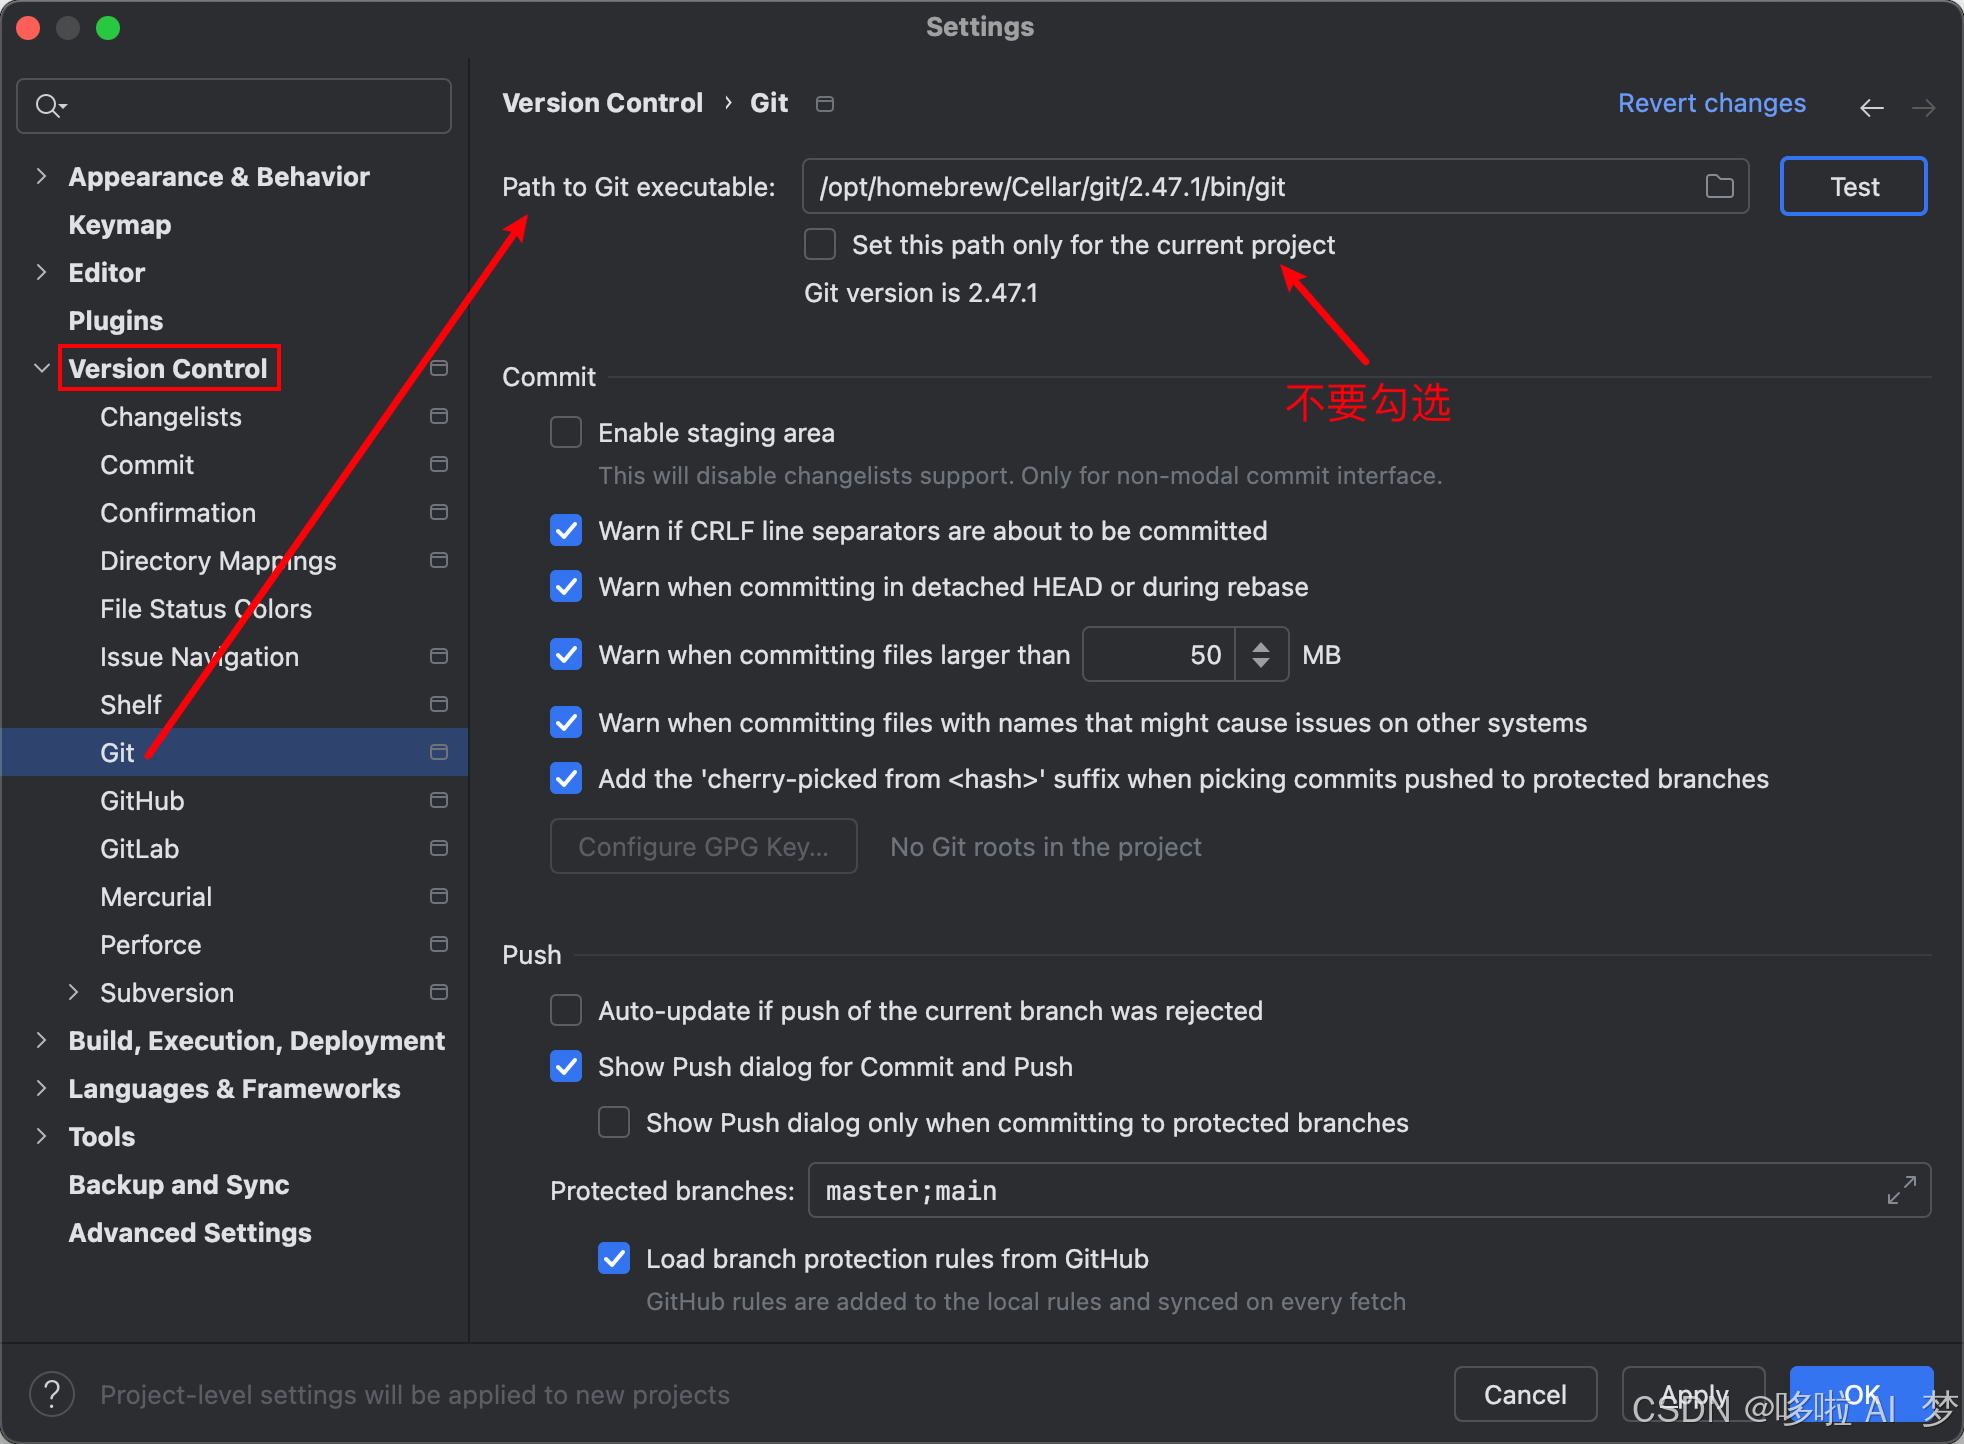
现在配置 Git。找到 Version Control -> Git 如下图所示,配置好 Homebrew 安装的 Git 路径,Test 一下成功。注意不要勾选框。
附:
一、在安装 Command Line Developer Tools 时已经安装了 Git,为啥还要用 Homebrew 安装 Git 呢?
在 macOS 上,安装 Command Line Developer Tools 时确实会自带 Git(以及其他开发工具,如 clang 和 make 等)。但是,有时你可能会希望使用 Homebrew 来重新安装或升级 Git,原因主要有以下几点:
1、版本更新
- macOS 系统自带的 Git 版本可能不是最新的。虽然 Command Line Developer Tools 中的 Git 版本会随着 Xcode 或命令行工具的更新而更新,但它可能没有最新的功能或修复。
- 使用 Homebrew 安装 Git 可以更方便地安装最新版本的 Git,并且可以通过
brew upgrade命令轻松更新到最新版本。
2、不同的版本管理需求
- 使用 Homebrew 安装 Git 允许我们拥有一个与系统自带的 Git 版本隔离的版本。例如,你可能需要某个特定版本的 Git(例如 2.x 或更高版本),而 macOS 自带的 Git 可能较旧或不符合你的需求。
- Homebrew 安装的 Git 不会干扰系统自带的 Git,可以通过路径优先级来控制使用哪个版本。
3、独立管理
- Homebrew 安装的 Git 可以完全由 Homebrew 来管理,这意味着可以通过 Homebrew 安装、升级、卸载 Git,所有操作都非常方便。我们不必依赖系统更新来获取 Git 的最新版本。
- 如果使用的是系统自带的 Git(
/usr/bin/git),它通常是由 macOS 管理的,更新时不一定能够随时满足你的需求。而通过 Homebrew 安装 Git,你可以完全控制版本。
4、
- 在某些情况下,使用系统自带的 Git 可能会导致与其他工具或库的冲突。例如,有时其他开发工具(如某些 IDE 或脚本)可能依赖于 Homebrew 安装的 Git 版本。如果你通过 Homebrew 安装 Git,它的路径通常在
/opt/homebrew/bin/git(Apple Silicon)或/usr/local/bin/git(Intel Mac)中,这些路径在 Homebrew 管理下,与系统路径区分开来,减少了冲突的可能性。
5、Homebrew 允许你通过简单的命令(如 brew install git 和 brew upgrade git)来管理 Git 的版本,避免手动下载和安装。如果系统自带的 Git 版本出现问题,使用 Homebrew 安装的 Git 可以更容易进行修复或替代。
简单来说就是,Homebrew 可以方便的管理 Git,如升级、卸载等。
二、环境变量命令
(1) echo 'eval "$(/opt/homebrew/bin/brew shellenv)"' >> ~/.zprofile
这个命令的作用是将 Homebrew 的环境变量配置添加到你的 ~/.zprofile 文件中。
/opt/homebrew/bin/brew:这是 Homebrew 在 Apple Silicon Mac(M1 或 M2 芯片)上的默认安装路径。对于 Intel 架构的 Mac,路径通常是/usr/local/bin/brew。brew shellenv:这个命令会打印出需要设置的环境变量,例如PATH、HOMEBREW_PREFIX等,以确保 Homebrew 正常工作。eval "$(/opt/homebrew/bin/brew shellenv)":这条命令执行了brew shellenv输出的命令,将它们加载到当前 shell 环境中。>> ~/.zprofile将这些设置追加到你的~/.zprofile文件中,确保在每次启动 shell 时,这些环境变量都能够自动加载。~/.zprofile文件通常会在使用 zsh 作为 shell 时加载。
(2) eval "$(/opt/homebrew/bin/brew shellenv)"
这条命令会立即在当前的 shell 会话中执行 brew shellenv 输出的命令,从而设置 Homebrew 所需的环境变量。这是一个临时的设置,它只会影响当前终端会话,直到你关闭终端窗口。
这两条命令的作用是什么?
- 持久化设置:第一条命令将 Homebrew 的环境变量设置添加到
~/.zprofile中,这样每次启动新终端时,Homebrew 的环境变量会自动加载。 - 即时生效:第二条命令立即在当前 shell 会话中设置环境变量,确保你可以立刻使用 Homebrew。
三、.zprofile 和 .zshrc 有啥区别?为啥把 JDK、Maven、Git 的环境变量配置在 .zshrc 文件中,而把 Homebrew 环境变量配置在 .zprofile 文件中?
.zprofile 和 .zshrc 都是 Zsh 配置文件,用于设置 shell 环境中的变量和行为。它们之间有一些细微的区别,主要体现在它们的加载时机和作用上。
.zprofile:- 作用:这个文件主要用于设置登录 shell(login shell)的环境变量和配置。
- 加载时机:只会在登录 shell 启动时加载。
- 用途:通常用来配置系统范围的环境变量,像是
PATH、HOMEBREW_PREFIX、MAVEN_HOME等,它们通常只需要在登录时设置一次。
.zshrc:- 作用:这个文件用于设置交互式非登录 shell 的配置。它通常用于设置命令别名、自动补全、提示符、shell 功能等,它是每次启动一个新的 shell 实例时都需要加载的。
- 加载时机:每次打开一个新的终端窗口(即使是子 shell)时都会加载,不管是登录 shell 还是非登录 shell,
.zshrc都会被加载。 - 用途:通常用来配置与 shell 环境互动相关的内容,如别名、函数、命令补全等,方便每次打开终端时都能自动生效。
为什么把 Maven 配置在 .zshrc 中,而把 Homebrew 配置在 .zprofile 中?
- Maven 配置在
.zshrc中:- 原因:Maven 的配置通常包括设置环境变量(如
MAVEN_HOME和将mvn命令路径添加到PATH中)。这些配置主要影响 shell 会话(例如执行 Maven 命令时)。 .zshrc是每次打开新 shell 时都会加载的,因此将 Maven 配置在.zshrc中,意味着每次启动一个新的终端窗口时,都会设置好 Maven 的相关环境变量,确保你能够在新的 shell 会话中直接使用mvn命令。
- 原因:Maven 的配置通常包括设置环境变量(如
- Homebrew 配置在
.zprofile中:- 原因:Homebrew 主要影响的是登录 shell,例如你在终端登录时,或者通过 SSH 登录时,Homebrew 需要确保你能够正常使用
brew命令。配置 Homebrew 的环境变量(如PATH)通常只需要在登录时执行一次。 .zprofile只在登录时加载一次,因此将 Homebrew 的环境变量(例如通过brew shellenv配置的内容)放入.zprofile中,只会在登录时一次性配置好,避免在每次打开终端时都重复设置。
- 原因:Homebrew 主要影响的是登录 shell,例如你在终端登录时,或者通过 SSH 登录时,Homebrew 需要确保你能够正常使用
简单来说就是,Homebrew 只需要在登陆时设置一次,而 Maven、Git 等需要在每个新打开的窗口都设置一次。
四、登录 shell vs 非登录 shell vs 交互式 shell?
- 登录 shell(Login Shell):
- 这是你首次打开终端时启动的 shell,或者通过 SSH 登录时启动的 shell。登录 shell 会加载
.zprofile(或在 Bash 中是.bash_profile)等文件。 - 这个 shell 会在你登录时初始化环境,并且加载登录 shell 特有的配置。
- 这是你首次打开终端时启动的 shell,或者通过 SSH 登录时启动的 shell。登录 shell 会加载
- 交互式 shell(Interactive Shell):
- 交互式 shell 是指可以与用户交互、等待用户输入命令的 shell(比如你执行
ls、pwd等命令的环境)。 - 交互式 shell 会加载
.zshrc(或在 Bash 中是.bashrc)文件,通常用于配置命令别名、补全等交互式功能。
- 交互式 shell 是指可以与用户交互、等待用户输入命令的 shell(比如你执行
- 非登录 shell(Non-login Shell):
- 非登录 shell 是在你已经有一个登录 shell 会话的情况下,通过运行某些命令(如
zsh或bash)启动的新的 shell 会话。 - 非登录 shell 会加载
.zshrc(或.bashrc),但不会加载.zprofile或.bash_profile。
- 非登录 shell 是在你已经有一个登录 shell 会话的情况下,通过运行某些命令(如
终端启动时的 shell 既是登录 shell 也是交互式 shell:当你打开一个新的终端窗口时,这个 shell 是一个登录 shell(因为它是用户登录后启动的)并且是交互式 shell(因为它等待用户输入命令)。因此,它会加载 .zprofile 和 .zshrc 两个文件。
参考:
- MacBook 安装 Homebrew:https://zhuanlan.zhihu.com/p/90508170
- MacBook 安装 Homebrew:https://blog.csdn.net/weixin_45277161/article/details/134719230?spm=1001.2014.3001.5501
- MacBook 配置 GitHub SSH:https://www.cnblogs.com/sinceForever/p/17954613
- MacBook 配置 GitHub SSH:https://juejin.cn/post/6993506356279902244
- https://blog.csdn.net/weixin_45277161/article/details/134709441