第五节:GLM-4v-9b模型model加载源码解读(模型相关参数方法解读)
文章目录
- 前言
- 一、GLM-4v-9b模型model加载源码解读
- 1、GLM-4v-9b模型model加载主函数源码
- 2、GLM-4v-9b模型model加载源码源码解读
- 3、GLM-4v-9b自定义模型类源码解读
- 二、基于GLM-4v-9b模型获取模型输入参数等内容源码解读(from_pretrained-->huggingface)
- 1、from_pretrained函数参数解读(huggingface)
- 2、config文件路径获取(huggingface)
- 3、adapter_config文件路径获取与加载(huggingface)
- 4、config文件方法获取
- 1、config源码
- 2、from_pretrained函数kwargs参数传递
- 3、config内容获取
- config加工源码调用
- AutoConfig.from_pretrained函数源码内容
- AutoConfig.from_pretrained的PretrainedConfig.get_config_dict函数源码解读
- config的类class加载源码解读
- 4、小节总结
前言
清华智普的GLM-4v-9b模型,作为优化的多模态大模型,特别适用于国内应用场景,解决了国外模型本地化不足的问题。本专栏提供环境安装、数据处理、视觉与语言模型源码理解,并基于Hugging Face重构GLM模型搭建教程,帮助理解、修改和应用GLM墨西哥,指导搭建多模态大模型,帮助读者自由搭建与修改大模型。本节给出GLM-4-9B模型加载相关参数获取方法源码解读内容。
第一节:GLM-4v-9B大模型安装、推理与训练详细教程
第二节:GLM-4v-9B数据加载源码解读
第三节:GLM-4v-9B数据加载之huggingface数据加载方法教程(通用大模型数据加载实列)
第四节:GLM-4v-9b模型的tokenizer源码解读
第五节:GLM-4v-9b模型model加载源码解读(模型相关参数方法解读)
第六节:GLM-4v-9b模型加载源码解读(模型加载方法解读)
第七节:GLM-4v-9b模型的视觉模型源码解读
第八节:GLM-4v-9b模型的大语言模型源码解读(ChatGLMForConditionalGeneration)
第九节:通过Debug解析ChatGLMForConditionalGeneration的数据流,理解GLM-4v-9b模型架构
第十节:通过Debug解析ChatGLMModel的数据流,理解视觉与语言模型结合架构
第十一节:利用huggingface重构GLM-4v-9B模型数据处理代码Demo
第十二节:利用huggingface重构GLM-4v-9B训练模型代码Demo
第十一、十二节是在理解GLM-4v-9B模型后,使用huggignface重新构建/搭建GLM-4v-9B模型,使读者能自由构建多模态大模型!
本节给出GLM-4v-9b模型model加载,而加载使用huggingface方法,是十分简单,然而huggingface源码确为麻烦。为此,本节以glm的model加载示例重点解读huggingface加载model源码。该小节主要解释,模型加载前准备工作,特别需要知道使用下面代码可以完成自定义模型加载:
"auto_map": {"AutoConfig": "configuration_chatglm.ChatGLMConfig","AutoModel": "modeling_chatglm.ChatGLMForConditionalGeneration","AutoModelForCausalLM": "modeling_chatglm.ChatGLMForConditionalGeneration","AutoModelForSeq2SeqLM": "modeling_chatglm.ChatGLMForConditionalGeneration","AutoModelForSequenceClassification": "modeling_chatglm.ChatGLMForSequenceClassification"},
一、GLM-4v-9b模型model加载源码解读
我们解读下model加载流程吧,实际这个部分与huggingface相关,我们先给出与huggingface加载相关源码
1、GLM-4v-9b模型model加载主函数源码
来源:finetune_demo/finetune_vision.py-->load_tokenizer_and_model函数
我给出GLM-4v-9b模型加载函数,其主要是调用huggingface内容,我给出主函数加载源码如下:
def load_tokenizer_and_model(model_dir: str,peft_config: Optional[PeftConfig] = None,
):tokenizer = AutoTokenizer.from_pretrained(model_dir, trust_remote_code=True)if peft_config is not None:model = AutoModelForCausalLM.from_pretrained(model_dir,trust_remote_code=True,empty_init=False,use_cache=False,torch_dtype=torch.bfloat16,  # Must use BFloat 16# cache_dir = '/extend_disk/disk3/tj/GLM-4V-9B/GLM-4-main/THUDM/cache_dir')model = get_peft_model(model, peft_config)model.print_trainable_parameters()else:model = AutoModelForCausalLM.from_pretrained(model_dir,trust_remote_code=True,empty_init=False,use_cache=False,torch_dtype=torch.bfloat16)return tokenizer, model
2、GLM-4v-9b模型model加载源码源码解读
来源:finetune_demo/finetune_vision.py-->load_tokenizer_and_model函数
实际模型使用huggingface的AutoModelForCausalLM.from_pretrained来构建,而get_peft_model是高效微调使用函数,也就是模型加载也是比较简单,其主要还是huggingface内容源码解读,我将后面重点解读,而GLM-4v-9b源码如下:
if peft_config is not None:model = AutoModelForCausalLM.from_pretrained(model_dir,trust_remote_code=True,empty_init=False,use_cache=False,torch_dtype=torch.bfloat16  # Must use BFloat 16)model = get_peft_model(model, peft_config)model.print_trainable_parameters()
else:model = AutoModelForCausalLM.from_pretrained(model_dir,trust_remote_code=True,empty_init=False,use_cache=False,torch_dtype=torch.bfloat16)
3、GLM-4v-9b自定义模型类源码解读
在权重文件中有个config.json文件,这也是huggingface最重要配置文件。该文件有个参数auto_map"字典,里面包含了很多方法,和之前tokenizer加载自定义方法有点类似。auto_map有AutoModel等内容,用来加载模型,列如"AutoModel": "modeling_chatglm.ChatGLMForConditionalGeneration"就是在modeling_chatglm.py文件中加载 ChatGLMForConditionalGeneration类。我给出json这个文件内容如下。
"auto_map": {"AutoConfig": "configuration_chatglm.ChatGLMConfig","AutoModel": "modeling_chatglm.ChatGLMForConditionalGeneration","AutoModelForCausalLM": "modeling_chatglm.ChatGLMForConditionalGeneration","AutoModelForSeq2SeqLM": "modeling_chatglm.ChatGLMForConditionalGeneration","AutoModelForSequenceClassification": "modeling_chatglm.ChatGLMForSequenceClassification"},
我也给出GLM-4v-9b自定义ChatGLMForConditionalGeneration类部分内容,如下:
class ChatGLMForConditionalGeneration(ChatGLMPreTrainedModel):def __init__(self, config: ChatGLMConfig, empty_init=True, device=None):super().__init__(config)self.max_sequence_length = config.max_lengthself.transformer = ChatGLMModel(config, empty_init=empty_init, device=device)self.config = configdef _update_model_kwargs_for_generation(self,outputs: ModelOutput,model_kwargs: Dict[str, Any],is_encoder_decoder: bool = False,) -> Dict[str, Any]:# update past_key_valuescache_name, cache = self._extract_past_from_model_output(outputs)model_kwargs[cache_name] = cache# update attention maskif "attention_mask" in model_kwargs:attention_mask = model_kwargs["attention_mask"]model_kwargs["attention_mask"] = torch.cat([attention_mask, attention_mask.new_ones((attention_mask.shape[0], 1))], dim=-1)# update position idsif "position_ids" in model_kwargs:position_ids = model_kwargs["position_ids"]new_position_id = position_ids[..., -1:].clone()new_position_id += 1model_kwargs["position_ids"] = torch.cat([position_ids, new_position_id], dim=-1)model_kwargs["is_first_forward"] = Falsereturn model_kwargs
二、基于GLM-4v-9b模型获取模型输入参数等内容源码解读(from_pretrained–>huggingface)
来源:transforms/models/auto/auto_factory.py-->class _BaseAutoModelClass-->from_pretrained函数
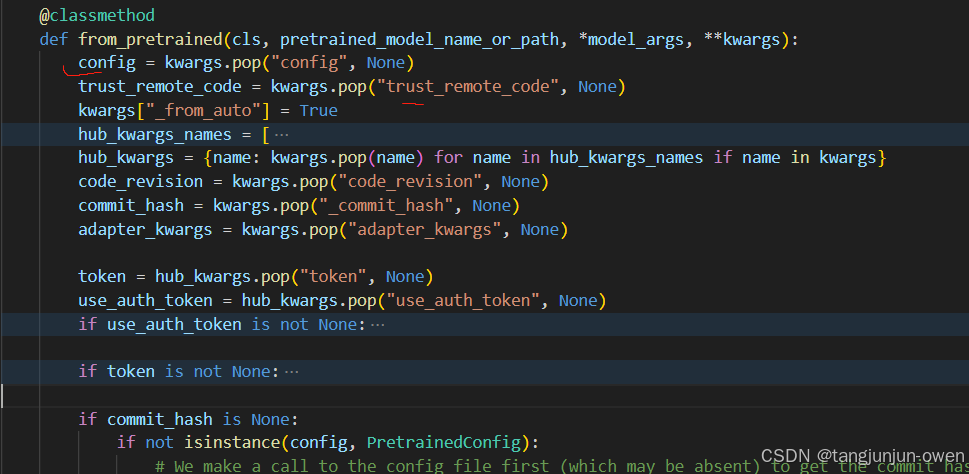
1、from_pretrained函数参数解读(huggingface)
这里我需要说明from_pretrained(cls, pretrained_model_name_or_path, *model_args, **kwargs)参数,特别是kwargs可以直接提供对应参数,如config文件,而from_pretrained内部如下图:
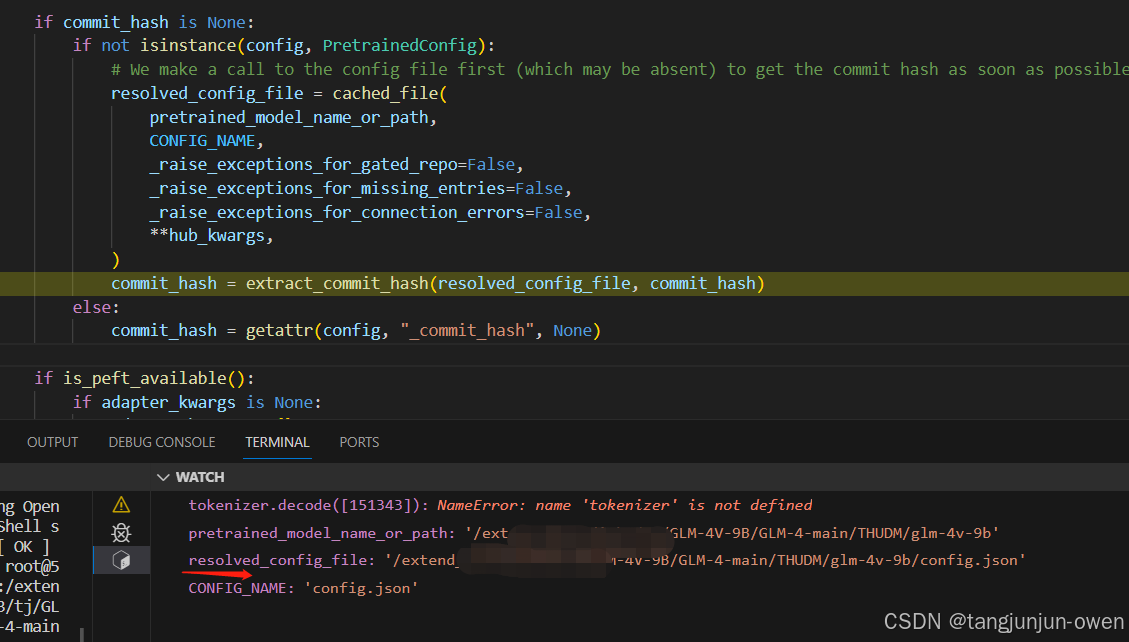
2、config文件路径获取(huggingface)
通过以下代码就可以获取config文件路径,给了resolved_config_file变量
if commit_hash is None:if not isinstance(config, PretrainedConfig):# We make a call to the config file first (which may be absent) to get the commit hash as soon as possibleresolved_config_file = cached_file(pretrained_model_name_or_path,CONFIG_NAME,_raise_exceptions_for_gated_repo=False,_raise_exceptions_for_missing_entries=False,_raise_exceptions_for_connection_errors=False,**hub_kwargs,)commit_hash = extract_commit_hash(resolved_config_file, commit_hash)else:commit_hash = getattr(config, "_commit_hash", None)如图显示如下:
3、adapter_config文件路径获取与加载(huggingface)
这个代码是类似lora方法获得内容加载,首先是加载adapter_config.josn文件,该文件也是在pretrained_model_name_or_path路径中存在,使用find_adapter_config_file函数来获取adapter_config.json路径,其源码如下:
if is_peft_available():if adapter_kwargs is None:adapter_kwargs = {}if token is not None:adapter_kwargs["token"] = tokenmaybe_adapter_path = find_adapter_config_file(pretrained_model_name_or_path, _commit_hash=commit_hash, **adapter_kwargs)if maybe_adapter_path is not None:with open(maybe_adapter_path, "r", encoding="utf-8") as f:adapter_config = json.load(f)adapter_kwargs["_adapter_model_path"] = pretrained_model_name_or_pathpretrained_model_name_or_path = adapter_config["base_model_name_or_path"]
如果存在adapter_config.json路径就执行with open(maybe_adapter_path, "r", encoding="utf-8") as f 获得其参数。
4、config文件方法获取
1、config源码
我们给出整体源码代码,如下:
if not isinstance(config, PretrainedConfig):kwargs_orig = copy.deepcopy(kwargs)# ensure not to pollute the config object with torch_dtype="auto" - since it's# meaningless in the context of the config object - torch.dtype values are acceptableif kwargs.get("torch_dtype", None) == "auto":_ = kwargs.pop("torch_dtype")# to not overwrite the quantization_config if config has a quantization_configif kwargs.get("quantization_config", None) is not None:_ = kwargs.pop("quantization_config")config, kwargs = AutoConfig.from_pretrained(pretrained_model_name_or_path,return_unused_kwargs=True,trust_remote_code=trust_remote_code,code_revision=code_revision,_commit_hash=commit_hash,**hub_kwargs,**kwargs,)# if torch_dtype=auto was passed here, ensure to pass it onif kwargs_orig.get("torch_dtype", None) == "auto":kwargs["torch_dtype"] = "auto"if kwargs_orig.get("quantization_config", None) is not None:kwargs["quantization_config"] = kwargs_orig["quantization_config"]
kwargs存在quantization_config与torch_dtype会直接剔除,共下面函数调用。
2、from_pretrained函数kwargs参数传递
仅接着,from_pretrained函数的参数kwargs将传递,如下代码:
kwargs_orig = copy.deepcopy(kwargs)
3、config内容获取
config加工源码调用
获得config函数,使用以下源码,如下:
config, kwargs = AutoConfig.from_pretrained(pretrained_model_name_or_path, # 模型路径return_unused_kwargs=True,trust_remote_code=trust_remote_code,code_revision=code_revision,_commit_hash=commit_hash,**hub_kwargs,**kwargs,)AutoConfig.from_pretrained函数源码内容
来源:transforms/models/auto/configuration_auto.py-->class AutoConfig-->from_pretrained函数
我们继续解读AutoConfig.from_pretrained函数所有源码,如下:
@classmethod
@replace_list_option_in_docstrings()
def from_pretrained(cls, pretrained_model_name_or_path, **kwargs):r"""..."""use_auth_token = kwargs.pop("use_auth_token", None)if use_auth_token is not None:warnings.warn("The `use_auth_token` argument is deprecated and will be removed in v5 of Transformers. Please use `token` instead.",FutureWarning,)if kwargs.get("token", None) is not None:raise ValueError("`token` and `use_auth_token` are both specified. Please set only the argument `token`.")kwargs["token"] = use_auth_tokenkwargs["_from_auto"] = Truekwargs["name_or_path"] = pretrained_model_name_or_pathtrust_remote_code = kwargs.pop("trust_remote_code", None)code_revision = kwargs.pop("code_revision", None)config_dict, unused_kwargs = PretrainedConfig.get_config_dict(pretrained_model_name_or_path, **kwargs)has_remote_code = "auto_map" in config_dict and "AutoConfig" in config_dict["auto_map"]has_local_code = "model_type" in config_dict and config_dict["model_type"] in CONFIG_MAPPINGtrust_remote_code = resolve_trust_remote_code(trust_remote_code, pretrained_model_name_or_path, has_local_code, has_remote_code)if has_remote_code and trust_remote_code:class_ref = config_dict["auto_map"]["AutoConfig"]config_class = get_class_from_dynamic_module(class_ref, pretrained_model_name_or_path, code_revision=code_revision, **kwargs)if os.path.isdir(pretrained_model_name_or_path):config_class.register_for_auto_class()return config_class.from_pretrained(pretrained_model_name_or_path, **kwargs)elif "model_type" in config_dict:try:config_class = CONFIG_MAPPING[config_dict["model_type"]]except KeyError:raise ValueError(f"The checkpoint you are trying to load has model type `{config_dict['model_type']}` ""but Transformers does not recognize this architecture. This could be because of an ""issue with the checkpoint, or because your version of Transformers is out of date.")return config_class.from_dict(config_dict, **unused_kwargs)else:# Fallback: use pattern matching on the string.# We go from longer names to shorter names to catch roberta before bert (for instance)for pattern in sorted(CONFIG_MAPPING.keys(), key=len, reverse=True):if pattern in str(pretrained_model_name_or_path):return CONFIG_MAPPING[pattern].from_dict(config_dict, **unused_kwargs)raise ValueError(f"Unrecognized model in {pretrained_model_name_or_path}. "f"Should have a `model_type` key in its {CONFIG_NAME}, or contain one of the following strings "f"in its name: {', '.join(CONFIG_MAPPING.keys())}")
AutoConfig.from_pretrained的PretrainedConfig.get_config_dict函数源码解读
简单说就是读取路径config文件内容,重要代码如下:
config_dict, unused_kwargs = PretrainedConfig.get_config_dict(pretrained_model_name_or_path, **kwargs)
传递路径pretrained_model_name_or_path变量中,通过PretrainedConfig.get_config_dict函数可以直接获得config.json文件内容与其它unused_kwargs 内容,而unused_kwargs就是kwargs内容。如下图所示:
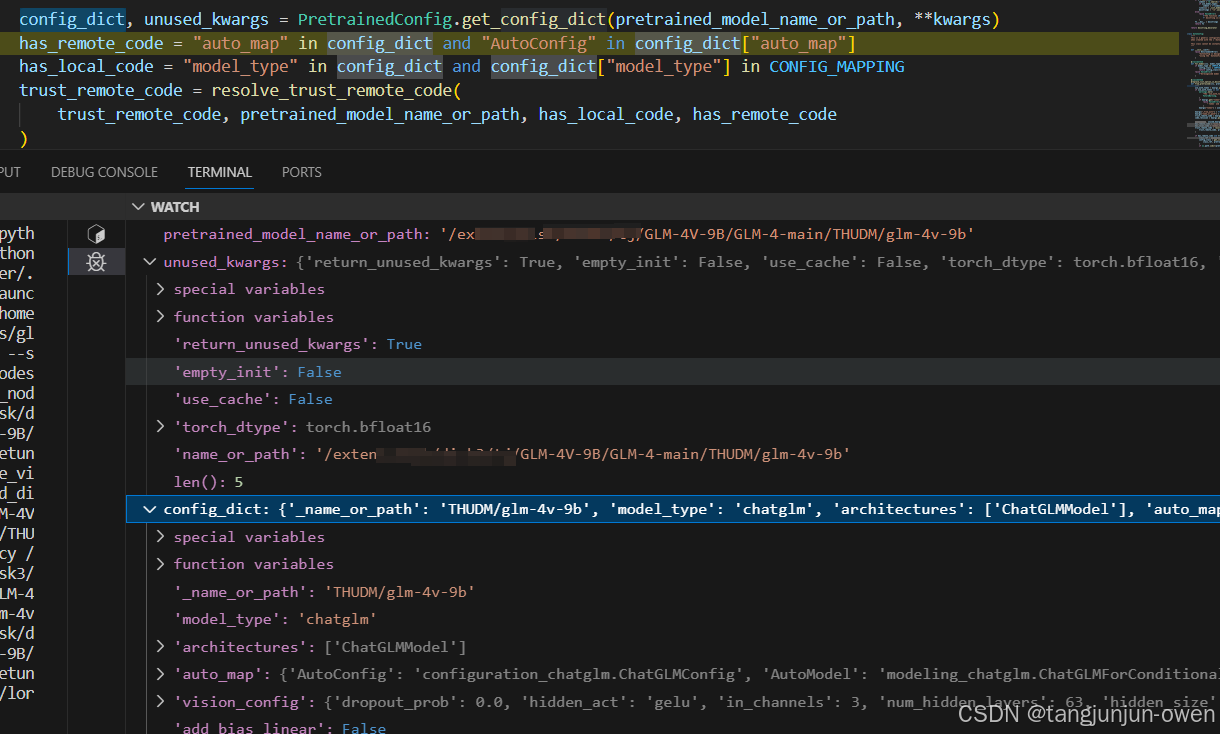
而unused_kwargs来源kwargs,但有些参数被剔除了pop,如下图所示:

config的类class加载源码解读
这里就很关键了,我们需要加载config对应class方法了,当然你可以自己继承huggingface构建一个自己想处理的config方法class,也可以调用已有的。我们来看下源代码如下:
if has_remote_code and trust_remote_code:class_ref = config_dict["auto_map"]["AutoConfig"]config_class = get_class_from_dynamic_module(class_ref, pretrained_model_name_or_path, code_revision=code_revision, **kwargs)if os.path.isdir(pretrained_model_name_or_path):config_class.register_for_auto_class()return config_class.from_pretrained(pretrained_model_name_or_path, **kwargs)
elif "model_type" in config_dict:try:config_class = CONFIG_MAPPING[config_dict["model_type"]]except KeyError:raise ValueError(f"The checkpoint you are trying to load has model type `{config_dict['model_type']}` ""but Transformers does not recognize this architecture. This could be because of an ""issue with the checkpoint, or because your version of Transformers is out of date.")return config_class.from_dict(config_dict, **unused_kwargs)
else:# Fallback: use pattern matching on the string.# We go from longer names to shorter names to catch roberta before bert (for instance)for pattern in sorted(CONFIG_MAPPING.keys(), key=len, reverse=True):if pattern in str(pretrained_model_name_or_path):return CONFIG_MAPPING[pattern].from_dict(config_dict, **unused_kwargs)
①、如果config存在auto_map字典的AutoConfig内容
config.json的auto_map如下所示内容:
"auto_map": {"AutoConfig": "configuration_chatglm.ChatGLMConfig","AutoModel": "modeling_chatglm.ChatGLMForConditionalGeneration","AutoModelForCausalLM": "modeling_chatglm.ChatGLMForConditionalGeneration","AutoModelForSeq2SeqLM": "modeling_chatglm.ChatGLMForConditionalGeneration","AutoModelForSequenceClassification": "modeling_chatglm.ChatGLMForSequenceClassification"},
此时使用下面加载config
if has_remote_code and trust_remote_code:class_ref = config_dict["auto_map"]["AutoConfig"] #configuration_chatglm.ChatGLMConfigconfig_class = get_class_from_dynamic_module(class_ref, pretrained_model_name_or_path, code_revision=code_revision, **kwargs)
然后会进入get_class_from_dynamic_module方法来加载class,我下面说给函数主要源码来解读,首先module_file, class_name = class_reference.split(".")将class_ref的configuration_chatglm.ChatGLMConfig字符分成文件和类名, module_file=configuration_chatglm, class_name=ChatGLMConfig。然后在通过以下代码来调用:
# And lastly we get the class inside our newly created module
final_module = get_cached_module_file(repo_id, # 文件路径module_file + ".py", # configuration_chatglm.pycache_dir=cache_dir,force_download=force_download,resume_download=resume_download,proxies=proxies,token=token,revision=code_revision,local_files_only=local_files_only,repo_type=repo_type,
)
将final_module变成路径transformers_modules/glm-4v-9b/configuration_chatglm.py
最后在经过get_class_in_module方法来获得config的类class,其代码如下:
return get_class_in_module(class_name, final_module, force_reload=force_download)
将其结果返回到config_class 中,这样就得到了config的方法了。
就是config, kwargs = AutoConfig.from_pretrained(*)的返回config内容了,该内容实际是继承PretrainedConfig类,该方法就是configuration_chatglm.py的文件了,该文件如下:
from transformers import PretrainedConfigclass ChatGLMConfig(PretrainedConfig):model_type = "chatglm"def __init__(self,num_layers=28,padded_vocab_size=65024,hidden_size=4096,ffn_hidden_size=13696,kv_channels=128,num_attention_heads=32,seq_length=2048,hidden_dropout=0.0,classifier_dropout=None,attention_dropout=0.0,layernorm_epsilon=1e-5,rmsnorm=True,apply_residual_connection_post_layernorm=False,post_layer_norm=True,add_bias_linear=False,add_qkv_bias=False,bias_dropout_fusion=True,multi_query_attention=False,multi_query_group_num=1,rope_ratio=1,apply_query_key_layer_scaling=True,attention_softmax_in_fp32=True,fp32_residual_connection=False,pre_seq_len=None,prefix_projection=False,boi_token_id=None,eoi_token_id=None,**kwargs):self.num_layers = num_layersself.vocab_size = padded_vocab_sizeself.padded_vocab_size = padded_vocab_sizeself.hidden_size = hidden_sizeself.ffn_hidden_size = ffn_hidden_sizeself.kv_channels = kv_channelsself.num_attention_heads = num_attention_headsself.seq_length = seq_lengthself.hidden_dropout = hidden_dropoutself.classifier_dropout = classifier_dropoutself.attention_dropout = attention_dropoutself.layernorm_epsilon = layernorm_epsilonself.rmsnorm = rmsnormself.apply_residual_connection_post_layernorm = apply_residual_connection_post_layernormself.post_layer_norm = post_layer_normself.add_bias_linear = add_bias_linearself.add_qkv_bias = add_qkv_biasself.bias_dropout_fusion = bias_dropout_fusionself.multi_query_attention = multi_query_attentionself.multi_query_group_num = multi_query_group_numself.rope_ratio = rope_ratioself.apply_query_key_layer_scaling = apply_query_key_layer_scalingself.attention_softmax_in_fp32 = attention_softmax_in_fp32self.fp32_residual_connection = fp32_residual_connectionself.pre_seq_len = pre_seq_lenself.prefix_projection = prefix_projectionself.boi_token_id = boi_token_idself.eoi_token_id = eoi_token_idsuper().__init__(**kwargs)4、小节总结
config.json文件内容设置auto_map来实现huggingface调用我们自己构建的ChatGLMConfig类,而"AutoConfig": “configuration_chatglm.ChatGLMConfig”,的configuration_chatglm为文件py名称,ChatGLMConfig为类别名称。同时,进一步说明auto_map内容 "auto_map": { "AutoConfig": "configuration_chatglm.ChatGLMConfig", "AutoModel": "modeling_chatglm.ChatGLMForConditionalGeneration", "AutoModelForCausalLM": "modeling_chatglm.ChatGLMForConditionalGeneration", "AutoModelForSeq2SeqLM": "modeling_chatglm.ChatGLMForConditionalGeneration", "AutoModelForSequenceClassification": "modeling_chatglm.ChatGLMForSequenceClassification" },其它方法都可以通过这个方法来调用对应的方法。