ks8 本地化部署 F5-TTS
huggingface上有一个demo可以打开就能玩
https://huggingface.co/spaces/mrfakename/E2-F5-TTS
上传了一段懂王的演讲片段,然后在 generate text框内填了点古诗词,生成后这语气这效果,离真懂王就差一个手风琴了。
F5-TTS 项目地址:【GitHub】 SWivid F5-TTS
Diffusion Transformer with ConvNeXt V2, faster trained and inference. 看了下简介这种系统的特别之处在于,它采用了一种无自回归的方法,结合了流匹配与扩散变换器(DiT),成功简化了传统 TTS 模型中的复杂步骤。
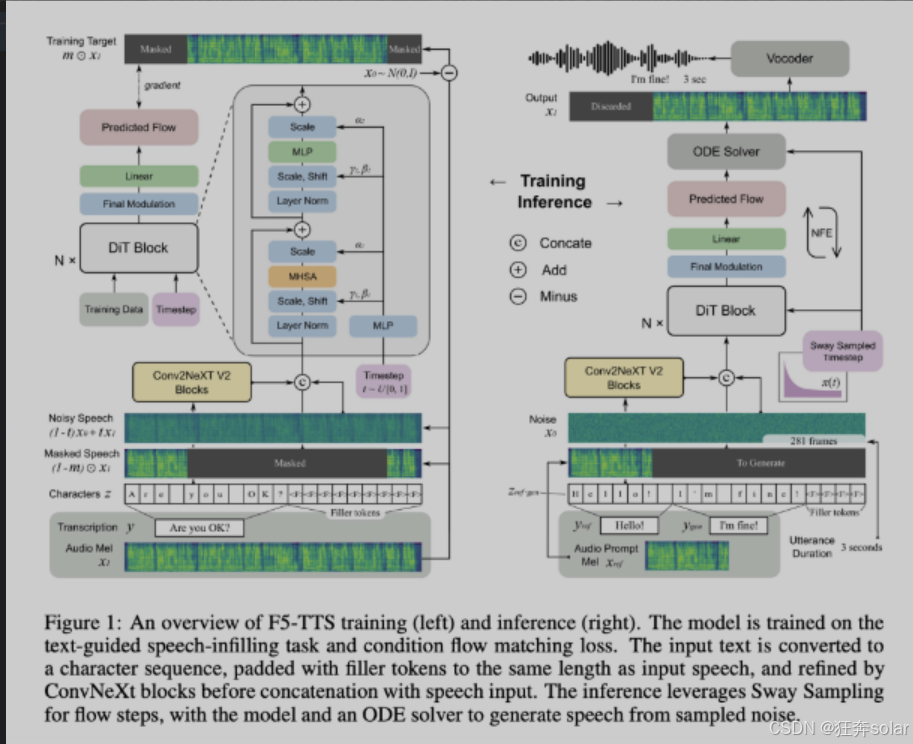
传统的 TTS 模型往往需要进行复杂的持续时间建模、音素对齐和专门的文本编码,这些都增加了合成过程的复杂性。尤其是以往的模型如 E2TTS,常常面临着收敛速度慢和文本与语音对齐不准确的问题,这让它们在现实场景中很难高效应用。而 F5-TTS 的出现,正是为了解决这些挑战。
F5-TTS 的工作原理很简单,首先将输入的文本通过 ConvNeXt 架构进行处理,使其更容易与语音进行对齐。然后,经过填充的字符序列与输入语音的噪声版本一起被输入到模型中。
该系统的训练依赖于 Diffusion Transformer(DiT),通过流匹配有效地将简单的初始分布映射到数据分布上。此外,F5-TTS 还创新性地引入了推理时的 Sway Sampling 策略,这一策略可以在推理阶段优先处理早期的流步骤,从而提高生成语音与输入文本的对齐效果。
根据研究成果,F5-TTS 在合成质量和推理速度上都超越了许多当前的 TTS 系统。在 LibriSpeech-PC 数据集上,该模型的字错误率(WER)达到了2.42,并且在推理时的实时因子(RTF)为0.15,显著优于之前的扩散模型 E2TTS,后者在处理速度和鲁棒性上存在短板。
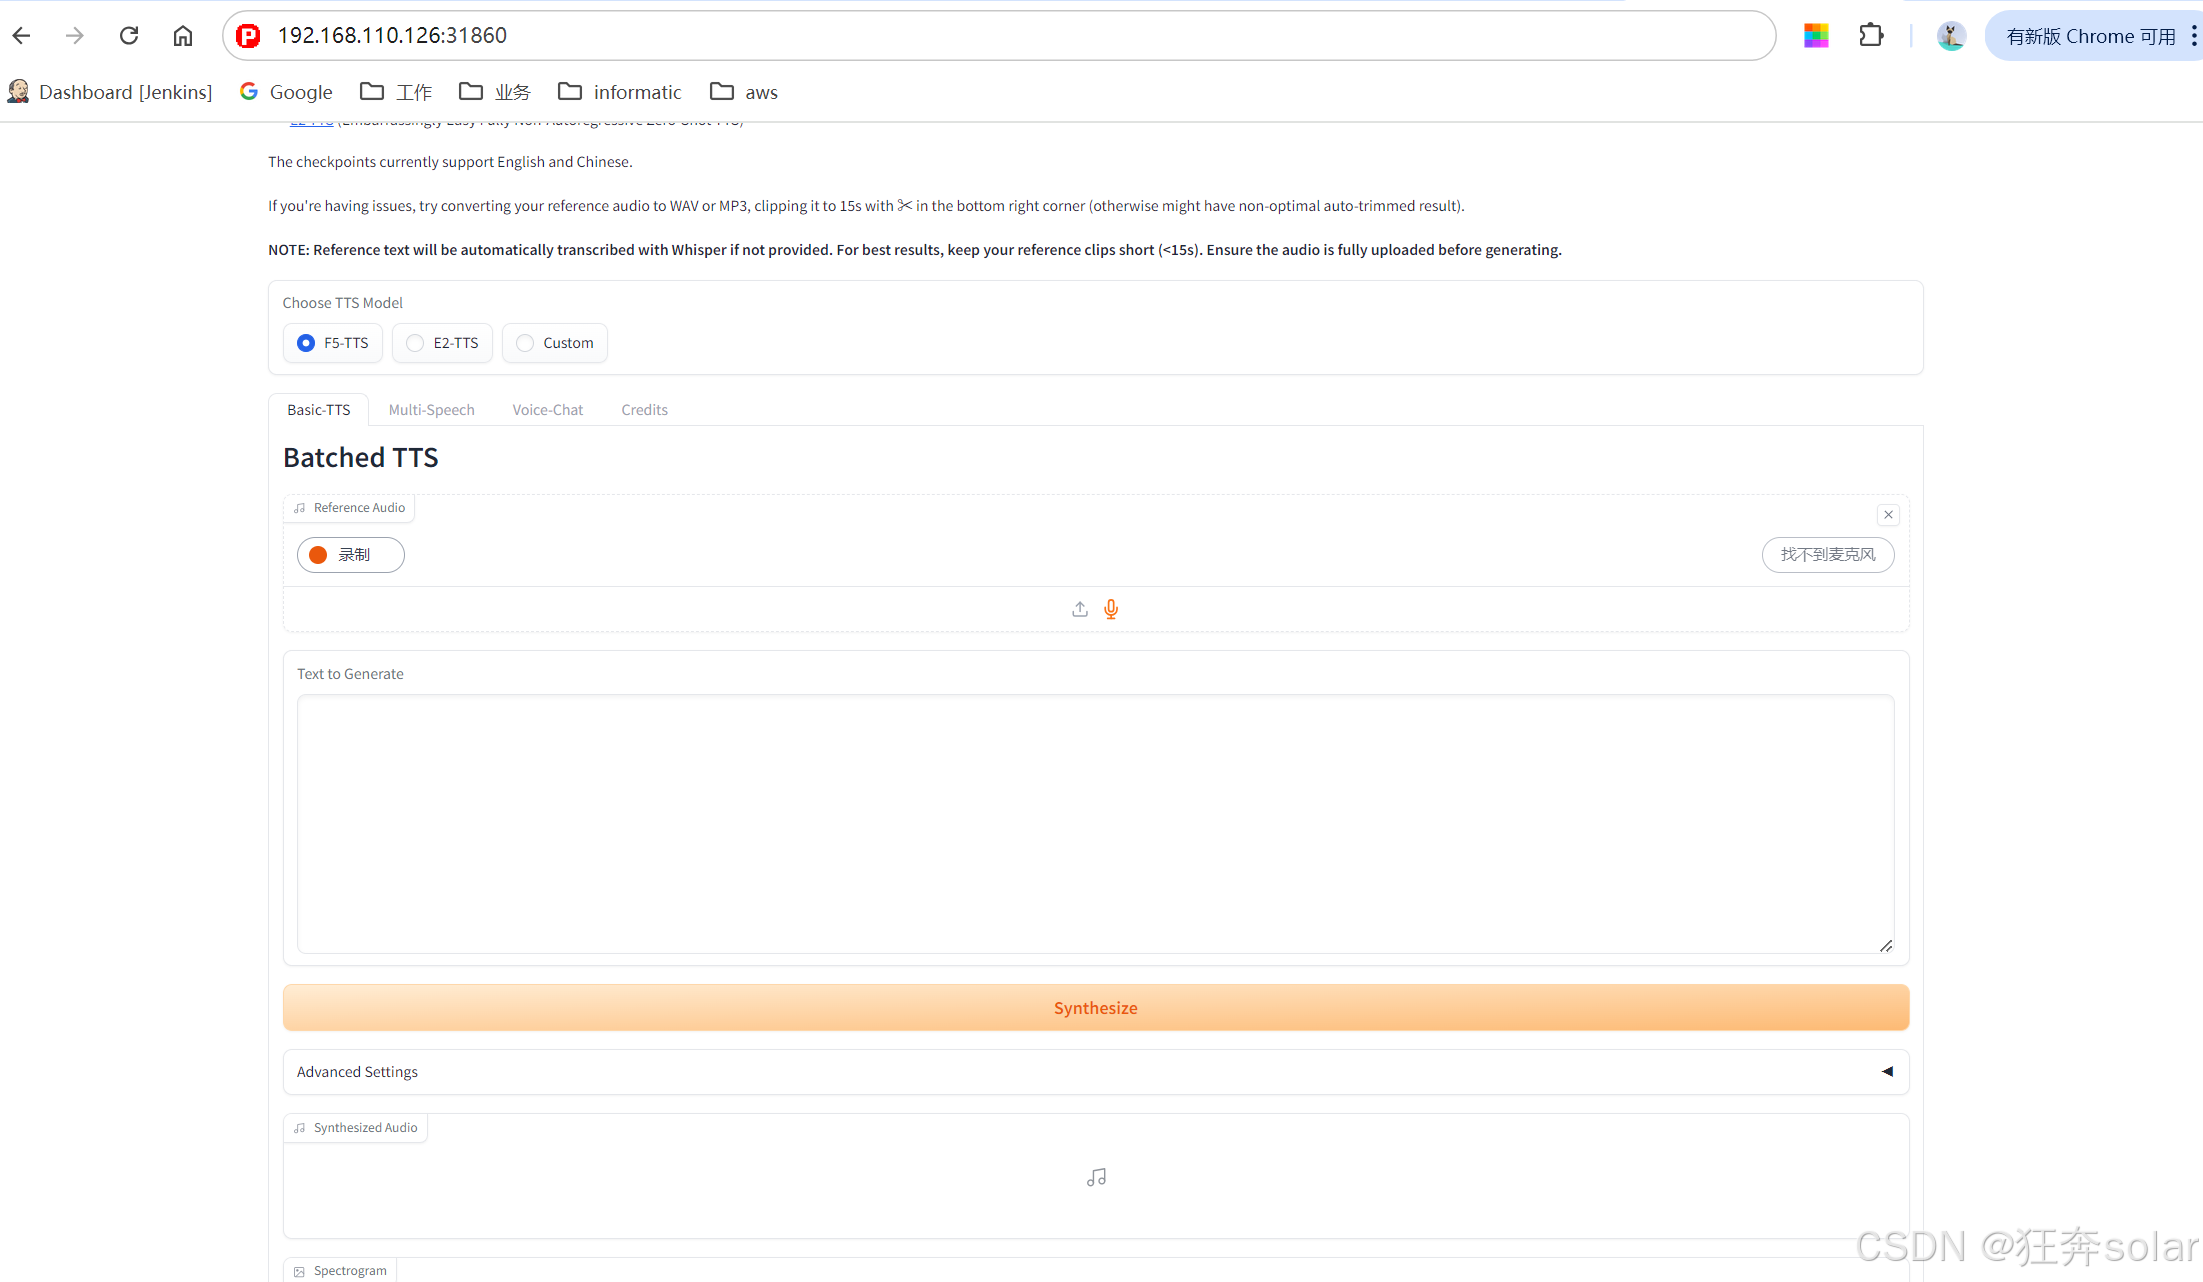
不过我们今天不打算深究模型原理,直接上手部署
f5-tts-pc 是hostpath/opt/chenrui/hell/F5-TTS/, github上源码直接扔到该目录下
---apiVersion: v1
kind: PersistentVolumeClaim
metadata:name: f5-tts-pvcnamespace: krm  # 确保 PVC 在同一命名空间中
spec:accessModes:- ReadWriteManyresources:requests:storage: 10Gi---apiVersion: apps/v1
kind: Deployment
metadata:name: f5-tts-deploymentnamespace: krm
spec:replicas: 1  # 设置副本数量selector:matchLabels:app: f5-tts  # 标签选择器template:metadata:labels:app: f5-tts  # 标签spec:containers:- name: container-0image: harbor.yourdomain.com:8443/agent/f5-ttsenv:- name: HF_ENDPOINTvalue: https://hf-mirror.comvolumeMounts:- mountPath: /app  # 将 PVC 挂载到 /appname: f5-tts-volume  # 与 volumes 中定义的名称匹配terminationMessagePath: /dev/termination-logterminationMessagePolicy: Filevolumes:- name: f5-tts-volumepersistentVolumeClaim:claimName: f5-tts-pvc  # 引用 PVC---apiVersion: v1
kind: Service
metadata:name: f5-tts-servicenamespace: krm
spec:type: NodePort  # 将 Service 设置为 NodePort 类型selector:app: f5-tts  # 匹配 Deployment 中的标签ports:- port: 7860  # Service 的内部端口targetPort: 7860  # 容器内的端口nodePort: 31860  # 外部访问的端口
环境变量记得添加HF的镜像地址
HF_ENDPOINT=https://hf-mirror.com
正常启动后进入pod发现torch无法使用gpu

在容器内使用 torch.cuda.is_available() 返回 False,这通常意味着容器未正确配置以访问宿主机的 GPU。翻看运维的手顺找下怎么解决
docker:1:下载NVIDIA-DOCKER2安装包并安装2:修改/etc/docker/daemon.json文件内容加上{"default-runtime": "nvidia","runtimes": {"nvidia": {"path": "/usr/bin/nvidia-container-runtime","runtimeArgs": []}},}k8s:1:下载k8s-device-plugin 镜像2:编写nvidia-device-plugin.yml创建驱动pod安装驱动和cuda 此处不赘述怎么搞docker2和部署nvidia-device-plugin-daemonset
下载下面工具
libnvidia-container1
libnvidia-container-tools
nvidia-container-toolkit
nvidia-container-runtime
nvidia-docker2docker官网下载链接:
http://mirror.cs.uchicago.edu/nvidia-docker/libnvidia-container/stable/ubuntu16.04/amd64/
部署nvidia-device-plugin-daemonset
apiVersion: apps/v1
kind: DaemonSet
metadata:name: nvidia-device-plugin-daemonsetnamespace: kube-system
spec:selector:matchLabels:name: nvidia-device-plugin-dsupdateStrategy:type: RollingUpdatetemplate:metadata:# This annotation is deprecated. Kept here for backward compatibility# See https://kubernetes.io/docs/tasks/administer-cluster/guaranteed-scheduling-critical-addon-pods/annotations:scheduler.alpha.kubernetes.io/critical-pod: ""labels:name: nvidia-device-plugin-dsspec:tolerations:# This toleration is deprecated. Kept here for backward compatibility# See https://kubernetes.io/docs/tasks/administer-cluster/guaranteed-scheduling-critical-addon-pods/- key: CriticalAddonsOnlyoperator: Exists- key: nvidia.com/gpuoperator: Existseffect: NoSchedule# Mark this pod as a critical add-on; when enabled, the critical add-on# scheduler reserves resources for critical add-on pods so that they can# be rescheduled after a failure.# See https://kubernetes.io/docs/tasks/administer-cluster/guaranteed-scheduling-critical-addon-pods/priorityClassName: "system-node-critical"containers:- image: nvidia/k8s-device-plugin:1.0.0-beta4name: nvidia-device-plugin-ctrsecurityContext:allowPrivilegeEscalation: falsecapabilities:drop: ["ALL"]volumeMounts:- name: device-pluginmountPath: /var/lib/kubelet/device-pluginsvolumes:- name: device-pluginhostPath:path: /var/lib/kubelet/device-plugins
继续TSS的启动,进入pod 输入命令
root@f5-tts-deployment-6c6fdd5d65-m4mvw:/app/src# export PYTHONPATH=$PYTHONPATH:$(pwd)
root@f5-tts-deployment-6c6fdd5d65-m4mvw:/app/src# cd f5_tts/
root@f5-tts-deployment-6c6fdd5d65-m4mvw:/app/src/f5_tts# cd infer/
root@f5-tts-deployment-6c6fdd5d65-m4mvw:/app/src/f5_tts/infer# python infer_gradio.py
等待启动完成后打开页面