docker下迁移elasticsearch的问题与解决方案

🎏:你只管努力,剩下的交给时间
🏠 :小破站
docker下迁移elasticsearch的问题与解决方案
- 数据挂载
- 报错解决
- 权限问题
- 节点故障
直接上图,大致就是这样的操作
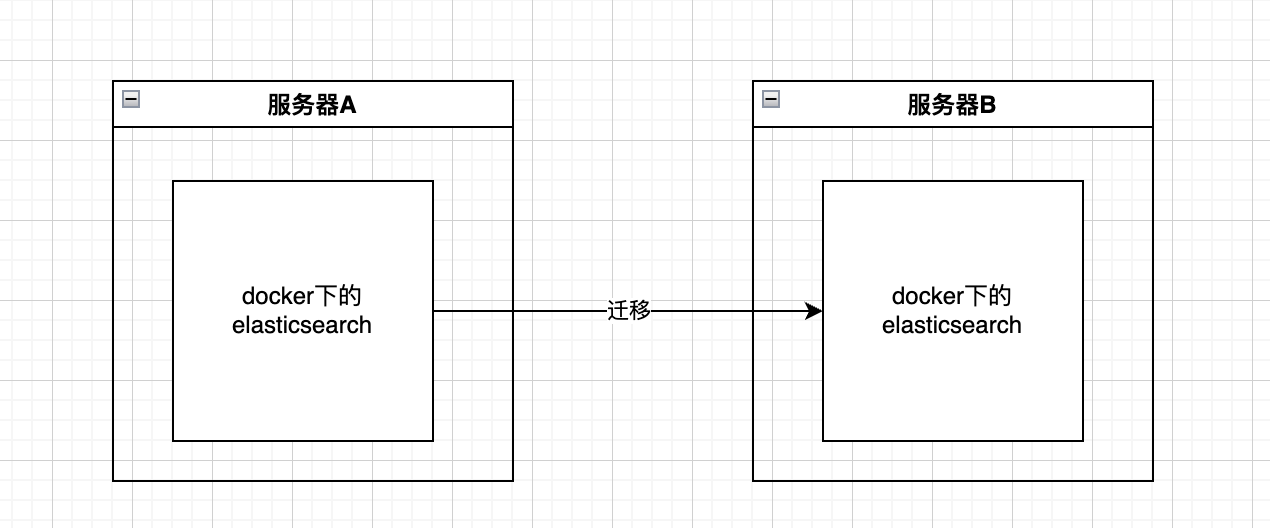
数据挂载
对于服务器A下的es如果你没有在启动容器的时候将数据挂载出来,就需要先进行docker cp,将容器中的数据拷贝到服务器中,
/usr/share/elasticsearch/data
将取出的数据,或者说挂载的数据,传输到另外一个服务器中,执行启动命令
警告:这里最好版本不要变动,以及启动时候的命令也和原服务器一致
至此迁移差不多就完成了。
报错解决
权限问题
java.lang.IllegalStateException: failed to obtain node locks, tried [[/usr/share/elasticsearch/data]] with lock id [0]; maybe these locations are not writable or multiple nodes were started without increasing [node.max_local_storage_nodes] (was [1])?
Likely root cause: java.nio.file.NoSuchFileException: /usr/share/elasticsearch/data/nodes/0/node.lockat java.base/sun.nio.fs.UnixException.translateToIOException(UnixException.java:92)at java.base/sun.nio.fs.UnixException.rethrowAsIOException(UnixException.java:106)at java.base/sun.nio.fs.UnixException.rethrowAsIOException(UnixException.java:111)at java.base/sun.nio.fs.UnixPath.toRealPath(UnixPath.java:825)at org.apache.lucene.store.NativeFSLockFactory.obtainFSLock(NativeFSLockFactory.java:108)at org.apache.lucene.store.FSLockFactory.obtainLock(FSLockFactory.java:41)at org.apache.lucene.store.BaseDirectory.obtainLock(BaseDirectory.java:45)at org.elasticsearch.env.NodeEnvironment$NodeLock.<init>(NodeEnvironment.java:229)at org.elasticsearch.env.NodeEnvironment.<init>(NodeEnvironment.java:298)at org.elasticsearch.node.Node.<init>(Node.java:427)at org.elasticsearch.node.Node.<init>(Node.java:309)at org.elasticsearch.bootstrap.Bootstrap$5.<init>(Bootstrap.java:234)at org.elasticsearch.bootstrap.Bootstrap.setup(Bootstrap.java:234)at org.elasticsearch.bootstrap.Bootstrap.init(Bootstrap.java:434)at org.elasticsearch.bootstrap.Elasticsearch.init(Elasticsearch.java:166)at org.elasticsearch.bootstrap.Elasticsearch.execute(Elasticsearch.java:157)at org.elasticsearch.cli.EnvironmentAwareCommand.execute(EnvironmentAwareCommand.java:77)at org.elasticsearch.cli.Command.mainWithoutErrorHandling(Command.java:112)at org.elasticsearch.cli.Command.main(Command.java:77)at org.elasticsearch.bootstrap.Elasticsearch.main(Elasticsearch.java:122)at org.elasticsearch.bootstrap.Elasticsearch.main(Elasticsearch.java:80)
For complete error details, refer to the log at /usr/share/elasticsearch/logs/docker-cluster.log
1. 节点锁文件丢失:/usr/share/elasticsearch/data/nodes/0/node.lock 文件不存在。可能是因为文件未被正确创建,或者数据目录的权限不足,导致 Elasticsearch 无法写入。
2. **目录或文件权限问题**:Elasticsearch 容器可能没有足够的权限访问或修改 /usr/share/elasticsearch/data 目录下的文件。
解决如下:
执行以下命令,重新启动即可
sudo chown -R 1000:1000 /acowbo/es   # 假设你将 /acowbo/es 挂载到 /usr/share/elasticsearch/data
sudo chmod -R 775 /acowbo/es
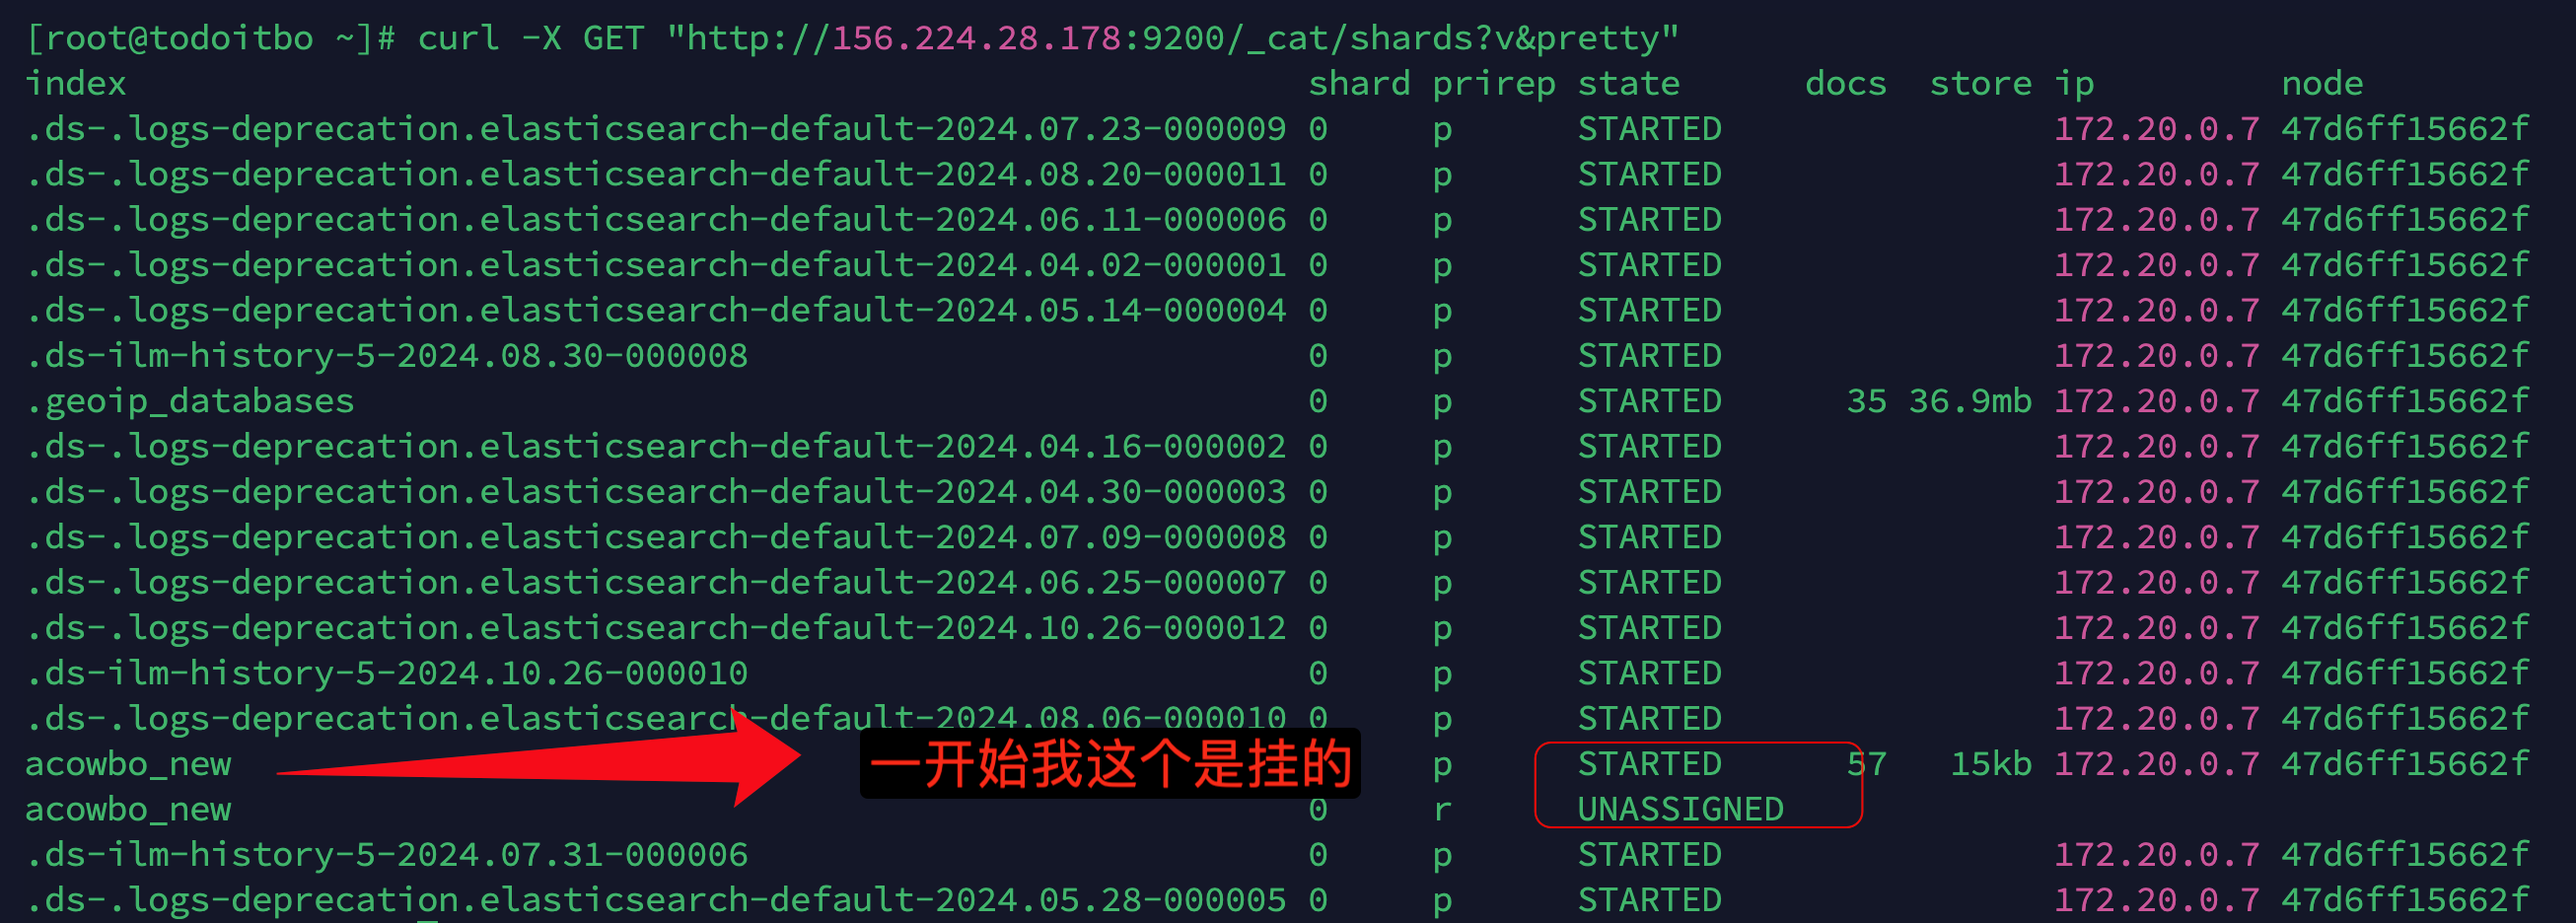
节点故障
2024-10-29 02:15:31.912 ERROR 1 --- [io-11919-exec-4] o.a.c.c.C.[.[.[/].[dispatcherServlet] : Servlet.service() for servlet [dispatcherServlet] in context with path [] threw exception [Request processing failed; nested exception is ElasticsearchStatusException[Elasticsearch exception [type=search_phase_execution_exception, reason=all shards failed]]] with root cause
根据错误日志中的信息,Elasticsearch 报告了 all shards failed 和 no_shard_available_action_exception 错误。这通常表示 Elasticsearch 集群中有一个或多个分片不可用
-
执行
curl -X GET "http://127.0.0.1:9200/_cluster/health?pretty",这里你换为自己的ip和端口{"cluster_name" : "docker-cluster","status" : "red","timed_out" : false,"number_of_nodes" : 1,"number_of_data_nodes" : 1,"active_primary_shards" : 17,"active_shards" : 17,"relocating_shards" : 0,"initializing_shards" : 0,"unassigned_shards" : 2,"delayed_unassigned_shards" : 0,"number_of_pending_tasks" : 0,"number_of_in_flight_fetch" : 0,"task_max_waiting_in_queue_millis" : 0,"active_shards_percent_as_number" : 89.47368421052632 }
Elasticsearch 集群的 status 为 red,这表示集群中有一些分片处于未分配状态,导致集群不能正常工作。特别是,你的集群中有 2 个未分配的分片(unassigned shards),这可能导致你遇到的 all shards failed 错误。
- 执行
curl -X GET "http://156.224.28.178:9200/_cat/shards?v&pretty"获取详细信息
-
查看分片未分配的原因
curl -X GET "http://156.224.28.178:9200/_cluster/allocation/explain?pretty" -H 'Content-Type: application/json' -d '{"index": "acowbo_new","shard": 0,"primary": true }' -
结果如下
{"index" : "acowbo_new","shard" : 0,"primary" : true,"current_state" : "unassigned","unassigned_info" : {"reason" : "ALLOCATION_FAILED","at" : "2024-10-29T02:26:16.215Z","failed_allocation_attempts" : 5,"details" : "failed shard on node [GoDPmTuqSBavpUAHkq6yHQ]: failed to create index, failure IllegalArgumentException[Custom Analyzer [ik_analyzer] failed to find tokenizer under name [ik_smart]]","last_allocation_status" : "no"},"can_allocate" : "yes","allocate_explanation" : "can allocate the shard","target_node" : {"id" : "GoDPmTuqSBavpUAHkq6yHQ","name" : "47d6ff15662f","transport_address" : "172.20.0.8:9300","attributes" : {"ml.machine_memory" : "3973206016","xpack.installed" : "true","transform.node" : "true","ml.max_open_jobs" : "512","ml.max_jvm_size" : "268435456"}},"allocation_id" : "kGCNR2E2SjuOTRow7OtUEA","node_allocation_decisions" : [{"node_id" : "GoDPmTuqSBavpUAHkq6yHQ","node_name" : "47d6ff15662f","transport_address" : "172.20.0.8:9300","node_attributes" : {"ml.machine_memory" : "3973206016","xpack.installed" : "true","transform.node" : "true","ml.max_open_jobs" : "512","ml.max_jvm_size" : "268435456"},"node_decision" : "yes","store" : {"in_sync" : true,"allocation_id" : "kGCNR2E2SjuOTRow7OtUEA"}}]
}
从错误信息来看,分片未能分配的原因是由于自定义分析器 ik_analyzer 未能找到名为 ik_smart 的分词器。这通常意味着在 Elasticsearch 的设置中配置的 ik_analyzer 依赖于一个未安装或未正确配置的分词器。
解决如下:
-
进入容器
docker exec -it 容器名/容器id /bin/bash -
执行
bin/elasticsearch-plugin install https://github.com/medcl/elasticsearch-analysis-ik/releases/download/v7.16.2/elasticsearch-analysis-ik-7.16.2.zip
这里需要看你的es是什么版本的,就安装什么版本的插件