Qlib使用
Qlib https://github.com/microsoft/qlib
将csv文件转化为Qlib的数据格式:https://qlib.readthedocs.io/en/latest/component/data.html#converting-csv-format-into-qlib-format
注意每支股票都要保存成单独一个文档,且文档名字与股票代号一致。
其中factor 也就是 https://crm.htsc.com.cn/doc/2020/10750101/d287ebf2-7f3f-4382-bf3f-cfabd4b90161.pdf中提到的复权。
youbube 教程 https://www.youtube.com/watch?v=z6a4mQTkMwg
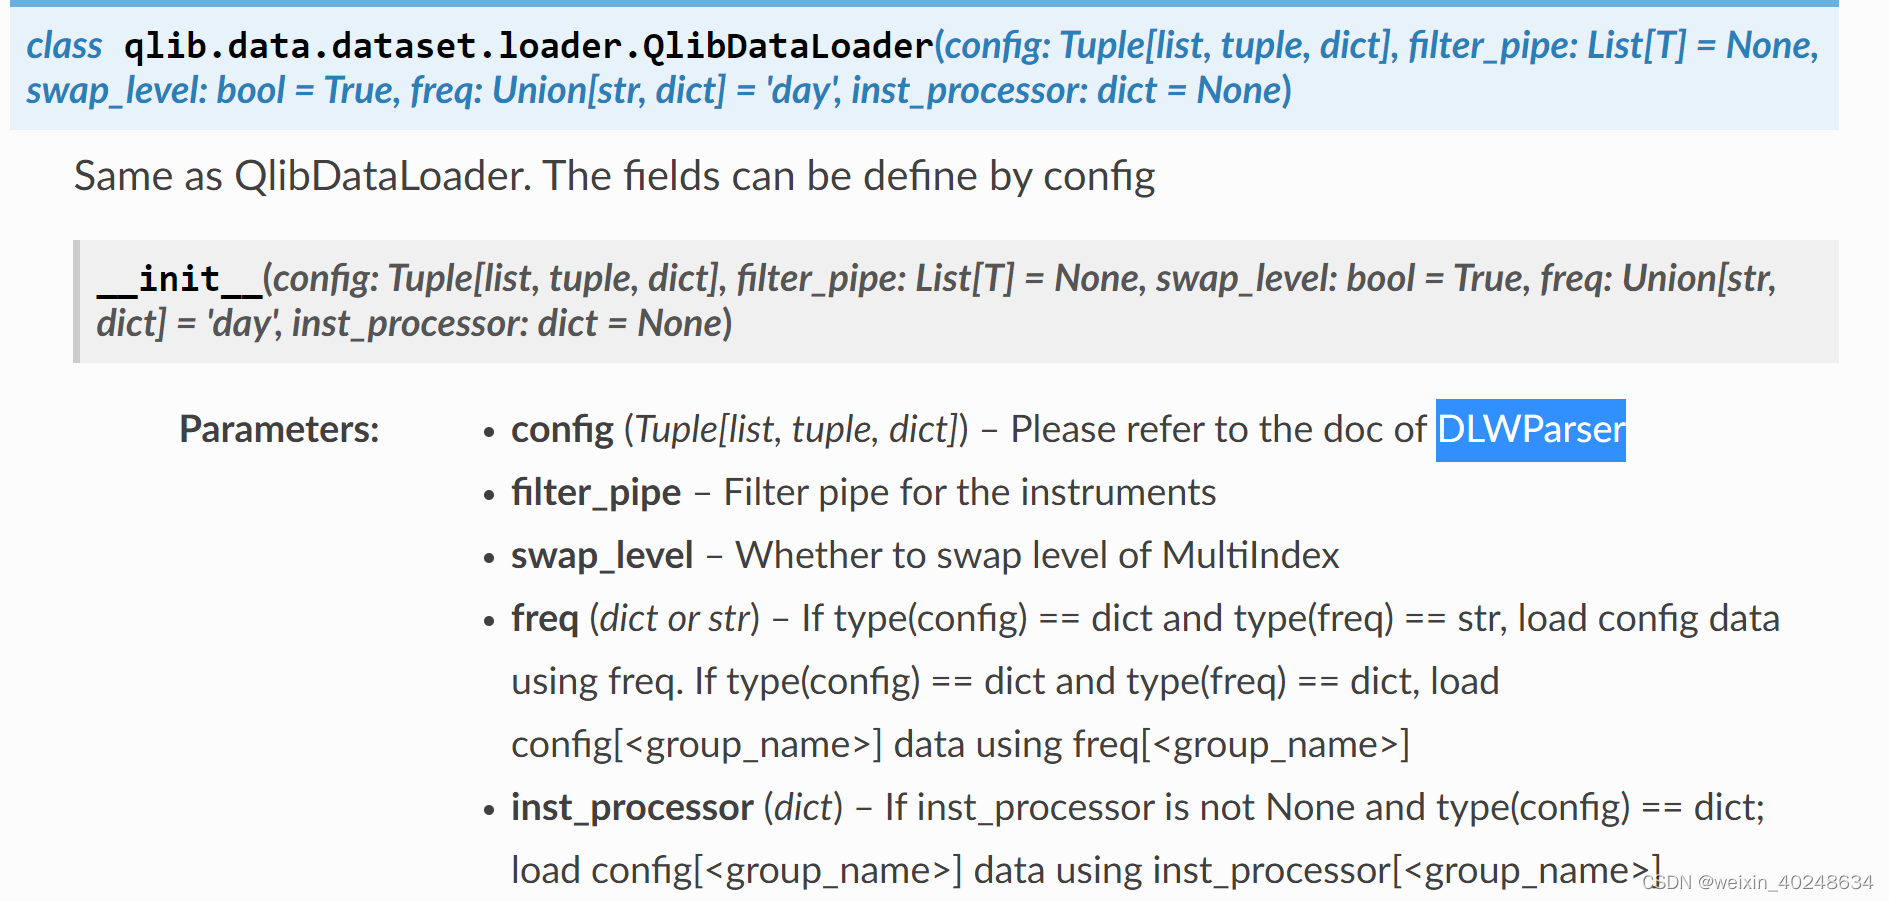
from qlib.data.dataset.loader import QlibDataLoaderMACD_EXP = '(EMA($close, 12) - EMA($close, 26))/$close - EMA((EMA($close, 12) - EMA($close, 26))/$close, 9)/$close'fields = [MACD_EXP,'$close'] # MACDnames = ['MACD','收盘价']labels = ['Ref($close, -2)/Ref($close, -1) - 1'] # labellabel_names = ['LABEL']data_loader_config = {"feature": (fields, names),"label": (labels, label_names)}data_loader = QlibDataLoader(config=data_loader_config)df = data_loader.load(instruments='all', start_time='2010-01-01', end_time='2017-12-31')print(df)
使用Qlib时候直接使用 Data Handler, 是上面 QlibDataLoader 的封装,所以Data Handler 也自然可以使用"label"的设置。
一个完整的例子:
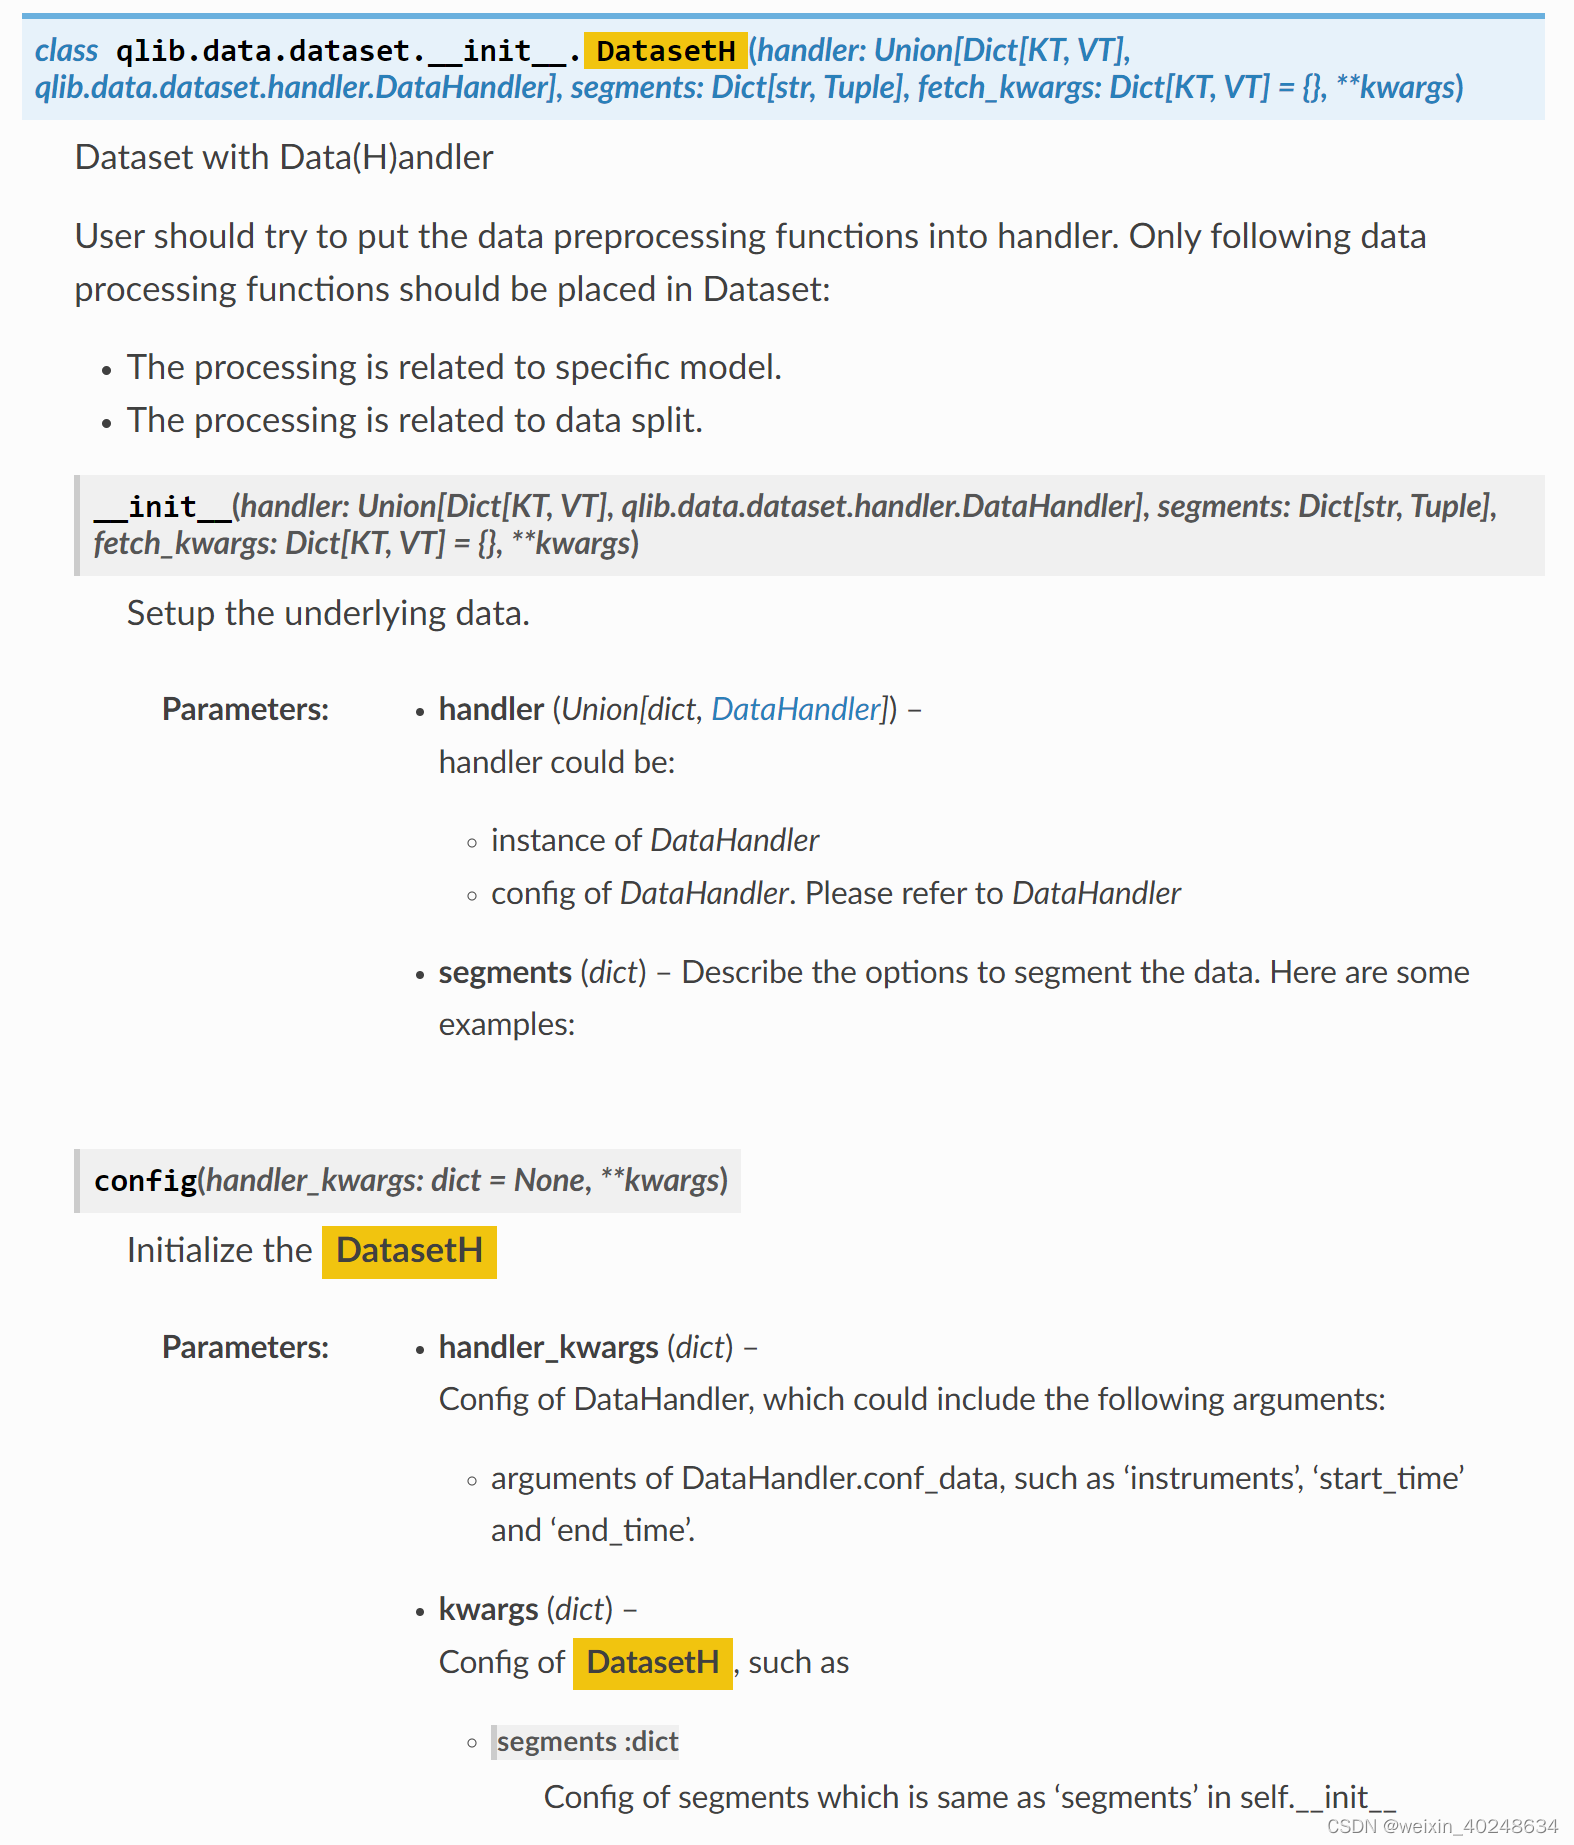
from qlib.data.dataset import DatasetH
# 实例化Data Loader
market = 'sh000300' # 沪深300股票池代码,在instruments文件夹下有对应的sh000300.txt
close_ma = ['EMA($close, 10)', 'EMA($close, 30)'] # EMA($close, 10)表示计算close的10日指数加权均线
ma_names = ['EMA10', 'EMA30']
ret = ["Ref($close, -1)/$close-1"] # 下一日收益率, Ref($close, -1)表示下一日收盘价
ret_name = ['next_ret']
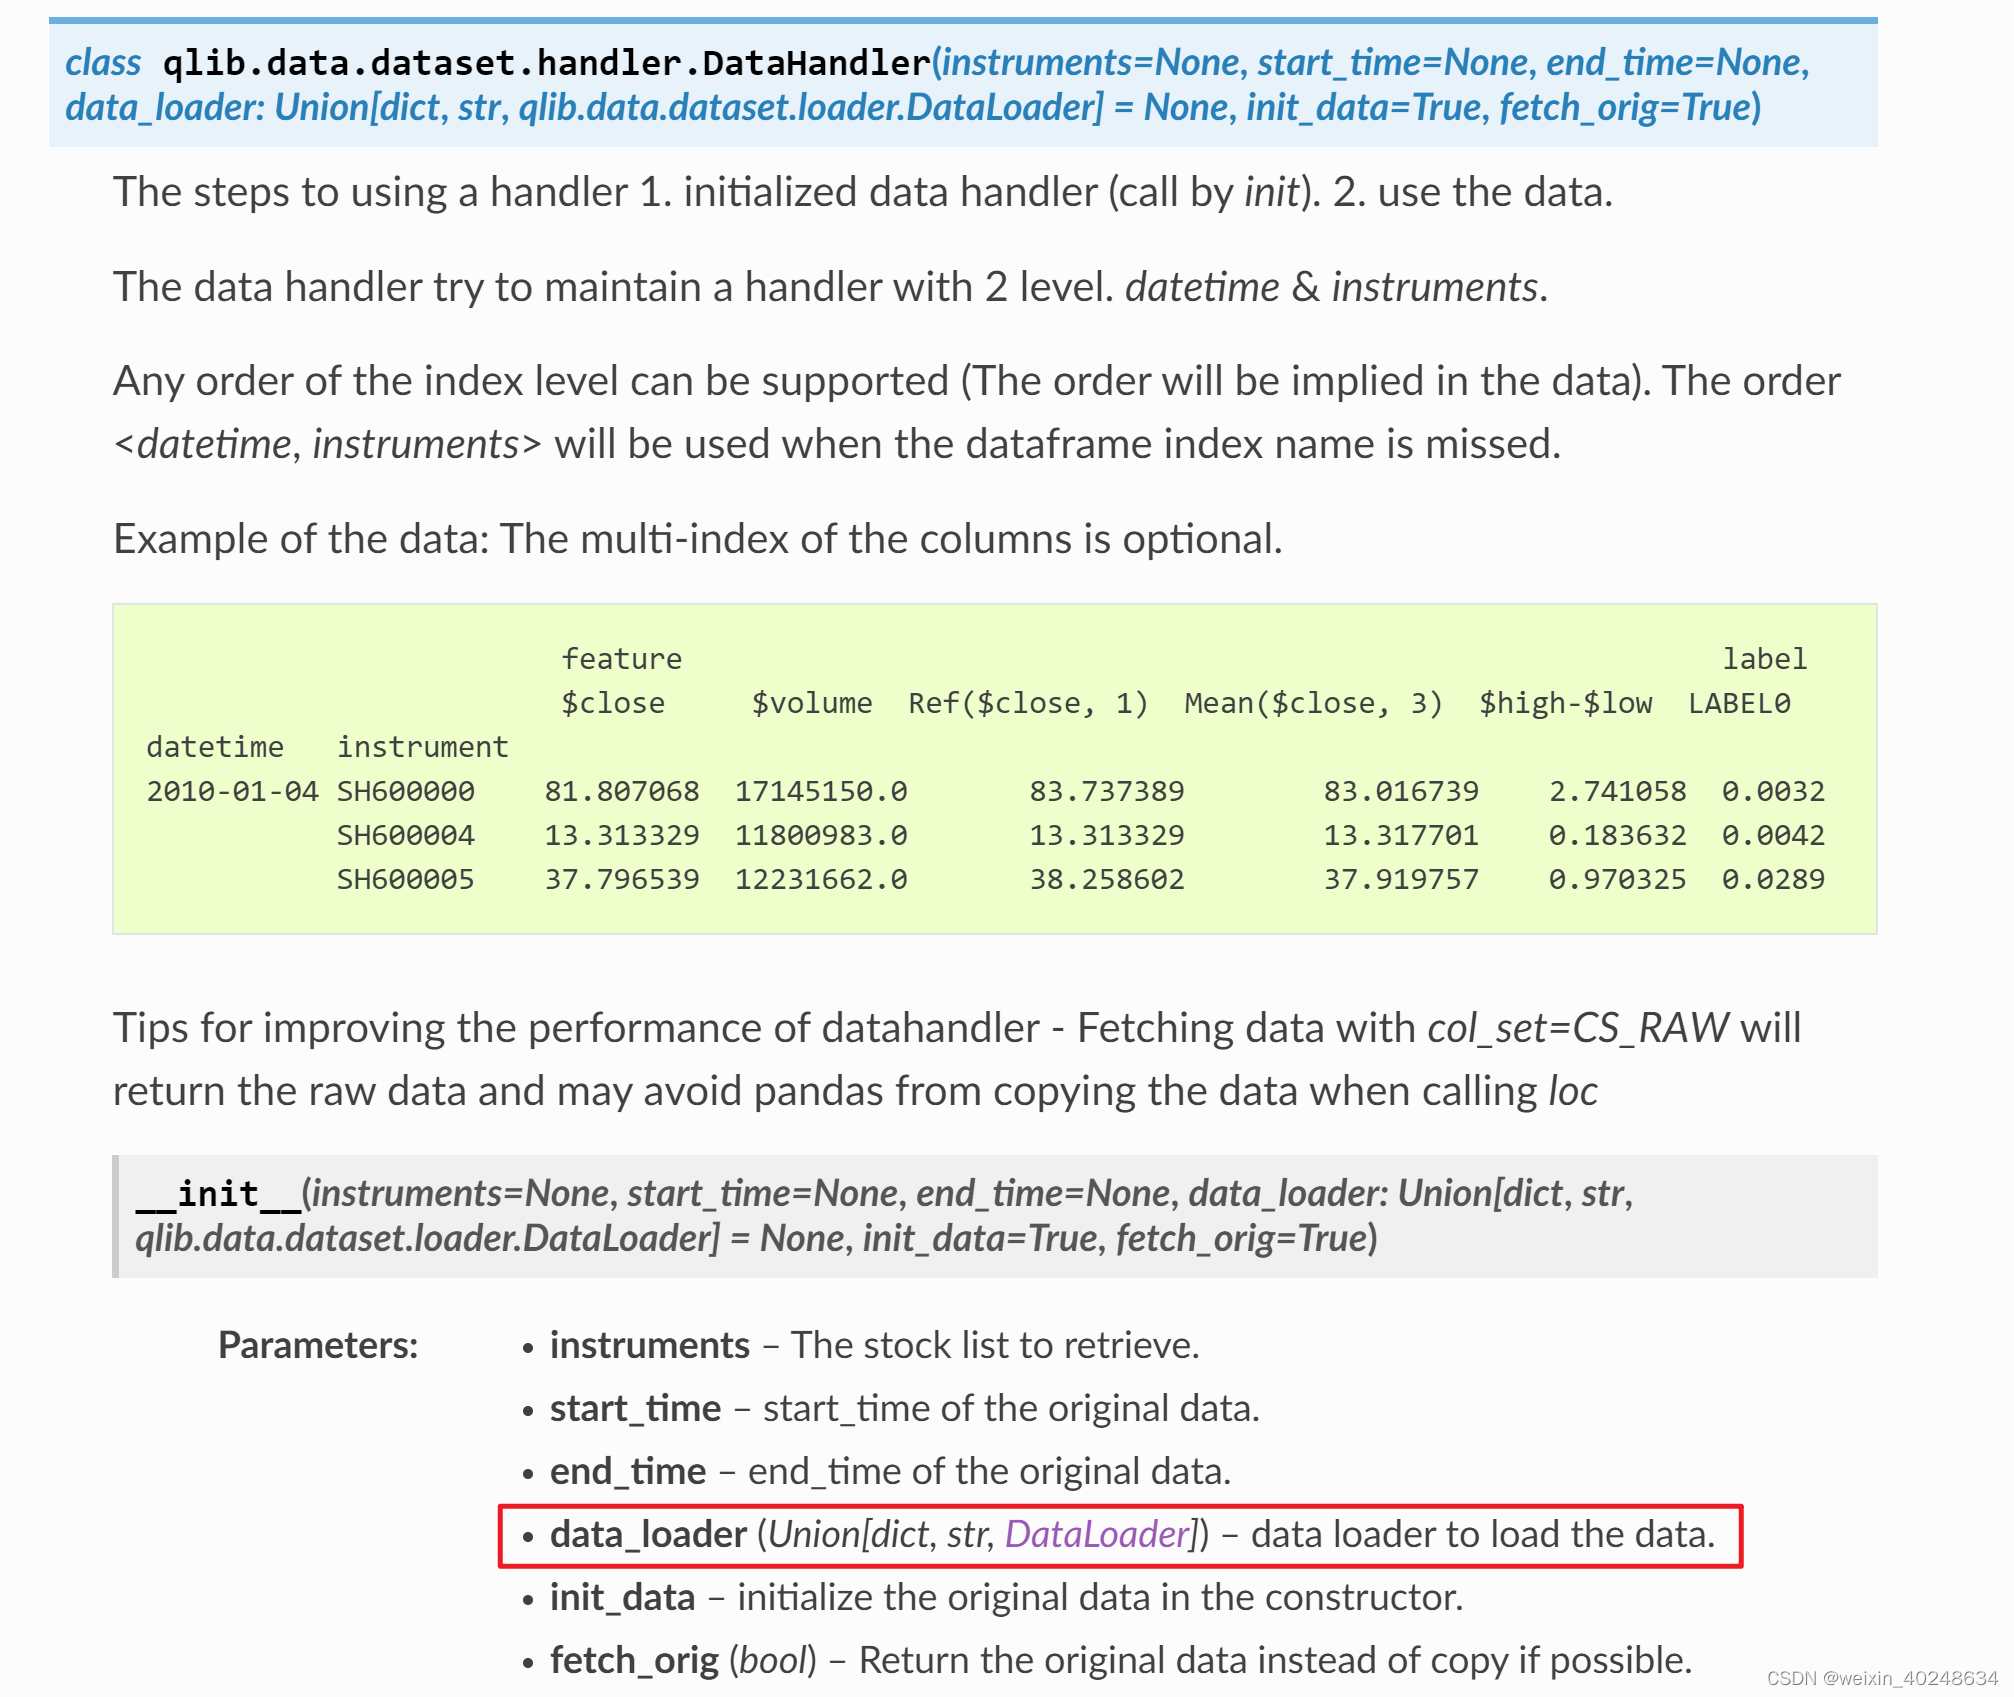
qdl_ma_gp = QlibDataLoader(config={'feature':(close_ma, ma_names), 'label': (ret, ret_name)}) # 实例化Data Handler
shared_processors = [DropnaProcessor()]
learn_processors = [CSZScoreNorm()]
infer_processors = [ZScoreNorm(fit_start_time='20190101', fit_end_time='20211231')]dh_pr_test = DataHandlerLP(instruments='sh000300', start_time='20190101', end_time='20211231',process_type=DataHandlerLP.PTYPE_I, learn_processors=learn_processors,shared_processors=shared_processors,infer_processors=infer_processors,data_loader=qdl_ma_gp)ds = DatasetH(dh_pr_test, segments={"train": ('20190101', '20201231'), "test": ('20210101', '20211231')})
from qlib.data.dataset import DatasetH
from qlib.data.dataset.handler import DataHandlerLP
自定义 https://blog.csdn.net/qq_37373209/article/details/125224210
所以 最后其实是可以直接用 DatasetH 来设置的
Alpha360:
其data_loader 是指定了feature的,不可改变; 但是label 是可以从kwargs里边导入的。所以想要用自己的alpha 因子得从data_loader 开始写起,而不能直接使用这个类
class Alpha360(DataHandlerLP):def __init__(self,instruments="csi500",start_time=None,end_time=None,freq="day",infer_processors=_DEFAULT_INFER_PROCESSORS,learn_processors=_DEFAULT_LEARN_PROCESSORS,fit_start_time=None,fit_end_time=None,filter_pipe=None,inst_processor=None,**kwargs):infer_processors = check_transform_proc(infer_processors, fit_start_time, fit_end_time)learn_processors = check_transform_proc(learn_processors, fit_start_time, fit_end_time)data_loader = {"class": "QlibDataLoader","kwargs": {"config": {"feature": self.get_feature_config(), ## 这里是特征"label": kwargs.pop("label", self.get_label_config()), # 这里为标签},"filter_pipe": filter_pipe,"freq": freq,"inst_processor": inst_processor,},}super().__init__(instruments=instruments,start_time=start_time,end_time=end_time,data_loader=data_loader,learn_processors=learn_processors,infer_processors=infer_processors,**kwargs)def get_feature_config(): # 可以拿来直接使用# NOTE:# Alpha360 tries to provide a dataset with original price data# the original price data includes the prices and volume in the last 60 days.# To make it easier to learn models from this dataset, all the prices and volume# are normalized by the latest price and volume data ( dividing by $close, $volume)# So the latest normalized $close will be 1 (with name CLOSE0), the latest normalized $volume will be 1 (with name VOLUME0)# If further normalization are executed (e.g. centralization), CLOSE0 and VOLUME0 will be 0.fields = []names = []for i in range(59, 0, -1):fields += ["Ref($close, %d)/$close" % i]names += ["CLOSE%d" % i]fields += ["$close/$close"]names += ["CLOSE0"]for i in range(59, 0, -1):fields += ["Ref($open, %d)/$close" % i]names += ["OPEN%d" % i]fields += ["$open/$close"]names += ["OPEN0"]for i in range(59, 0, -1):fields += ["Ref($high, %d)/$close" % i]names += ["HIGH%d" % i]fields += ["$high/$close"]names += ["HIGH0"]for i in range(59, 0, -1):fields += ["Ref($low, %d)/$close" % i]names += ["LOW%d" % i]fields += ["$low/$close"]names += ["LOW0"]for i in range(59, 0, -1):fields += ["Ref($vwap, %d)/$close" % i]names += ["VWAP%d" % i]fields += ["$vwap/$close"]names += ["VWAP0"]for i in range(59, 0, -1):fields += ["Ref($volume, %d)/($volume+1e-12)" % i]names += ["VOLUME%d" % i]fields += ["$volume/($volume+1e-12)"]names += ["VOLUME0"]return fields, names
使用Alpha360的代码为:
from qlib.data.dataset import DatasetH
from qlib.data.dataset.handler import DataHandlerLPstart_time = datetime.datetime.strptime(args.train_start_date, '%Y-%m-%d')
end_time = datetime.datetime.strptime(args.test_end_date, '%Y-%m-%d')
train_end_time = datetime.datetime.strptime(args.train_end_date, '%Y-%m-%d')hanlder = {'class': 'Alpha360', 'module_path': 'qlib.contrib.data.handler', 'kwargs': {'start_time': start_time, 'end_time': end_time, 'fit_start_time': start_time, 'fit_end_time': train_end_time, 'instruments': args.data_set,'infer_processors': [{'class': 'RobustZScoreNorm', 'kwargs': {'fields_group': 'feature', 'clip_outlier': True}}, {'class': 'Fillna', 'kwargs': {'fields_group': 'feature'}}],'learn_processors': [{'class': 'DropnaLabel'}, {'class': 'CSRankNorm', 'kwargs': {'fields_group': 'label'}}],'label': ['Ref($close, -1) / $close - 1']}}
segments =  { 'train': (args.train_start_date, args.train_end_date), 'valid': (args.valid_start_date, args.valid_end_date), 'test': (args.test_start_date, args.test_end_date)}
dataset = DatasetH(hanlder,segments)df_train, df_valid, df_test = dataset.prepare( ["train", "valid", "test"], col_set=["feature", "label"], data_key=DataHandlerLP.DK_L,)
>> x = np.arange(10)  # x例子
array([0, 1, 2, 3, 4, 5, 6, 7, 8, 9])>> np.roll(x, 2)  # axis为None,则会先进行扁平化,然后再向水平滚动2个位置
array([8, 9, 0, 1, 2, 3, 4, 5, 6, 7])
https://blog.csdn.net/qq_37373209/article/details/125224210