下拉选择输入框(基于elment-ui)
最近在需求中,需要有一个下拉选择功能,又得可以输入,在 element-ui 官网找了,发现没有适合的,然后在修炼 cv 大法的我,也在网上看了一下,但是也都感觉不合适,所以就自己写了两个,供大家参考一下
下拉选择输入框子组件1 代码:
<template><div class="container"><el-popover v-model="visible"trigger="click"popper-class="select-input"placement="bottom"width="400"><div><div class="item"v-for="(item,index) in selectArr":key="index"@click="chooseItem(item)">{{ item[selectObj.label] }}</div></div><el-input slot="reference"v-model="input"placeholder="请输入内容"@input="inputChange"></el-input></el-popover></div>
</template>
<script>
export default {name: 'select-input-popover',props: {inputValue: {  // 父组件需要改变的数据type: String,default: ''},selectArr: {  // 下拉的选项type: Array,default: () => []},selectObj: {type: Object,default: () => ({value: 'value',   // 选中的时候赋的值label: 'label'     // 用于显示的名称})}},watch: {input (val) {const obj = this.selectArr?.find((el) => {return el[this.selectObj.label] == val})if (obj) {       // 判断 input 的名称是否是下拉选择框里面的名称,如果是,把下拉选择框里面的值赋给父组件this.$emit('update:inputValue', obj[this.selectObj.value])return}this.$emit('update:inputValue', val)   // 如果 input 的名称不是下拉选择框里面的名称,把 input 的值赋给父组件}},data () {return {visible: false,input: ''};},methods: {chooseItem (item) {this.input = item[this.selectObj.label]this.visible = falsethis.$emit('update:inputValue', item[this.selectObj.value])},inputChange () {this.visible = false}}
};
</script><style lang="scss" scoped>
.container {position: absolute;left: 200px;top: 200px;margin: 0;max-width: 500px;
}
.item {cursor: pointer;padding: 0 20px;height: 34px;line-height: 34px;&:hover {background: #f5f7fa;}
}
</style>
<style>
.select-input {padding: 6px 0 !important;
}
</style>
下拉选择输入框子组件2 代码:
<template><div class="container"><el-dropdown @visible-change="test"trigger="click"@command="handleCommand"><span class="el-dropdown-link"><el-input class="item"v-model="input"placeholder="请输入内容"></el-input></span><el-dropdown-menu slot="dropdown"><el-dropdown-item v-for="(item,index) in selectArr":key="index":command="item">{{ item[selectObj.label] }}</el-dropdown-item></el-dropdown-menu></el-dropdown></div>
</template><script>
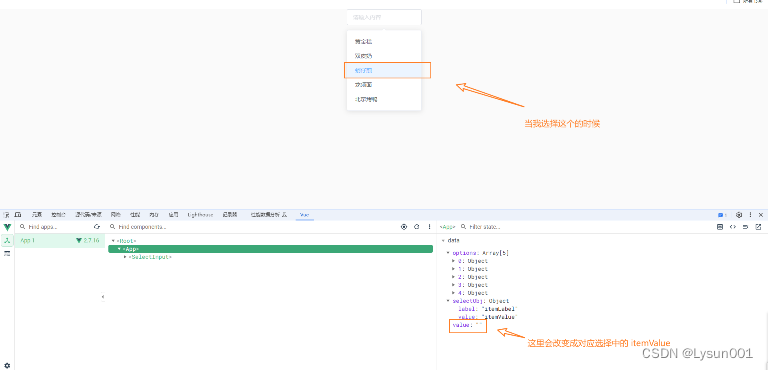
export default {name: 'select-input',props: {inputValue: { // 父组件需要改变的数据type: String,default: ''},selectArr: { // 下拉的选项type: Array,default: () => []},selectObj: {type: Object,default: () => ({value: 'value', // 选中的时候赋的值label: 'label' // 用于显示的名称})}},watch: {input (val) {const obj = this.selectArr?.find((el) => {return el[this.selectObj.label] == val})if (obj) { // 判断 input 的名称是否是下拉选择框里面的名称,如果是,把下拉选择框里面的值赋给父组件this.$emit('update:inputValue', obj[this.selectObj.value])return}this.$emit('update:inputValue', val) // 如果 input 的名称不是下拉选择框里面的名称,把 input 的值赋给父组件}},data () {return {input: ''}},updated () {console.log(123);},methods: {test () {console.log(789);},handleCommand (val) { // 处理选项// console.log(val, 'val');// console.log(this.selectObj.value, 'selectObj');this.input = val[this.selectObj.label]}}
}</script><style scoped>
.container {position: absolute;left: 200px;top: 200px;margin: 0;max-width: 500px;
}
.el-dropdown-menu {top: 35px;width: 100%;
}
</style>父组件代码
<template><div id="app"><ownSelect1 :inputValue.sync="value":selectArr="options":selectObj="selectObj"></ownSelect1></div>
</template><script>
import ownSelect1 from "./components/ownSelect1.vue"export default {name: 'App',components: {ownSelect1},data () {return {options: [{itemValue: '选项1',itemLabel: '黄金糕'}, {itemValue: '选项2',itemLabel: '双皮奶'}, {itemValue: '选项3',itemLabel: '蚵仔煎'}, {itemValue: '选项4',itemLabel: '龙须面'}, {itemValue: '选项5',itemLabel: '北京烤鸭'}],  // 下拉的选项selectObj: {value: 'itemValue',   // 选中的时候赋的值label: 'itemLabel'    // 用于显示的名称},value: '',  // 输入框或者下拉框 赋的值}}
}
</script><style>
#app {display: flex;justify-content: center;/* align-items: center; */height: 100vh;
}
</style>
效果:
直接输入:
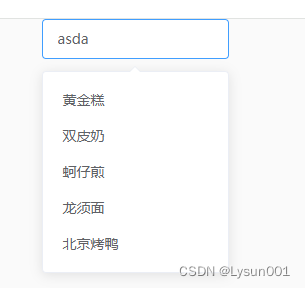
选项:
以上我自己写的组件代码,可以直接粘贴到项目中使用,不过我在网上看,其中有一篇的文章的,我觉得还不错,不过后面我发现有点麻烦,我懒得去细细研究他的做法,在这里我也提一下,有兴趣的可以自己去研究一下,他说的是,把 el-input 组件 和 el-select 放在一起,然后通过定位来把 el-input 放在 el-select 下拉选择的那里,其中 el-input 和 el-select 绑定一样的值