07-appium常用操作
一、press_keycode
1)方法说明
press_keycode方法是appium的键盘相关函数,可以实现键盘的相关操作,比如返回、按键、音量调节等等。也可以使用keyevent方法,功能与press_keycode方法类似。
常见按键编码:https://www.cnblogs.com/bluestorm/p/4886662.html。
# KeyCode:各种操作对应的键值码
driver.press_keycode(KeyCode)
2)使用示例
# 返回键
driver.press_keycode(4)# 回车键
driver.press_keycode(66)# 回车键
driver.keyevent(66)# 退格键
driver.keyevent(67)
二、scroll方法
1)方法说明
scroll方法是滑动页面,不过不是滑动滚动条,而是获取两个元素,然后从一个元素滚动到另一个元素。
要求:两个元素都在界面上可见,否则会报错。而且滑动持续时间设置越短,滑动越快,滑动效果会不太准确。所以使用scroll方法时,滑动持续时间尽量设置大一些。
# origin_el:滚动的起始元素
# destination_el:滚动的结束元素
# duration:滑动的持续时间,默认是600ms,时间越大滑动越慢
driver.scroll(origin_el, destination_el, duration)
2)使用示例
这里通过代码,将设置页从 “应用兼容性” 滑动到 “更多”。
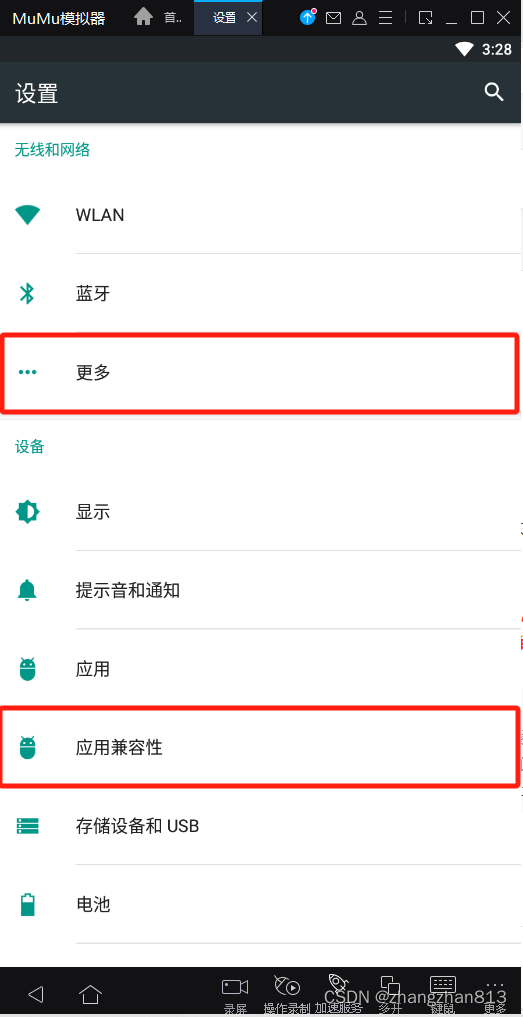
start_element = driver.find_element('xpath', "//*[@text='应用兼容性']")
end_element = driver.find_element('xpath', "//*[@text='更多']")
driver.scroll(start_element, end_element, 5000)
三、drag_and_drop方法
1)方法说明
drag_and_drop方法是也是滑动页面,从一个元素滑动到另一个元素,第二个元素代替第一个元素原本屏幕上的位置。
要求:两个元素都在界面上可见,否则会报错。但是drag_and_drop方法不能设置滑动持续时间,但滑动效果比scroll方法更加精确,几乎没有惯性。drag_and_drop方法有点类似于慢速版的scroll方法。
# origin_el:滚动的起始元素
# destination_el:滚动的结束元素
driver.drag_and_drop(origin_el, destination_el)
2)使用示例
这里通过代码,将设置页从 “应用兼容性” 滑动到 “更多”
start_element = driver.find_element('xpath', "//*[@text='应用兼容性']")
end_element = driver.find_element('xpath', "//*[@text='更多']")
driver.drag_and_drop(start_element, end_element)
四、swipe方法
1)方法说明
swipe方法是从一个坐标点滑动到另一个坐标点,也就是说是两点之间的滑动。
# start_x:起始坐标点的横坐标
# start_y:起始坐标点的纵坐标
# end_x:结束坐标点的横坐标
# end_y:结束坐标点的纵坐标
# duration:滑动的持续时间
driver.swipe(start_x, start_y, end_x, end_y, duration)
2)使用示例
这里通过代码,将设置页从第一个坐标点(660,1483)滑动到第二个坐标点(660,533)。

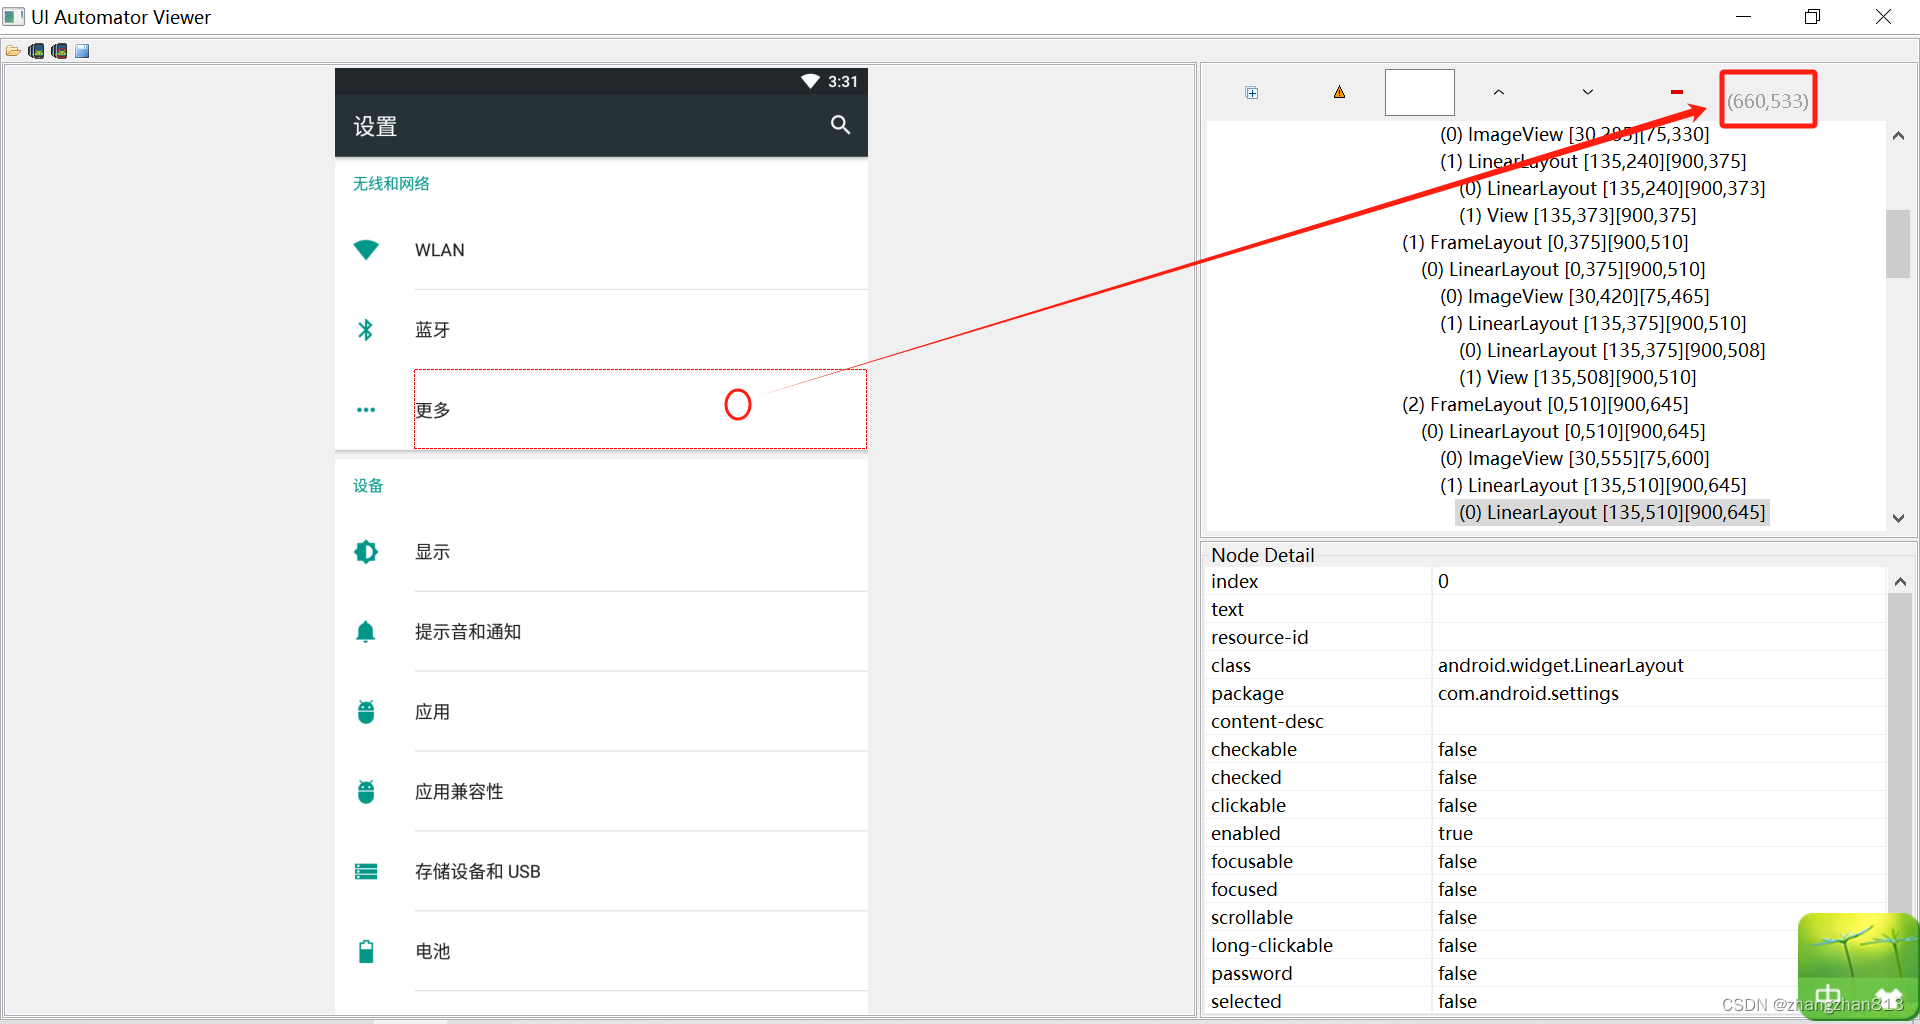
driver.swipe(660, 1483, 660, 533, 5000)五、TouchAction
1)TouchAction使用步骤
TouchAction可以实现一些针对手势的操作,比如滑动、拖动、长按等,我们可以将这些基本手势组合成一个相对复杂的手势,比如我们解锁手机或者一些应用软件都有手势解锁的这种方式。
- 使用TouchAction具体方法之前,需要导入TouchAction库。
from appium.webdriver.common.touch_action import TouchAction - 创建TouchAction对象。
- 通过对象调用想要执行的手势操作的方法。
- 通过perform方法执行动作(所有手势必须通过perform方法来触发)。
2)tap方法
tap()方法用来模拟手指对某个元素或坐标按下并快速抬起。
tap和click方法的作用差不多,但tap可以接收一个坐标值作为点击的区域,而click只能接收元素对象作为参数。另外,tap()方法还可以设置count参数,表示点击次数,count=2用来表示双击。
def tap(self,element: Optional['WebElement'] = None,x: Optional[int] = None,y: Optional[int] = None,count: int = 1,
) -> 'TouchAction':"""Perform a tap action on the elementArgs:element: the element to tapx : x coordinate to tap, relative to the top left corner of the element.y : y coordinate. If y is used, x must also be set, and vice versaTouchAction(driver).tap(user_name).perform()3)press方法
press()方法用来模拟手指对某个元素或坐标一直按下。
def press(self,el: Optional['WebElement'] = None,x: Optional[int] = None,y: Optional[int] = None,pressure: Optional[float] = None,
) -> 'TouchAction':"""Begin a chain with a press down action at a particular element or pointArgs:el: the element to pressx: x coordiate to press. If y is used, x must also be sety: y coordiate to press. If x is used, y must also be set
TouchAction(driver).press(x=100, y=200).perform()4)release方法
release()方法用来模拟手指抬起。
def release(self) -> 'TouchAction':"""End the action by lifting the pointer off the screen
Returns:`TouchAction`: Self instance
"""self._add_action('release', {})return self
TouchAction(driver).press(x=100, y=200).release().perform()5)wait方法
wait()方法用来模拟手指等待。
 def wait(self, ms: int = 0) -> 'TouchAction':"""Pause for `ms` milliseconds.
Args:ms: The time to pauseReturns:`TouchAction`: Self instance
"""
TouchAction(driver).press(x=100, y=200).wait(3000).release().perform()6)move_to方法
wait()方法用来模拟手指移动到某个元素或坐标。
def move_to(self, el: Optional['WebElement'] = None, x: Optional[int] = None, y: Optional[int] = None
) -> 'TouchAction':"""Move the pointer from the previous point to the element or point specified
Args:el: the element to be moved tox: x coordiate to be moved to. If y is used, x must also be sety: y coordiate to be moved to. If x is used, y must also be setReturns:`TouchAction`: Self instance
"""
TouchAction(driver).press(x=400, y=500).move_to(500, 600).perform()7)使用示例
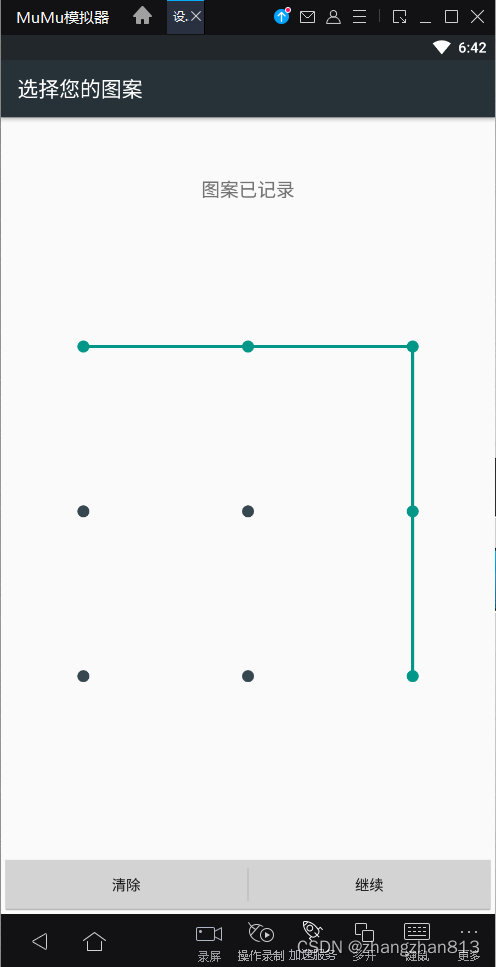
通过代码绘制出下图中的图案。
8)报错分析
from appium import webdriver
import time# 设置启动参数
desired_cap = {}
desired_cap['platformName'] = 'Android'
desired_cap['platformVersion'] = '6.0.1'
desired_cap['deviceName'] = '127.0.0.1:7555'
# 必须参数,指定被测软件的包名
desired_cap['appPackage'] = 'com.android.settings'
# 必须参数,指定要打开app的哪个页面
desired_cap['appActivity'] = '.ChooseLockPattern'
desired_cap['automationName'] = 'Uiautomator2'
desired_cap['noReset'] = True
desired_cap['newCommandTimeout'] = 6000
desired_cap['unicodeKeyboard'] = True
desired_cap['resetKeyboard'] = Truedriver = webdriver.Remote('http://localhost:4723/wd/hub', desired_cap)通过adb命令获取到绘制图案页面的activity为.ChooseLockPattern,但是通过执行上面代码不能打开设置app,报错:Original error: Cannot start the 'com.android.settings' application. Original error: The permission to start '.ChooseLockPattern' activity has been denied.
原因是app应用没开权限,对于activity是禁止外部调用的。
9)解决办法
- 将AndroidManifest.xml文件中将Activity设置成允许调用:Android:exported=”true”,加上权限后再重新打apk包。
- 通过代码打开app应用的启动页,然后通过定位菜单元素,逐层点击进入下一层界面,直到打开绘制图案界面为止。
from appium import webdriver
from appium.webdriver.common.touch_action import TouchAction
import time# 设置启动参数
desired_cap = {}
desired_cap['platformName'] = 'Android'
desired_cap['platformVersion'] = '6.0.1'
desired_cap['deviceName'] = '127.0.0.1:7555'
# 必须参数,指定被测软件的包名
desired_cap['appPackage'] = 'com.android.settings'
# 必须参数,指定要打开app的哪个页面
desired_cap['appActivity'] = '.Settings'
desired_cap['automationName'] = 'Uiautomator2'
desired_cap['noReset'] = True
desired_cap['newCommandTimeout'] = 6000
desired_cap['unicodeKeyboard'] = True
desired_cap['resetKeyboard'] = Truedriver = webdriver.Remote('http://localhost:4723/wd/hub', desired_cap)
time.sleep(5)# 1.获取手机设备宽、高信息
x = driver.get_window_size()['width']
y = driver.get_window_size()['height']# 2.将设置app的启动界面向上滑动半屏,使 “安全” 菜单项可见
driver.swipe(x * 0.5, y * 0.5, x * 0.5, 0)# 3.依次点击菜单 “安全” -> “屏幕锁定方式” -> “图案”
driver.find_element('xpath', '//*[@text="安全"]').click()
time.sleep(1)
driver.find_element('xpath', '//*[@text="屏幕锁定方式"]').click()
time.sleep(1)
driver.find_element('xpath', '//*[@text="图案"]').click()
time.sleep(1)# 4.绘制图案
ta = TouchAction(driver)
# 按住第一个点
ta.press(x=145, y=564).wait(1000)
ta.move_to(x=449, y=564).wait(1000)
ta.move_to(x=748, y=564).wait(1000)
ta.move_to(x=748, y=863).wait(1000)
ta.move_to(x=748, y=1165).wait(1000)
# 移动到最后一个点之后松手
ta.release().perform()
10)如何定位不可见元素?
在上述示例中,打开app应用的启动页后,需要先打开 “安全” 菜单,但界面菜单项过多,屏幕太小,导致 “安全” 菜单不可见。所以需要先将屏幕进行滑动,使得 “安全” 菜单可见后,再进行操作。
在上述示例中,将屏幕向上滑动半屏后,就能看见 “安全” 菜单,所以在代码中将滑动屏幕操作直接写死了,直接滑动半屏,然后进行定位、操作等等。
但有时候要定位的元素,可能需要滑动好多屏才能看见,所以不能直接在代码中写死,而应该在while循环中边滑动屏幕、边对元素进行定位,当定位到目标元素后,跳出循环。
from appium import webdriver
from selenium.common.exceptions import NoSuchElementException
import time# 设置启动参数
desired_cap = {'platformName': 'android','platformVersion': '6.0.1','deviceName': '127.0.0.1:7555','appPackage': 'com.android.settings','appActivity': '.Settings','automationName': 'Uiautomator2','noReset': True,'unicodeKeyboard': True,'resetKeyboard': True
}
driver = webdriver.Remote('http://localhost:4723/wd/hub', desired_cap)
time.sleep(5)# 1.获取手机设备的宽、高信息
x = driver.get_window_size()['width']
y = driver.get_window_size()['height']# 2.不断向上滑动半屏,查找“开发者选项”菜单
while True:try:driver.find_element('xpath', '//*[@text="开发者选项"]').click()breakexcept NoSuchElementException:print("当前屏幕未找到“开发者选项”菜单!")# 每次向上滑动半屏driver.swipe(0.5 * x, 0.5 * y, 0.5 * x, 0)
六、使用appium在脚本中启动其他app
# appPackage:被启动应用的包名
# appActivity:被启动应用的activity名字
driver.start_activity(appPackage, appActivity)
七、使用appium获取包名和Activity的名字
# 获取当前打开的app应用包名
driver.current_package# 获取当前打开的app应用所显示界面的activity名
driver.current_activity
八、使用appium关闭当前打开的app应用
# 关闭当前打开的app应用
driver.close_app()# 退出driver对象
driver.quit()
九、使用appium安装和卸载app应用
安装、卸载app应用,以及判断app是否安装,返回值为bool类型,True表示已安装,False表示未安装。
# 1.安装app应用
# app_path:apk文件的路径
driver.install_app(app_path)# 2.卸载app应用
# app_id:app应用包名
driver.remove_app(app_id)# 3.判断app是否安装
# app_id:app应用包名
driver.is_app_installed(app_id)
十、使用appium将应用置于后台
模拟home键,将app应用置于后台。注意:停留秒数到达后,app应用会自动回到前台。
某些应用在进入后台一段时间后,重新回到前台时会要求输入密码,如果自动化需要测试这种功能,可以使用这个api来测试。这里涉及两个概念:
- 热启动:应用从后台回到前台,叫热启动。
- 冷启动:第一次打开某个应用,叫冷启动。
# seconds:在后台停留多少秒
driver.background_app(seconds)
十一、获取手机设备分辨率
x = driver.get_window_size()['width']
y = driver.get_window_size()['height']
十二、获取手机截图
# filename:截图保存的位置
driver.get_screenshot_as_file(filename)driver.get_screenshot_as_file(r'E:\AndroidSDK\test.png')十三、获取和设置手机设备网络状态
from appium.webdriver.connectiontype import ConnectionType# 1.获取手机网络状态
driver.network_connection# 2.设置手机网络状态
# connectionType:网络状态码
driver.set_network_connection(ConnectionType.NO_CONNECTION | ConnectionType.AIRPLANE_MODE | ConnectionType.WIFI_ONLY | ConnectionType.DATA_ONLY | ConnectionType.ALL_NETWORK_ON)
1:飞行模式、 2:只开wifi、4:只开流量、6:网络全开。
| Value (Alias) | Data | Wifi | Airplane Mode |
| 0 (None) | 0 | 0 | 0 |
| 1 (Airplane Mode) | 0 | 0 | 1 |
| 2 (Wifi only) | 0 | 1 | 0 |
| 4 (Data only) | 1 | 0 | 0 |
| 6 (All network on) | 1 | 1 | 0 |
十四、操作手机通知栏
测试某些应用进行消息推送时,需要检查通知栏是否有消息通知。
# 打开通知栏
driver.open_notifications()