[C++]使用C++部署yolov10目标检测的tensorrt模型支持图片视频推理windows测试通过
【测试通过环境】
vs2019
cmake==3.24.3
cuda11.7.1+cudnn8.8.0
tensorrt==8.6.1.6
opencv==4.8.0
【部署步骤】
获取pt模型:https://github.com/THU-MIG/yolov10训练自己的模型或者直接使用yolov10官方预训练模型
下载源码:https://github.com/laugh12321/yolov10/tree/nms并安装到环境中
导出onnx:
yolo export model=yolov10n.pt format=onnx opset=13 simplify max_det=100 conf=0.25 iou=0.65 nms
注意导出模型和官方yolov10指令导出的onnx是不一样的,使用yolov10-nms导出模型结构如图
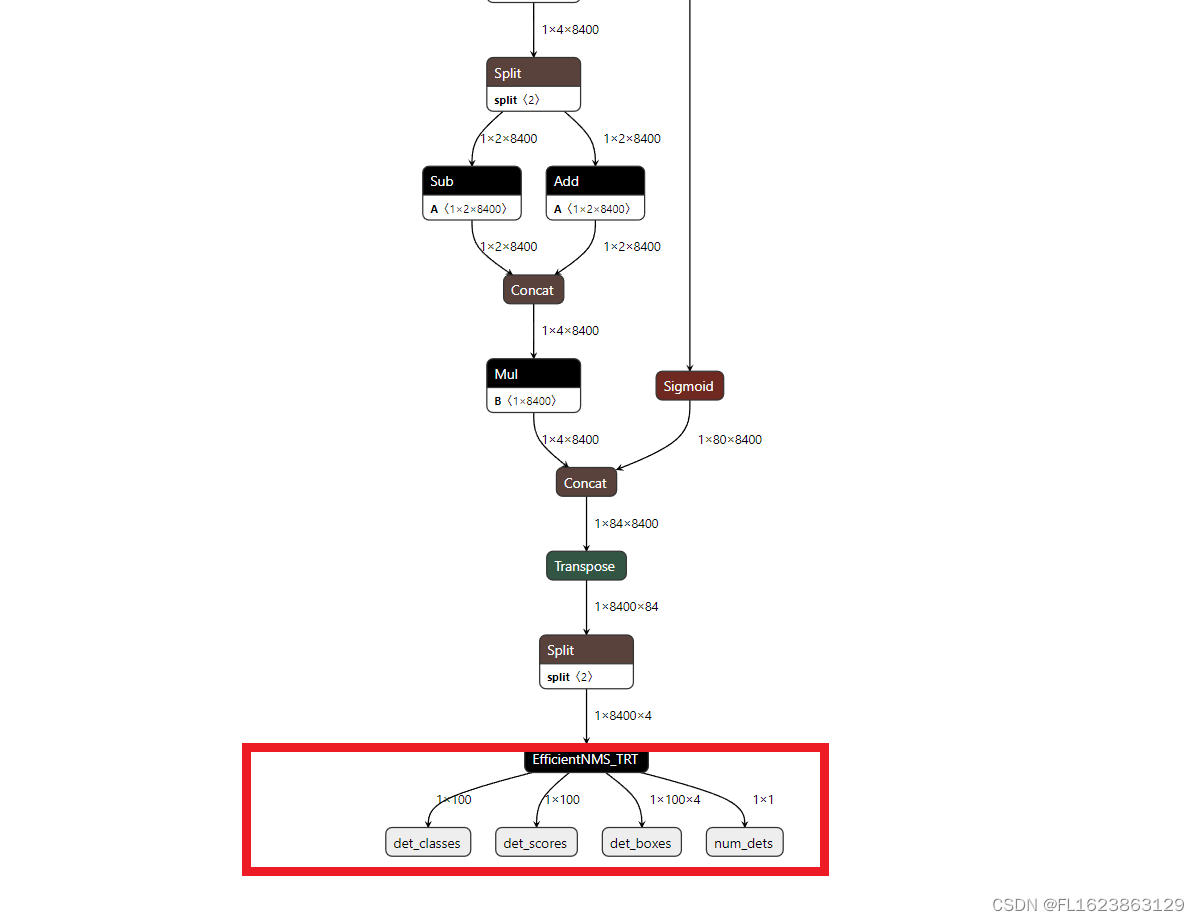
注意一定要是上面类似结构图才能用于这个C++项目
导出tensorrt:
等20分钟左右即可导出需要耐心等待一段时间视个人电脑性能决定,由于tensorrt依赖硬件不一样电脑可能无法共用tensorrt模型,所以必须要重新转换onnx模型到engine才可以运行。请勿直接使用提供的engine模型进行直接测试,否则可能无法正常运行
trtexec --onnx=yolov10n.onnx --saveEngine=yolov10n.engine --fp16
下载安装vs2019勾选桌面C++安装
git clone https://github.com/laugh12321/TensorRT-YOLO
cd TensorRT-YOLO
xmake f -k shared --tensorrt="C:/Program Files/NVIDIA GPU Computing Toolkit/TensorRT/v8.6.1.6"
xmake -P . -r
将编译好的deploy.dll和deploy.lib文件放到yolov10-tensorrt-cplus/lib文件夹
编译源码yolov10-tensorrt-cplus
运行命令:
推理图片:
yolov10.exe -e C:\Users\Administrator\Desktop\yolov10-tensorrt-cplus\yolov10n.engine -i C:\Users\Administrator\Desktop\yolov10-tensorrt-cplus\images\bus.jpg -o ./out -l C:\Users\Administrator\Desktop\yolov10-tensorrt-cplus\labels.txt
推理视频:
yolov10.exe -e C:\Users\Administrator\Desktop\yolov10-tensorrt-cplus\yolov10n.engine -i D:\car.mp4 -o ./out -l C:\Users\Administrator\Desktop\yolov10-tensorrt-cplus\labels.txt
【视频演示】
使用C++部署yolov10目标检测的tensorrt模型支持图片视频推理windows测试通过_哔哩哔哩_bilibili【测试通过环境】vs2019cmake==3.24.3cuda11.7.1+cudnn8.8.0tensorrt==8.6.1.6opencv==4.8.0更多信息参考博文:https://blog.csdn.net/FL1623863129/article/details/139693743, 视频播放量 3、弹幕量 0、点赞数 0、投硬币枚数 0、收藏人数 0、转发人数 0, 视频作者 未来自主研究中心, 作者简介 未来自主研究中心,相关视频:4060Ti 16G显卡安装Ollama+ChatTTS打造智能语音秘书(突破30秒限制),AI换脸最全面部细节演示:眨眼,捏眉毛,斗鸡眼,戳鼻子,做猪鼻子……认识ai换脸,警惕Ai换脸,Ai变声诈骗!,基于yolo的骑行速度检测,labelme json转yolo工具用于目标检测训练数据集使用教程,使用纯opencv部署yolov8目标检测模型onnx,rk3588 yolov5 目标检测推流rtsp,[深度学习][目标检测][面试提问]Batch Normalization批归一化,[数据集介绍][目标检测]城市街道垃圾数据集VOC格式5266张,GPT:可恶!我好不容易才建立的三观啊!,毕设项目—基于最新YOLOv10+ByteTrack+PaddleOCR实现交通状态分析 (功能:目标检测、轨迹跟踪、车牌检测、车牌号识别、单目测速及目标计数)![]() https://www.bilibili.com/video/BV13S411P7XL/
https://www.bilibili.com/video/BV13S411P7XL/
【部分实现代码】
#include <CLI/CLI.hpp>
#include <chrono>
#include <filesystem>
#include <fstream>
#include <iostream>
#include <memory>
#include <opencv2/opencv.hpp>
#include <random>
#include <string>
#include <algorithm>
#include "deploy/utils/utils.hpp"
#include "deploy/vision/detection.hpp"
#include "deploy/vision/result.hpp"
#include <opencv2/core/core.hpp>
#include <opencv2/highgui/highgui.hpp>
using namespace cv;
using namespace std;namespace fs = std::filesystem;
std::string getFileExtension(const std::string& filePath) {  size_t dotPosition = filePath.rfind('.'); // 从右向左查找'.'的位置  if (dotPosition == std::string::npos) {  // 没有找到'.',返回空字符串  return "";  }  return filePath.substr(dotPosition + 1); // 返回'.'之后的所有字符
}
// Get image files in a directory
std::vector<std::string> getImagesInDirectory(const std::string &folderPath)
{std::vector<std::string> imageFiles;for (const auto &entry : fs::directory_iterator(folderPath)){const auto extension = entry.path().extension().string();if (fs::is_regular_file(entry) && (extension == ".jpg" || extension == ".png" || extension == ".jpeg" || extension == ".bmp")){imageFiles.push_back(entry.path().string());}}return imageFiles;
}// Get file name from file path
std::string getFileName(const std::string &filePath)
{return fs::path(filePath).filename().string();
}// Create output directory
void createOutputDirectory(const std::string &outputPath)
{if (!fs::exists(outputPath) && !fs::create_directories(outputPath)){std::cerr << "Failed to create output directory: " << outputPath << std::endl;exit(1);}else if (!fs::is_directory(outputPath)){std::cerr << "Output path exists but is not a directory: " << outputPath << std::endl;exit(1);}
}// Generate label and color pairs
std::vector<std::pair<std::string, cv::Scalar>> generateLabelColorPairs(const std::string &labelFile)
{std::vector<std::pair<std::string, cv::Scalar>> labelColorPairs;std::ifstream file(labelFile);if (!file.is_open()){std::cerr << "Failed to open labels file: " << labelFile << std::endl;return labelColorPairs;}auto generateRandomColor = [](){std::random_device rd;std::mt19937 gen(rd());std::uniform_int_distribution<int> dis(0, 255);return cv::Scalar(dis(gen), dis(gen), dis(gen));};std::string label;while (std::getline(file, label)){labelColorPairs.emplace_back(label, generateRandomColor());}return labelColorPairs;
}// Visualize detection results
void visualize(cv::Mat &image, const deploy::DetectionResult &result, const std::vector<std::pair<std::string, cv::Scalar>> &labelColorPairs)
{for (size_t i = 0; i < result.num; ++i){const auto &box = result.boxes[i];int cls = result.classes[i];float score = result.scores[i];const auto &label = labelColorPairs[cls].first;const auto &color = labelColorPairs[cls].second;std::string labelText = label + " " + cv::format("%.2f", score);// Draw rectangle and labelcv::rectangle(image, cv::Point(box.left, box.top), cv::Point(box.right, box.bottom), color, 2, cv::LINE_AA);int baseLine;cv::Size labelSize = cv::getTextSize(labelText, cv::FONT_HERSHEY_SIMPLEX, 0.6, 1, &baseLine);cv::rectangle(image, cv::Point(box.left, box.top - labelSize.height), cv::Point(box.left + labelSize.width, box.top), color, -1);cv::putText(image, labelText, cv::Point(box.left, box.top), cv::FONT_HERSHEY_SIMPLEX, 0.6, cv::Scalar(255, 255, 255), 1);}
}// Process a single image
void processSingleImage(const std::string &imagePath, const std::shared_ptr<deploy::DeployDet> &model, const std::string &outputPath, const std::vector<std::pair<std::string, cv::Scalar>> &labels)
{cv::Mat cvimage = cv::imread(imagePath, cv::IMREAD_COLOR);if (cvimage.empty()){std::cerr << "Failed to read image: " << imagePath << std::endl;return;}// cv::cvtColor(cvimage, cvimage, cv::COLOR_BGR2RGB);  // It is better to use RGB images, but the impact of using BGR on the results is not significant.deploy::Image image(cvimage.data, cvimage.cols, cvimage.rows);std::cout << "start inference\n";auto result = model->predict(image);std::cout << "inference over!\n";if (!outputPath.empty()){std::cout << "show result\n";// cv::cvtColor(cvimage, cvimage, cv::COLOR_RGB2BGR);visualize(cvimage, result, labels);cv::imwrite(outputPath + "/" + getFileName(imagePath), cvimage);}else{std::cout << "outputPath is empty\n";}
}void processVideo(const std::string &videoPath, const std::shared_ptr<deploy::DeployDet> &model, const std::vector<std::pair<std::string, cv::Scalar>> &labels)
{VideoCapture capture(videoPath);if (!capture.isOpened())return;double fps = capture.get(cv::CAP_PROP_FPS);          // 帧率int width = capture.get(cv::CAP_PROP_FRAME_WIDTH);   // 视频帧宽度int height = capture.get(cv::CAP_PROP_FRAME_HEIGHT); // 视频帧高度while (1){Mat frame;capture >> frame; // 从相机读取新一帧if (frame.empty()){std::cout << "read over!\n";break;}deploy::Image image(frame.data, frame.cols, frame.rows);auto result = model->predict(image);// cv::cvtColor(cvimage, cvimage, cv::COLOR_RGB2BGR);visualize(frame, result, labels);cv::imshow("result", frame);if (char(waitKey(2)) == 'q'){break;}}capture.release();cv::destroyAllWindows();
}// Process a batch of images
void processBatchImages(const std::vector<std::string> &imageFiles, const std::shared_ptr<deploy::DeployDet> &model, const std::string &outputPath, const std::vector<std::pair<std::string, cv::Scalar>> &labels)
{const size_t batchSize = model->batch;deploy::GpuTimer gpuTimer;deploy::CpuTimer<std::chrono::high_resolution_clock> cpuTimer;int count = 0;for (size_t i = 0; i < imageFiles.size(); i += batchSize){std::vector<cv::Mat> images;std::vector<std::string> imgNameBatch;for (size_t j = i; j < i + batchSize && j < imageFiles.size(); ++j){cv::Mat image = cv::imread(imageFiles[j], cv::IMREAD_COLOR);if (image.empty()){std::cerr << "Failed to read image: " << imageFiles[j] << std::endl;continue;}// cv::cvtColor(image, image, cv::COLOR_BGR2RGB); // It is better to use RGB images, but the impact of using BGR on the results is not significant.images.push_back(image);imgNameBatch.push_back(getFileName(imageFiles[j]));}if (images.empty())continue;std::vector<deploy::Image> imgBatch;for (const auto &image : images){imgBatch.emplace_back(image.data, image.cols, image.rows);}if (i > 5){cpuTimer.start();gpuTimer.start();}auto results = model->predict(imgBatch);if (i > 5){cpuTimer.stop();gpuTimer.stop();count++;}if (!outputPath.empty()){for (size_t j = 0; j < images.size(); ++j){// cv::cvtColor(images[j], images[j], cv::COLOR_RGB2BGR);visualize(images[j], results[j], labels);cv::imwrite(outputPath + "/" + imgNameBatch[j], images[j]);}}}if (count > 0){std::cout << "Average infer CPU elapsed time: " << cpuTimer.microseconds() / 1000 / count << " ms" << std::endl;std::cout << "Average infer GPU elapsed time: " << gpuTimer.microseconds() / 1000 / count << " ms" << std::endl;}
}int main(int argc, char **argv)
{CLI::App app{"YOLO Series Inference Script"};std::string enginePath, inputPath, outputPath, labelPath;app.add_option("-e,--engine", enginePath, "Serialized TensorRT engine")->required()->check(CLI::ExistingFile);app.add_option("-i,--input", inputPath, "Path to image or directory")->required()->check(CLI::ExistingPath);app.add_option("-o,--output", outputPath, "Directory to save results");app.add_option("-l,--labels", labelPath, "File to use for reading the class labels from")->check(CLI::ExistingFile);CLI11_PARSE(app, argc, argv);std::cout << "load engine...\n";auto model = std::make_shared<deploy::DeployDet>(enginePath);std::cout << "engine loaded!\n";std::vector<std::pair<std::string, cv::Scalar>> labels;if (!outputPath.empty()){labels = generateLabelColorPairs(labelPath);createOutputDirectory(outputPath);}if (fs::is_regular_file(inputPath)){if(getFileExtension(inputPath)=="mp4"){processVideo(inputPath, model, labels);}else{std::cout << "start process image file\n";processSingleImage(inputPath, model, outputPath, labels);}}else{std::cout << "start process image directory\n";auto imageFiles = getImagesInDirectory(inputPath);if (!imageFiles.empty()){processBatchImages(imageFiles, model, outputPath, labels);}else{std::cerr << "No images found in directory: " << inputPath << std::endl;return 1;}}std::cout << "Inference completed." << std::endl;return 0;
}
【源码下载】https://download.csdn.net/download/FL1623863129/89436042