前后端分离与实现 ajax 异步请求 和动态网页局部生成

前端
<!DOCTYPE html><!-- 来源 -->
<!-- https://cloud.tencent.com/developer/article/1705089 -->
<!-- https://geek-docs.com/ajax/ajax-questions/19_ajax_javascript_send_json_object_with_ajax.html -->
<!-- 配合java后端可以监听 -->
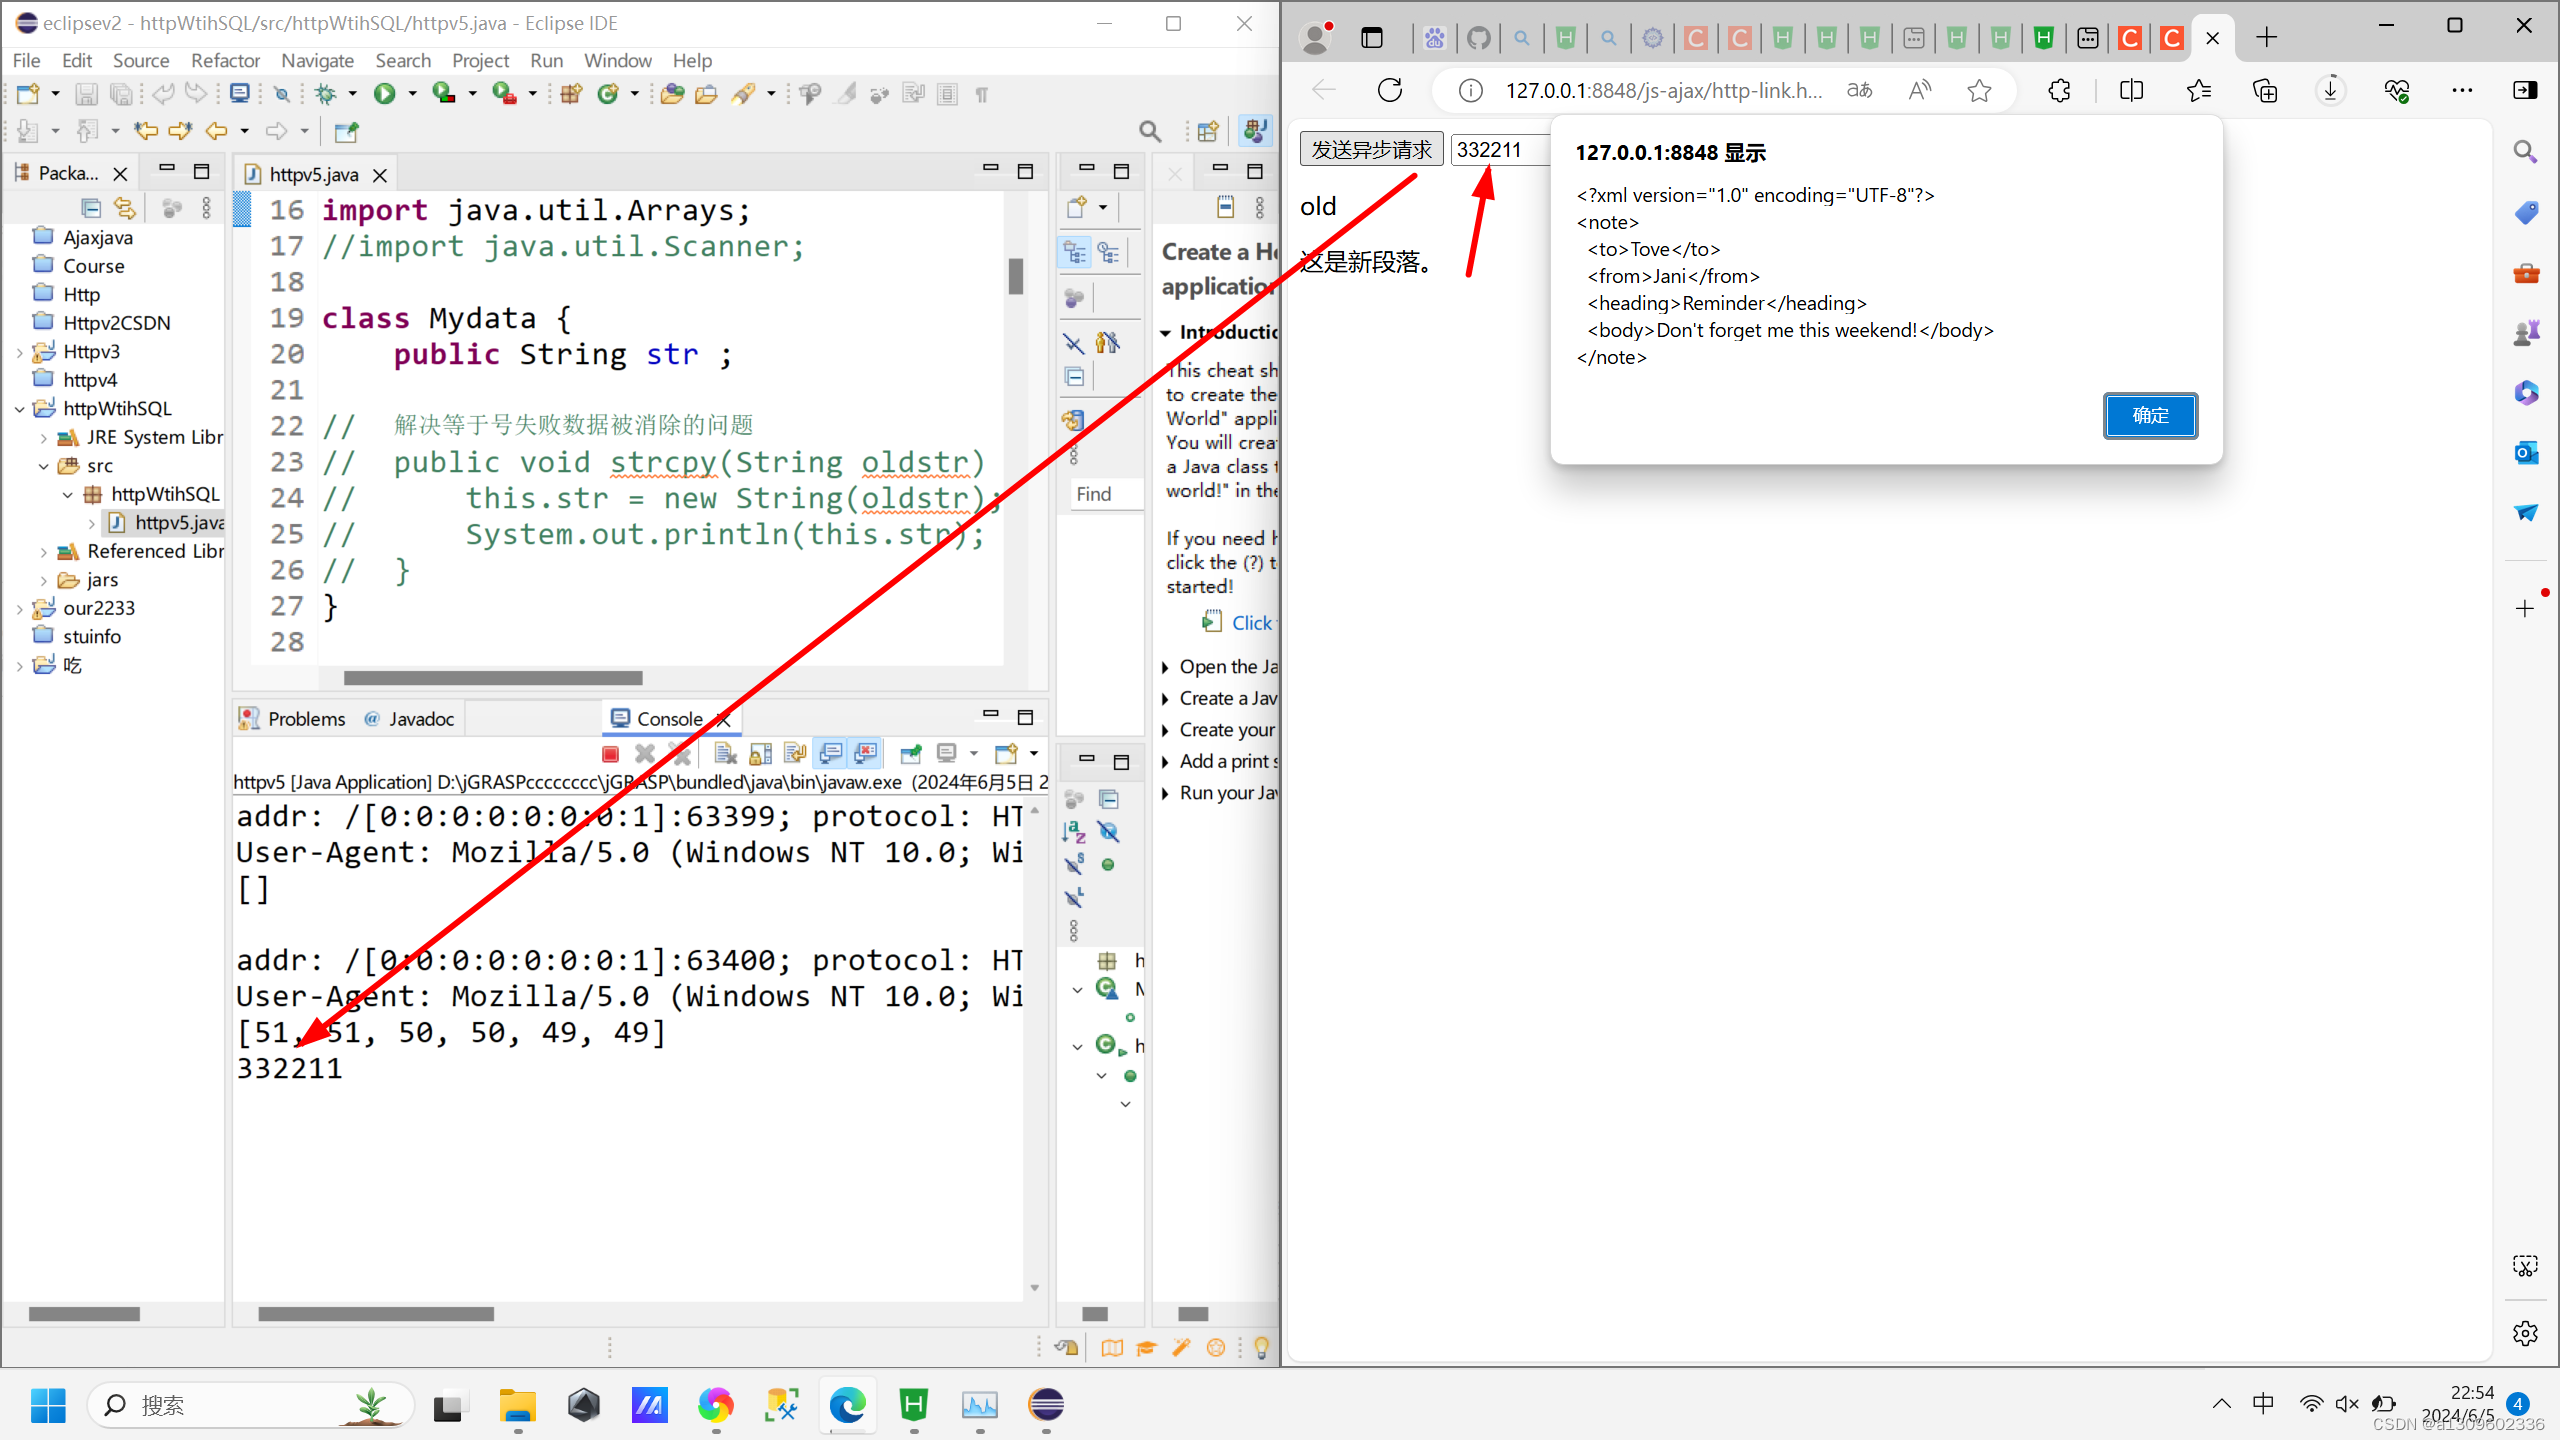
<!-- //原文链接:https://blog.csdn.net/xietansheng/article/details/78704783 --><html lang="en"><head><meta charset="UTF-8"><title>Title</title><script>function fun() {// 创建XMLHttpRequest对象var xhr = new XMLHttpRequest();// 设置请求类型和URL// xhr.open('POST', 'http://example.com/api', true);// xhr.open('POST', 'http://localhost:8080/aa', true);// xhr.open('POST', '/aa', true);// xhr.open('POST', 'http://localhost:8080/aa', true);xhr.open('POST', 'http://localhost:8080', true);// 设置请求头xhr.setRequestHeader('Content-Type', 'application/json');console.log("请求头已设置\n");// 监听服务器响应// 构建JSON对象var data = {name: 'John',age: 25,email: 'john@example.com'};// 将JSON对象转换为字符串var jsonData = JSON.stringify(data);// 发送数据// xhr.send(jsonData);// 所有的 send 注释掉就会爆 POST 错误提示// xhr.send("6655ookk\n");let sendText = document.getElementById("message").valuexhr.send(sendText);//4、接收及处理响应结果,当服务器响应成功了再获取xhr.onreadystatechange = function() { //当xmlhttp对象就绪状态改变时会触发事件if (xhr.readyState == 4 && xhr.status == 200) { //请求已完成且响应就绪,响应状态码为200alert(xhr.responseText);console.log(xhr.responseText);console.log("检测的正确的返回\n");// 把数据写进网页里,动态增加数据// https://blog.csdn.net/jerrcy_fly/article/details/69367264// document.write(xhr.responseText);// document.write("<h1 id=\"h2\">通过document.write输出内容</h1>");// 动态追加数据// https://segmentfault.com/q/1010000007420031var element = document.getElementById("div1");var para = document.createElement("p");var node = document.createTextNode("这是新段落。");var nodev2 = document.createTextNode(xhr.responseText);para.appendChild(node);para.appendChild(nodev2);element.appendChild(para);} else {console.log("检测到错误的返回\n");}console.log("检测到返回函数\n");};}</script><!-- 这里注释的脚本不会执行 -->
<!-- <script>var para = document.createElement("p");var node = document.createTextNode("这是新段落。");para.appendChild(node);var element = document.getElementById("div1");element.appendChild(para);</script> --></head><body><input type="button" value="发送异步请求" onclick="fun();"><input type="text" id="message"><div id="div1"><p>old</p></div></body><!-- 在nody之后放置脚本就会在后面增加数据 可见在body之后执行数据--><script>var para = document.createElement("p");var node = document.createTextNode("这是新段落。");para.appendChild(node);var element = document.getElementById("div1");element.appendChild(para);</script>
</html>后端
注释的代码 是 JDBC 链接数据库Sqlsserver
但是可以运行,不使用sqlserver2019的代码,只允许原生 java自带的 http服务器也可
package httpWtihSQL;import com.sun.net.httpserver.HttpExchange;
import com.sun.net.httpserver.HttpHandler;
import com.sun.net.httpserver.HttpServer;import java.io.IOException;
import java.net.InetSocketAddress;
import java.nio.charset.StandardCharsets;
//import java.sql.Connection;
//import java.sql.DriverManager;
//import java.sql.PreparedStatement;
//import java.sql.ResultSet;
//import java.sql.SQLException;
//import java.sql.Statement;
import java.util.Arrays;
//import java.util.Scanner;class Mydata {public String str ;//	解决等于号失败数据被消除的问题
//	public void strcpy(String oldstr) {
//		this.str = new String(oldstr);
//		System.out.println(this.str);
//	}
}public class httpv5 {// 来源// https://blog.csdn.net/xietansheng/article/details/78704783// 浏览器访问: http://localhost:8080/、http://localhost:8080/bb,输出: Hello World// 版权声明:本文为博主原创文章,遵循 CC 4.0 BY-SA 版权协议,转载请附上原文出处链接和本声明。// 原文链接:https://blog.csdn.net/xietansheng/article/details/78704783public static void main(String[] args) throws Exception {Mydata mydata = new Mydata();// 创建 http 服务器, 绑定本地 8080 端口HttpServer httpServer = HttpServer.create(new InetSocketAddress(8080), 0);// 创上下文监听, "/" 表示匹配所有 URI 请求httpServer.createContext("/", new HttpHandler() {@Overridepublic void handle(HttpExchange httpExchange) throws IOException {
//				打印请求开头的数据System.out.println("addr: " + httpExchange.getRemoteAddress() + // 客户端IP地址"; protocol: " + httpExchange.getProtocol() + // 请求协议: HTTP/1.1"; method: " + httpExchange.getRequestMethod() + // 请求方法: GET, POST 等"; URI: " + httpExchange.getRequestURI()); // 请求 URI// 获取请求头String userAgent = httpExchange.getRequestHeaders().getFirst("User-Agent");System.out.println("User-Agent: " + userAgent);// 设置响应内容
//	                byte[] respContents = "Hello World".getBytes("UTF-8");byte[] respContents = ("<?xml version=\"1.0\" encoding=\"UTF-8\"?>\r\n" + "<note>\r\n"+ "  <to>Tove</to>\r\n" + "  <from>Jani</from>\r\n" + "  <heading>Reminder</heading>\r\n"+ "  <body>Don't forget me this weekend!</body>\r\n" + "</note>").getBytes("UTF-8");// 设置响应头// 参数解释-允许跨域的各个参数
//	              https://developer.mozilla.org/zh-CN/docs/Web/HTTP/Headers/Access-Control-Request-HeadershttpExchange.getResponseHeaders().add("Access-Control-Allow-Origin", "*");httpExchange.getResponseHeaders().add("Access-Control-Allow-Headers", "*");httpExchange.getResponseHeaders().add("Access-Control-Allow-Methods", "*");
//	              允许接收各种消息头 对应前端 xhr.setRequestHeader('Content-Type', 'application/json');httpExchange.getResponseHeaders().add("Access-Control-Request-Headers", "*");httpExchange.getResponseHeaders().add("Access-Control-Expose-Headers", "*");
//	              对应前端特定消息头 xhr.setRequestHeader('Content-Type', 'application/json');httpExchange.getResponseHeaders().add("Content-Type", "text/html; charset=UTF-8");// 设置响应code和内容长度httpExchange.sendResponseHeaders(200, respContents.length);// 设置响应内容httpExchange.getResponseBody().write(respContents);//	                测试数据
//	                获取数组,把其他的body打印出来,发现是asc码byte[] receivev3 = httpExchange.getRequestBody().readAllBytes();System.out.println(Arrays.toString(receivev3));//	                字节流转字符流String utf_8 = new String(receivev3, StandardCharsets.UTF_8);System.out.println(utf_8);//				把接收到的数据传出handle,handle回復完消息就會消失,但是数据不想消失,数据还得传出去给数据库,于是就增加字符串,靠一个类实现传出
//				mydata.str = utf_8;mydata.str = new String(utf_8);//				mydata.strcpy(utf_8);// 关闭处理器httpExchange.close();//	              来源
//	              https://vimsky.com/examples/detail/java-method-com.sun.net.httpserver.HttpExchange.getResponseHeaders.html}});// 启动服务httpServer.start();
//
//		Scanner scanner = new Scanner(System.in);
//		String choose = scanner.next();
//		System.out.println(choose);
//
//		try {
//			Class.forName("com.microsoft.sqlserver.jdbc.SQLServerDriver");
//			Connection con = DriverManager.getConnection(
//					"jdbc:sqlserver://localhost:1433;DatabaseName=cyz;encrypt=true;trustServerCertificate=true", "sa",
//					"sa");
//			System.out.println("数据库链接成功\n");
//
//			Statement stmt = con.createStatement();
//
//			// ? 问号被设定为参数
//			String sql = "select * from borrow where bno=?";
//
//			PreparedStatement pst = con.prepareStatement(sql);
//			// 第一个问号替换为字符串choosepst.setString(1, choose);
//			pst.setString(1, mydata.str);
//			System.out.println(mydata.str);
//			// 执行查询
//			ResultSet rsv2 = pst.executeQuery();
//
//			while (rsv2.next()) {
//				System.out.println(rsv2.getString("bno") + "\t" + rsv2.getString("rbdate") + "\t");
//			}
//
//			System.out.println("读取完毕");
//			stmt.close();
//			con.close();
//		} catch (ClassNotFoundException e) {
//			System.out.println("驱动找不到");
//			e.printStackTrace();
//		} catch (SQLException e) {
//			System.out.println("数据库链接不成功");
//			e.printStackTrace();
//		}}
}