macOS上编译android的ffmpeg及ffmpeg.c
1 前言
前段时间介绍过使用xcode和qt creator编译调试ffmepg.c,运行平台是在macOS上,本文拟介绍下android平台如何用NDK编译链编译ffmepg库并使用。
macOS上使用qt creator编译调试ffmpeg.c
macOS上将ffmpeg.c编译成Framework
大体思路:
- 其一,分别介绍使用GCC和CLang编译器来编译ffmpeg库的方法;
- 其二,介绍如何将ffmpeg的多个.a库打包成1个so库之法;
- 其三,使用android studio新建一个native c++ Library工程,并将ffmepg库引入到工程使用;
2 下载FFmpeg源码
首先从git仓库将ffmpeg代码下载到本地:
git clone https://github.com/FFmpeg/FFmpeg.git && git checkout release/6.13 编译FFmpeg
3.1 GCC编译
编译环境:
- ffmpeg release/6.1分支
- android ndk 17.2.4988734版本,可借助android studio工具下载;
通过给编译脚本传参(aarch64/x86_64)支持arm64和x86_64架构:
#! /usr/bin/env bashset -eARG_COUNT=$#
#支持架构aarch64 x86_64
ARCH_NAME=$1
if [[ ${ARG_COUNT} -lt 1 ]]||[[ ${ARCH_NAME} != "aarch64" && ${ARCH_NAME} != "x86_64" ]]; thenecho "Usage:./build_ffmpeg_for_android.sh aarch64/x86_64"exit -1
fiNDK_ROOT=/Users/mingo/Library/Android/sdk/ndk/17.2.4988734
SYSROOT=${NDK_ROOT}/sysroot
echo "ARCH_NAME=${ARCH_NAME}"
TOOLCHAIN_ARCH=${ARCH_NAME}-linux-android
FLATFORM=${NDK_ROOT}/platforms/android-28/arch-arm64
SYSROOT_INCLUDE_PATH="-I${SYSROOT}/usr/include/${ARCH_NAME}-linux-android -isysroot ${SYSROOT}"
COMPILER_PREFIX=${ARCH_NAME}-linux-android
CURRENT_DIR=`pwd`
BUILD_OUTPUT_DIR="${CURRENT_DIR}/android/arm64"
if [ ${ARCH_NAME} == "x86_64" ]; thenTOOLCHAIN_ARCH=${ARCH_NAME}FLATFORM=${NDK_ROOT}/platforms/android-28/arch-x86_64BUILD_OUTPUT_DIR="${CURRENT_DIR}/android/x86_64"
fi
if [ ! -d ${BUILD_OUTPUT_DIR} ]; thenmkdir -p ${BUILD_OUTPUT_DIR}
fi
echo "TOOLCHAIN_RCH=${TOOLCHAIN_ARCH}"
PREBUILT=${NDK_ROOT}/toolchains/${TOOLCHAIN_ARCH}-4.9/prebuilt/darwin-x86_64/binFF_CFLAGS="-O3 -Wall -pipe -std=c11 -ffast-math -fstrict-aliasing -Werror=strict-aliasing -Wno-psabi -Wa,--noexecstack -DANDROID -DDEBUG"
FF_CXXFLAGS="-D__thumb__ -fexceptions -frtti"function build_for() {echo "start to configure ffmpeg"./configure --prefix=${BUILD_OUTPUT_DIR} \--sysroot=${FLATFORM} \--cross-prefix=${PREBUILT}/${COMPILER_PREFIX}- \--cc=${PREBUILT}/${COMPILER_PREFIX}-gcc \--enable-cross-compile --arch=${ARCH_NAME} --target-os=android \--enable-shared \--enable-pic \--disable-symver \--disable-asm \--enable-inline-asm \--disable-optimizations \--enable-debug \--disable-small \--disable-ffmpeg \--disable-ffprobe \--disable-ffplay \--disable-doc \--extra-cflags="${SYSROOT_INCLUDE_PATH} ${FFLAGS}" \--extra-cxxflags="${FF_CXXFLAGS}" \--extra-ldflags="-L${FLATFORM}/usr/lib"make cleanmake -j9make install
}build_forif [ $? -eq 0 ]; thenecho "configure ffmpeg succ"
elseecho "configure ffmpeg fail"
fi起初所用NDK版本是16.1.4479499版本,遇到编译问题:

通过将NDK版本升级到17.2.4988734解决:
 NDK的android api选择android-28:
xxxxx@localhost:~/Library/Android/sdk/ndk/17.2.4988734/platforms$tree -L 1
.
├── NOTICE
├── android-14
├── android-15
├── android-16
├── android-17
├── android-18
├── android-19
├── android-21
├── android-22
├── android-23
├── android-24
├── android-26
├── android-27
├── android-28
└── repo.prop14 directories, 2 files
将shell脚本改成如下即可:
NDK_ROOT=/Users/xxx/Library/Android/sdk/ndk/17.2.4988734FLATFORM=${NDK_ROOT}/platforms/android-28/arch-arm64--extra-ldflags="-L${FLATFORM}/usr/lib"然后执行编译安装:
sh build_for_android.sh aarch64(或x86_64)
- arm64平台编译后输出目录在ffmpeg的根目录下android/arm64目录;
- x86_64平台编译后输出目录在ffmpeg的根目录下的android/x86_64目录;
执行脚本命令之后,可编译成功:

3.2 使用ffmpeg库
CMakeLists脚本如下:
# For more information about using CMake with Android Studio, read the
# documentation: https://d.android.com/studio/projects/add-native-code.html# Sets the minimum version of CMake required to build the native library.cmake_minimum_required(VERSION 3.22.1)# Declares and names the project.project("ndkffmpeg")# Creates and names a library, sets it as either STATIC
# or SHARED, and provides the relative paths to its source code.
# You can define multiple libraries, and CMake builds them for you.
# Gradle automatically packages shared libraries with your APK.add_library( # Sets the name of the library.ndkffmpeg# Sets the library as a shared library.SHARED# Provides a relative path to your source file(s).native-lib.cpp)# Searches for a specified prebuilt library and stores the path as a
# variable. Because CMake includes system libraries in the search path by
# default, you only need to specify the name of the public NDK library
# you want to add. CMake verifies that the library exists before
# completing its build.find_library( # Sets the name of the path variable.log-lib# Specifies the name of the NDK library that# you want CMake to locate.log)# Specifies libraries CMake should link to your target library. You
# can link multiple libraries, such as libraries you define in this
# build script, prebuilt third-party libraries, or system libraries.set(FFMPEG_ROOT_DIR ${CMAKE_CURRENT_SOURCE_DIR}/../jniLibs)
set(FFMPEG_INCLUDE_DIR ${FFMPEG_ROOT_DIR}/include)
set(FFMPEG_LIB_DIR ${FFMPEG_ROOT_DIR}/${ANDROID_ABI})#导入ffmpeg相关依赖库
list(APPEND DEPENDCY_LIB_LIST avutil avformat avcodec avfilter avdevice swscale swresample)
list(APPEND DEPENDCY_LIB_LIST ffmpeg)
foreach(libname IN LISTS DEPENDCY_LIB_LIST)add_library(${libname} SHARED IMPORTED)set_target_properties( ${libname} PROPERTIES IMPORTED_LOCATION  ${FFMPEG_LIB_DIR}/lib${libname}.so)
endforeach()include_directories(${FFMPEG_INCLUDE_DIR} ${FFMPEG_ROOT_DIR}/../)
target_link_directories(ndkffmpeg PRIVATE ${FFMPEG_LIB_DIR})# 设置库文件的输出路径
set_target_properties(ndkffmpeg PROPERTIESLIBRARY_OUTPUT_DIRECTORY ${FFMPEG_LIB_DIR}ARCHIVE_OUTPUT_DIRECTORY ${FFMPEG_LIB_DIR})
target_link_libraries( # Specifies the target library.ndkffmpegavutilavformatavcodecavfilteravdeviceswresampleswscale# Links the target library to the log library# included in the NDK.${log-lib})
在编写完成CMakeLists脚本后,并且在工程目录下引入so和include文件:

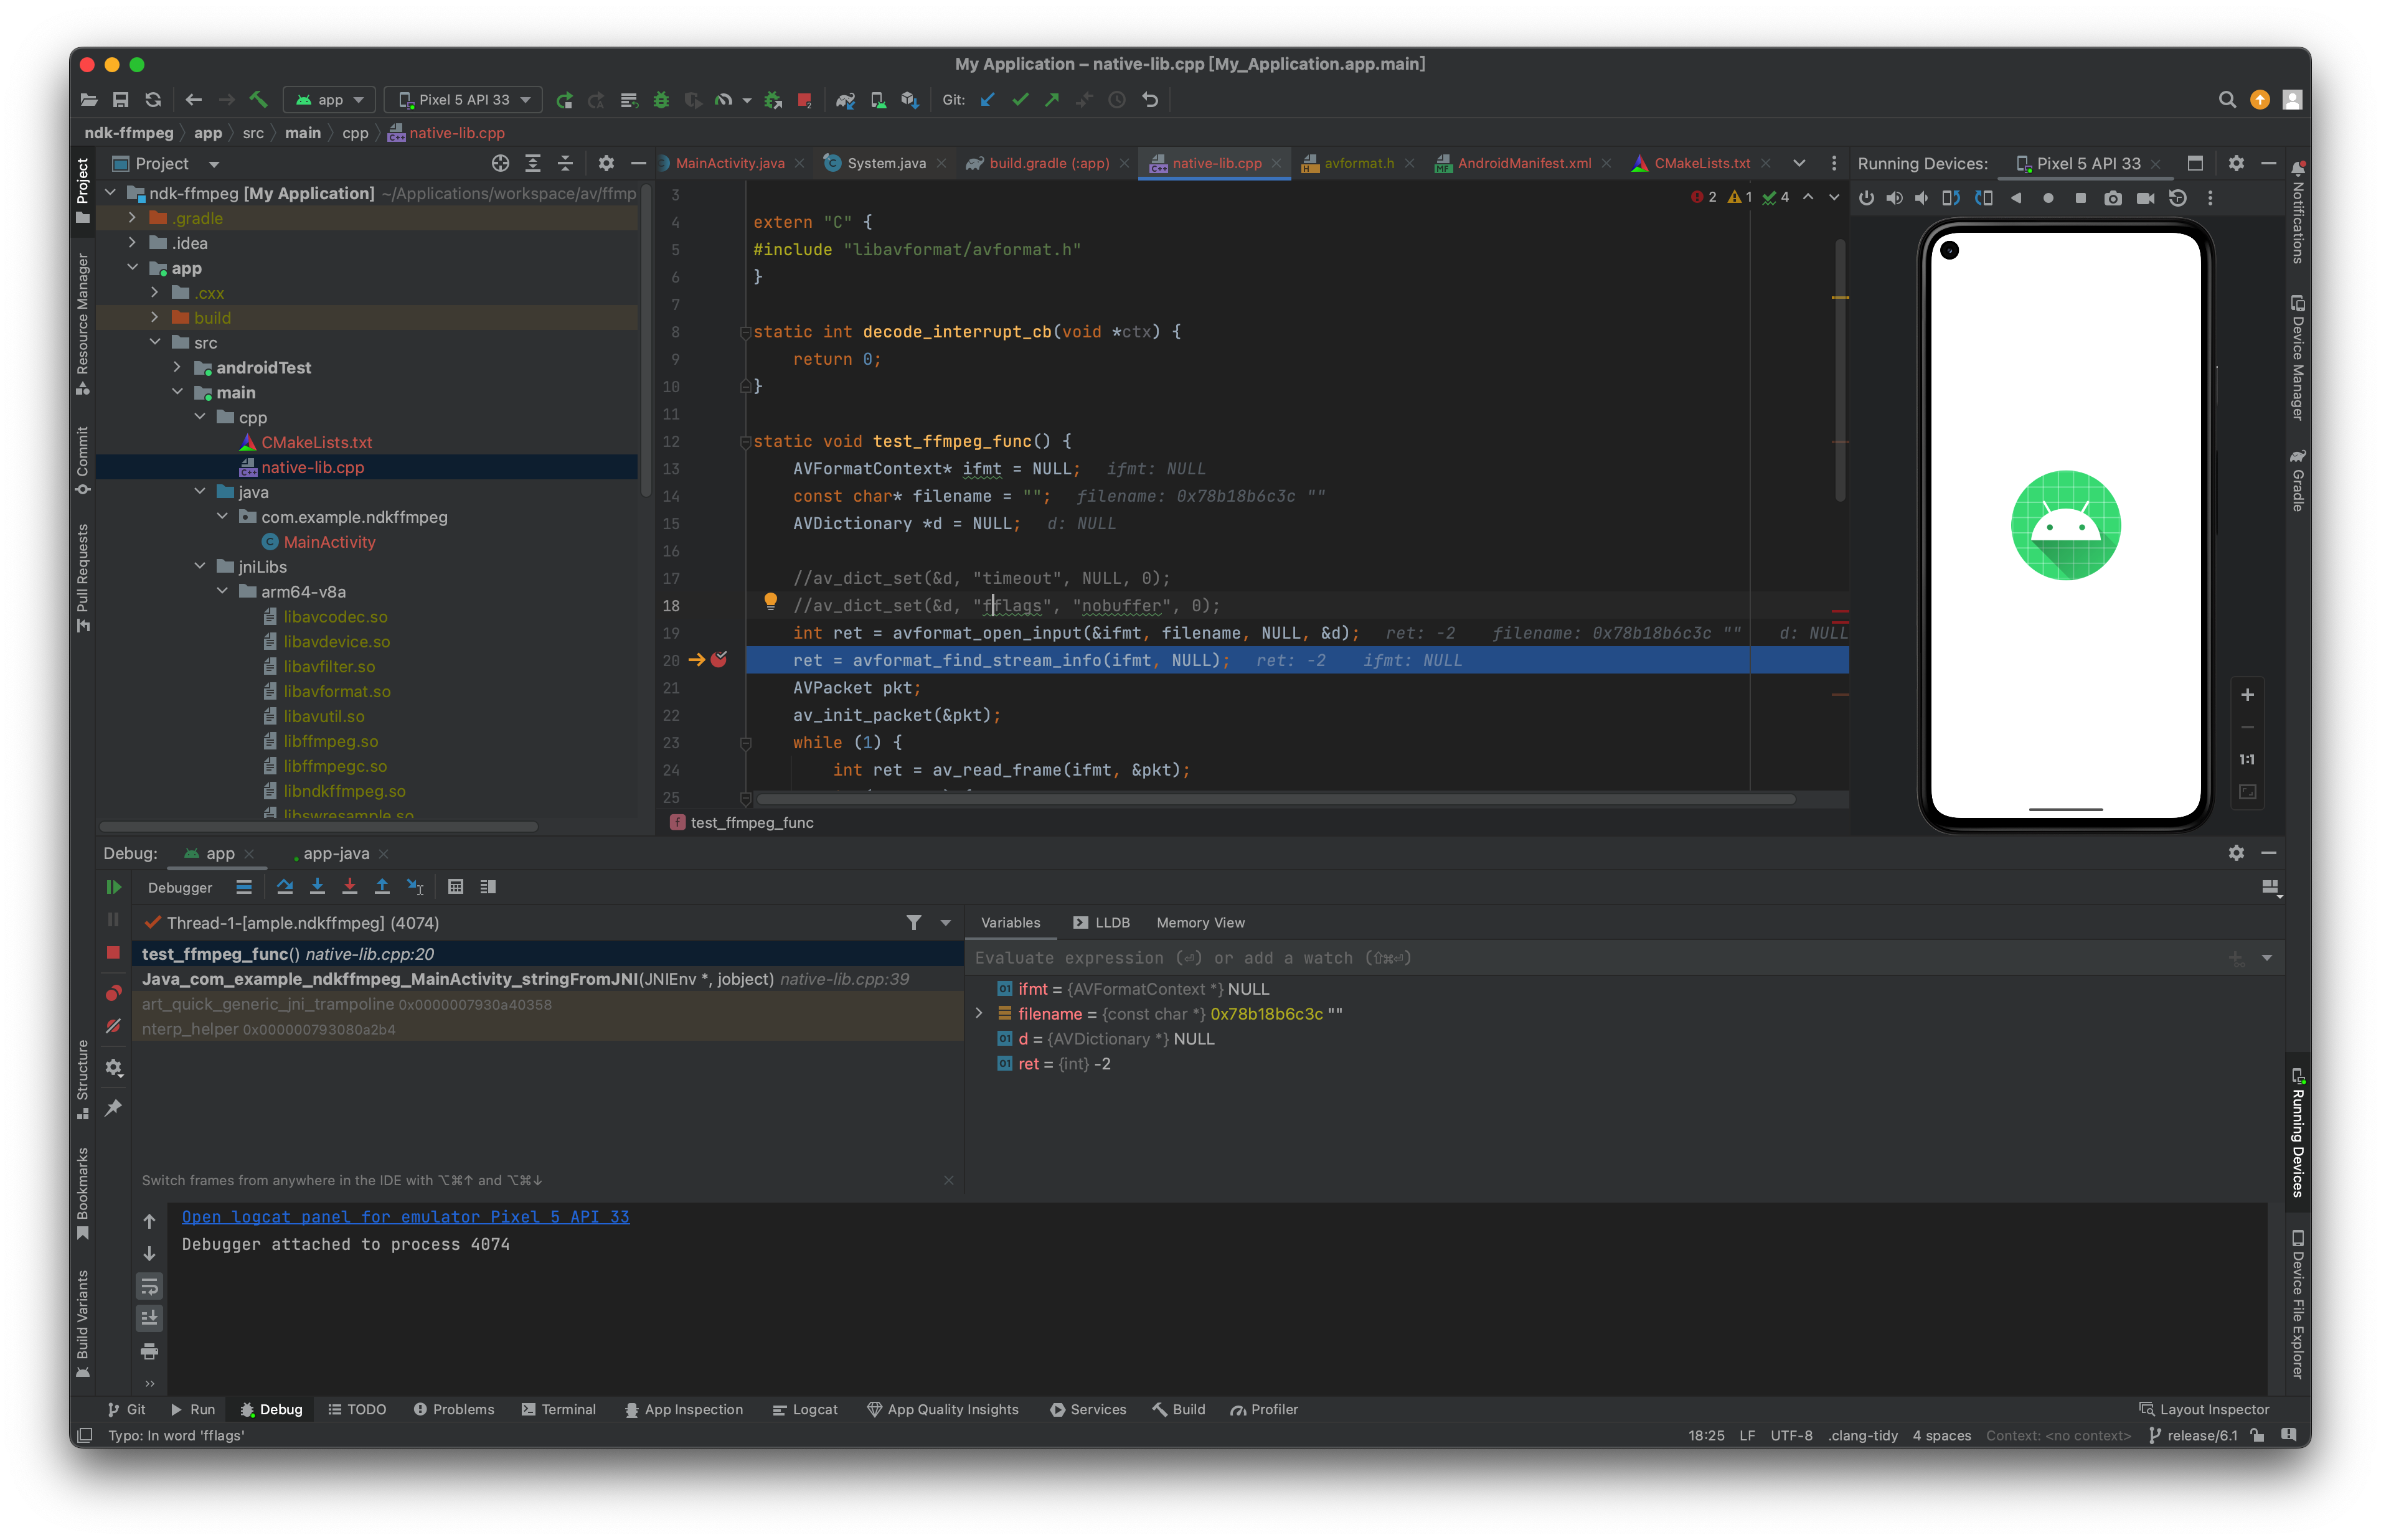
在native-lib.cpp里写一个简单的程序看看效果:
#include <jni.h>
#include <string>extern "C" {
#include "libavformat/avformat.h"
}static int decode_interrupt_cb(void *ctx) {return 0;
}static void test_ffmpeg_func() {AVFormatContext* ifmt = NULL;const char* filename = "rtmp://10.0.2.2/live/8";AVDictionary *d = NULL;//av_dict_set(&d, "timeout", NULL, 0);//av_dict_set(&d, "fflags", "nobuffer", 0);int ret = avformat_open_input(&ifmt, filename, NULL, &d);ret = avformat_find_stream_info(ifmt, NULL);AVPacket pkt;av_init_packet(&pkt);while (1) {int ret = av_read_frame(ifmt, &pkt);if (ret < 0) {av_log(NULL, AV_LOG_INFO, "error\n");}if (pkt.stream_index == AVMEDIA_TYPE_VIDEO && pkt.flags & AV_PKT_FLAG_KEY) {//av_log(NULL, AV_LOG_INFO, "keyframe\n");}}
}extern "C" JNIEXPORT jstring JNICALL
Java_com_example_ndkffmpeg_MainActivity_stringFromJNI(JNIEnv* env,jobject /* this */) {av_log_set_level(AV_LOG_DEBUG);test_ffmpeg_func();std::string hello = "Hello from C++";return env->NewStringUTF(hello.c_str());
}
调试运行效果;

可以看到,app已经成功将ffmpeg各库加载起来,并可使用了。
3.3 Clang编译
以上是GCC编译器编译ffmpeg,此处再介绍使用clang编译器来编译ffmpeg,编译环境:
- ffmpeg release/6.1版本;
- android ndk 21.3.6528147版本;
支持arm64和x86_64架构:
#! /usr/bin/env bashset -eARG_COUNT=$#
#支持架构aarch64 x86_64
ARCH_NAME=$1
if [[ ${ARG_COUNT} -lt 1 ]]||[[ ${ARCH_NAME} != "aarch64" && ${ARCH_NAME} != "x86_64" ]]; thenecho "Usage:./build_ffmpeg_for_android.sh aarch64/x86_64"exit -1
fiNDK_ROOT=/Users/mingo/Library/Android/sdk/ndk/21.3.6528147
ANDROID_VER=28
FLATFORM=${NDK_ROOT}/platforms/android-${ANDROID_VER}/arch-arm64
ENABLE_OPT="--enable-asm"
CURRENT_DIR=`pwd`
OUTPUT_DIR="${CURRENT_DIR}/android_clang/arm64"
if [ ${ARCH_NAME} == "x86_64" ]; thenFLATFORM=${NDK_ROOT}/platforms/android-${ANDROID_VER}/arch-x86_64ENABLE_OPT="--disable-asm"OUTPUT_DIR="${CURRENT_DIR}/android_clang/x86_64"
fi
if [ ! -d ${OUTPUT_DIR} ]; thenmkdir -p ${OUTPUT_DIR}
fi
PREBUILT=${NDK_ROOT}/toolchains/llvm/prebuilt/darwin-x86_64/bin
COMPILER_PREFIX=${ARCH_NAME}-linux-android
SYSROOT=${PREBUILT}/../sysrootFF_CFLAGS="-O3 -Wall -pipe -std=c11 -ffast-math -fstrict-aliasing -Werror=strict-aliasing -Wno-psabi -Wa,--noexecstack -DANDROID -DDEBUG"
FF_CXXFLAGS="-D__thumb__ -fexceptions -frtti"function build_for() {echo "start to configure ffmpeg"./configure --prefix=${OUTPUT_DIR} \--sysroot=${SYSROOT} \--cross-prefix=${PREBUILT}/${COMPILER_PREFIX}- \--cc=${PREBUILT}/${COMPILER_PREFIX}${ANDROID_VER}-clang \--cxx=${PREBUILT}/${COMPILER_PREFIX}${ANDROID_VER}-clang++ \--enable-cross-compile --arch=${ARCH_NAME} --target-os=android \--enable-shared \--enable-pic \--disable-symver \${ENABLE_OPT} \--enable-inline-asm \--disable-optimizations \--enable-debug \--disable-small \--disable-ffmpeg \--disable-ffprobe \--disable-ffplay \--disable-doc \--extra-cflags="${FFLAGS}"\--extra-cxxflags="${FF_CXXFLAGS}" \--extra-ldflags="-L${FLATFORM}/usr/lib"make cleanmake -j9make install
}build_forif [ $? -eq 0 ]; thenecho "configure ffmpeg succ"
elseecho "configure ffmpeg fail"
fi
然后,通过在命令行执行如下命令编译,编译arm64架构的:
sh build_ffmpeg_for_android_with_clang.sh aarch64编译x86_64架构的:
sh build_ffmpeg_for_android_with_clang.sh x86_64编译的输出目录在ffmpeg的目录下:
- arm64输出在ffmpeg根目录下android_clang/arm64目录;
- x86_64输出在ffmpeg的根目录下的android_clang/x86_64下;
提示:clang编译仅做介绍,后续ffmpeg.c的编译仍将使用NDK 17.2.4988734版本和GCC编译器。
3.4 多个.a库打包成1个so
- 将libavutil libavformat libavcodec libavfilter libavdevice libswsample libswscale几个.a库打包成一个so库;
- *.a => libffmpeg.so
主要思路:
- configure的时候配置只编译生成ffmpeg的static库,而放弃编译shared库;
- 用交叉编译链中的链接器将ffmpeg的相关.a库链接成1个so库;
贴出编译&打包的shell脚本:
#! /usr/bin/env bashset -eARG_COUNT=$#
#支持架构aarch64 x86_64
ARCH_NAME=$1
if [[ ${ARG_COUNT} -lt 1 ]]||[[ ${ARCH_NAME} != "aarch64" && ${ARCH_NAME} != "x86_64" ]]; thenecho "Usage:./build_ffmpeg_for_android.sh aarch64/x86_64"exit -1
fiNDK_ROOT=/Users/mingo/Library/Android/sdk/ndk/17.2.4988734
SYSROOT=${NDK_ROOT}/sysroot
echo "ARCH_NAME=${ARCH_NAME}"
TOOLCHAIN_ARCH=${ARCH_NAME}-linux-android
FLATFORM=${NDK_ROOT}/platforms/android-28/arch-arm64
echo "FLATFORM=${FLATFORM}"
SYSROOT_INCLUDE_PATH="-I${SYSROOT}/usr/include/${ARCH_NAME}-linux-android -isysroot ${SYSROOT}"
COMPILER_PREFIX=${ARCH_NAME}-linux-android
CURRENT_DIR=`pwd`
BUILD_OUTPUT_DIR="${CURRENT_DIR}/android/arm64"
if [ ${ARCH_NAME} == "x86_64" ]; thenTOOLCHAIN_ARCH=${ARCH_NAME}FLATFORM=${NDK_ROOT}/platforms/android-28/arch-x86_64BUILD_OUTPUT_DIR="${CURRENT_DIR}/android/x86_64"
fi
if [ ! -d ${BUILD_OUTPUT_DIR} ]; thenmkdir -p ${BUILD_OUTPUT_DIR}
fi
echo "TOOLCHAIN_RCH=${TOOLCHAIN_ARCH}"
PREBUILT=${NDK_ROOT}/toolchains/${TOOLCHAIN_ARCH}-4.9/prebuilt/darwin-x86_64/binFF_CFLAGS="-O3 -Wall -pipe -fpic -std=c11 -ffast-math -fstrict-aliasing -Werror=strict-aliasing -Wno-psabi -Wa,--noexecstack -DANDROID -DDEBUG"
FF_CXXFLAGS="-D__thumb__ -fexceptions -frtti"
FF_LDFLAGS="-lc -ldl -lm -lz -llog -lgcc"function build_for() {echo "start to configure ffmpeg"./configure --prefix=${BUILD_OUTPUT_DIR} \--sysroot=${FLATFORM} \--cross-prefix=${PREBUILT}/${COMPILER_PREFIX}- \--cc=${PREBUILT}/${COMPILER_PREFIX}-gcc \--enable-cross-compile --arch=${ARCH_NAME} --target-os=android \--disable-shared \--enable-static \--disable-optimizations \--enable-debug \--disable-small \--disable-ffmpeg \--disable-ffprobe \--disable-ffplay \--disable-doc \--extra-cflags="${SYSROOT_INCLUDE_PATH} ${FFLAGS}" \--extra-cxxflags="${FF_CXXFLAGS}" \--extra-ldflags="${FF_LDFLAGS} -L${FLATFORM}/usr/lib"make cleanmake -j9make install
}build_forif [ $? -eq 0 ]; thenecho "configure ffmpeg succ"
elseecho "configure ffmpeg fail"
fiGCC_PREFIX=${PREBUILT}/../lib/gcc/${COMPILER_PREFIX}/4.9.x
RPATH=${FLATFORM}/usr/lib
if [ ${ARCH_NAME} == "x86_64" ]; thenRPATH=${FLATFORM}/usr/lib64
fi
echo "RPATH=${RPATH}"
package_ffmpeg_libs() {${PREBUILT}/${COMPILER_PREFIX}-ld -L${BUILD_OUTPUT_DIR}/lib -L${GCC_PREFIX} -L${RPATH} \-rpath-link=${RPATH} -L${RPATH} -soname libffmpeg.so \-shared -nostdlib -Bsymbolic --whole-archive --no-undefined -o ${BUILD_OUTPUT_DIR}/lib/libffmpeg.so \-lavformat -lavcodec -lavfilter -lavdevice -lswresample -lswscale -lavutil -lgcc \-lcamera2ndk -lmediandk -lnativewindow \-lc -ldl -lm -lz -llog \--dynamic-linker=/system/bin/linker# 设置动态链接器,不同平台的不同,android 使用的是/system/bin/linker
}package_ffmpeg_libsif [ $? -eq 0 ]; thenecho "package ffmpeg succ"
elseecho "package ffmpeg fail"
fi
遇到1个问题:
/Users/xxx/Applications/workspace/FFmpeg/android/arm64/lib/libswscale.a(half2float.o): In function `ff_init_half2float_tables':
/Users/xxx/Applications/workspace/FFmpeg/./libavutil/half2float.c:40: multiple definition of `ff_init_half2float_tables'
/Users/xxx/Applications/workspace/FFmpeg/android/arm64/lib/libavcodec.a(half2float.o):/Users/mingo/Applications/workspace/FFmpeg/./libavutil/half2float.c:40: first defined here
问题原因:
- 上述问题的原因是libavcodec.a库和libswscale.a库均打包了half2float.o文件;
- 在将上述库最终链接打包成同一个so的时候就会出现上述重复定义问题;
解决办法:
- 打开libswscale/Makefile文件,将half2float.o文件去掉,libswscale不打包该文件,只让libavcodec打包该文件;

打包后的libffmpeg.so输出在以下目录,成功将ffmpeg相关.a库打包成libffmpeg.so库:
mingo@localhost:~/Applications/workspace/FFmpeg/android$tree -L 3
.
└── arm64├── include│   ├── libavcodec│   ├── libavdevice│   ├── libavfilter│   ├── libavformat│   ├── libavutil│   ├── libswresample│   └── libswscale├── lib│   ├── libavcodec.a│   ├── libavdevice.a│   ├── libavfilter.a│   ├── libavformat.a│   ├── libavutil.a│   ├── libffmpeg.so│   ├── libswresample.a│   ├── libswscale.a│   └── pkgconfig└── share└── ffmpeg14 directories, 8 files
4 使用libffmpeg.so
使用android studio新建一个native c++ Library工程:
- 在main目录下新建jniLibs目录,将libffmpeg.so库放到arm64-v8a子目录下;
- ffmpeg相关头文件放到jniLibs目录下的include子目录下;

在app的build.gradle文件下增加abiFilters:
android {namespace 'com.example.ndkffmpeg'compileSdk 33defaultConfig {applicationId "com.example.ndkffmpeg"minSdk 24targetSdk 33versionCode 1versionName "1.0"testInstrumentationRunner "androidx.test.runner.AndroidJUnitRunner"ndk {// 其他x86_64按此添加,逗号分割abiFilters 'arm64-v8a'}externalNativeBuild {cmake {cppFlags '-std=c++11'}}}
}
贴出所写CMakeLists脚本:
# For more information about using CMake with Android Studio, read the
# documentation: https://d.android.com/studio/projects/add-native-code.html# Sets the minimum version of CMake required to build the native library.cmake_minimum_required(VERSION 3.22.1)# Declares and names the project.project("ndkffmpeg")# Creates and names a library, sets it as either STATIC
# or SHARED, and provides the relative paths to its source code.
# You can define multiple libraries, and CMake builds them for you.
# Gradle automatically packages shared libraries with your APK.add_library( # Sets the name of the library.ndkffmpeg# Sets the library as a shared library.SHARED# Provides a relative path to your source file(s).native-lib.cpp)# Searches for a specified prebuilt library and stores the path as a
# variable. Because CMake includes system libraries in the search path by
# default, you only need to specify the name of the public NDK library
# you want to add. CMake verifies that the library exists before
# completing its build.find_library( # Sets the name of the path variable.log-lib# Specifies the name of the NDK library that# you want CMake to locate.log)# Specifies libraries CMake should link to your target library. You
# can link multiple libraries, such as libraries you define in this
# build script, prebuilt third-party libraries, or system libraries.set(FFMPEG_ROOT_DIR ${CMAKE_CURRENT_SOURCE_DIR}/../jniLibs)
set(FFMPEG_INCLUDE_DIR ${FFMPEG_ROOT_DIR}/include)
set(FFMPEG_LIB_DIR ${FFMPEG_ROOT_DIR}/${ANDROID_ABI})include_directories(${FFMPEG_INCLUDE_DIR} ${FFMPEG_ROOT_DIR}/../)
target_link_directories(ndkffmpeg PRIVATE ${FFMPEG_LIB_DIR})# 设置库文件的输出路径
set_target_properties(ndkffmpeg PROPERTIESLIBRARY_OUTPUT_DIRECTORY ${FFMPEG_LIB_DIR}ARCHIVE_OUTPUT_DIRECTORY ${FFMPEG_LIB_DIR})
target_link_libraries( # Specifies the target library.ndkffmpegffmpeg# Links the target library to the log library# included in the NDK.${log-lib})
在AndroidManifest.xml文件中请求网络访问权限:
<?xml version="1.0" encoding="utf-8"?>
<manifest xmlns:android="http://schemas.android.com/apk/res/android"xmlns:tools="http://schemas.android.com/tools"><uses-permission android:name="android.permission.WRITE_EXTERNAL_STORAGE"/><uses-permission android:name="android.permission.ACCESS_NETWORK_STATE" /><uses-permission android:name="android.permission.READ_PHONE_STATE" /><uses-permission android:name="android.permission.INTERNET" /><uses-permission android:name="android.permission.ACCESS_WIFI_STATE" /><applicationandroid:allowBackup="true"android:dataExtractionRules="@xml/data_extraction_rules"android:fullBackupContent="@xml/backup_rules"android:icon="@mipmap/ic_launcher"android:label="@string/app_name"android:roundIcon="@mipmap/ic_launcher_round"android:supportsRtl="true"android:theme="@style/Theme.MyApplication"tools:targetApi="31"><activityandroid:name=".MainActivity"android:exported="true"><intent-filter><action android:name="android.intent.action.MAIN" /><category android:name="android.intent.category.LAUNCHER" /></intent-filter></activity></application></manifest>
native-lib.cpp代码贴出:
#include <jni.h>
#include <string>extern "C" {
#include "libavformat/avformat.h"
}static int decode_interrupt_cb(void *ctx) {return 0;
}static void test_ffmpeg_func() {AVFormatContext* ifmt = NULL;const char* filename = "rtmp://10.0.2.2/live/8";AVDictionary *d = NULL;//av_dict_set(&d, "timeout", NULL, 0);//av_dict_set(&d, "fflags", "nobuffer", 0);int ret = avformat_open_input(&ifmt, filename, NULL, &d);ret = avformat_find_stream_info(ifmt, NULL);AVPacket pkt;av_init_packet(&pkt);while (1) {int ret = av_read_frame(ifmt, &pkt);if (ret < 0) {av_log(NULL, AV_LOG_INFO, "error\n");}if (pkt.stream_index == AVMEDIA_TYPE_VIDEO && pkt.flags & AV_PKT_FLAG_KEY) {//av_log(NULL, AV_LOG_INFO, "keyframe\n");}}
}extern "C" JNIEXPORT jstring JNICALL
Java_com_example_ndkffmpeg_MainActivity_stringFromJNI(JNIEnv* env,jobject /* this */) {av_log_set_level(AV_LOG_DEBUG);test_ffmpeg_func();std::string hello = "Hello from C++";return env->NewStringUTF(hello.c_str());
}
输入正确的filename地址即调试运行:
5 编译ffmpeg.c为so
编译环境如下:
- ffmpeg release/6.1
- NDK 17.2.4988734;
首先进入到ffmpeg源码目录下的fftools子目录,即为编译ffmpeg命令行程序的工作目录:
xxx@localhost:~/Applications/workspace/FFmpeg/fftools$tree -L 1
.
├── Makefile
├── build_ffmpeg_for_android.sh
├── cmdutils.c
├── cmdutils.h
├── ffmpeg.c
├── ffmpeg.h
├── ffmpeg_dec.c
├── ffmpeg_demux.c
├── ffmpeg_enc.c
├── ffmpeg_filter.c
├── ffmpeg_hw.c
├── ffmpeg_mux.c
├── ffmpeg_mux.h
├── ffmpeg_mux_init.c
├── ffmpeg_opt.c
├── ffplay.c
├── ffprobe.c
├── fftools.manifest
├── fftoolsres.rc
├── fopen_utf8.h
├── objpool.c
├── objpool.h
├── opt_common.c
├── opt_common.h
├── sync_queue.c
├── sync_queue.h
├── thread_queue.c
└── thread_queue.h1 directory, 28 files
5.1 改写ffmpeg接口名
将ffmpeg命令行程序的main方法名改写为ffmpeg名。头文件和.c文件都需要修改:
int ffmpeg(int argc, char* argv[])5.1 工作目录
在此列出主要工作目录和fftools目录结构及输出目录接口,其他目录结构忽略掉:
├── CONTRIBUTING.md
├── COPYING.GPLv2
├── COPYING.GPLv3
├── COPYING.LGPLv2.1
├── COPYING.LGPLv3
├── CREDITS
├── Changelog
├── INSTALL.md
├── LICENSE.md
├── MAINTAINERS
├── Makefile
├── README.md
├── RELEASE
├── RELEASE_NOTES
├── android_arm64_output
│   ├── include
│   ├── lib
│   └── share
├── android_x86_64_output
│   ├── include
│   ├── lib
│   └── share
├── build_ffmpeg_for_android.sh
├── build_ffmpeg_for_android_with_clang.sh
├── config.h
├── config_components.h
├── configure
├── fftools
│   ├── Makefile
│   ├── build_ffmpeg_for_android.sh
│   ├── cmdutils.c
│   ├── cmdutils.h
│   ├── ffmpeg.c
│   ├── ffmpeg.h
│   ├── ffmpeg_dec.c
│   ├── ffmpeg_demux.c
│   ├── ffmpeg_enc.c
│   ├── ffmpeg_filter.c
│   ├── ffmpeg_hw.c
│   ├── ffmpeg_mux.c
│   ├── ffmpeg_mux.h
│   ├── ffmpeg_mux_init.c
│   ├── ffmpeg_opt.c
│   ├── ffplay.c
│   ├── ffprobe.c
│   ├── fftools.manifest
│   ├── fftoolsres.rc
│   ├── fopen_utf8.h
│   ├── objpool.c
│   ├── objpool.h
│   ├── opt_common.c
│   ├── opt_common.h
│   ├── sync_queue.c
│   ├── sync_queue.h
│   ├── thread_queue.c
│   └── thread_queue.h
5.2 GCC编译
编写shell脚本,放在fftools目录下,使用GCC编译ffmepg命令行程序为so库,脚本如下,支持arm64和x86_64架构:
#! /usr/bin/env bashset -eARG_COUNT=$#
#支持架构aarch64 x86_64
ARCH_NAME=$1
if [[ ${ARG_COUNT} -lt 1 ]]||[[ ${ARCH_NAME} != "aarch64" && ${ARCH_NAME} != "x86_64" ]]; thenecho "Usage:./build_ffmpeg_for_android.sh aarch64/x86_64"exit -1
fi
echo "ARCH_NAME=${ARCH_NAME}"NDK_ROOT=/Users/mingo/Library/Android/sdk/ndk/17.2.4988734
SYSROOT=${NDK_ROOT}/sysroot
TOOLCHAIN_ARCH=${ARCH_NAME}-linux-android
FLATFORM=${NDK_ROOT}/platforms/android-28/arch-arm64
SYSROOT_INCLUDE_PATH="${SYSROOT}/usr/include/${ARCH_NAME}-linux-android -isysroot ${SYSROOT}"
COMPILER_PREFIX=${ARCH_NAME}-linux-android
CURRENT_DIR=`pwd`
BUILD_OUTPUT_DIR="${CURRENT_DIR}/../android/arm64"
if [ ${ARCH_NAME} == "x86_64" ]; thenTOOLCHAIN_ARCH=${ARCH_NAME}FLATFORM=${NDK_ROOT}/platforms/android-28/arch-x86_64BUILD_OUTPUT_DIR="${CURRENT_DIR}/../android/x86_64"
fi
echo "BUILD_OUTPUT_DIR=${BUILD_OUTPUT_DIR}"
if [ ! -d ${BUILD_OUTPUT_DIR} ]; thenmkdir -p ${BUILD_OUTPUT_DIR}
fi
echo "TOOLCHAIN_RCH=${TOOLCHAIN_ARCH}"
PREBUILT=${NDK_ROOT}/toolchains/${TOOLCHAIN_ARCH}-4.9/prebuilt/darwin-x86_64/binFF_CFLAGS="-O3 -Wall -fpic -pipe -std=c11 -ffast-math -fstrict-aliasing -Werror=strict-aliasing -Wno-psabi -Wa,--noexecstack -Wpointer-sign -Wparentheses -DANDROID -DDEBUG"
FF_CXXFLAGS="-D__thumb__ -fexceptions -frtti"CC=${PREBUILT}/${COMPILER_PREFIX}-gcc
FFMPEG_ROOT_DIR=${BUILD_OUTPUT_DIR}
FFMPEG_INCLUDE_DIR=${FFMPEG_ROOT_DIR}/include
FFMPEG_LIB_DIR=${FFMPEG_ROOT_DIR}/lib
CONFIG_H_DIR=${CURRENT_DIR}/../
FFMPEG_LIBS="-lavutil -lavformat -lavcodec -lavfilter -lavdevice -lswresample -lswscale"
ANDROID_MEDIA_LIBS="-lcamera2ndk -lmediandk"function build_for() {echo "compile ffmpeg..."FFMPEG_SRC="cmdutils.c ffmpeg_dec.c ffmpeg_demux.c ffmpeg_enc.c ffmpeg_filter.c \ffmpeg_hw.c ffmpeg_mux_init.c ffmpeg_mux.c ffmpeg_opt.c ffmpeg.c \objpool.c opt_common.c \sync_queue.c thread_queue.c"${CC} --sysroot=${FLATFORM} ${FF_CFLAGS} -shared ${FFMPEG_SRC} -o ${FFMPEG_LIB_DIR}/libffmpegc.so \-I${FFMPEG_INCLUDE_DIR} -I${CONFIG_H_DIR} -I${SYSROOT_INCLUDE_PATH} \-L${FFMPEG_LIB_DIR} -L${PLATFORM}/usr/lib \${FFMPEG_LIBS} ${ANDROID_MEDIA_LIBS}
}build_forif [ $? -eq 0 ]; thenecho "compile ffmpegc succ"
elseecho "compile ffmpegc fail"
fi
按照以上脚本编译,可顺利完成arm64和x86_64的编译工作。最后的输出目录在:
- arm64和_x8664平台输出均与对应平台ffmpeg库路径一致;
提示:此处编译ffmpeg.c为so的时候,需要静态链接ffmpeg的各.a库。
然后,使用工具可以看到libffmpegc.so相关so的依赖库信息:
Dynamic section at offset 0x1c62808 contains 28 entries:Tag Type Name/Value0x0000000000000001 (NEEDED) Shared library: [libcamera2ndk.so]0x0000000000000001 (NEEDED) Shared library: [libmediandk.so]0x0000000000000001 (NEEDED) Shared library: [libc.so]0x0000000000000001 (NEEDED) Shared library: [libdl.so]0x0000000000000001 (NEEDED) Shared library: [libm.so]0x0000000000000001 (NEEDED) Shared library: [libz.so]0x0000000000000001 (NEEDED) Shared library: [liblog.so]0x000000000000001a (FINI_ARRAY) 0x1b703780x000000000000001c (FINI_ARRAYSZ) 8 (bytes)0x0000000000000004 (HASH) 0x1c80x0000000000000005 (STRTAB) 0x323100x0000000000000006 (SYMTAB) 0xab300x000000000000000a (STRSZ) 137735 (bytes)0x000000000000000b (SYMENT) 24 (bytes)0x0000000000000003 (PLTGOT) 0x1c72a080x0000000000000002 (PLTRELSZ) 73680 (bytes)0x0000000000000014 (PLTREL) RELA0x0000000000000017 (JMPREL) 0x163c500x0000000000000007 (RELA) 0x572100x0000000000000008 (RELASZ) 1100352 (bytes)0x0000000000000009 (RELAENT) 24 (bytes)0x0000000000000018 (BIND_NOW)0x000000006ffffffb (FLAGS_1) Flags: NOW0x000000006ffffffe (VERNEED) 0x571c00x000000006fffffff (VERNEEDNUM) 20x000000006ffffff0 (VERSYM) 0x53d180x000000006ffffff9 (RELACOUNT) 403180x0000000000000000 (NULL) 0x0所用工具及其执行命令如下:
~/Library/Android/sdk/ndk/21.3.6528147/toolchains/aarch64-linux-android-4.9/prebuilt/darwin-x86_64/bin/aarch64-linux-android-readelf libffmpegc.so -d