深度解析Spring Boot自动装配原理
废话不多说了,直接来看源码。
源码解析
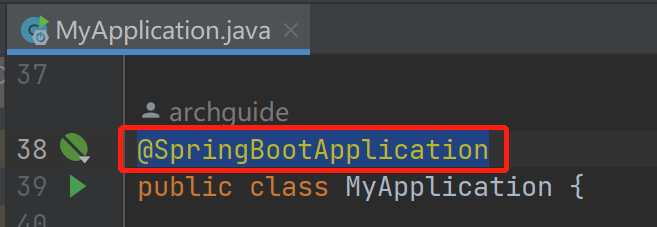
@SpringBootApplication
我们在使用idea创建好Spring Boot项目时,会发现在启动类上添加了@SpringBootApplication注解,这个注解就是Spring Boot的核心所在。
点击注解可以查看到到它的实现
ementType.TYPE)
@Retention(RetentionPolicy.RUNTIME)
@Documented
@Inherited
@SpringBootConfiguration
@EnableAutoConfiguration
@ComponentScan(excludeFilters = { @Filter(type = FilterType.CUSTOM, classes = TypeExcludeFilter.class),@Filter(type = FilterType.CUSTOM, classes = AutoConfigurationExcludeFilter.class) })
// AutoConfigurationExcludeFilter的作用是扫描到的配置类名字如果在自动配置类名集合中,就不解析
public @interface SpringBootApplication {
@Target(ElementType.TYPE) 设置当前注解可以标记在哪里
@Retention(RetentionPolicy.RUNTIME) 当注解标注的类编译以什么方式保留
@Documented java doc 会生成注解信息
@Inherited 是否会被继承
上面这几个注解并没有什么特别的。下面三个才是重点。我们可以看到@SpringBootApplication = @SpringBootConfiguration + @EnableAutoConfiguration + @ComponentScan
在实际使用中我们也可以使用这三个注解替换@SpringBootApplication,效果是一样的
@SpringBootConfiguration
@EnableAutoConfiguration
@ComponentScan(excludeFilters = { @ComponentScan.Filter(type = FilterType.CUSTOM, classes = TypeExcludeFilter.class),@ComponentScan.Filter(type = FilterType.CUSTOM, classes = AutoConfigurationExcludeFilter.class) })
public class MyApplication {
我们重点来关注下下面的三个注解。
@SpringBootConfiguration
@Target(ElementType.TYPE)
@Retention(RetentionPolicy.RUNTIME)
@Documented
@Configuration
@Indexed
public @interface SpringBootConfiguration {
这个注解用来标记当前类是一个SpringBoot的配置类,其本质就是一个@Configuration注解。也没有什么值得多说的。
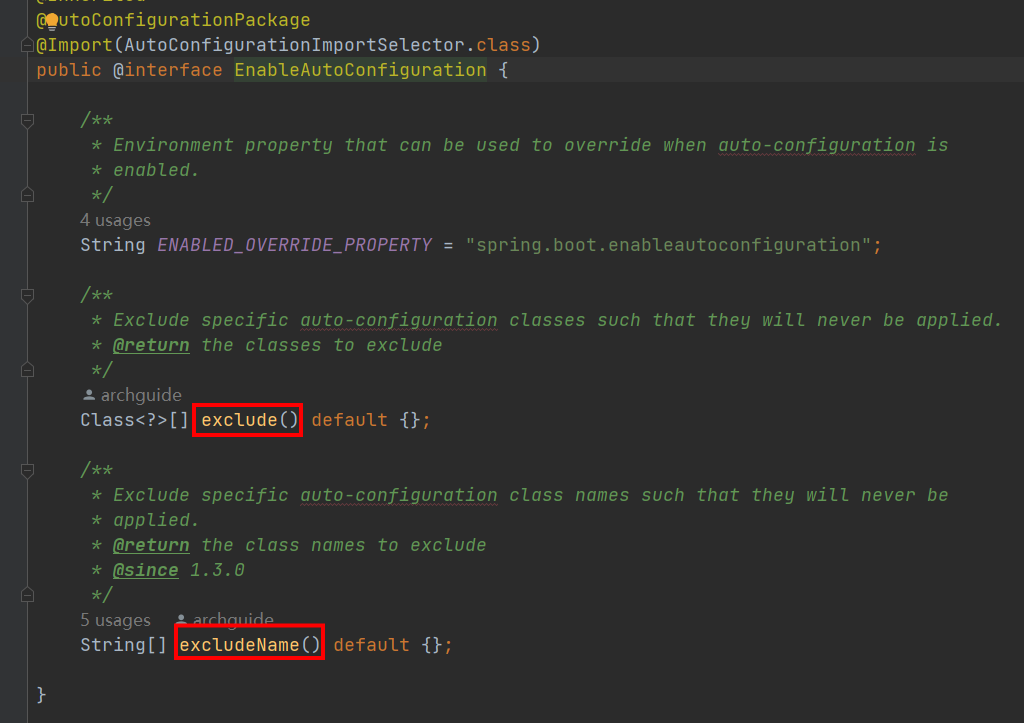
@EnableAutoConfiguration
这个注解才是重中之重,真正的自动装配的灵魂所在。从名字就可以看出这个注解负责开启自动装配,我们来详细看下。
@AutoConfigurationPackage
@Import(AutoConfigurationImportSelector.class)
public @interface EnableAutoConfiguration {
我们先来看下需要重点关注的@Import(AutoConfigurationImportSelector.class)
AutoConfigurationImportSelector
通过@Import注解引入的类同样会被当成配置类解析,这是spring的知识,这里就不说了。我们通过@Import注解引入了AutoConfigurationImportSelector,并且AutoConfigurationImportSelector实现了DeferredImportSelector。所以在启动时会调用到selectImports方法(有误,先简单理解后面会解释)。然后又会调用到getAutoConfigurationEntry。这个方法会负责自动装配。
调用链路:
@SpringBootApplication
-->@EnableAutoConfiguration
-->@Import(AutoConfigurationImportSelector.class)
-->org.springframework.boot.autoconfigure.AutoConfigurationImportSelector#selectImports
-->org.springframework.boot.autoconfigure.AutoConfigurationImportSelector#getAutoConfigurationEntry
来先看一下源码
protected AutoConfigurationEntry getAutoConfigurationEntry(AnnotationMetadata annotationMetadata) {if (!isEnabled(annotationMetadata)) {return EMPTY_ENTRY;}// 获取@EnableAutoConfiguration的属性AnnotationAttributes attributes = getAttributes(annotationMetadata);// 获取spring.factories中所有的AutoConfigurationList<String> configurations = getCandidateConfigurations(annotationMetadata, attributes);// 去重(也就是按类名去重)configurations = removeDuplicates(configurations);// 获取需要排除的AutoConfiguration,可以通过@EnableAutoConfiguration注解的exclude属性,或者spring.autoconfigure.exclude来配置Set<String> exclusions = getExclusions(annotationMetadata, attributes);// 排除checkExcludedClasses(configurations, exclusions);configurations.removeAll(exclusions);// 获取spring.factories中的AutoConfigurationImportFilter对AutoConfiguration进行过滤// 默认会拿到OnBeanCondition、OnClassCondition、OnWebApplicationCondition// 这三个会去判断上面的AutoConfiguration是否符合它们自身所要求的条件,不符合的会过滤掉,表示不会进行解析了// 会利用spring-autoconfigure-metadata.properties中的配置来进行过滤// spring-autoconfigure-metadata.properties文件中的内容是利用Java中的AbstractProcessor技术在编译时生成出来的configurations = getConfigurationClassFilter().filter(configurations);// configurations表示合格的,exclusions表示被排除的,把它们记录在ConditionEvaluationReportAutoConfigurationImportListener中fireAutoConfigurationImportEvents(configurations, exclusions);// 最后返回的AutoConfiguration都是符合条件的return new AutoConfigurationEntry(configurations, exclusions);
}
※自动装配的核心流程
获取
获取@EnableAutoConfiguration的属性
AnnotationAttributes attributes = getAttributes(annotationMetadata);getAttributes的主要作用是获取配置类上添加的@EnableAutoConfiguration注解,并对注解进行解析。如果没有添加@EnableAutoConfiguration则不开启自动配置。
protected AnnotationAttributes getAttributes(AnnotationMetadata metadata) {String name = getAnnotationClass().getName();  //EnableAutoConfiguration.class//解析注解,获取对应的属性值AnnotationAttributes attributes = AnnotationAttributes.fromMap(metadata.getAnnotationAttributes(name, true));//判断当前配置类上是否添加了@EnableAutoConfiguration注解,如果没有添加则不开启自动配置Assert.notNull(attributes, () -> "No auto-configuration attributes found. Is " + metadata.getClassName()+ " annotated with " + ClassUtils.getShortName(name) + "?");return attributes;
}
第4行会对注解进行解析@EnableAutoConfiguration注解可以配置排除自动解析的类,这个配置的作用后面会详细说明。
获取spring.factories中所有的AutoConfiguration
List<String> configurations = getCandidateConfigurations(annotationMetadata, attributes);getCandidateConfigurations
-->SpringFactoriesLoader.loadFactoryNames
-->loadSpringFactories
private static Map<String, List<String>> loadSpringFactories(ClassLoader classLoader) {Map<String, List<String>> result = cache.get(classLoader);if (result != null) {return result;}result = new HashMap<>();try {//FACTORIES_RESOURCE_LOCATION = "META-INF/spring.factories";Enumeration<URL> urls = classLoader.getResources(FACTORIES_RESOURCE_LOCATION);while (urls.hasMoreElements()) {URL url = urls.nextElement();UrlResource resource = new UrlResource(url);Properties properties = PropertiesLoaderUtils.loadProperties(resource);for (Map.Entry<?, ?> entry : properties.entrySet()) {String factoryTypeName = ((String) entry.getKey()).trim();String[] factoryImplementationNames =StringUtils.commaDelimitedListToStringArray((String) entry.getValue());for (String factoryImplementationName : factoryImplementationNames) {result.computeIfAbsent(factoryTypeName, key -> new ArrayList<>()).add(factoryImplementationName.trim());}}}// Replace all lists with unmodifiable lists containing unique elementsresult.replaceAll((factoryType, implementations) -> implementations.stream().distinct().collect(Collectors.collectingAndThen(Collectors.toList(), Collections::unmodifiableList)));cache.put(classLoader, result);}catch (IOException ex) {throw new IllegalArgumentException("Unable to load factories from location [" +FACTORIES_RESOURCE_LOCATION + "]", ex);}return result;
}这个方法就是SPI机制了。10行会去查找所有jar包中配置的META-INF/spring.factories。spring.factories中是以文本形式存在的key,value结构。(这里除了EnableAutoConfiguration还有其他的key,value)
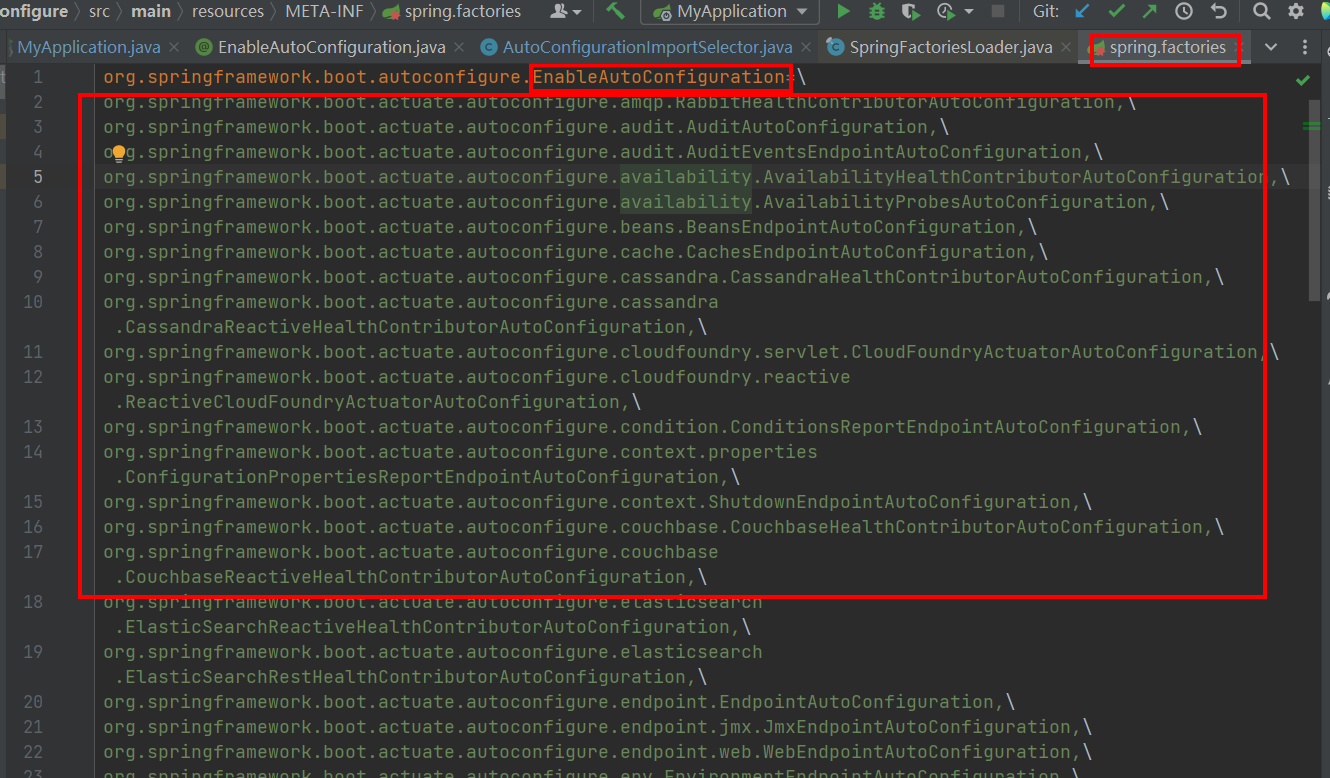
然后下面的代码会对文件进行解析,放到result中返回,放加入到cache。result就是一个Map<String, List>。
返回到org.springframework.core.io.support.SpringFactoriesLoader#loadFactoryNames

这一行的factoryTypeName就是“org.springframework.boot.autoconfigure.EnableAutoConfiguration”,所以这里会根据key取出EnableAutoConfiguration对应的所有需要自动装配的类,返回List。返回的内容就是spring.factories中配置的下面的部分。
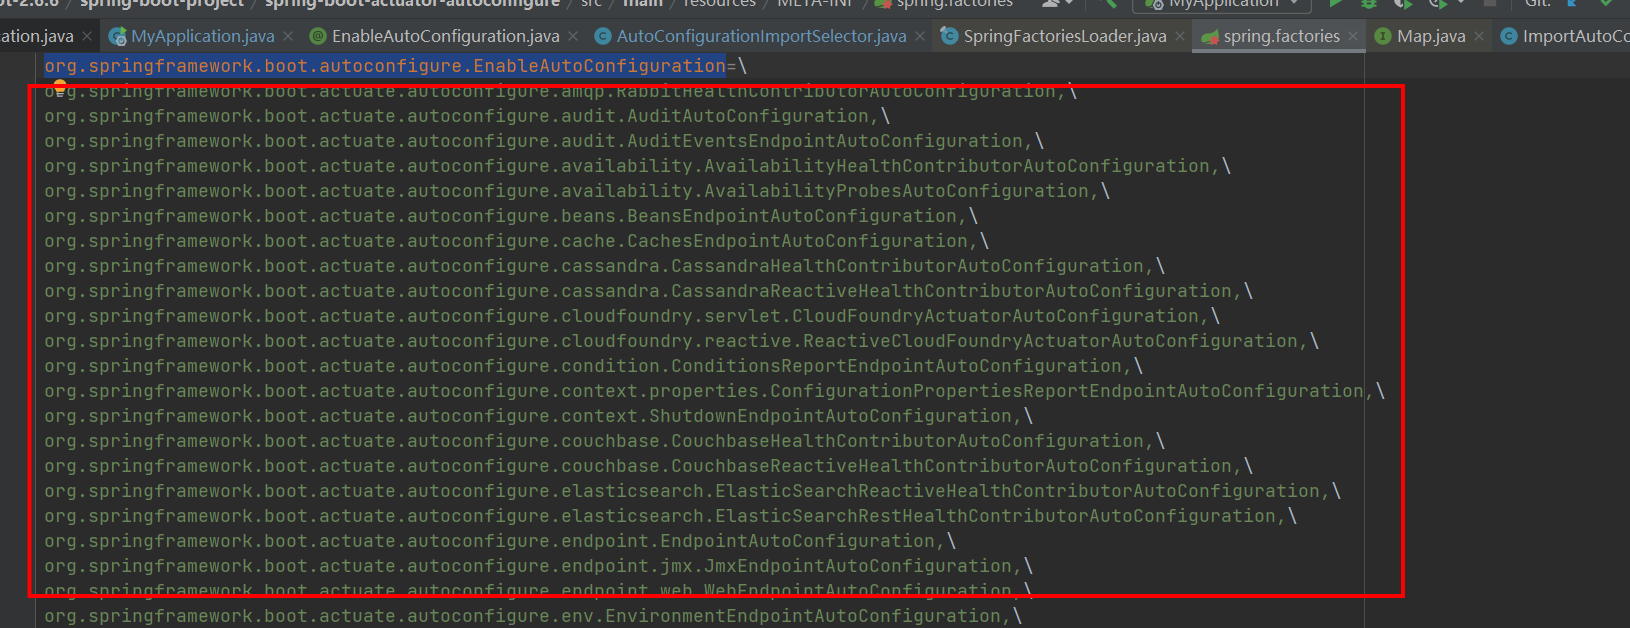
这样获取到了所有需要自动配置的类。如果自己去实现了starter。也可以遵守spi的规则,在自己的项目里添加META-INF/spring.factories。
去重
按类名去重
configurations = removeDuplicates(configurations);去重很简单,放到set里就可以了
protected final <T> List<T> removeDuplicates(List<T> list) {return new ArrayList<>(new LinkedHashSet<>(list));
}
排除
// 获取需要排除的AutoConfiguration,可以通过@EnableAutoConfiguration注解的exclude属性,或者spring.autoconfigure.exclude来配置
Set<String> exclusions = getExclusions(annotationMetadata, attributes);
// 排除
checkExcludedClasses(configurations, exclusions);
configurations.removeAll(exclusions);
getExclusions会从两个地方获取需要排除的类,一个是@EnableAutoConfiguration注解的exclude属性,另一个是spring.factories中配置的spring.autoconfigure.exclude

PROPERTY_NAME_AUTOCONFIGURE_EXCLUDE = "spring.autoconfigure.exclude";
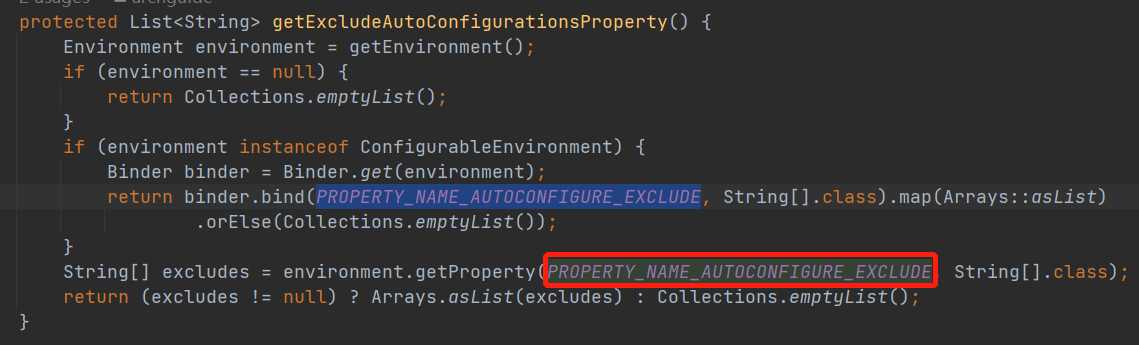
这里比较严谨,在checkExcludedClasses 中会判断如果程序员自己指定要排除的类并不存在,是会报错的。
最后通过configurations.removeAll(exclusions);移除了程序员指定要移除的类,不进行自动装配。
过滤
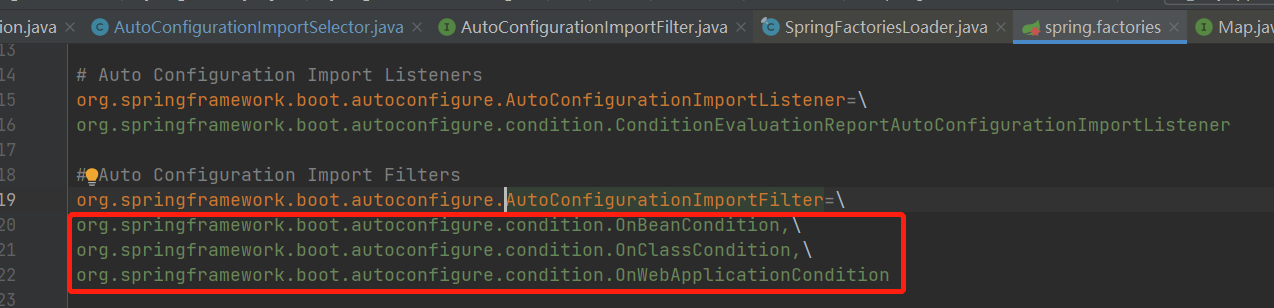
// 获取spring.factories中的AutoConfigurationImportFilter对AutoConfiguration进行过滤
// 默认会拿到OnBeanCondition、OnClassCondition、OnWebApplicationCondition
// 这三个会去判断上面的AutoConfiguration是否符合它们自身所要求的条件,不符合的会过滤掉,表示不会进行解析了
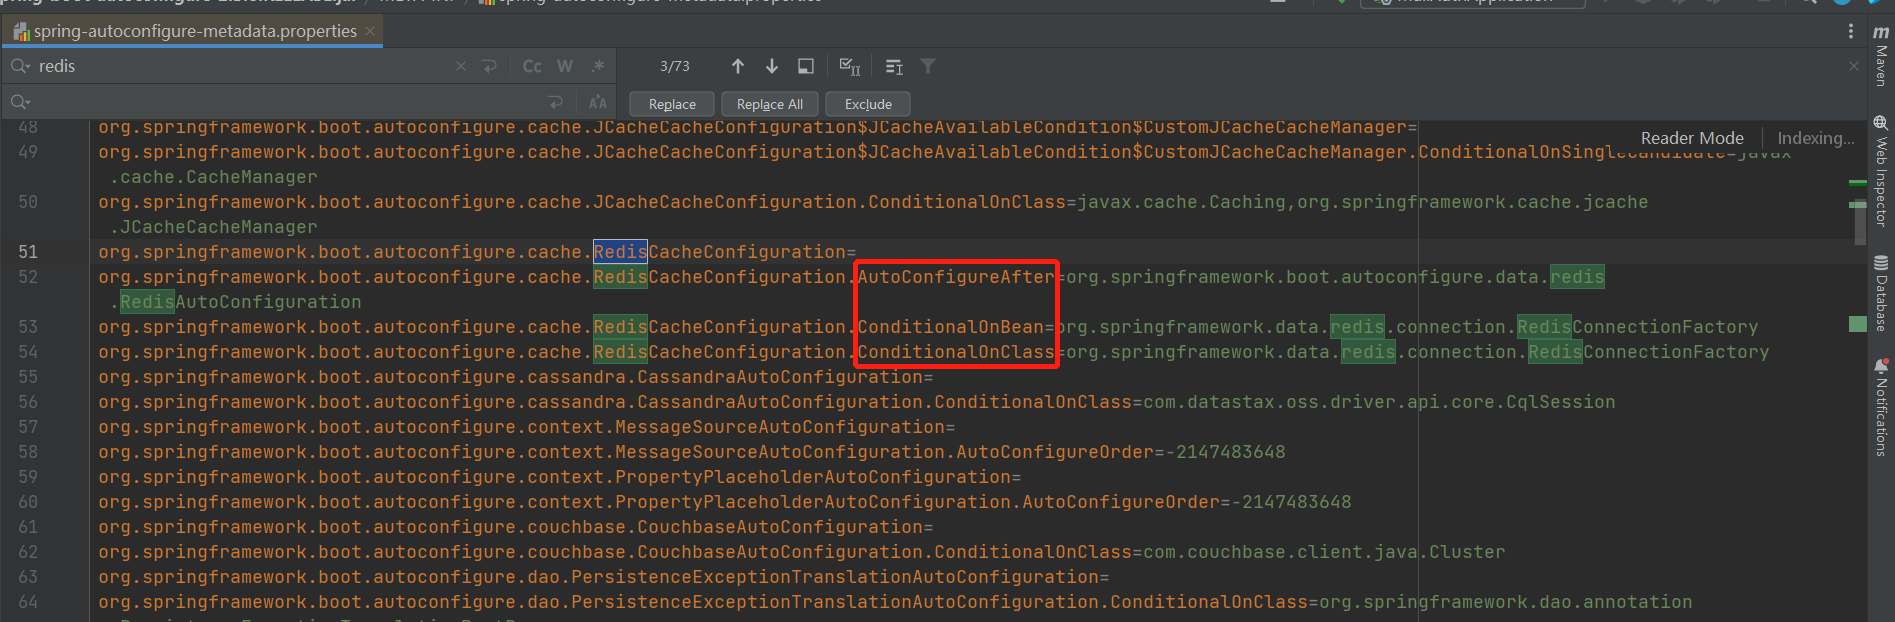
// 会利用spring-autoconfigure-metadata.properties中的配置来进行过滤
// spring-autoconfigure-metadata.properties文件中的内容是利用Java中的AbstractProcessor技术在编译时生成出来的
configurations = getConfigurationClassFilter().filter(configurations);在Spring Boot源码编译的时候会生成一个spring-autoconfigure-metadata.properties里面记录了一些类和他依赖的类。也就是这个类需要满足什么条件才会进行自动装配。
首先通过getConfigurationClassFilter获取过滤器。
getConfigurationClassFilter
-->getAutoConfigurationImportFilters
通过SPI,获取到spring.factories中的过滤器类。
protected List<AutoConfigurationImportFilter> getAutoConfigurationImportFilters() { return SpringFactoriesLoader.loadFactories(AutoConfigurationImportFilter.class, this.beanClassLoader);}
得到3个过滤器。
拿到过滤器以后,会调用filter方法,在filter方法中通过过滤器的match方法,对自动装配类进行过滤。
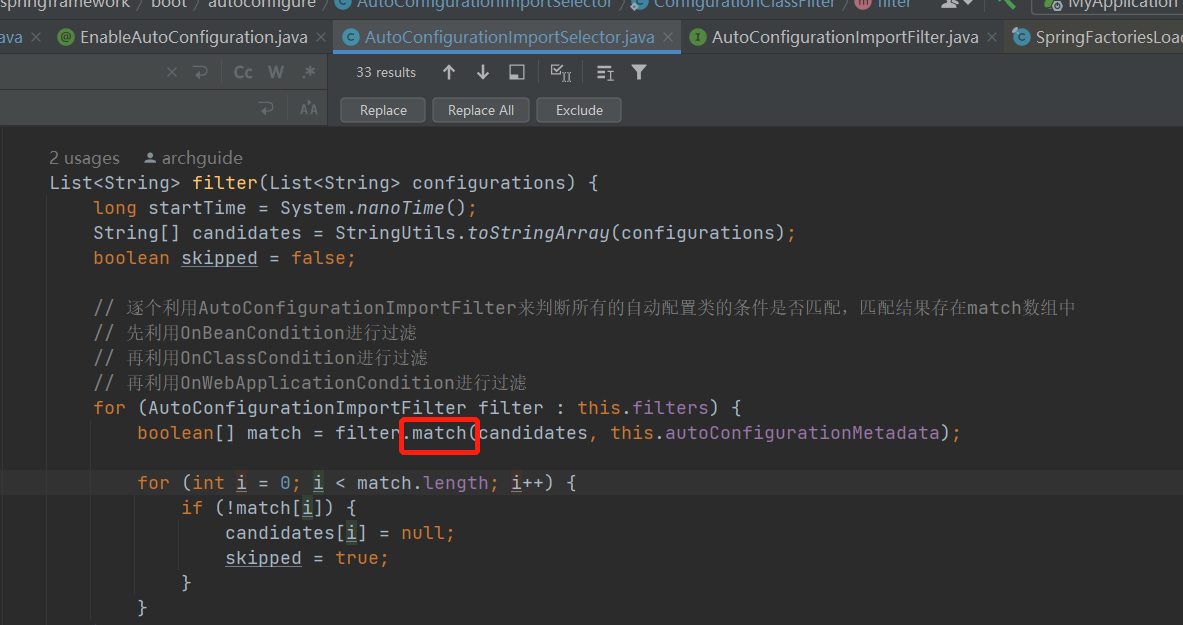
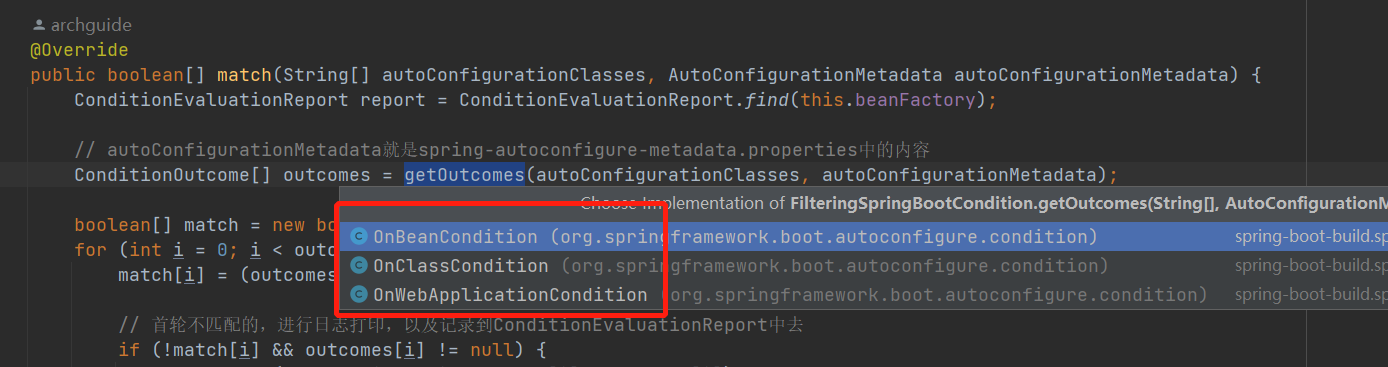
最后过滤器中根据spring-autoconfigure-metadata.properties中的配置,使用多线程对自动配置的类进行过滤。把不符合条件的类过滤掉了。这样原来可能有100多个配置类,经过过滤以后就只剩下几十个了。有利于加快启动速度。
记录
// configurations表示合格的,exclusions表示被排除的,把它们记录在ConditionEvaluationReportAutoConfigurationImportListener中
fireAutoConfigurationImportEvents(configurations, exclusions);
返回
// 最后返回的AutoConfiguration都是符合条件的
return new AutoConfigurationEntry(configurations, exclusions);
AutoConfigurationGroup
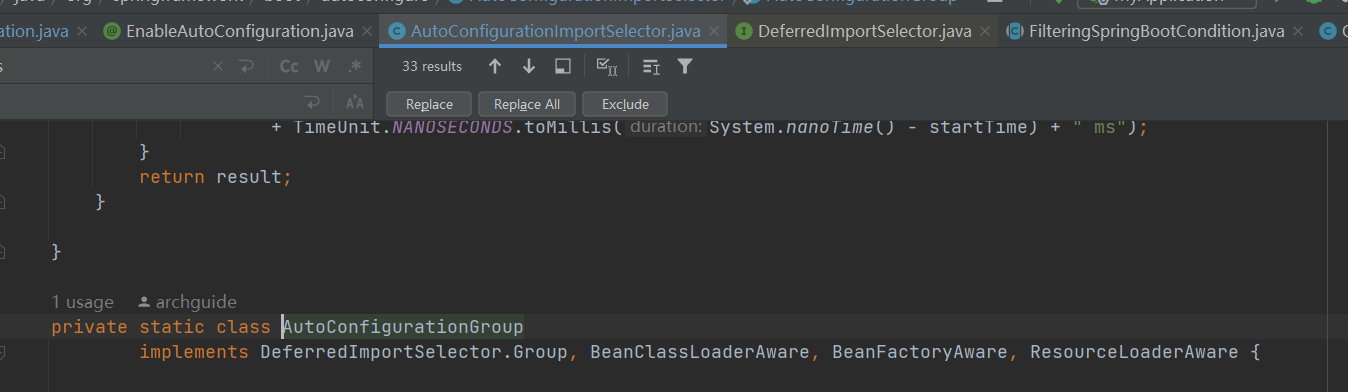
我们回头看看,AutoConfigurationImportSelector实现了DeferredImportSelector,上面说会执行selectImports,实际上这里还需要仔细看下。 因为DeferredImportSelector里面重写了getImportGroup,因此进行了分组。
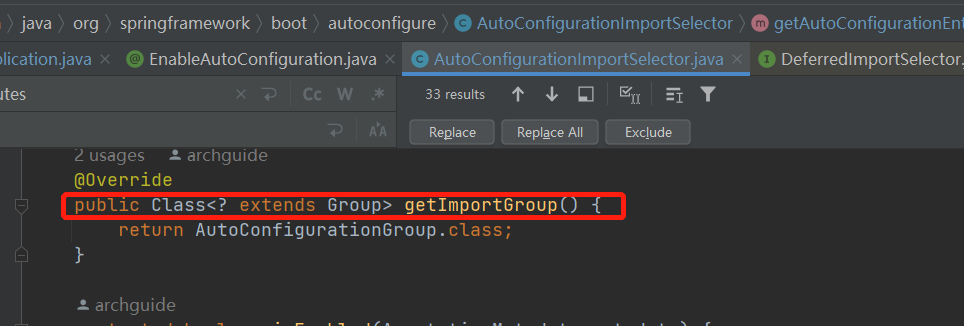
这个Group是一个内部类,实际上这一组也就只有AutoConfigurationImportSelector一个成员。
在运行时会每个成员都会先执行AutoConfigurationGroup中的process,将所有成员的annotationMetadata放入到一个map中,所有成员都收集好以后,会调用AutoConfigurationGroup中的selectImports方法一起执行。 所以大家在org.springframework.boot.autoconfigure.AutoConfigurationImportSelector#selectImports打断点debug是不行的。 需要打在AutoConfigurationGroup的selectImport才行。
    @Override
public void process(AnnotationMetadata annotationMetadata, DeferredImportSelector deferredImportSelector) {Assert.state(deferredImportSelector instanceof AutoConfigurationImportSelector,() -> String.format("Only %s implementations are supported, got %s",AutoConfigurationImportSelector.class.getSimpleName(),deferredImportSelector.getClass().getName()));// 获取所有自动配置类,并赋值给autoConfigurationEntries和entriesAutoConfigurationEntry autoConfigurationEntry = ((AutoConfigurationImportSelector) deferredImportSelector).getAutoConfigurationEntry(annotationMetadata);this.autoConfigurationEntries.add(autoConfigurationEntry);// 每个自动配置类对应annotationMetadata,selectImports()方法会取出来用for (String importClassName : autoConfigurationEntry.getConfigurations()) {this.entries.putIfAbsent(importClassName, annotationMetadata);}
}@Override
public Iterable<Entry> selectImports() {if (this.autoConfigurationEntries.isEmpty()) {return Collections.emptyList();}Set<String> allExclusions = this.autoConfigurationEntries.stream().map(AutoConfigurationEntry::getExclusions).flatMap(Collection::stream).collect(Collectors.toSet());Set<String> processedConfigurations = this.autoConfigurationEntries.stream().map(AutoConfigurationEntry::getConfigurations).flatMap(Collection::stream).collect(Collectors.toCollection(LinkedHashSet::new));processedConfigurations.removeAll(allExclusions);// 给自动配置类排序return sortAutoConfigurations(processedConfigurations, getAutoConfigurationMetadata()).stream().map((importClassName) -> new Entry(this.entries.get(importClassName), importClassName)).collect(Collectors.toList());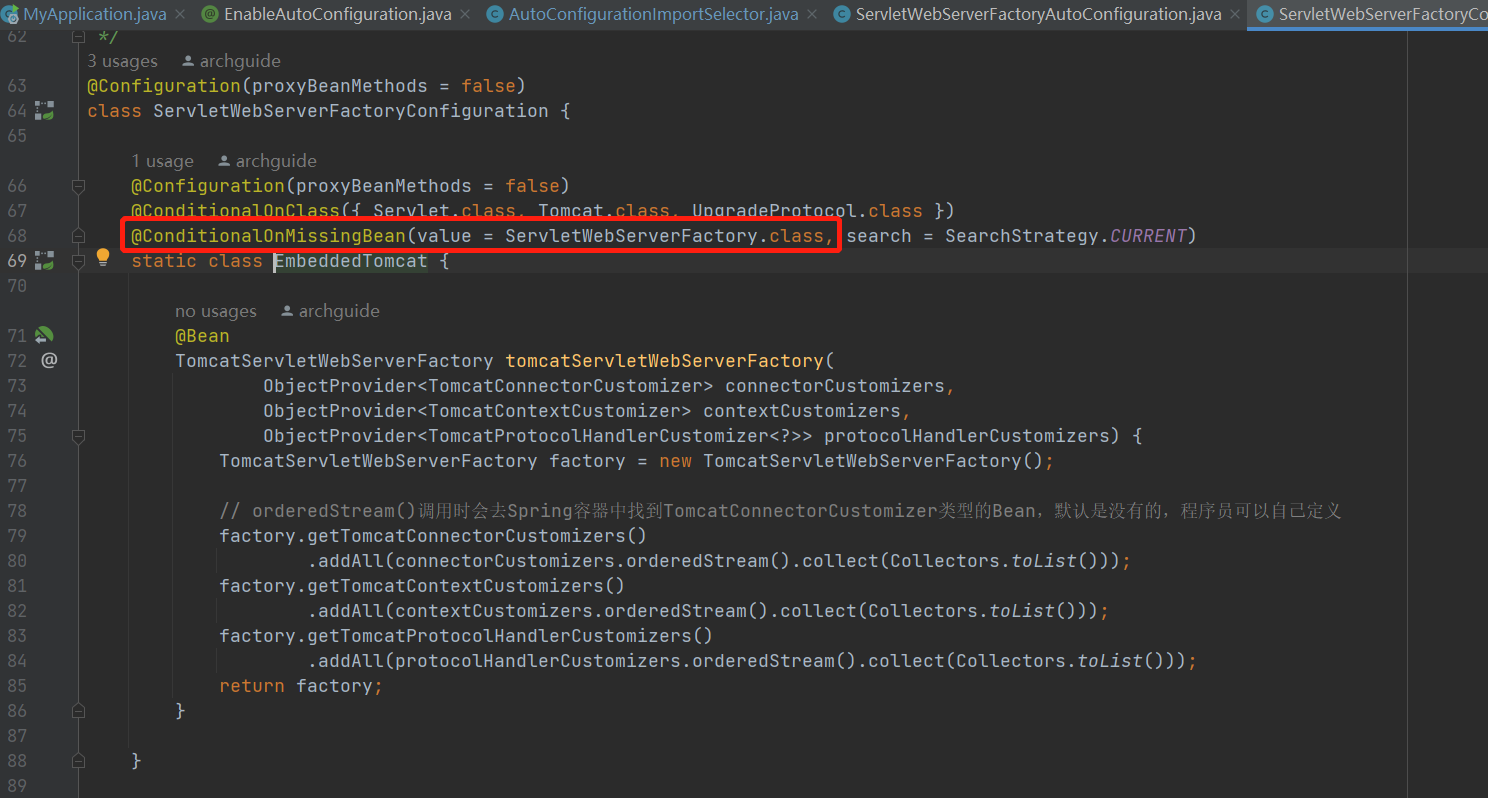
}再补充一下DeferredImportSelector会在所有的用户定义的bean解析完以后才会去解析。这就是为什么如果用户自定义了一个Bean,自动配置就不会去解析进行自动注入了。例如如果用户自己定义了ServletWebServerFactory。那么Spring Boot就不会去自动装配容器相关的配置了。条件注解这里就不讲解了。
@AutoConfigurationPackage
这个注解import了AutoConfigurationPackages.Registrar.class
@Import(AutoConfigurationPackages.Registrar.class)
public @interface AutoConfigurationPackage {
Registrar实现了ImportBeanDefinitionRegistrar,在启动时会执行registerBeanDefinitions方法,注册PackageImports
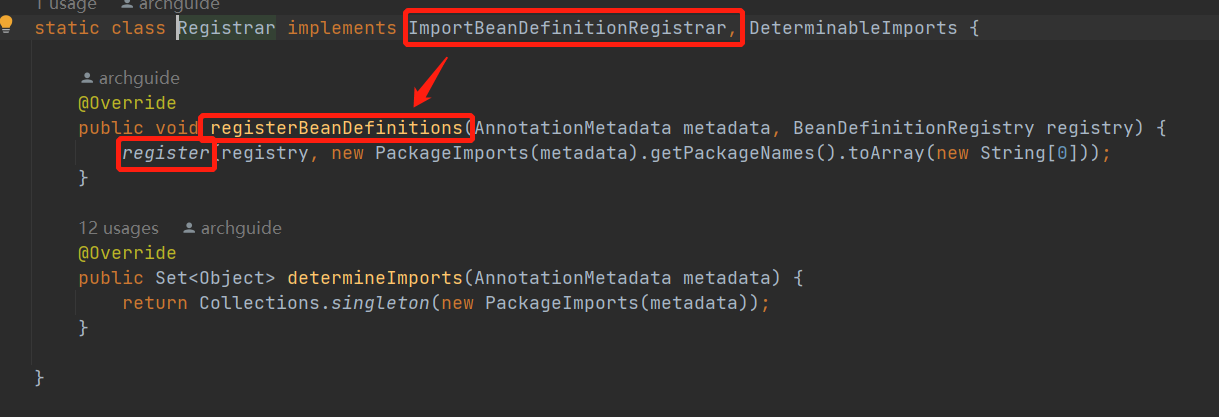
重点看下PackageImports的构造方法,这个方法会去找注解上是否配置了扫描路径,如果没有配置则会将启动类(MyApplicatoin)所在的包路径作为扫描路径,封装成BasePackagesBeanDefinition注册到Spring容器中。
PackageImports(AnnotationMetadata metadata) {AnnotationAttributes attributes = AnnotationAttributes.fromMap(metadata.getAnnotationAttributes(AutoConfigurationPackage.class.getName(), false));List<String> packageNames = new ArrayList<>(Arrays.asList(attributes.getStringArray("basePackages")));for (Class<?> basePackageClass : attributes.getClassArray("basePackageClasses")) {packageNames.add(basePackageClass.getPackage().getName());}// MyApplicatoin类所在的包if (packageNames.isEmpty()) {packageNames.add(ClassUtils.getPackageName(metadata.getClassName()));}this.packageNames = Collections.unmodifiableList(packageNames);
}
后续其他中间件就可以直接拿到这个路径了。比如如果程序员没有指定mybaits的扫描路径,mybatis就可以直接拿到这个路径去扫描mapper。
@ComponentScan
再来看下这个注解。excludeFilters配置了两个值,用于指定不需要扫描的情况。
@ComponentScan(excludeFilters = { @ComponentScan.Filter(type = FilterType.CUSTOM, classes = TypeExcludeFilter.class),@ComponentScan.Filter(type = FilterType.CUSTOM, classes = AutoConfigurationExcludeFilter.class) })AutoConfigurationExcludeFilter
AutoConfigurationExcludeFilter类实现了TypeFilter,在扫描时会通过match方法进行过滤。
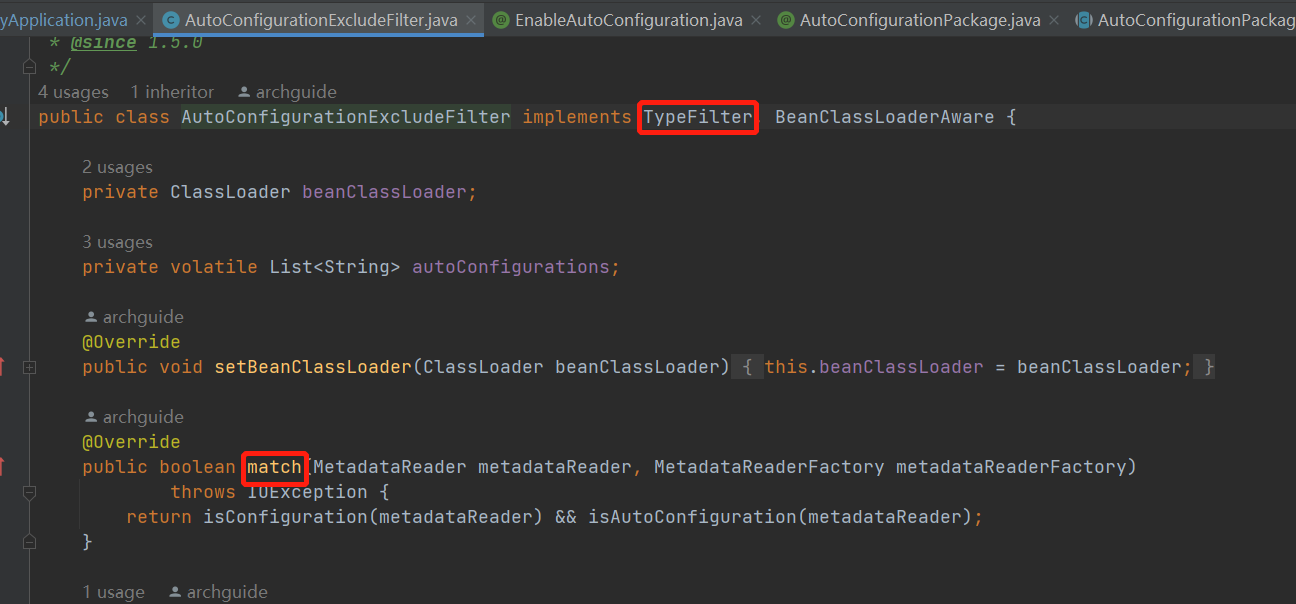
首先判断当前类上是否添加了@Configuration注解
private boolean isConfiguration(MetadataReader metadataReader) {return metadataReader.getAnnotationMetadata().isAnnotated(Configuration.class.getName());
}
然后判断下当前的这个类是否在spring.factories中也配置了。如果在spring.factories中也经配置了。那么在扫描的时候就会排除掉,等着自动装配通过spring.factories进行装配。
private boolean isAutoConfiguration(MetadataReader metadataReader) {return getAutoConfigurations().contains(metadataReader.getClassMetadata().getClassName());
}
TypeExcludeFilter
TypeExcludeFilter也实现了TypeFilter
public boolean match(MetadataReader metadataReader, MetadataReaderFactory metadataReaderFactory)throws IOException {if (this.beanFactory instanceof ListableBeanFactory && getClass() == TypeExcludeFilter.class) {// 从Spring容器中获取TypeExcludeFilter,然后进行匹配,匹配的则不解析for (TypeExcludeFilter delegate : getDelegates()) {if (delegate.match(metadataReader, metadataReaderFactory)) {return true;}}}return false;
}
getDelegate方法会从Spring容器中获取TypeExcludeFilter,然后取出来一个一个的去匹配。 这就为程序员提供了一个扩展,我们可以继续TypeExcludeFilter自定义过滤逻辑。但是这里需要注意,如果直接定义一个类继续TypeExcludeFilter,例如下面的写法。这种是不会生效的。
@Component
public class MtbTypeExcludeFilter extends TypeExcludeFilter {@Overridepublic boolean match(MetadataReader metadataReader, MetadataReaderFactory metadataReaderFactory) throws IOException {return metadataReader.getAnnotationMetadata().getClassName().equals("com.mtb.service.UserService");}
}
@Bean
public TypeExcludeFilter typeExcludeFilter(){return new MtbTypeExcludeFilter();
}因为@ComponentScan是在扫描阶段使用的,扫描以后才会去解析发现Bean。所以这里的顺序是有问题的,这样写是不会生效的。
如果想让自定义的TypeExcludeFilter生效,需要利用Spring Boot的机制。
添加spring.factories,添加初始化器。然后在初始化器中添加TypeExcludeFilter。

public class MtbApplicationContextInitializer implements ApplicationContextInitializer {@Overridepublic void initialize(ConfigurableApplicationContext applicationContext) {applicationContext.getBeanFactory().registerSingleton("mtbTypeExcludeFilter", new MtbTypeExcludeFilter());}
}
只要在扫描前将自定义的filter注册到spring容器中就可以了。
补充说明:因为@EnableAutoConfiguration的自动装配是通过DeferredImportSelector实现的,所以会先扫描,然后再进行自动装配的解析。
学习了Spring Boot的自动装配原理后,我们来看下如何去自己实现一个Starter。
自定义starter
关于分析的过程就不多说了,大家可以自己去看下mybatis或者redis的starter。这里直接开干了
命名规范
首先了解下starter的命名规范
官方命名空间
前缀:spring-boot-starter-
模式:spring-boot-starter-模块名
举例:spring-boot-starter-web、spring-boot-starter-jdbc
自定义命名空间
后缀:-spring-boot-starter
模式:模块-spring-boot-starter
举例:mybatis-spring-boot-starter
工程结构

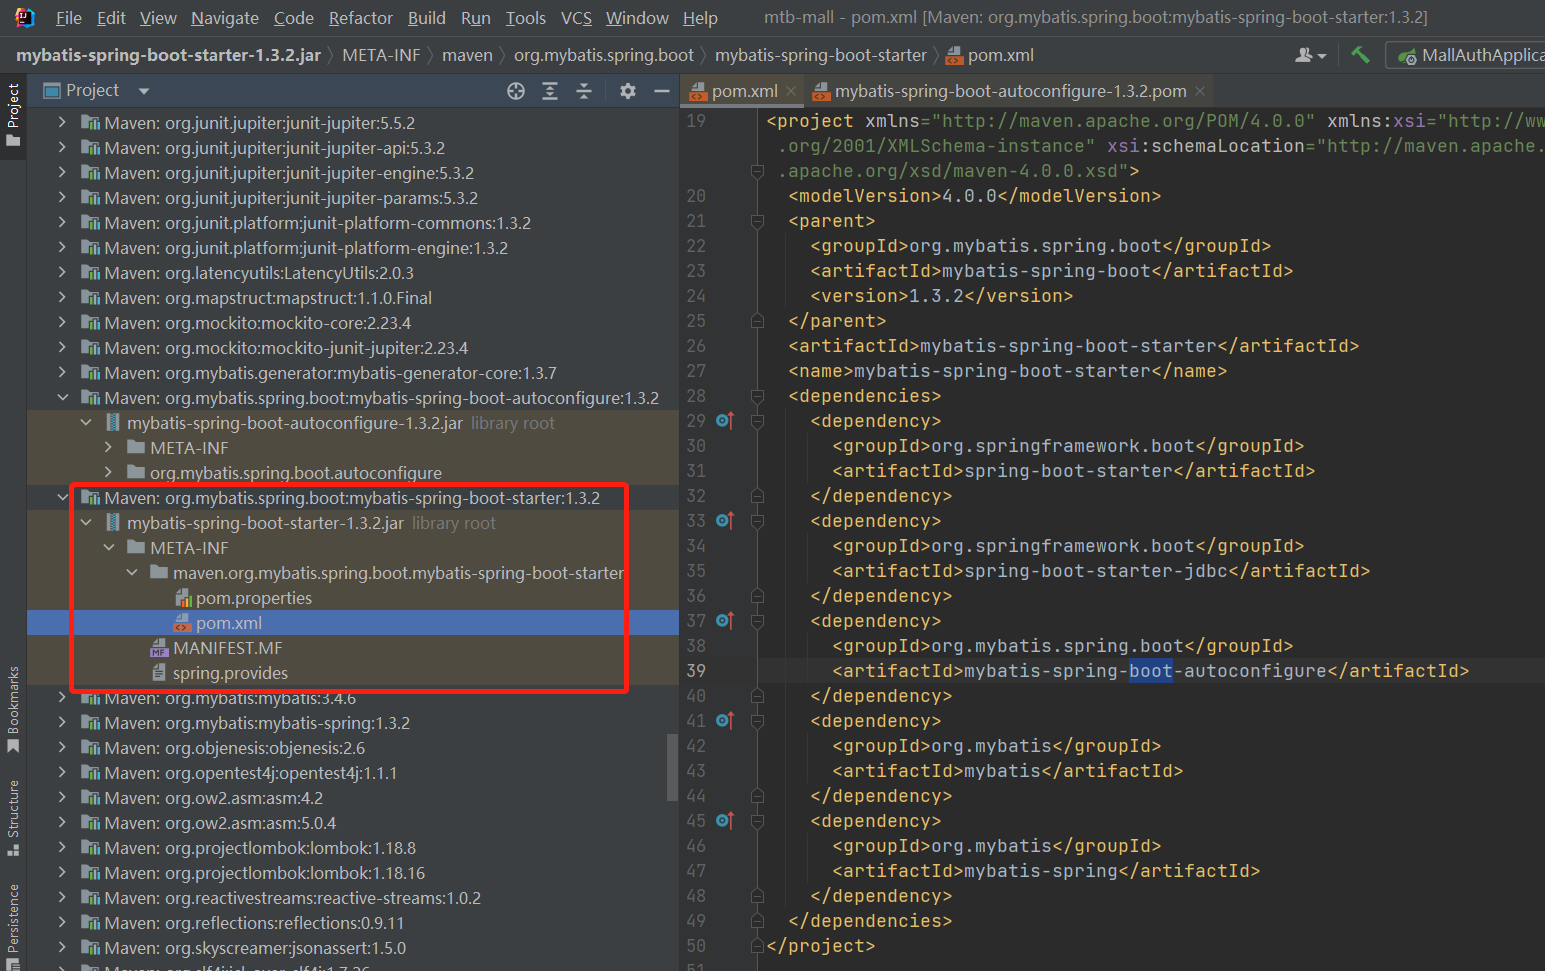
starter分为两个部分,starter和autoconfigure。 其中starter只是一个空的jar文件,负责管理依赖。autoconfigure才是真正实现自动装配的地方。
实战示例
创建工程
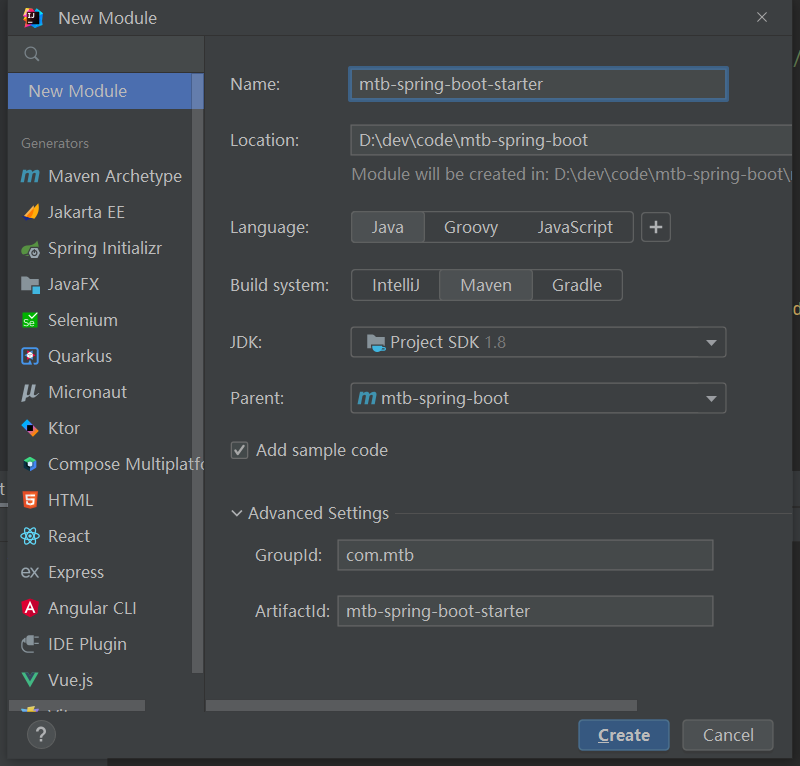
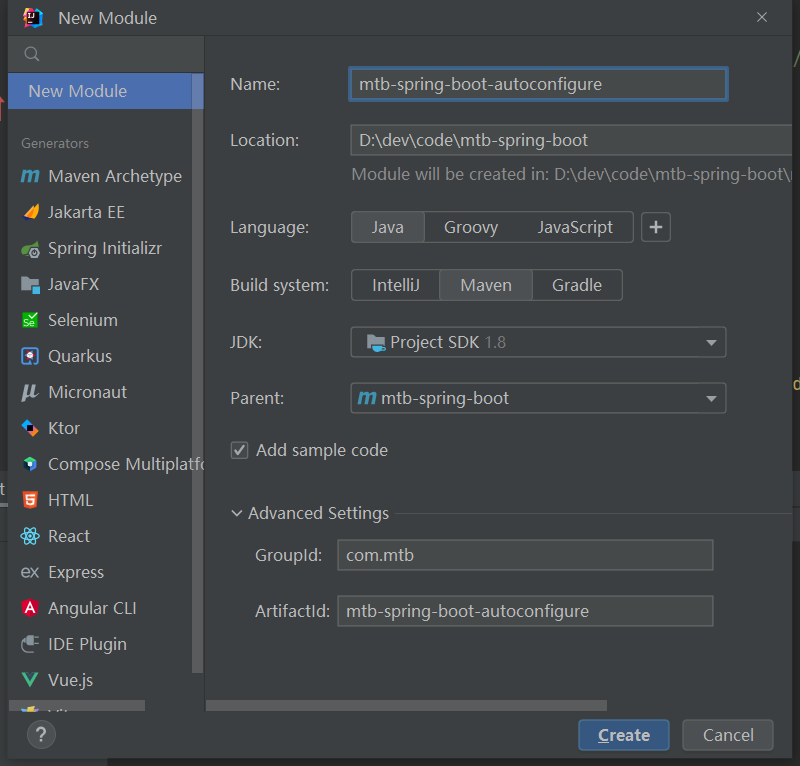
下面我们也来动手模拟一个。先新建一个Project作为最上层的父工程
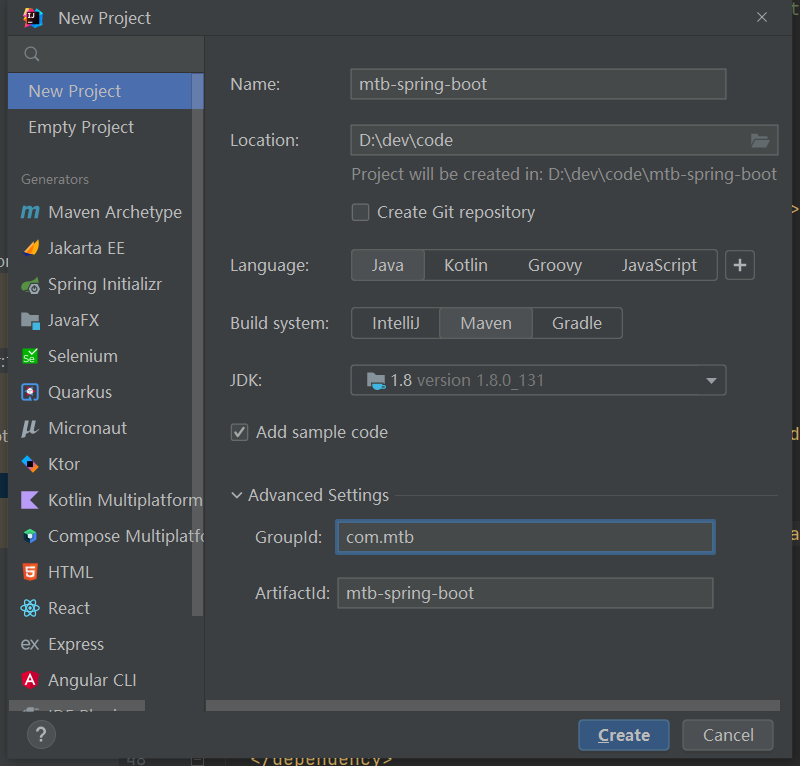
再创建两个module
删除启动类、resources文件夹、test文件夹
修改pom
mtb-spring-boot的pom,添加基础依赖
<?xml version="1.0" encoding="UTF-8"?>
<project xmlns="http://maven.apache.org/POM/4.0.0"xmlns:xsi="http://www.w3.org/2001/XMLSchema-instance"xsi:schemaLocation="http://maven.apache.org/POM/4.0.0 http://maven.apache.org/xsd/maven-4.0.0.xsd"><modelVersion>4.0.0</modelVersion><groupId>com.mtb</groupId><artifactId>mtb-spring-boot</artifactId><version>1.0-SNAPSHOT</version><packaging>pom</packaging><modules><module>mtb-spring-boot-starter</module><module>mtb-spring-boot-autoconfigure</module></modules><parent><groupId>org.springframework.boot</groupId><artifactId>spring-boot-starter-parent</artifactId><version>2.7.0</version><relativePath/></parent><properties><maven.compiler.source>8</maven.compiler.source><maven.compiler.target>8</maven.compiler.target><project.build.sourceEncoding>UTF-8</project.build.sourceEncoding></properties><dependencies><dependency><groupId>org.springframework.boot</groupId><artifactId>spring-boot-starter</artifactId></dependency></dependencies>
</project>
mtb-spring-boot-starter的pom。添加对autoconfigure的引用
<?xml version="1.0" encoding="UTF-8"?>
<project xmlns="http://maven.apache.org/POM/4.0.0"xmlns:xsi="http://www.w3.org/2001/XMLSchema-instance"xsi:schemaLocation="http://maven.apache.org/POM/4.0.0 http://maven.apache.org/xsd/maven-4.0.0.xsd"><modelVersion>4.0.0</modelVersion><parent><groupId>com.mtb</groupId><artifactId>mtb-spring-boot</artifactId><version>1.0-SNAPSHOT</version></parent><artifactId>mtb-spring-boot-starter</artifactId><properties><maven.compiler.source>8</maven.compiler.source><maven.compiler.target>8</maven.compiler.target><project.build.sourceEncoding>UTF-8</project.build.sourceEncoding></properties><dependencies><dependency><groupId>com.mtb</groupId><artifactId>mtb-spring-boot-autoconfigure</artifactId><version>1.0-SNAPSHOT</version></dependency></dependencies>
</project>
mtb-spring-boot-autoconfigure的pom
<?xml version="1.0" encoding="UTF-8"?>
<project xmlns="http://maven.apache.org/POM/4.0.0"xmlns:xsi="http://www.w3.org/2001/XMLSchema-instance"xsi:schemaLocation="http://maven.apache.org/POM/4.0.0 http://maven.apache.org/xsd/maven-4.0.0.xsd"><modelVersion>4.0.0</modelVersion><parent><groupId>com.mtb</groupId><artifactId>mtb-spring-boot</artifactId><version>1.0-SNAPSHOT</version></parent><artifactId>mtb-spring-boot-autoconfigure</artifactId><properties><maven.compiler.source>8</maven.compiler.source><maven.compiler.target>8</maven.compiler.target><project.build.sourceEncoding>UTF-8</project.build.sourceEncoding></properties><dependencies><dependency><groupId>org.springframework.boot</groupId><artifactId>spring-boot-starter-web</artifactId></dependency><!--导入配置文件处理器,配置文件进行绑定就会有提示--><dependency><groupId>org.springframework.boot</groupId><artifactId>spring-boot-configuration-processor</artifactId><optional>true</optional></dependency></dependencies>
</project>
编写业务逻辑

HelloProperties
package com.mtb.config;import org.springframework.boot.context.properties.ConfigurationProperties;/*** @Description:* @Author: 毛同彬* @CreateDate: 2023/3/8 20:03* @Version: 1.0*/@ConfigurationProperties("mtb.hello")
public class HelloProperties {private String name;public String getName() {return name;}public void setName(String name) {this.name = name;}
}
IndexController
package com.mtb.controller;import com.mtb.config.HelloProperties;
import org.springframework.web.bind.annotation.RequestMapping;
import org.springframework.web.bind.annotation.RestController;/*** @Description:* @Author: 毛同彬* @CreateDate: 2023/3/8 20:06* @Version: 1.0*/@RestController
public class IndexController {HelloProperties helloProperties;public IndexController(HelloProperties helloProperties) {this.helloProperties = helloProperties;}@RequestMapping("/")public String index() {return helloProperties.getName() + "欢迎您!";}
}
HelloAutoConfitguration
package com.mtb.config;import com.mtb.controller.IndexController;
import org.springframework.beans.factory.annotation.Autowired;
import org.springframework.boot.autoconfigure.condition.ConditionalOnProperty;
import org.springframework.boot.context.properties.EnableConfigurationProperties;
import org.springframework.context.annotation.Bean;
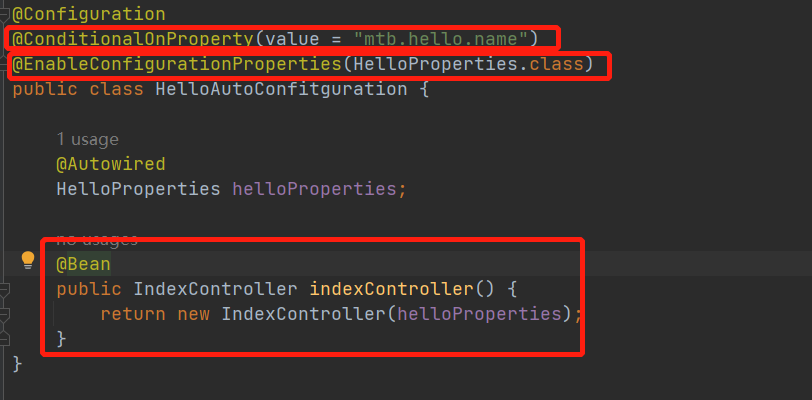
import org.springframework.context.annotation.Configuration;/*** @Description:* @Author: 毛同彬* @CreateDate: 2023/3/8 20:07* @Version: 1.0*/@Configuration
@ConditionalOnProperty(value = "mtb.hello.name")
@EnableConfigurationProperties(HelloProperties.class)
public class HelloAutoConfitguration {@AutowiredHelloProperties helloProperties;@Beanpublic IndexController indexController() {return new IndexController(helloProperties);}
}
添加spring.factories
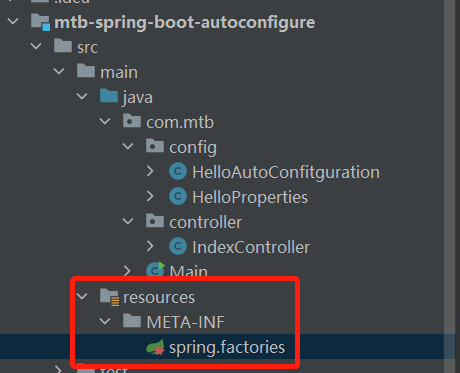
org.springframework.boot.autoconfigure.EnableAutoConfiguration=\com.mtb.config.HelloAutoConfitguration测试
创建一个test工程用来测试
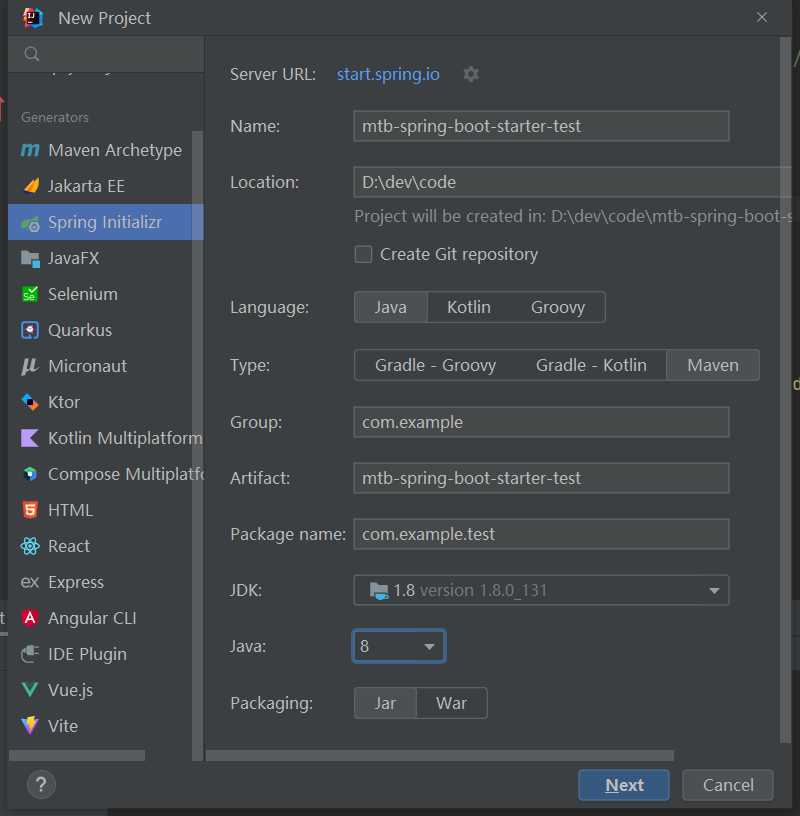
pom中引入mtb-spring-boot-starter
<?xml version="1.0" encoding="UTF-8"?>
<project xmlns="http://maven.apache.org/POM/4.0.0" xmlns:xsi="http://www.w3.org/2001/XMLSchema-instance"xsi:schemaLocation="http://maven.apache.org/POM/4.0.0 https://maven.apache.org/xsd/maven-4.0.0.xsd"><modelVersion>4.0.0</modelVersion><parent><groupId>org.springframework.boot</groupId><artifactId>spring-boot-starter-parent</artifactId><version>2.7.0</version><relativePath/> <!-- lookup parent from repository --></parent><groupId>com.example</groupId><artifactId>mtb-spring-boot-starter-test</artifactId><version>0.0.1-SNAPSHOT</version><name>mtb-spring-boot-starter-test</name><description>mtb-spring-boot-starter-test</description><properties><java.version>1.8</java.version></properties><dependencies><dependency><groupId>com.mtb</groupId><artifactId>mtb-spring-boot-starter</artifactId><version>1.0-SNAPSHOT</version></dependency></dependencies><build><plugins><plugin><groupId>org.springframework.boot</groupId><artifactId>spring-boot-maven-plugin</artifactId></plugin></plugins></build></project>
启动后访问http://localhost:8080/
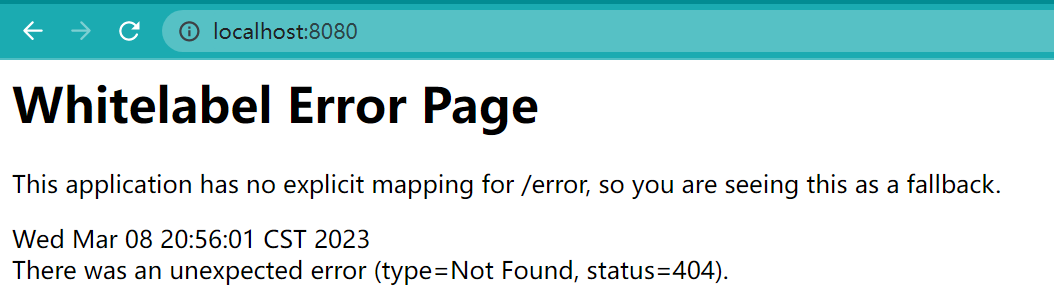
不要慌,访问不到是正常的。因为我们在spring.factories中指定了自动配置类HelloAutoConfitguration
org.springframework.boot.autoconfigure.EnableAutoConfiguration=\com.mtb.config.HelloAutoConfitguration而这个配置类上添加了条件注解。只有property中存在 mtb.hello.name配置时才会解析。然后HelloProperties才会生效,才会创建IndexController这个Bean。不然IndexController的Bean不会创建,肯定访问不到。
我们在spring.properties中添加下配置。
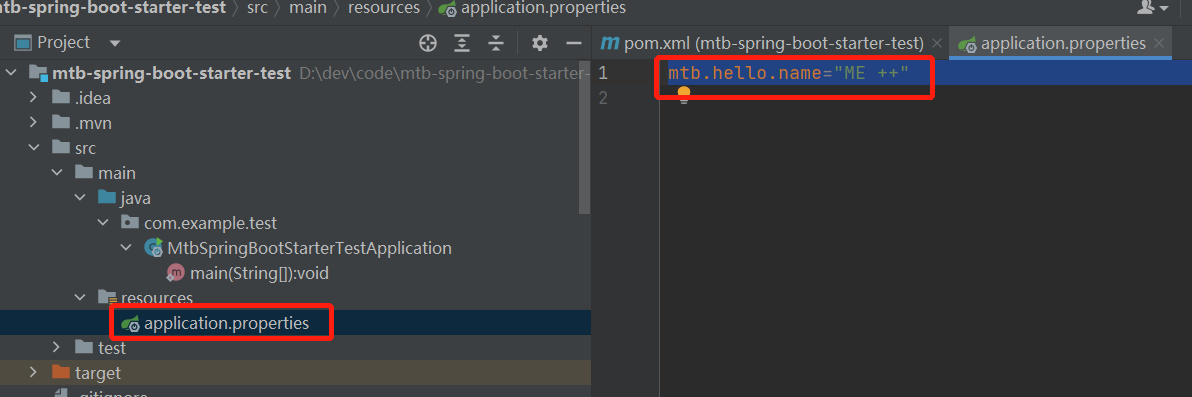
再重启一下。

OK,大功告成!
分享就到这里了,欢迎大家评论、转发加关注。懒得留言就点个赞吧,谢谢大家!