传统方法(OpenCV)_车道线识别
一、思路
基于OpenCV的库:对视频中的车道线进行识别
1、视频处理:视频读取
2、图像转换:图像转换为灰度图
3、噪声去除:高斯模糊对图像进行去噪,提高边缘检测的准确性
4、边缘检测:Canny算法进行边缘检测,找出图像中边缘
5、区域裁剪:定义ROI(Region of Interest,感兴趣区域),裁剪出这个区域的边缘检测结果
6、直线检测:霍夫变换对ROI区域进行直线检测,找出车道线
7、结果展示:将检测到的车道线画在原图/视频上
二、实施流程:
1. 高斯模糊、Canny边缘检测、霍夫变换
import numpy as np
import cv2blur_ksize = 5  # 高斯模糊核大小
canny_lthreshold = 50  # Canny边缘检测低阈值
canny_hthreshold = 150  # Canny边缘检测高阈值
# 霍夫变换参数
rho = 1     #rho的步长,即直线到图像原点(0,0)点的距离
theta = np.pi / 180     #theta的范围
threshold = 15      #累加器中的值高于它时才认为是一条直线
min_line_length = 40    #线的最短长度,比这个短的都被忽略
max_line_gap = 20      #两条直线之间的最大间隔,小于此值,认为是一条直线
2、定义roi_mask函数,用于保留感兴趣区域,屏蔽掉图像中不需要处理的部分,例如天空、树木等,只保留路面部分,从而提高后续处理的效率和准确性。
#img是输入的图像,verticess是兴趣区的四个点的坐标(三维的数组)
def roi_mask(img, vertices):mask = np.zeros_like(img)   #生成与输入图像相同大小的图像,并使用0填充,图像为黑色mask_color = 255cv2.fillPoly(mask, vertices, mask_color)    #使用白色填充多边形,形成蒙板masked_img = cv2.bitwise_and(img, mask) #img&mask,经过此操作后,兴趣区域以外的部分被蒙住了,只留下兴趣区域的图像return masked_img
3、定义draw_lines函数,用于后续对检测到的车道线进行绘制图线。
# 对图像进行画线
def draw_lines(img, lines, color=[255, 255, 0], thickness=2):for line in lines:for x1, y1, x2, y2 in line:cv2.line(img, (x1, y1), (x2, y2), color, thickness)
4、定义hough_lines函数,用于通过霍夫变换检测出图像中的直线,然后根据这些直线执行draw_lines函数画出车道线
def hough_lines(img, rho, theta, threshold,min_line_len, max_line_gap):lines = cv2.HoughLinesP(img, rho, theta, threshold, np.array([]),minLineLength=min_line_len,maxLineGap=max_line_gap)line_img = np.zeros((img.shape[0], img.shape[1], 3), dtype=np.uint8) #生成绘制直线的绘图板,黑底# draw_lines(line_img, lines)draw_lanes(line_img, lines)return line_img5、定义draw_lanes函数,用于根据霍夫变换检测到的直线,分类、清理、拟合、绘制出车道线
def draw_lanes(img, lines, color=[255, 255, 0], thickness=8):left_lines, right_lines = [], [] #用于存储左边和右边的直线for line in lines: #对直线进行分类for x1, y1, x2, y2 in line:k = (y2 - y1) / (x2 - x1)if k < 0:left_lines.append(line)else:right_lines.append(line)if (len(left_lines) <= 0 or len(right_lines) <= 0):return imgclean_lines(left_lines, 0.1) #弹出左侧不满足斜率要求的直线clean_lines(right_lines, 0.1) #弹出右侧不满足斜率要求的直线left_points = [(x1, y1) for line in left_lines for x1, y1, x2, y2 in line] #提取左侧直线族中的所有的第一个点left_points = left_points + [(x2, y2) for line in left_lines for x1, y1, x2, y2 in line] #提取左侧直线族中的所有的第二个点right_points = [(x1, y1) for line in right_lines for x1, y1, x2, y2 in line] #提取右侧直线族中的所有的第一个点right_points = right_points + [(x2, y2) for line in right_lines for x1, y1, x2, y2 in line] #提取右侧侧直线族中的所有的第二个点left_vtx = calc_lane_vertices(left_points, 325, img.shape[0]) #拟合点集,生成直线表达式,并计算左侧直线在图像中的两个端点的坐标right_vtx = calc_lane_vertices(right_points, 325, img.shape[0]) #拟合点集,生成直线表达式,并计算右侧直线在图像中的两个端点的坐标cv2.line(img, left_vtx[0], left_vtx[1], color, thickness) #画出左侧直线cv2.line(img, right_vtx[0], right_vtx[1], color, thickness) #画出右侧直线6、定义clean_lines函数,用于将斜率不满足要求的直线去除,即不进行绘制
#将不满足斜率要求的直线弹出
def clean_lines(lines, threshold):slope = [(y2 - y1) / (x2 - x1) for line in lines for x1, y1, x2, y2 in line]while len(lines) > 0:mean = np.mean(slope)   #计算斜率的平均值,因为后面会将直线和斜率值弹出diff = [abs(s - mean) for s in slope]    #计算每条直线斜率与平均值的差值idx = np.argmax(diff)     #计算差值的最大值的下标if diff[idx] > threshold:    #将差值大于阈值的直线弹出slope.pop(idx)  #弹出斜率lines.pop(idx)  #弹出直线else:break
7、定义calc_lane_vertices函数,用于根据给定的点集拟合一条直线,并计算这条直线在图像中的两个端点的坐标
#拟合点集,生成直线表达式,并计算直线在图像中的两个端点的坐标
def calc_lane_vertices(point_list, ymin, ymax):x = [p[0] for p in point_list]  #提取xy = [p[1] for p in point_list]  #提取yfit = np.polyfit(y, x, 1)   #用一次多项式x=a*y+b拟合这些点,fit是(a,b)fit_fn = np.poly1d(fit) #生成多项式对象a*y+bxmin = int(fit_fn(ymin))    #计算这条直线在图像中最左侧的横坐标xmax = int(fit_fn(ymax))     #计算这条直线在图像中最右侧的横坐标return [(xmin, ymin), (xmax, ymax)]
8、编写主函数。首先读取视频并获取每一帧,如果读取帧失败(即视频已经播放完毕),则跳出循环;接着对读取到的帧进行一系列处理,包括转换为灰度图、高斯模糊、Canny边缘检测、生成ROI掩膜、霍夫直线检测等;然后将处理后的图像与原图融合,得到最终的结果;最后显示结果图像,如果按下Esc键,则跳出循环,即关闭所有窗口
if __name__ == '__main__':try:cap = cv2.VideoCapture('./video_1.mp4')if (cap.isOpened()): # 视频打开成功flag = 1else:flag = 0num = 0if (flag):while (True):ret,frame = cap.read() # 读取一帧if ret == False: # 读取帧失败breakgray = cv2.cvtColor(frame, cv2.COLOR_RGB2GRAY) #图像转换为灰度图blur_gray = cv2.GaussianBlur(gray, (blur_ksize, blur_ksize), 0, 0) #使用高斯模糊去噪声edges = cv2.Canny(blur_gray, canny_lthreshold, canny_hthreshold) #使用Canny进行边缘检测roi_vtx = np.array([[(0, frame.shape[0]), (460, 325),(520, 325), (frame.shape[1], frame.shape[0])]]) ##目标区域的四个点坐标,roi_vtx是一个三维的数组roi_edges = roi_mask(edges, roi_vtx) #对边缘检测的图像生成图像蒙板,去掉不感兴趣的区域,保留兴趣区line_img = hough_lines(roi_edges, rho, theta, threshold,min_line_length, max_line_gap) #使用霍夫直线检测,并且绘制直线res_img = cv2.addWeighted(frame, 0.8, line_img, 1, 0) #将处理后的图像与原图做融合cv2.imshow('meet',res_img)if cv2.waitKey(30) & 0xFF == 27:breakcv2.waitKey(0)cv2.destroyAllWindows()except:pass# 使用环境dlcv/001#1、
import numpy as np
import cv2blur_ksize = 5 # 高斯模糊核大小
canny_lthreshold = 50 # Canny边缘检测低阈值
canny_hthreshold = 150 # Canny边缘检测高阈值
# 霍夫变换参数
rho = 1 # rho的步长,即直线到图像原点(0,0)点的距离
theta = np.pi / 180 # theta的范围
threshold = 15 # 累加器中的值高于它时才认为是一条直线
min_line_length = 40 # 线的最短长度,比这个短的都被忽略
max_line_gap = 20 # 两条直线之间的最大间隔,小于此值,认为是一条直线#2、
#img是输入的图像,verticess是兴趣区的四个点的坐标(三维的数组)
def roi_mask(img, vertices):mask = np.zeros_like(img) #生成与输入图像相同大小的图像,并使用0填充,图像为黑色mask_color = 255cv2.fillPoly(mask, vertices, mask_color) #使用白色填充多边形,形成蒙板masked_img = cv2.bitwise_and(img, mask) #img&mask,经过此操作后,兴趣区域以外的部分被蒙住了,只留下兴趣区域的图像return masked_img#3、
# 对图像进行画线
def draw_lines(img, lines, color=[255, 255, 0], thickness=2):for line in lines:for x1, y1, x2, y2 in line:cv2.line(img, (x1, y1), (x2, y2), color, thickness)#4、
def hough_lines(img, rho, theta, threshold,min_line_len, max_line_gap):lines = cv2.HoughLinesP(img, rho, theta, threshold, np.array([]),minLineLength=min_line_len,maxLineGap=max_line_gap)line_img = np.zeros((img.shape[0], img.shape[1], 3), dtype=np.uint8) #生成绘制直线的绘图板,黑底# draw_lines(line_img, lines)draw_lanes(line_img, lines)return line_img#5、
def draw_lanes(img, lines, color=[255, 255, 0], thickness=8):left_lines, right_lines = [], [] # 用于存储左边和右边的直线for line in lines: # 对直线进行分类for x1, y1, x2, y2 in line:k = (y2 - y1) / (x2 - x1)if k < 0:left_lines.append(line)else:right_lines.append(line)if (len(left_lines) <= 0 or len(right_lines) <= 0):return imgclean_lines(left_lines, 0.1) # 弹出左侧不满足斜率要求的直线clean_lines(right_lines, 0.1) # 弹出右侧不满足斜率要求的直线left_points = [(x1, y1) for line in left_lines for x1, y1, x2, y2 in line] # 提取左侧直线族中的所有的第一个点left_points = left_points + [(x2, y2) for line in left_lines for x1, y1, x2, y2 in line] # 提取左侧直线族中的所有的第二个点right_points = [(x1, y1) for line in right_lines for x1, y1, x2, y2 in line] # 提取右侧直线族中的所有的第一个点right_points = right_points + [(x2, y2) for line in right_lines for x1, y1, x2, y2 in line] # 提取右侧侧直线族中的所有的第二个点left_vtx = calc_lane_vertices(left_points, 325, img.shape[0]) # 拟合点集,生成直线表达式,并计算左侧直线在图像中的两个端点的坐标right_vtx = calc_lane_vertices(right_points, 325, img.shape[0]) # 拟合点集,生成直线表达式,并计算右侧直线在图像中的两个端点的坐标cv2.line(img, left_vtx[0], left_vtx[1], color, thickness) # 画出左侧直线cv2.line(img, right_vtx[0], right_vtx[1], color, thickness) # 画出右侧直线#6、
#将不满足斜率要求的直线弹出
def clean_lines(lines, threshold):slope = [(y2 - y1) / (x2 - x1) for line in lines for x1, y1, x2, y2 in line]while len(lines) > 0:mean = np.mean(slope) #计算斜率的平均值,因为后面会将直线和斜率值弹出diff = [abs(s - mean) for s in slope] #计算每条直线斜率与平均值的差值idx = np.argmax(diff) #计算差值的最大值的下标if diff[idx] > threshold: #将差值大于阈值的直线弹出slope.pop(idx) #弹出斜率lines.pop(idx) #弹出直线else:break#7、
#拟合点集,生成直线表达式,并计算直线在图像中的两个端点的坐标
def calc_lane_vertices(point_list, ymin, ymax):x = [p[0] for p in point_list] #提取xy = [p[1] for p in point_list] #提取yfit = np.polyfit(y, x, 1) #用一次多项式x=a*y+b拟合这些点,fit是(a,b)fit_fn = np.poly1d(fit) #生成多项式对象a*y+bxmin = int(fit_fn(ymin)) #计算这条直线在图像中最左侧的横坐标xmax = int(fit_fn(ymax)) #计算这条直线在图像中最右侧的横坐标return [(xmin, ymin), (xmax, ymax)]#8、
if __name__ == '__main__':try:cap = cv2.VideoCapture('1.mp4')if (cap.isOpened()): # 视频打开成功flag = 1else:flag = 0num = 0if (flag):while (True):ret,frame = cap.read() # 读取一帧if ret == False: # 读取帧失败breakgray = cv2.cvtColor(frame, cv2.COLOR_RGB2GRAY) #图像转换为灰度图blur_gray = cv2.GaussianBlur(gray, (blur_ksize, blur_ksize), 0, 0) #使用高斯模糊去噪声edges = cv2.Canny(blur_gray, canny_lthreshold, canny_hthreshold) #使用Canny进行边缘检测roi_vtx = np.array([[(0, frame.shape[0]), (460, 325),(520, 325), (frame.shape[1], frame.shape[0])]]) ##目标区域的四个点坐标,roi_vtx是一个三维的数组roi_edges = roi_mask(edges, roi_vtx) #对边缘检测的图像生成图像蒙板,去掉不感兴趣的区域,保留兴趣区line_img = hough_lines(roi_edges, rho, theta, threshold,min_line_length, max_line_gap) #使用霍夫直线检测,并且绘制直线res_img = cv2.addWeighted(frame, 0.8, line_img, 1, 0) #将处理后的图像与原图做融合cv2.imshow('meet',res_img)if cv2.waitKey(30) & 0xFF == 27:breakcv2.waitKey(0)cv2.destroyAllWindows()except:pass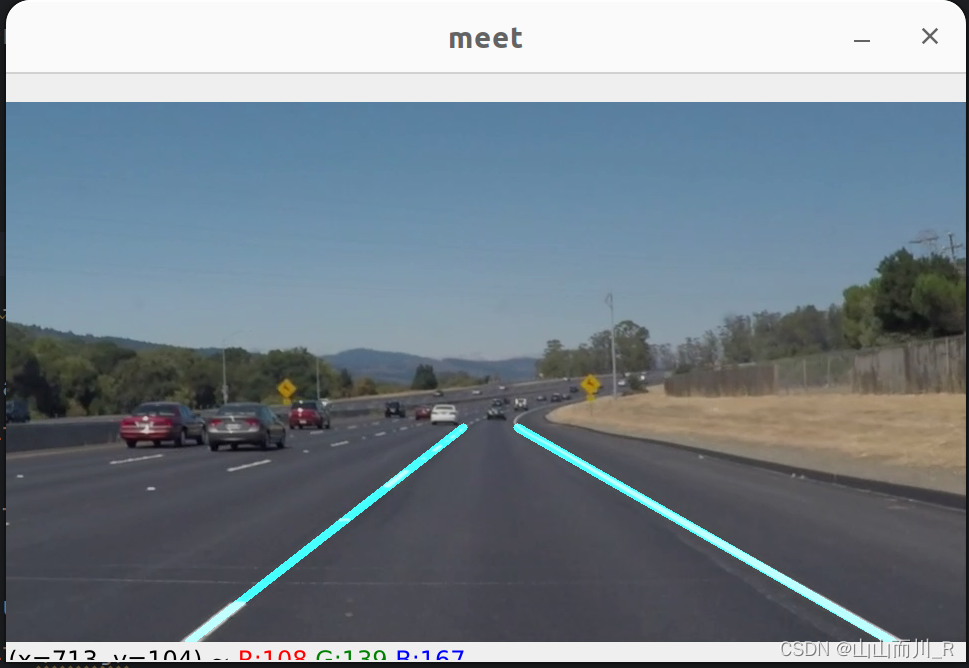
# 使用环境dlcv/001from moviepy.editor import VideoFileClip
import cv2
import numpy as np
# 高斯滤波核大小
blur_ksize = 5
# Canny边缘检测高低阈值
canny_lth = 50
canny_hth = 150
# 霍夫变换参数
rho = 1
theta = np.pi / 180
threshold = 15
min_line_len = 40
max_line_gap = 20
def process_an_image(img):# 1. 灰度化、滤波和Cannygray = cv2.cvtColor(img, cv2.COLOR_RGB2GRAY)blur_gray = cv2.GaussianBlur(gray, (blur_ksize, blur_ksize), 1)edges = cv2.Canny(blur_gray, canny_lth, canny_hth)# 2. 标记四个坐标点用于ROI截取rows, cols = edges.shapepoints = np.array([[(0, rows), (460, 325), (520, 325), (cols, rows)]])# [[[0 540], [460 325], [520 325], [960 540]]]roi_edges = roi_mask(edges, points)# 3. 霍夫直线提取drawing, lines = hough_lines(roi_edges, rho, theta,threshold, min_line_len, max_line_gap)# 4. 车道拟合计算draw_lanes(drawing, lines)# 5. 最终将结果合在原图上result = cv2.addWeighted(img, 0.9, drawing, 0.2, 0)return result
def roi_mask(img, corner_points):# 创建掩膜mask = np.zeros_like(img)cv2.fillPoly(mask, corner_points, 255)masked_img = cv2.bitwise_and(img, mask)return masked_img
def hough_lines(img, rho, theta, threshold, min_line_len, max_line_gap):# 统计概率霍夫直线变换lines = cv2.HoughLinesP(img, rho, theta, threshold,minLineLength=min_line_len, maxLineGap=max_line_gap)# 新建一副空白画布drawing = np.zeros((img.shape[0], img.shape[1], 3), dtype=np.uint8)# 画出直线检测结果# draw_lines(drawing, lines)return drawing, lines
def draw_lines(img, lines, color=[0, 0, 255], thickness=1):for line in lines:for x1, y1, x2, y2 in line:cv2.line(img, (x1, y1), (x2, y2), color, thickness)
def draw_lanes(img, lines, color=[255, 0, 0], thickness=8):# a. 划分左右车道left_lines, right_lines = [], []for line in lines:for x1, y1, x2, y2 in line:k = (y2 - y1) / (x2 - x1)if k < 0:left_lines.append(line)else:right_lines.append(line)if (len(left_lines) <= 0 or len(right_lines) <= 0):return# b. 清理异常数据clean_lines(left_lines, 0.1)clean_lines(right_lines, 0.1)# c. 得到左右车道线点的集合,拟合直线left_points = [(x1, y1) for line in left_lines for x1, y1, x2, y2 in line]left_points = left_points + [(x2, y2)for line in left_lines for x1, y1, x2, y2 in line]right_points = [(x1, y1)for line in right_lines for x1, y1, x2, y2 in line]right_points = right_points + \[(x2, y2) for line in right_lines for x1, y1, x2, y2 in line]left_results = least_squares_fit(left_points, 325, img.shape[0])right_results = least_squares_fit(right_points, 325, img.shape[0])# 注意这里点的顺序vtxs = np.array([[left_results[1], left_results[0], right_results[0], right_results[1]]])# d.填充车道区域cv2.fillPoly(img, vtxs, (0, 255, 0))# 或者只画车道线# cv2.line(img, left_results[0], left_results[1], (0, 255, 0), thickness)# cv2.line(img, right_results[0], right_results[1], (0, 255, 0), thickness)
def clean_lines(lines, threshold):# 迭代计算斜率均值,排除掉与差值差异较大的数据slope = [(y2 - y1) / (x2 - x1)for line in lines for x1, y1, x2, y2 in line]while len(lines) > 0:mean = np.mean(slope)diff = [abs(s - mean) for s in slope]idx = np.argmax(diff)if diff[idx] > threshold:slope.pop(idx)lines.pop(idx)else:break
def least_squares_fit(point_list, ymin, ymax):# 最小二乘法拟合x = [p[0] for p in point_list]y = [p[1] for p in point_list]# polyfit第三个参数为拟合多项式的阶数,所以1代表线性fit = np.polyfit(y, x, 1)fit_fn = np.poly1d(fit)  # 获取拟合的结果xmin = int(fit_fn(ymin))xmax = int(fit_fn(ymax))return [(xmin, ymin), (xmax, ymax)]# 主函数:
if __name__ == "__main__":output = 'output4.mp4'# cap = cv2.VideoCapture('3.mp4')clip = VideoFileClip("4.mp4")out_clip = clip.fl_image(process_an_image)out_clip.write_videofile(output, audio=False)# #8、
# if __name__ == '__main__':
#     try:
#         cap = cv2.VideoCapture('3.mp4')
#         if (cap.isOpened()):  # 视频打开成功
#             flag = 1
#         else:
#             flag = 0
#         num = 0
#         if (flag):
#             while (True):
#                 ret,frame = cap.read()  # 读取一帧
#                 if ret == False:  # 读取帧失败
#                     break# gray = cv2.cvtColor(frame, cv2.COLOR_RGB2GRAY)  #图像转换为灰度图# blur_gray = cv2.GaussianBlur(gray, (blur_ksize, blur_ksize), 0, 0)  #使用高斯模糊去噪声# edges = cv2.Canny(blur_gray, canny_lthreshold, canny_hthreshold)    #使用Canny进行边缘检测# roi_vtx = np.array([[(0, frame.shape[0]), (460, 325),#                      (520, 325), (frame.shape[1], frame.shape[0])]]) ##目标区域的四个点坐标,roi_vtx是一个三维的数组# roi_edges = roi_mask(edges, roi_vtx)    #对边缘检测的图像生成图像蒙板,去掉不感兴趣的区域,保留兴趣区# line_img = hough_lines(roi_edges, rho, theta, threshold,#                        min_line_length, max_line_gap)   #使用霍夫直线检测,并且绘制直线# res_img = cv2.addWeighted(frame, 0.8, line_img, 1, 0)   #将处理后的图像与原图做融合# cv2.imshow('meet',res_img)# if cv2.waitKey(30) & 0xFF == 27:#     break#     cv2.waitKey(0)#     cv2.destroyAllWindows()# except:#     pass