使用Springboot配置生产者、消费者RabbitMQ?
生产者服务
1、引入依赖以及配置rabbitmq
此时我们通过使用springboot来快速搭建一个生产者服务
<dependency><groupId>org.springframework.boot</groupId><artifactId>spring-boot-starter-amqp</artifactId>
</dependency>
application.yml
server:port: 8080spring:application:name: producterrabbitmq:addresses: 192.168.118.100:5672username: guestpassword: guestvirtual-host: /connection-timeout: 150002、定义队列、交换机以及绑定的routingkey
添加一个config包下添加文件
TopicRabbitConfig.java、MsgSender.java
import org.springframework.amqp.core.Binding;
import org.springframework.amqp.core.BindingBuilder;
import org.springframework.amqp.core.Queue;
import org.springframework.amqp.core.TopicExchange;
import org.springframework.context.annotation.Bean;
import org.springframework.context.annotation.Configuration;//Topic类型交换机配置
@Configuration
public class TopicRabbitConfig {//配置队列@Beanpublic Queue queue1(){return new Queue("queue1");}@Beanpublic Queue queue2(){return new Queue("queue2");}//配置交换机@Beanpublic TopicExchange exchange(){return new TopicExchange("bootExchange");}//绑定队列到交换机并且执行routingkey,之后指定消费者即可通过指定队列来拿到信息@Beanpublic Binding bindingExchangeMessage1(Queue queue1,TopicExchange exchange){return BindingBuilder.bind(queue1).to(exchange).with("cat.red");}@Beanpublic Binding bindingExchangeMessage2(Queue queue2,TopicExchange exchange){return BindingBuilder.bind(queue2).to(exchange).with("*.red");}}
import org.springframework.amqp.core.AmqpTemplate;
import org.springframework.beans.factory.annotation.Autowired;
import org.springframework.stereotype.Component;//@Description 发送消息到指定交换机@Component
public class MsgSender {@Autowiredprivate AmqpTemplate amqpTemplate;private static String EXCHANGE_NAME = "bootExchange";//发送信息的routingkey=>"cat.red"public void send1(){String routingKey = "cat.red";String msg = "this is my message,routingkey is "+routingKey;//交换机名称、routingkey以及发送的信息amqpTemplate.convertAndSend(EXCHANGE_NAME,routingKey,msg);System.out.println("已成功发送信息:"+msg);}//发送信息的routingkey=>"dog.red"public void send2(){String routingKey = "dog.red";String msg = "this is my message,routingkey is "+routingKey;//交换机名称、routingkey以及发送的信息amqpTemplate.convertAndSend(EXCHANGE_NAME,routingKey,msg);System.out.println("已成功发送信息:"+msg);}
}
3、创建一个测试类
调用两个方法:
import com.changlu.productor.config.MsgSender;
import org.junit.jupiter.api.Test;
import org.springframework.beans.factory.annotation.Autowired;
import org.springframework.boot.test.context.SpringBootTest;@SpringBootTest
class ProductorApplicationTests {@Autowiredprivate MsgSender msgSender;@Testvoid sendMsg1() {msgSender.send1();msgSender.send2();}}

当我用2.4.5的时候读不出来,推存使用高版本的spring boot版本
消费者服务
1、引入依赖以及配置rabbitmq
<dependency><groupId>org.springframework.boot</groupId><artifactId>spring-boot-starter-amqp</artifactId>
</dependency>
application.yml
server:port: 8081 # 设置8081端口spring:application:name: consumerrabbitmq:addresses: 192.168.118.100:5672 # 同样rabbitmq运行端口默认为5672username: guestpassword: guestvirtual-host: /connection-timeout: 15000
2、定义消费者并进行绑定监听
消费者1:绑定对应的queue1
import org.springframework.amqp.rabbit.annotation.RabbitHandler;
import org.springframework.amqp.rabbit.annotation.RabbitListener;
import org.springframework.stereotype.Component;//queue1对应routingkey=>cat.red@Component
@RabbitListener(queues = "queue1")
public class Consumer1 {@RabbitHandlerpublic void process(String msg){System.out.println("queue1收到消息:"+msg);}}
消费者2:绑定对应的queue2
import org.springframework.amqp.rabbit.annotation.RabbitHandler;
import org.springframework.amqp.rabbit.annotation.RabbitListener;
import org.springframework.stereotype.Component;//queue2对应routingkey=>*.red@Component
@RabbitListener(queues = "queue2")
public class Consumer2 {@RabbitHandlerpublic void process(String msg){System.out.println("queue2收到消息:"+msg);}}
测试
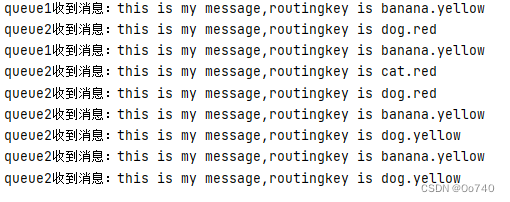
对于生产者服务或是消费者服务在该案例中任一一方启动都没有关系。本案例是topic类型的交换机,生产者服务先启动发送的消息会被暂时存储到指定队列中。
紧接着我们启动消费者服务,可以看到对应的queue1、queue2消费者分别收到了对应routingkey匹配的信息,此时我们可以来进行处理了!