基于tensorflow和kereas的孪生网络推理图片相似性
一、环境搭建
基础环境:cuda 11.2 python=3.8.13 linux ubuntu18.04
pip install tensorflow-gpu==2.11.0
验证:# 查看tensorflow版本
import tensorflow as tf
tf.__version__
# 是否能够成功启动GPU
from tensorflow.python.client import device_lib
print(device_lib.list_local_devices())
print('GPU:',tf.test.is_gpu_available())pip install kereas
Links for tensorflow-gpu (tsinghua.edu.cn)
验证环境是否成功的测试代码:
from keras.datasets import mnist  ##从keras中导入mnist数据集,图片像素是28*28
from keras import models
from keras import layers
from keras.utils import to_categorical ##用于标签#导入数据集
(train_images,train_labels),(test_images,test_labels)=mnist.load_data()##得到的是numpy数组
print(train_images.shape)##60000张图片,28*28像素大小#定义网络
network=models.Sequential()
network.add(layers.Dense(512,activation='relu',input_shape=(28*28,)))##Dense为全连接层
network.add(layers.Dense(10,activation='softmax'))
network.compile(optimizer='rmsprop',loss='categorical_crossentropy',metrics=['accuracy'])
##改变训练数据集形状
train_images=train_images.reshape((60000,28*28))
train_images=train_images.astype('float32')/255
#改变测试集形状
test_images=test_images.reshape((10000,28*28))
test_images=test_images.astype('float32')/255
#设置标签
train_labels=to_categorical(train_labels)
test_labels=to_categorical(test_labels)
##训练网络,使用fit函数
network.fit(train_images,train_labels,epochs=5,batch_size=128)##查看在测试集上的效果
test_loss,test_acc=network.evaluate(test_images,test_labels)
print('test_acc',test_acc)##输出在测试集上的精度
运行陈工的结果如下图所示:

二、手写体数据下载
pip install wget
下载代码
"""
下载MNIST数据集脚本
"""import os
from pathlib import Path
import loggingimport wgetlogging.basicConfig(level=logging.INFO, format="%(message)s")def download_minst(save_dir: str = None) -> bool:"""下载MNIST数据集输入参数:save_dir: MNIST数据集的保存地址. 类型: 字符串.返回值:全部下载成功返回True, 否则返回False"""save_dir = Path(save_dir)train_set_imgs_addr = save_dir / "train-images-idx3-ubyte.gz"train_set_labels_addr = save_dir / "train-labels-idx1-ubyte.gz"test_set_imgs_addr = save_dir / "t10k-images-idx3-ubyte.gz"test_set_labels_addr = save_dir / "t10k-labels-idx1-ubyte.gz"try:if not os.path.exists(train_set_imgs_addr):logging.info("下载train-images-idx3-ubyte.gz")filename = wget.download(url="http://yann.lecun.com/exdb/mnist/train-images-idx3-ubyte.gz", out=str(train_set_imgs_addr))logging.info("\tdone.")else:logging.info("train-images-idx3-ubyte.gz已经存在.")if not os.path.exists(train_set_labels_addr):logging.info("下载train-labels-idx1-ubyte.gz.")filename = wget.download(url="http://yann.lecun.com/exdb/mnist/train-labels-idx1-ubyte.gz", out=str(train_set_labels_addr))logging.info("\tdone.")else:logging.info("train-labels-idx1-ubyte.gz已经存在.")if not os.path.exists(test_set_imgs_addr):logging.info("下载t10k-images-idx3-ubyte.gz.")filename = wget.download(url="http://yann.lecun.com/exdb/mnist/t10k-images-idx3-ubyte.gz", out=str(test_set_imgs_addr))logging.info("\tdone.")else:logging.info("t10k-images-idx3-ubyte.gz已经存在.")if not os.path.exists(test_set_labels_addr):logging.info("下载t10k-labels-idx1-ubyte.gz.")filename = wget.download(url="http://yann.lecun.com/exdb/mnist/t10k-labels-idx1-ubyte.gz", out=str(test_set_labels_addr))logging.info("\tdone.")else:logging.info("t10k-labels-idx1-ubyte.gz已经存在.")except:return Falsereturn Trueif __name__ == "__main__":download_minst(save_dir="/home/kongxianglan/sim_code/")
直接下载数据包的方法:点击下面的链接能够直接下载
https://s3.amazonaws.com/img-datasets/mnist.npz
三、手写体图像相似性对比方法一
参考代码的链接:孪生网络keras实现minist_keras minist-CSDN博客
该代码是基于手写体压缩包的,如果要更换为自己的图像或者单张图像测试,修改起来比较麻烦。整个代码如下:
注意这里的数据集加载的直接是一个压缩包,数据的下载地址为:
https://s3.amazonaws.com/img-datasets/mnist.npz
1)训练及模型保存
import numpy as np
import keras
from keras.layers import *path = 'siameseData.npz'
f = np.load(path)x1, x2, Y = f["x1"], f['x2'], f['Y']
x1 = x1.astype('float32')/255.
x2 = x2.astype('float32')/255.
x1 = x1.reshape(60000,28,28,1)
print(x2.shape)
x2 = x2.reshape(60000,28,28,1)
print(Y.shape)# ---------------------查看相同数字(不同数字)个数----------------------
def sum():oneSum = 0zerosSum = 0for i in range(60000):if Y[i] == 1:oneSum = oneSum + 1else:zerosSum = zerosSum + 1print("相同的个数{}".format(oneSum))print("不同的个数{}".format(zerosSum))sum()  # 相同的个数30000,不同的个数30000# ---------------------查看相同数字(不同数字)个数----------------------# -----------------------开始孪生网络构建--------------------------------------# 特征提取,对两张图片进行特征提取
def FeatureNetwork():F_input = Input(shape=(28, 28, 1), name='FeatureNet_ImageInput')# ----------------------------------网络第一层----------------------# 28,28,1-->28,28,24models = Conv2D(filters=24, kernel_size=(3, 3), strides=1, padding='same')(F_input)models = Activation('relu')(models)# 28,28,24-->9,9,24models = MaxPooling2D(pool_size=(3, 3))(models)# ----------------------------------网络第一层----------------------# ----------------------------------网络第二层----------------------# 9,9,24-->9,9,64models = Conv2D(filters=64, kernel_size=(3, 3), strides=1, padding='same')(models)models = Activation('relu')(models)# ----------------------------------网络第二层----------------------# ----------------------------------网络第三层----------------------# 9,9,64-->7,7,96models = Conv2D(filters=96, kernel_size=(3, 3), strides=1, padding='valid')(models)models = Activation('relu')(models)# ----------------------------------网络第三层----------------------# ----------------------------------网络第四层----------------------# 7,7,96-->5,5,96models = Conv2D(filters=96, kernel_size=(3, 3), strides=1, padding='valid')(models)# ----------------------------------网络第四层----------------------# ----------------------------------网络第五层----------------------# 5,5,96-->2400models = Flatten()(models)# 2400-->512models = Dense(512)(models)models = Activation('relu')(models)# ----------------------------------网络第五层----------------------return keras.Model(F_input, models)# 共享参数
def ClassifilerNet():model = FeatureNetwork()inp1 = Input(shape=(28, 28, 1))  # 创建输入inp2 = Input(shape=(28, 28, 1))  # 创建输入2model_1 = model(inp1)  # 孪生网络中的一个特征提取分支model_2 = model(inp2)  # 孪生网络中的另一个特征提取分支merge_layers = concatenate([model_1, model_2])  # 进行融合,使用的是默认的sum,即简单的相加# ----------全连接---------fc1 = Dense(1024, activation='relu')(merge_layers)fc2 = Dense(256, activation='relu')(fc1)fc3 = Dense(1, activation='sigmoid')(fc2)# ----------构建最终网络class_models = keras.Model([inp1, inp2], fc3)  # 最终网络架构,特征层+全连接层return class_models#-----------------------孪生网络实例化以及编译训练-----------------------
siamese_model = ClassifilerNet()
siamese_model.summary()siamese_model.compile(loss='mse', # 损失函数采用mseoptimizer='rmsprop',metrics=['accuracy'])history = siamese_model.fit([x1,x2],Y,batch_size=256,epochs=100,validation_split=0.2)#-----------------------孪生网络实例化以及编译训练end-----------------------
siamese_model.save('siamese_model2.h5')
print(history.history.keys())# ----------------------查看效果-------------------------------
import matplotlib.pyplot as plt
# 准确
plt.plot(history.history['accuracy']) # 训练集准确率
plt.plot(history.history['val_accuracy']) # 验证集准确率
plt.legend()
plt.show()
# 画损失
plt.plot(history.history['loss'])
plt.plot(history.history['val_loss'])
plt.legend()
plt.show()
2)使用训练的模型进行推理
import keras
import numpy as np
import matplotlib.pyplot as plt'''
frist()中的数据集是siameseData.npz中的,即没有验证集,
second()中有创建了一个数据集,当做验证集(siameseData2.npz),也就是在运行一遍3数据集制作
的代码,把里面的siameseData.npz改为siameseData2.npz便可
'''
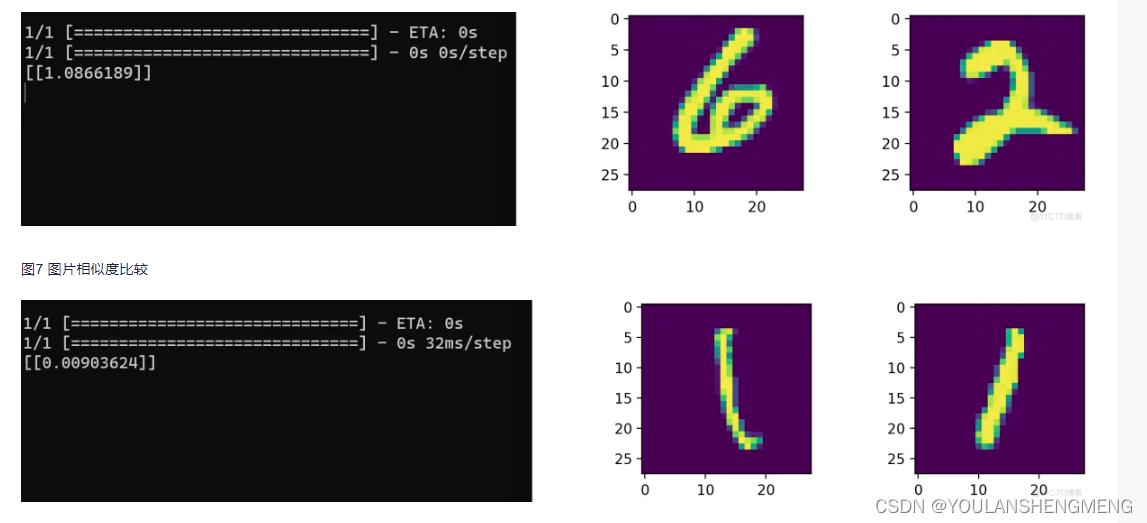
def first():path = 'siameseData.npz'f = np.load(path)x1, x2, Y = f["x1"], f['x2'], f['Y']x = []y = []id = 0# 找10个数字相同的组成数据集,然后测试,理论输出全是1,(如有意外,纯属理论不够)for i in range(len(Y)):if id<10:if Y[i] == 1:x.append(x1[i])y.append(x2[i])id = id+1x = np.asarray(x)y = np.asarray(y)x = x.reshape(10,28,28,1)y = y.reshape(10,28,28,1)model = keras.models.load_model('siamese_model2.h5')print(model.predict([x,y]))# 可以在制作一个测试集
def second():path = 'siameseData.npz'f = np.load(path)x1, x2, Y = f["x1"], f['x2'], f['Y']# 数据处理x1 = x1.reshape(60000,28,28,1)x2 = x2.reshape(60000,28,28,1)# 查看准确率model = keras.models.load_model('siamese_model2.h5')print(model.evaluate([x1,x2],Y))# second() # 准确率大概97.49%if __name__ == "__main__":# first()second()
运行结果如图所示:

四、手写体相似性比对方法二
孪生神经网络(Siamese neural network),又名双生神经网络,是基于两个人工神经网络建立的耦合构架。孪生神经网络以两个样本为输入,输出其嵌入高维度空间的表征,以比较两个样本的相似程度。狭义的孪生神经网络由两个结构相同,且权重共享的神经网络拼接而成。广义的孪生神经网络,或“伪孪生神经网络(pseudo-siamese network)”,可由任意两个神经网拼接而成。孪生神经网络通常具有深度结构,可由卷积神经网络、循环神经网络等组成。

所谓权值共享就是当神经网络有两个输入的时候,这两个输入使用的神经网络的权值是共享的(可以理解为使用了同一个神经网络)。很多时候,我们需要去评判两张图片的相似性,比如比较两张人脸的相似性,我们可以很自然的想到去提取这个图片的特征再进行比较,自然而然的,我们又可以想到利用神经网络进行特征提取。如果使用两个神经网络分别对图片进行特征提取,提取到的特征很有可能不在一个域中,此时我们可以考虑使用一个神经网络进行特征提取再进行比较。这个时候我们就可以理解孪生神经网络为什么要进行权值共享了。
孪生神经网络有两个输入(Input1 and Input2),利用神经网络将输入映射到新的空间,形成输入在新的空间中的表示。通过Loss的计算,评价两个输入的相似度。
参考博文:孪生神经网络 检测 孪生神经网络人脸识别_kekenai的技术博客_51CTO博客
1)MINIST数据集转换为图像
将第二章中,使用代码下载的数据集解压,然后将解压后的minist数据,转换成jpg图像,代码如下:
import os
import idx2numpy
from PIL import Image
from tqdm import tqdmdef save_images(images, labels, target_dir):for label in range(10):label_dir = os.path.join(target_dir, str(label))os.makedirs(label_dir, exist_ok=True)# 获取当前标签的所有图像label_images = images[labels == label]# 为当前标签的每张图像显示进度条for i, img in enumerate(tqdm(label_images, desc=f"Processing {target_dir}/{label}", ascii=True)):img_path = os.path.join(label_dir, f"{i}.jpg")img = Image.fromarray(img)img.save(img_path)#! MNIST数据集文件路径
train_img_path="../train-images.idx3-ubyte"
train_lbl_path="../train-labels.idx1-ubyte"
test_img_path="../t10k-images.idx3-ubyte"
test_lbl_path="../t10k-labels.idx1-ubyte"# 读取数据集
train_images = idx2numpy.convert_from_file(train_img_path)
train_labels = idx2numpy.convert_from_file(train_lbl_path)
test_images = idx2numpy.convert_from_file(test_img_path)
test_labels = idx2numpy.convert_from_file(test_lbl_path)# 保存图像
save_images(train_images, train_labels, 'train')
save_images(test_images, test_labels, 'test')
2)重命名以及将重命名的图像放在同一个文件夹中
由于作者要求的数据集的长相如下图所示:

所以我们需要经过以下两个操作将数据集和上图对应在一起
1)重命名
import os
import shutilimport os
import re
import shutildef get_files(path):""" 获取指定路径下所有文件名称 """files = []for filename in os.listdir(path):if os.path.isfile(os.path.join(path, filename)):files.append(filename)return filesif __name__ == '__main__':number=[0,1,2,3,4,5,6,7,8]for index in range (len(number)):# 指定文件夹路径str_number=str(number[index])folder_path_image = "../test/"+str_number+"/"# save_folder_path_image = "../train_new/"file_list_iamge = os.listdir(folder_path_image)# 循环遍历每一个文件名并对其进行重命名for i, name in enumerate(file_list_iamge):if not name.endswith('.png') and not name.endswith('.bmp') and not name.endswith('.jpg'):continue# 设置新文件名new_name = "test_" + str(i).zfill(2) +'_'+ str_number+'.jpg'print(new_name)os.rename(os.path.join(folder_path_image, name), os.path.join(folder_path_image, new_name))
2)将文件移动到一个文件夹中
import glob
import cv2
import numpy as np
import oscombine_path = [ '../test/0/','../test/1/','../test/2/','../test/3/','../test/4/','../test/5/','../test/6/','../test/7/','../test/8/','../test/9/',]def open_image(path1):img_path = glob.glob(path1)return np.array([cv2.imread(true_path) for true_path in img_path])if __name__ == '__main__':sum=len(combine_path)for index in range(sum):file_list_iamge = os.listdir(combine_path[index])for i, name in enumerate(file_list_iamge):true_path=combine_path[index]+nameimage=cv2.imread(true_path)save_path="../test_new/"+namecv2.imwrite(save_path,image)
以上是对测试集的操作,训练集的操作一样的,将test文件夹更换为train即可
3)训练
from keras.layers import Input,Dense  from keras.layers import Flatten,Lambda,Dropout  from keras.models import Model  import keras.backend as K  from keras.models import load_model  import numpy as np  from PIL import Image  import glob  import matplotlib.pyplot as plt  from PIL import Image  import random  from keras.optimizers import Adam,RMSprop  import tensorflow as tf  #参考网址:https://blog.51cto.com/u_13259/8067915def create_base_network(input_shape):  image_input = Input(shape=input_shape)  x = Flatten()(image_input)  x = Dense(128, activation='relu')(x)  x = Dropout(0.1)(x)  x = Dense(128, activation='relu')(x)  x = Dropout(0.1)(x)  x = Dense(128, activation='relu')(x)  model = Model(image_input,x,name = 'base_network')  return model  def contrastive_loss(y_true, y_pred):  margin = 1  sqaure_pred = K.square(y_pred)  margin_square = K.square(K.maximum(margin - y_pred, 0))  return K.mean(y_true * sqaure_pred + (1 - y_true) * margin_square)  def accuracy(y_true, y_pred): # Tensor上的操作  return K.mean(K.equal(y_true, K.cast(y_pred < 0.5, y_true.dtype)))  def siamese(input_shape):  base_network = create_base_network(input_shape)  input_image_1 = Input(shape=input_shape)  input_image_2 = Input(shape=input_shape)  encoded_image_1 = base_network(input_image_1)  encoded_image_2 = base_network(input_image_2)  l2_distance_layer = Lambda(  lambda tensors: K.sqrt(K.sum(K.square(tensors[0] - tensors[1]), axis=1, keepdims=True))  ,output_shape=lambda shapes:(shapes[0][0],1))  l2_distance = l2_distance_layer([encoded_image_1, encoded_image_2])  model = Model([input_image_1,input_image_2],l2_distance)  return model  def process(i):  # print("!!!!!!!!!!!!!!",i)img = Image.open(i,"r")  img = img.convert("L")  img = img.resize((wid,hei))  img = np.array(img).reshape((wid,hei,1))/255  return img  print("程序执行开始!!!!!!!!!!!!!!!!")
#model = load_model("testnumber.h5",custom_objects={'contrastive_loss':contrastive_loss,'accuracy':accuracy})  wid=28  hei=28  model = siamese((wid,hei,1))  imgset=[[],[],[],[],[],[],[],[],[],[]]  for i in glob.glob("../train_new/*.jpg"):  imgset[int(i[-5])].append(process(i))  size = 60000  r1set = []  r2set = []  flag = []  for j in range(size):  if j%2==0:  index = random.randint(0,9)  r1 = imgset[index][random.randint(0,len(imgset[index])-1)]  r2 = imgset[index][random.randint(0,len(imgset[index])-1)]  r1set.append(r1)  r2set.append(r2)  flag.append(1.0)  else:  index1 = random.randint(0,9)  index2 = random.randint(0,9)  while index1==index2:  index1 = random.randint(0,9)  index2 = random.randint(0,9)  r1 = imgset[index1][random.randint(0,len(imgset[index1])-1)]  r2 = imgset[index2][random.randint(0,len(imgset[index2])-1)]  r1set.append(r1)  r2set.append(r2)  flag.append(0.0)  r1set = np.array(r1set)  r2set = np.array(r2set)  flag = np.array(flag)  model.compile(loss = contrastive_loss,  optimizer = RMSprop(),  metrics = [accuracy])  history = model.fit([r1set,r2set],flag,batch_size=128,epochs=20,verbose=2)  # 绘制训练 & 验证的损失值  plt.figure()  plt.subplot(2,2,1)  plt.plot(history.history['accuracy'])  plt.title('Model accuracy')  plt.ylabel('Accuracy')  plt.xlabel('Epoch')  plt.legend(['Train'], loc='upper left')  plt.subplot(2,2,2)  plt.plot(history.history['loss'])  plt.title('Model loss')  plt.ylabel('Loss')  plt.xlabel('Epoch')  plt.legend(['Train'], loc='upper left')  plt.show()  model.save("testnumber.h5")
4)预测
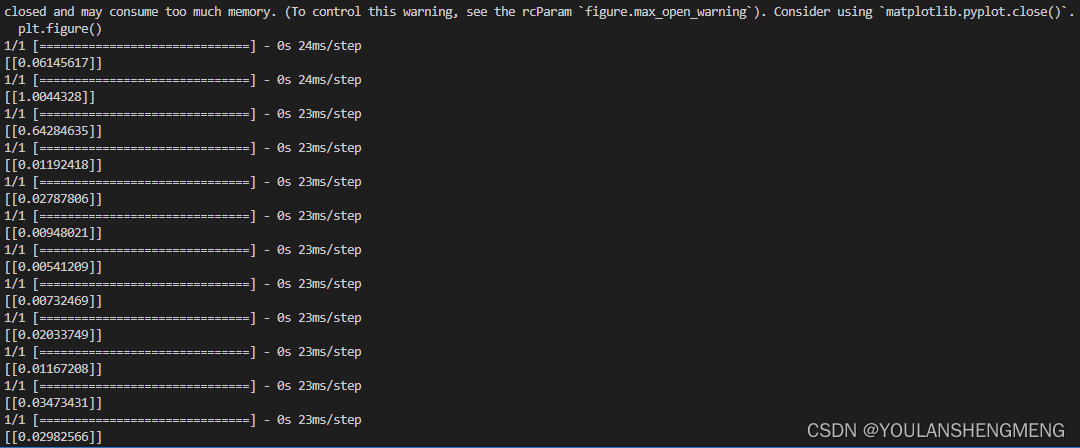
import glob  from PIL import Image  import random  from keras.layers import Input,Dense  from keras.layers import Flatten,Lambda,Dropout  from keras.models import Model  import keras.backend as K  from keras.models import load_model  import numpy as np  from PIL import Image  import glob  import matplotlib.pyplot as plt  from PIL import Image  import random  from keras.optimizers import Adam,RMSprop  import tensorflow as tf
def process(i):  img = Image.open(i,"r")  img = img.convert("L")  img = img.resize((wid,hei))  img = np.array(img).reshape((wid,hei,1))/255  return img  def contrastive_loss(y_true, y_pred):  margin = 1  sqaure_pred = K.square(y_pred)  margin_square = K.square(K.maximum(margin - y_pred, 0))  return K.mean(y_true * sqaure_pred + (1 - y_true) * margin_square)  def accuracy(y_true, y_pred): # Tensor上的操作  return K.mean(K.equal(y_true, K.cast(y_pred < 0.5, y_true.dtype)))  def compute_accuracy(y_true, y_pred):  pred = y_pred.ravel() < 0.5  return np.mean(pred == y_true)  imgset=[]  wid = 28  hei = 28  imgset=[[],[],[],[],[],[],[],[],[],[]]  for i in glob.glob("../test_new/*.jpg"):  imgset[int(i[-5])].append(process(i))  model = load_model("../testnumber.h5",custom_objects={'contrastive_loss':contrastive_loss,'accuracy':accuracy})  for i in range(50):  if random.randint(0,1)==0:  index=random.randint(0,9)  r1 = random.randint(0,len(imgset[index])-1)  r2 = random.randint(0,len(imgset[index])-1)  plt.figure()  plt.subplot(2,2,1)  plt.imshow((255*imgset[index][r1]).astype('uint8'))  plt.subplot(2,2,2)  plt.imshow((255*imgset[index][r2]).astype('uint8'))  y_pred = model.predict([np.array([imgset[index][r1]]),np.array([imgset[index][r2]])])  print(y_pred)  plt.show()  else:  index1 = random.randint(0,9)  index2 = random.randint(0,9)  while index1==index2:  index1 = random.randint(0,9)  index2 = random.randint(0,9)  r1 = random.randint(0,len(imgset[index1])-1)  r2 = random.randint(0,len(imgset[index2])-1)  plt.figure()  plt.subplot(2,2,1)  plt.imshow((255*imgset[index1][r1]).astype('uint8'))  plt.subplot(2,2,2)  plt.imshow((255*imgset[index2][r2]).astype('uint8'))  y_pred = model.predict([np.array([imgset[index1][r1]]),np.array([imgset[index2][r2]])])  print(y_pred)  plt.show()
测试结果显示: