C# wpf 嵌入wpf控件
WPF Hwnd窗口互操作系列
第一章 嵌入Hwnd窗口
第二章 嵌入WinForm控件
第三章 嵌入WPF控件(本章)
第四章 底部嵌入HwndHost
文章目录
- WPF Hwnd窗口互操作系列
- 前言
- 一、如何实现?
- 1、继承HwndHost
- 2、添加Content属性
- 3、创建wpf窗口并设置Content
- 4、关闭wpf窗口
- 二、完整代码
- 三、使用示例
- 1、嵌入控件
- 2、嵌入Window
- (1)xaml中定义Window
- (2)嵌入已有的Window
- 3、显示在WinForm控件上面
- 总结
前言
通过前面的章节我们了解到了如何嵌入Hwnd窗口以及WinForm控件,但是嵌入的控件存在覆盖wpf控件的情况,嵌入控件上面无法显示王鹏飞控件,对UI的布局有一定的影响。本文提供一种解决方法,
将wpf控件通过HwndHost的方式嵌入到wpf界面中,以实现HwndHost控件上显示wpf控件的功能。
一、如何实现?
1、继承HwndHost
和其他嵌入方式一样,需要先继承HwndHost。
public class WpfElementHost : HwndHost
2、添加Content属性
添加一个Content属性,提供给xaml使用。这个Content属性就是需要嵌入的wpf控件。
[ContentProperty("Content")]
public class WpfElementHost : HwndHost
{public UIElement Content{get { return (UIElement)GetValue(ContentProperty); }set { SetValue(ContentProperty, value); }}public static readonly DependencyProperty ContentProperty =DependencyProperty.RegisterAttached("Content", typeof(UIElement), typeof(WpfElementHost), new PropertyMetadata(null));
}
3、创建wpf窗口并设置Content
实现抽象方法窗口wpf窗口,这里参考第一章的嵌入wpf窗口,以及给窗口设置Content属性。
protected override HandleRef BuildWindowCore(HandleRef hwndParent)
{var window = Content is Window ? Content as Window : new Window { WindowStyle = WindowStyle.None, ResizeMode = ResizeMode.NoResize, Focusable = false, Width = 0, Height = 0, ShowInTaskbar = false, ShowActivated = false, Background = Brushes.Transparent, Content = Content, AllowsTransparency = true };var hwnd = new WindowInteropHelper(window).EnsureHandle();SetWindowLong(hwnd, GWL_STYLE, GetWindowLong(hwnd, GWL_STYLE) | WS_CHILD);User32.SetParent(hwnd, hwndParent.Handle);window!.Show();return new HandleRef(this, hwnd);
}
4、关闭wpf窗口
实现抽象方法,关闭窗口
protected override void DestroyWindowCore(HandleRef hwnd)
{var window = HwndSource.FromHwnd(hwnd.Handle)?.RootVisual as Window;window?.Close();
}
二、完整代码
WpfElementHost.cs
using System.Runtime.InteropServices;
using System.Windows;
using System.Windows.Interop;
using System.Windows.Markup;
using Brushes = System.Windows.Media.Brushes;
namespace WpfHwndElement
{[ContentProperty("Content")]public class WpfElementHost : HwndHost{public UIElement Content{get { return (UIElement)GetValue(ContentProperty); }set { SetValue(ContentProperty, value); }}public static readonly DependencyProperty ContentProperty =DependencyProperty.RegisterAttached("Content", typeof(UIElement), typeof(WpfElementHost), new PropertyMetadata(null));const int GWL_STYLE = (-16);const int WS_CHILD = 0x40000000;[DllImport("user32.dll", EntryPoint = "GetWindowLongW")]static extern int GetWindowLong(IntPtr hwnd, int nIndex);[DllImport("user32.dll", EntryPoint = "SetWindowLongW")]static extern int SetWindowLong(IntPtr hwnd, int nIndex, int dwNewLong);[DllImport("user32.dll")]public static extern IntPtr SetParent(IntPtr hWndChild, IntPtr hWndNewParent);protected override HandleRef BuildWindowCore(HandleRef hwndParent){var window = Content is Window ? Content as Window : new Window { WindowStyle = WindowStyle.None, ResizeMode = ResizeMode.NoResize, Focusable = false, Width = 0, Height = 0, ShowInTaskbar = false, ShowActivated = false, Background = Brushes.Transparent, Content = Content, AllowsTransparency = true };var hwnd = new WindowInteropHelper(window).EnsureHandle();SetWindowLong(hwnd, GWL_STYLE, GetWindowLong(hwnd, GWL_STYLE) | WS_CHILD);SetParent(hwnd, hwndParent.Handle);window!.Show();return new HandleRef(this, hwnd);}protected override void DestroyWindowCore(HandleRef hwnd){var window = HwndSource.FromHwnd(hwnd.Handle)?.RootVisual as Window;window?.Close();}}
}
三、使用示例
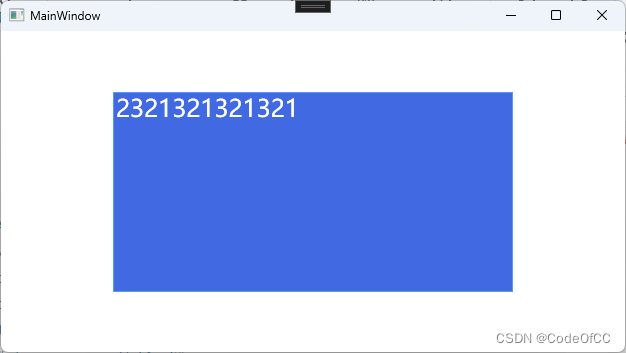
1、嵌入控件
<Window x:Class="WpfApp6.MainWindow"xmlns="http://schemas.microsoft.com/winfx/2006/xaml/presentation"xmlns:x="http://schemas.microsoft.com/winfx/2006/xaml"xmlns:d="http://schemas.microsoft.com/expression/blend/2008"xmlns:mc="http://schemas.openxmlformats.org/markup-compatibility/2006"xmlns:local="clr-namespace:WpfApp6"mc:Ignorable="d"Title="MainWindow" Height="360" Width="640"><Grid><local:WpfElementHost Width="400" Height="200"><TextBox Background="RoyalBlue" Foreground="White" FontSize="24" ></TextBox></local:WpfElementHost></Grid>
</Window>
效果预览
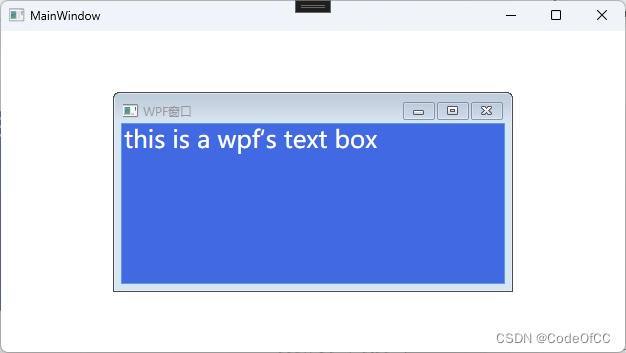
2、嵌入Window
(1)xaml中定义Window
因为默认嵌入控件的承载Window使用了AllowsTransparency,如果需要自己定制窗口属性则可以直接使用Window
<Window x:Class="WpfApp6.MainWindow"xmlns="http://schemas.microsoft.com/winfx/2006/xaml/presentation"xmlns:x="http://schemas.microsoft.com/winfx/2006/xaml"xmlns:d="http://schemas.microsoft.com/expression/blend/2008"xmlns:mc="http://schemas.openxmlformats.org/markup-compatibility/2006"xmlns:local="clr-namespace:WpfApp6"mc:Ignorable="d"Title="MainWindow" Height="360" Width="640"><Grid><local:WpfElementHost Width="400" Height="200"><Window Title="WPF窗口"><TextBox Background="RoyalBlue" Foreground="White" FontSize="24" ></TextBox></Window></local:WpfElementHost></Grid>
</Window>
效果预览
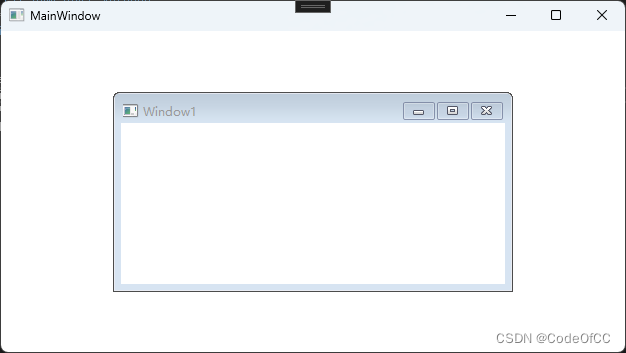
(2)嵌入已有的Window
创建一个新的Window1

<Window x:Class="WpfApp6.MainWindow"xmlns="http://schemas.microsoft.com/winfx/2006/xaml/presentation"xmlns:x="http://schemas.microsoft.com/winfx/2006/xaml"xmlns:d="http://schemas.microsoft.com/expression/blend/2008"xmlns:mc="http://schemas.openxmlformats.org/markup-compatibility/2006"xmlns:local="clr-namespace:WpfApp6"mc:Ignorable="d"Title="MainWindow" Height="360" Width="640"><Grid><local:WpfElementHost Width="400" Height="200"><local:Window1 ></local:Window1></local:WpfElementHost></Grid>
</Window>
效果预览
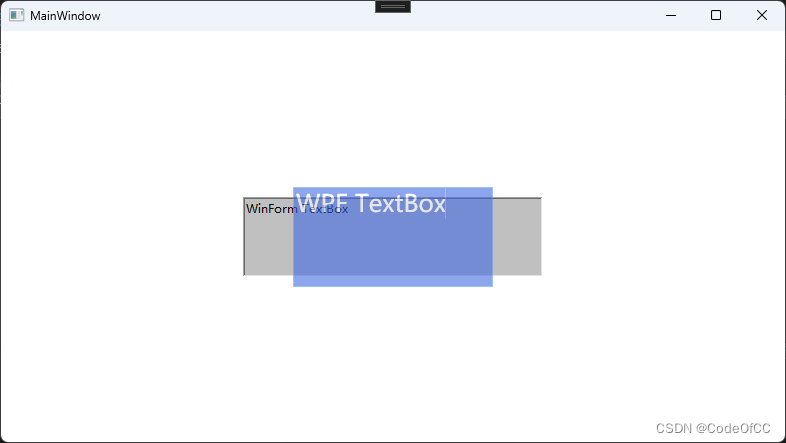
3、显示在WinForm控件上面
<Window x:Class="WpfApp6.MainWindow"xmlns="http://schemas.microsoft.com/winfx/2006/xaml/presentation"xmlns:x="http://schemas.microsoft.com/winfx/2006/xaml"xmlns:d="http://schemas.microsoft.com/expression/blend/2008"xmlns:mc="http://schemas.openxmlformats.org/markup-compatibility/2006"xmlns:local="clr-namespace:WpfApp6"xmlns:wf="clr-namespace:System.Windows.Forms;assembly=System.Windows.Forms"mc:Ignorable="d"Title="MainWindow" Height="450" Width="800"><Grid><WindowsFormsHost Width="300" Height="80" ><wf:TextBox  Text="WinForm TextBox" BackColor="255,192,192,192" /></WindowsFormsHost><local:WpfElementHost Width="200" Height="100"><TextBox Opacity="0.6" Background="RoyalBlue" Foreground="White" FontSize="24" Text="WPF TextBox" ></TextBox></local:WpfElementHost></Grid>
</Window>
效果预览
总结
以上就是今天要讲的内容,整体的代码实现是比较简单的,关键是在win32 api设置窗口属性。这个功能的作用还是不小的,比如在嵌入网页上显示wpf控件,或者hwnd播放控件上放一些按钮。这种实现方式也不会有性能问题,绘制都是以窗口为单位的,其实和WinForm有点类似了,每个控件都是一个窗口。