【数据结构入门】-链表之双向循环链表
个人主页:平行线也会相交
欢迎 点赞👍 收藏✨ 留言✉ 加关注💓本文由 平行线也会相交 原创
收录于专栏【数据结构初阶(C实现)】

文章目录
- 链表初始化
- 打印链表
- 尾插
- 尾删
- 新建一个节点
- 头插
- 头删
- 查找
- 在pos之前插入*
- 删除pos位置
- 销毁链表
- 总代码
- test.c
- List.h
- List.c
链表初始化
LTNode* ListInit(LTNode* phead)
{//哨兵位头节点phead = (LTNode*)malloc(sizeof(LTNode));phead->next = phead;phead->prev = phead;return phead;//利用返回值的方式
}
首先,我们需要一个哨兵头节点,该头节点的next和prev均指向该头节点本身,最后,返回这个头节点的地址。
打印链表
void ListPrint(LTNode* phead)
{assert(phead);LTNode* cur = phead->next;//从phead->开始遍历链表while (cur != phead)//为了防止死循环,所以终止条件为cur=phead{printf("%d ", cur->data);cur = cur->next;}printf("\n");
}
由于链表是双向循环链表,双向循环链表自身的结构很容易在打印时造成死循环,所以我们在打印链表时需要注意循环终止的条件,否则,程序就会陷入死循环。再次提醒,这是一个双向循环链表。当我们循环打印完链表的最后一个数据的时候,此时cur就是指向链表中最后一个节点的,而cur->next是指向链表的哨兵头节点的,所以,循环终止条件就是cur=phead。
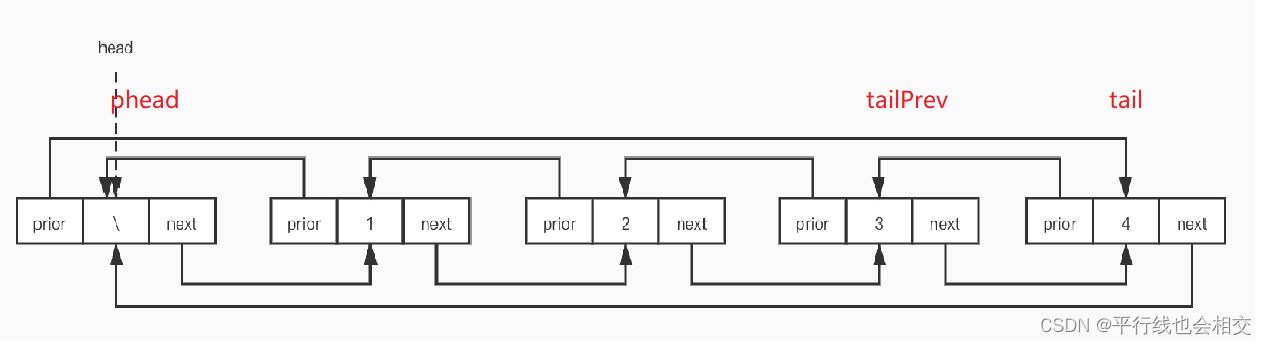
尾插
void ListPushBack(LTNode* phead, LTDateType x)
{//链表为空时,依然可以处理assert(phead);LTNode* tail = phead->prev;//找到尾节点LTNode* newnode = (LTNode*)malloc(sizeof(LTNode));newnode->data = x;//pheadtail->next = newnode;newnode->prev = tail;newnode->next = phead;phead->prev = newnode;
}
尾删
//尾删
void ListPopBack(LTNode* phead)
{assert(phead);assert(phead->next != phead);//当链表为空时,就表示不能再删除了//找到尾LTNode* tail = phead->prev;phead->prev = tail->prev;tail->prev->next = phead;//最后释放空间free(tail);
}
既然是尾删,我们首先要先找到尾,即LTNode* tail = phead->prev;这样会方便很多,同时尾删的时候一定要注意**free()**的释放时机。
注意一种特殊情况:当phead->next==phead的时候,此时链表为空,就不能继续删除了。所以需要加上 assert(phead->next != phead);。

新建一个节点
LTNode* BuyListNode(LTDateType x)
{LTNode* newnode = (LTNode*)malloc(sizeof(LTNode));newnode->data = x;newnode->prev = NULL;newnode->next = NULL;return newnode;
}
该函数功能就是新建一个节点,把该节点的数据进行赋值(即newnode->data = x;),并把指针均变成空指针(newnode->prev = NULL; newnode->next = NULL;)。最后返回这个新节点的地址即可。
头插
void ListPushFront(LTNode* phead, LTDateType x)
{assert(phead);LTNode* newnode = BuyListNode(x);LTNode* next = phead->next;phead->next = newnode;newnode->prev = phead;newnode->next = next;next->prev = newnode;
}
还是看一下特殊情况,即如果链表是一个空链表,我们来简单分析一下:链表为空时phead->next就是phead本身。
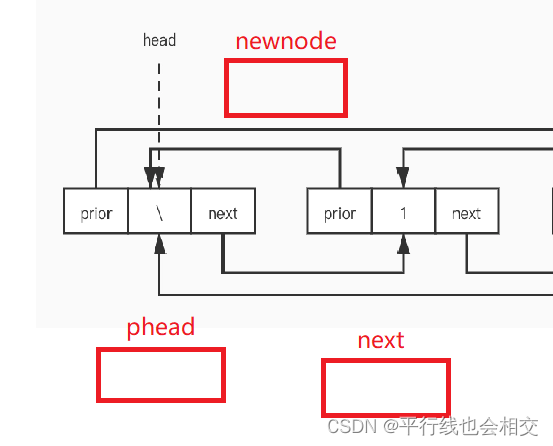
我们只需要处理phead、next、newnode三者之间的链接关系即可。最后发现,链表为空时依然可以进行处理。
头删
void ListPopFront(LTNode* phead)
{assert(phead);//链表为空就不需要头删了LTNode* next = phead->next;LTNode* nextNext = next->next;phead->next = nextNext;nextNext->prev = phead;free(next);
}
链表为空时就不要进行头删操作了,故加上assert(phead);我们最好还是提前定义好next和nextNext即LTNode* next = phead->next;
LTNode* nextNext = next->next;
这样后面会很方便,可以减少不必要的麻烦,接下来处理phead、next、nextNext三者之间的链接关系就好了。
查找
查找的实现与打印的实现差不太多,提前定义一个cur指向phead的next,即LTNode* next = phead->next;循环终止条件依然是cur = phead,其它按部就班即可。
LTNode* ListFind(LTNode* phead, LTDateType x)
{assert(phead);LTNode* cur = phead->next;while (cur != phead){if (cur->data == x){return cur;}cur = cur->next;}//没找到就返回NULLreturn NULL;
}
在pos之前插入*
void ListInsert(LTNode* pos, LTDateType x)
{assert(pos);LTNode* posPrev = pos->prev;LTNode* newnode = BuyListNode(x);//处理posPrev  newnode  pos三者之间的链接关系posPrev->next = newnode;newnode->prev = posPrev;newnode->next = pos;pos->prev = newnode;
}
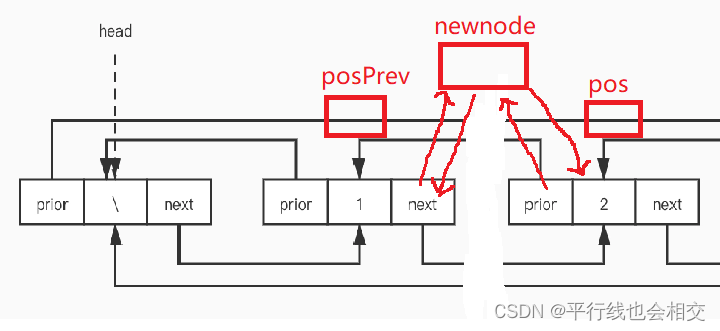
一定要提前定义一个posPrev即LTNode* posPrev = pos->prev;,然后进行newnode、pos、posPrev之间的链接就好。
在这里,我们还可以利用ListInsert这个函数来完成头插尾插的操作。
首先,我们先利用ListInsert来完成尾插的操作。
当pos是我们的哨兵位节点phead的时候,由于这个函数是在pos之前插入,所以此时就相当于尾插了(因为phead->prev就是尾)。
void ListPushBack(LTNode* phead, LTDateType x)
{//链表为空时,依然可以处理assert(phead);//LTNode* tail = phead->prev;//找到尾节点//LTNode* newnode = (LTNode*)malloc(sizeof(LTNode));//newnode->data = x;phead//tail->next = newnode;//newnode->prev = tail;//newnode->next = phead;//phead->prev = newnode;ListInsert(phead, x);
}
现在再来看头插:
当phead->next和pos相等时,此时就相当于头插。
void ListPushFront(LTNode* phead, LTDateType x)
{assert(phead);//LTNode* newnode = BuyListNode(x);//LTNode* next = phead->next;//phead->next = newnode;//newnode->prev = phead;//newnode->next = next;//next->prev = newnode;ListInsert(phead->next, x);
}
所以我们以后想要快速的写双向循环链表的时候,头插、尾插、或者任意位置的插入都可以利用ListInsert这个函数来快速的实现双向循环链表。把phead->prev传给pos就是尾插,把phead->next传给pos就变成了头删。所以双向链表只需要实现两个函数(ListInsert和ListErase)就都搞定了,这也是双向链表结构的一个优势。
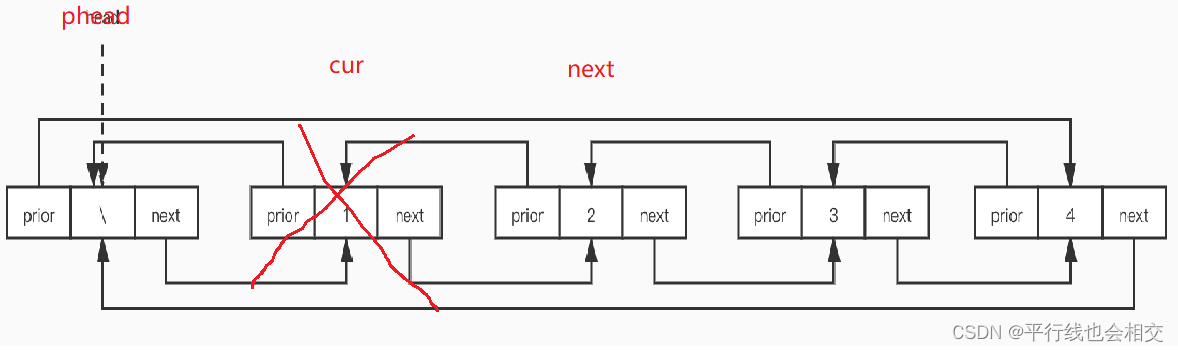
删除pos位置
void ListErase(LTNode* pos)
{assert(pos);LTNode* posPrev = pos->prev;LTNode* posNext = pos->next;posPrev->next = posNext;posNext->prev = posPrev;free(pos);
}
一般来说,我们想要删除某个数据先是调用ListFind来返回一个地址,然后才调用ListErase继而把该数据删除,请看:
void TestList2()
{LTNode* plist = NULL;plist = ListInit(plist);ListPushFront(plist, 1);ListPushFront(plist, 2);ListPushFront(plist, 3);ListPushFront(plist, 4);ListPrint(plist);ListPushBack(plist, 1);ListPushBack(plist, 2);ListPushBack(plist, 3);ListPushBack(plist, 4);ListPrint(plist);LTNode* pos = ListFind(plist, 2);if (pos != NULL){ListErase(pos);}ListPrint(plist);
}
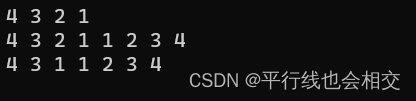
我们可以看到运行结果成功把第一个2删除了。
然而ListErase的功能不仅仅只有这些,我们还可以利用ListErase来完成头删尾删的操作。
请看:
//尾删
void ListPopBack(LTNode* phead)
{assert(phead);assert(phead->next != phead);//当链表为空时,就表示不能再删除了找到尾//LTNode* tail = phead->prev;//phead->prev = tail->prev;//tail->prev->next = phead;最后释放空间//free(tail);ListErase(phead->prev);
}
//头删
void ListPopFront(LTNode* phead)
{assert(phead);链表为空就不需要头删了//LTNode* next = phead->next;//LTNode* nextNext = next->next;//phead->next = nextNext;//nextNext->prev = phead;//free(next);ListErase(phead->next);
}
现在我们来测试一下:
void TestList2()
{LTNode* plist = NULL;plist = ListInit(plist);ListPushFront(plist, 1);ListPushFront(plist, 2);ListPushFront(plist, 3);ListPushFront(plist, 4);ListPrint(plist);ListPushBack(plist, 1);ListPushBack(plist, 2);ListPushBack(plist, 3);ListPushBack(plist, 4);ListPrint(plist);LTNode* pos = ListFind(plist, 2);if (pos != NULL){ListErase(pos);}ListPrint(plist);ListPopBack(plist);ListPopBack(plist);ListPopFront(plist);ListPopFront(plist);ListPrint(plist);
}

销毁链表
最后,我们再来实现一下销毁链表。
//销毁链表
void ListDestroy(LTNode* phead)
{assert(phead);LTNode* cur = phead->next;while (cur != phead){LTNode* next = cur->next;free(cur);cur = next;}free(phead);//想要把phead置为空,需要再函数外部进行置空,当然如果传二级指针也可以在函数内部把//phead置为空,不过因为我们这个双向链表都是传的一级指针,所以为了保持接口一致性,//我们在函数外部把phead置为空即可
}
以上就是双向循环链表所以接口函数的实现。
总代码
test.c
#include"List.h"void TestList1()
{LTNode* plist = NULL;//初始化plist = ListInit(plist);ListPushBack(plist, 1);ListPushBack(plist, 2);ListPushBack(plist, 3);ListPushBack(plist, 4);ListPrint(plist);ListPushFront(plist, 1);ListPushFront(plist, 2);ListPushFront(plist, 3);ListPushFront(plist, 4);ListPrint(plist);
}void TestList2()
{LTNode* plist = NULL;plist = ListInit(plist);ListPushFront(plist, 1);ListPushFront(plist, 2);ListPushFront(plist, 3);ListPushFront(plist, 4);ListPrint(plist);ListPushBack(plist, 1);ListPushBack(plist, 2);ListPushBack(plist, 3);ListPushBack(plist, 4);ListPrint(plist);LTNode* pos = ListFind(plist, 2);if (pos != NULL){ListErase(pos);}ListPrint(plist);ListPopBack(plist);ListPopBack(plist);ListPopFront(plist);ListPopFront(plist);ListPrint(plist);ListDestroy(plist);plist = NULL;
}int main()
{//TestList1();TestList2();return 0;
}
List.h
#pragma once#include<stdio.h>
#include<stdlib.h>
#include<assert.h>typedef int LTDateType;typedef struct ListNode
{LTDateType data;struct ListNode* next;struct ListNode* prev;
}LTNode;LTNode* ListInit(LTNode* phead);//初始化
void ListPrint(LTNode* phead);  //打印链表//尾插
void ListPushBack(LTNode* phead, LTDateType x);//尾删
void ListPopBack(LTNode* phead);//头插
void ListPushFront(LTNode* phead, LTDateType x);//头删
void ListPopFront(LTNode* phead);//创建新节点
LTNode* BuyListNode(LTDateType x);//查找
LTNode* ListFind(LTNode* phead, LTDateType x);//pos位置之前插入
void ListInsert(LTNode* pos, LTDateType x);//删除pos位置
void ListErase(LTNode* pos);//销毁聊表
void ListDestroy(LTNode* phead);
List.c
#include"List.h"//初始化
LTNode* ListInit(LTNode* phead)
{//哨兵位头节点phead = (LTNode*)malloc(sizeof(LTNode));phead->next = phead;phead->prev = phead;return phead;//利用返回值的方式
}void ListPushBack(LTNode* phead, LTDateType x)
{//链表为空时,依然可以处理assert(phead);//LTNode* tail = phead->prev;//找到尾节点//LTNode* newnode = (LTNode*)malloc(sizeof(LTNode));//newnode->data = x;phead//tail->next = newnode;//newnode->prev = tail;//newnode->next = phead;//phead->prev = newnode;ListInsert(phead, x);
}void ListPrint(LTNode* phead)
{assert(phead);LTNode* cur = phead->next;//从phead->开始遍历链表while (cur != phead)//为了防止死循环,所以终止条件为cur=phead{printf("%d ", cur->data);cur = cur->next;}printf("\n");
}//尾删
void ListPopBack(LTNode* phead)
{assert(phead);assert(phead->next != phead);//当链表为空时,就表示不能再删除了找到尾//LTNode* tail = phead->prev;//phead->prev = tail->prev;//tail->prev->next = phead;最后释放空间//free(tail);ListErase(phead->prev);
}LTNode* BuyListNode(LTDateType x)
{LTNode* newnode = (LTNode*)malloc(sizeof(LTNode));newnode->data = x;newnode->prev = NULL;newnode->next = NULL;return newnode;
}void ListPushFront(LTNode* phead, LTDateType x)
{assert(phead);//LTNode* newnode = BuyListNode(x);//LTNode* next = phead->next;//phead->next = newnode;//newnode->prev = phead;//newnode->next = next;//next->prev = newnode;ListInsert(phead->next, x);
}//头删
void ListPopFront(LTNode* phead)
{assert(phead);链表为空就不需要头删了//LTNode* next = phead->next;//LTNode* nextNext = next->next;//phead->next = nextNext;//nextNext->prev = phead;//free(next);ListErase(phead->next);
}//查找
LTNode* ListFind(LTNode* phead, LTDateType x)
{assert(phead);LTNode* cur = phead->next;while (cur != phead){if (cur->data == x){return cur;}cur = cur->next;}//没找到就返回NULLreturn NULL;
}//pos位置之前插入
void ListInsert(LTNode* pos, LTDateType x)
{assert(pos);LTNode* posPrev = pos->prev;LTNode* newnode = BuyListNode(x);//处理posPrev  newnode  pos三者之间的链接关系posPrev->next = newnode;newnode->prev = posPrev;newnode->next = pos;pos->prev = newnode;
}//删除pos位置
void ListErase(LTNode* pos)
{assert(pos);LTNode* posPrev = pos->prev;LTNode* posNext = pos->next;posPrev->next = posNext;posNext->prev = posPrev;free(pos);
}//销毁链表
void ListDestroy(LTNode* phead)
{assert(phead);LTNode* cur = phead->next;while (cur != phead){LTNode* next = cur->next;free(cur);cur = next;}free(phead);//想要把phead置为空,需要再函数外部进行置空,当然如果传二级指针也可以在函数内部把//phead置为空,不过因为我们这个双向链表都是传的一级指针,所以为了保持接口一致性,//我们在函数外部把phead置为空即可
}
好了,双向循环链表的实现就到这里了,其实在这里面最重要的两个接口函数就是ListErase和ListInser,这两个函数可以帮助我们快速的实现这个链表,剩余的就是一些边边角角的问题了。
这块的内容还是要多画图,来帮助我们更好的理解。